Fun Floral Mother’s Day Card

Fun Floral Mother’s Day Card

Fun Floral Mother's Day Card xDSC_0333.jpg

The challenge this week over at the  Mod Squad Challenge is Mother’s Day.  I was asked to co-host with the very talented Peggy Timmerman.  (Sadly, this site is no longer active.)

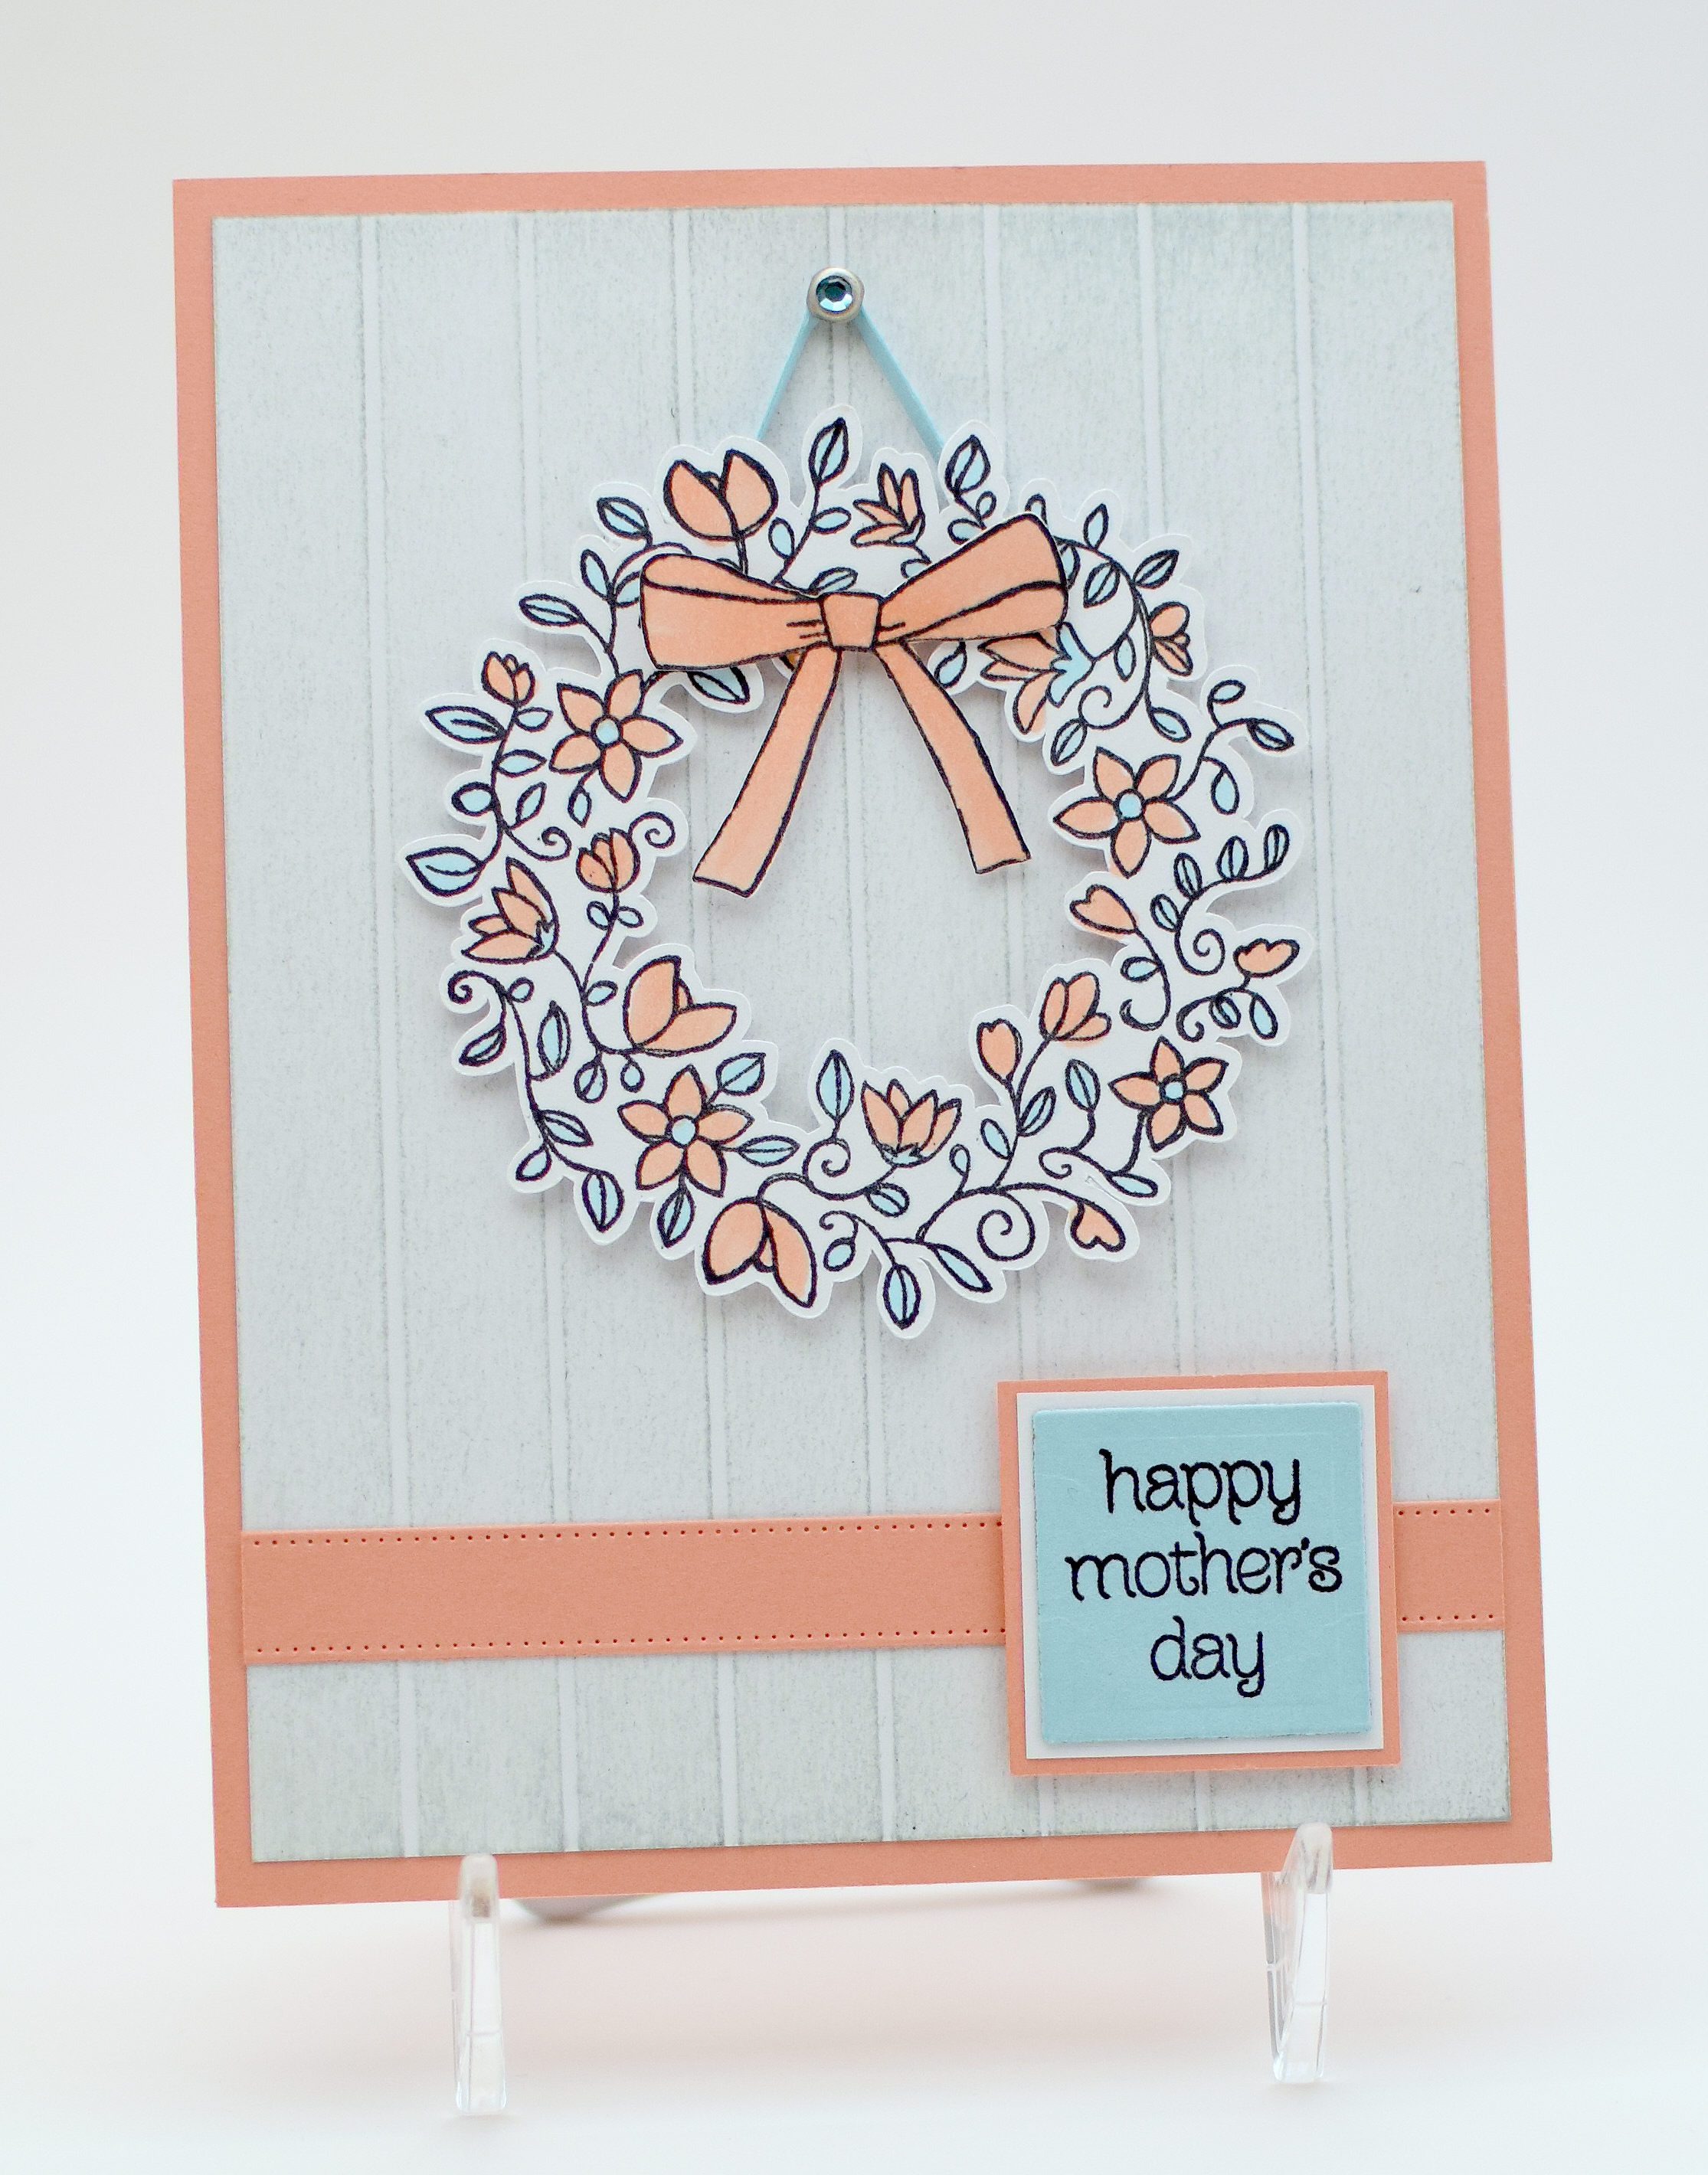
For my card, I used the lily of the valley, coneflower, and tulip stamps from the Lawn Fawn – Fairy Friends stamp set along with dies from the Gina Marie Designs – Stitched Rectangle Dies set and the Happy Mother’s Day die by Lawn Fawn.  All of these items are available at Kat Scrappiness who is one of the Mod Squad Challenge sponsors this week .

Lawn Fawn Fairies Stamp Set

Kat stocks the products that she loves and uses as well as what her customers request.  If you don’t see it in her store, feel free to contact her.  She is happy to do special orders for you!  And she offers a DISCOUNT CODE for The Mod Squad Challenge: MSC10!

This was a fun challenge for me because I wanted to create a card using one of the stamp sets I had previously purchased from Kat Scrappiness while I waited for the arrival of a new set I ordered, but I didn’t have any that seemed Mother’s Day-ish…at first.  I liked the bold and chunky style of these flowers and was able to quickly color them with Copic Markers (YG03, YG93, R14, BV04, and V000) to create my bright, whimsical  card.  I chose the patterned paper called “Garden Walk” from the Happy Day collection by Pebbles to complement these images.  This patterned paper is two sided; the front is the floral pattern I used as my background, and the back is primarily peach/orange that I used for my greeting die cut.  I chose to use the black mats to complement the bold black outlines of the flowers.

Now it’s your turn!  Head on over to the Mod Squad Challenge Blog, and show us your Mother’s Day projects. I can’t wait to see what you create!

Thanks for checking out my card project!

Floral Wreath Mother’s Day Card

Floral Wreath Mother’s Day Card

Floral Mother's Day Card yDSC_0360.jpg

This Mother’s Day card features stamps from the “Circle of Spring” set by Stampin’ Up.  I really love this delicate wreath image and chose to keep the layout simple to highlight the wreath.

I created a faux wood-grained background by scoring a piece of white card stock with my Martha Stewart Scoring Board and then swiping Papertrey Ink Soft Stone ink across the surface.  I also used Gina K Designs Peach Bellini and Ocean Mist card stock along with the white.

I created a cut file of the wreath with my Silhouette.  Then I stamped the image onto the die cut with Memento Tuxedo Black ink and colored it with Copic Markers (E93  and B00).  I know, it’s a bit weird that I chose blue for the leaves, but I LOVED these two colors together!

I created the “ribbon” with the “Alison’s Ribbons” die by Cheery Lynn Designs and used a die from the “Classic Squares (large)” set by Spellbinders for the greeting block.  (The mats were cut with my trimmer.)  The finishing touch was a “string” created with a thin strip of the Ocean Mist card stock and a jeweled brad by Recollections.

Thanks for checking out my card project!

This content uses referral links as described in the disclosure policy on my sidebar.

Hoppy Easter – MSC Card Sample

Hoppy Easter – MSC Card Sample

Hoppy Easter z DSCN9683 LR adjustments.jpg

(inside sentiment: Hoppy Easter!)

I was asked to co-host the Mod Squad Challenge this week with the very talented Peggy Timmerman. The theme of the challenge is SPRINGTIME.  (Sadly, this site is no longer active.)

For my card sample, I used a few of the stamps from the Newton’s Nook Designs – Bunny Hop stamp set along with the Gina Marie Designs – 4×4 Stitched Quilt Die #2.  Both of these items are available at Kat Scrappiness who is one of the Mod Squad Challenge sponsors this week .

  bunny hop stamp set       quilt die

Kat stocks the products that she loves and uses as well as what her customers request.  If you don’t see it in her store, feel free to contact her.  She is happy to do special orders for you!  And she offers a DISCOUNT CODE for The Mod Squad Challenge: MSC10!

For the quilt, I used digital paper from a set called Happy Easter by Pininkie that I purchased on Etsy. The panels on the quilt are pretty small, so I needed small-patterned prints.  With digital paper, you can choose how big or small to print your panel which varies the size of the pattern.  You can see this if you look at the egg print on my card.  The panel for the quilt was printed small (3.5 x 5 with “fit picture to frame” unchecked) and the panel for the background strip was printed larger (4 x 6).  You can see the difference in the size of the eggs.

In addition to the digital paper, I also used white and Gina K Lemon Drop card stock.

The bunny image was stamped on white card stock with Memento Tuxedo Black ink, colored with Copic markers (YG03, R85, R81, BV20, C0, Y11, Y13, and Y15), and fussy cut.  It was then adhered to the circle panels cut with dies from the Spellbinders Standard Circle Dies (large) and Spellbinders Standard Circle Dies (small) sets.  I used the EK Tools 2-Point Flag Large Tag Punch to shape the ends of the accent panels behind the circles.

The Cuttlebug Scrollwork Embossing Folder was used on the white circle and the white background panel to add a bit of fun texture.

I wanted my background egg panel to have stitched sides to match the stitched patterned on the quilt, so I used a die from the Gina Marie Designs – Stitched Rectangle Dies set (also available from Kat Scrappiness.  The set didn’t contain a rectangle in the size I needed so I just used one edge of a larger rectangle and “stiched” just the top and bottom edges of my strip.

Now it’s your turn!  Head on over to the Mod Squad Challenge Blog, and show us your spring projects. I can’t wait to see what you create!

Thanks for checking out my card project!

This content uses referral links as described in the disclosure policy on my sidebar.

Easter Tulips – Center Step Card

Easter Tulips – Center Step Card

Easter Tulip DSCN9822 LR11- - Copy.jpg

(inside sentiment: may joy and peace surround you this Easter season)

This 5×7 Center Step Card card features images from the Stampin’ Up “Two Step Stampin’ – Terrific Tulips” set along with a greeting from the SU “All Year Cheer I” set.  They were stamped on white card stock with Gina K Designs Wild Lilac, Lovely Lavender, and Fresh Asparagus Ink.  This panel was adhered to a piece of Gina K Wild Lilac card stock.

The patterned background paper on the front is called “Lavender Lines” by Recollections.  The card base was made with Gina K Heavy Base Weight White.  I used a panel of Gina K Lovely Lavender and white card stock for the inside.  The sentiment on the inside was computer generated.  (I need to get more Easter stamps!)

I thought I’d participate in The Paper Players Challenge this week which is “Clean-and-Simple: Celebrate Spring ” so I tried not to add too much to this card.  However, I will admit that I don’t really know what CAS is exactly since the card samples from their design team vary greatly in the amount of “stuff” on the cards.  Since I feared my step card wasn’t CAS enough, I decided to try an even simpler design using the same stamped panel on just a plain white card base:

wwwwDSCN9882 cropped

I’m still not sure it is CAS enough since the card base is so small (this is an A2 sized card) and the stamped images are so big, but this is the version I decided to submit.  I do love CAS card designs when others make them and wish I were better at them; this is something I will definitely keep working on.

Thanks for checking out my card projects!


Love Is…

Love Is…

Love Is... yDSCN9673.jpg


The Die-Namites Inspiration Challenge this month is to create any project using love as the theme, and “as love is in the air, anything goes.”  Below is the inspiration photo for this challenge; I used the word “LOVE” on my project.

die namites feb inspiration photo

To participate in their challenge you need to use any die cut from Die-Namites and let it be the STAR of your design. You can use this combined with any colors, shapes, patrons, pattern papers, stamps, paints, stencils, etc.  (There is a required minimum of 9 different participants or entries on the challenge which was not met this month so there will be no prize given nor “Top 3 Favorites” chosen.)

I was not familiar with this challenge blog before Verna mentioned it in her blog post, nor did I own any of their dies.  I purchased the Flower Scroll die last week so I could participate in this challenge and have enjoyed playing with it the past few days. I created another 6×6 card using this die.

floral scroll die

This card is also being entered in the “February Release Party Challenge – Mixing Patterns” on stamptv where we are to use at least two different patterned papers and a stamp from Gina K Designs.  You can check out the gallery of cards HERE.

The stamp I used is called “Love Is” (an incentive stamp in Jan. 2015) by Gina K Designs and was stamped with Gina K Charcoal Brown ink.

zDSCN9693

I used two sheets of patterned paper from the “French Kiss” 6″ paper pack by Glitz.  Gina K Charcoal Brown was used for the mats and card base.  Since this card was too big to create the base by folding an 8 1/2 x 11 inch piece of paper in half, I needed to create the card base with two panels that I adhered together.  (The front panel was slightly longer and was folded over the top of the back panel.  If you turn the card over, you can see the seam.)

The panels on which the floral die cut (and its “shadow”) are attached were cut using a die from the Spellbinders Decorative Labels Eight set.  I cut a panel of vellum using a die from the Spellbinders Labels Eight set and placed it under the floral die cuts to soften the background a touch to make it easier to see the flowers.  I used the same die from the Labels Eight set for the stamped panel and its shadow piece.

Adhering vellum to your project can be tricky because most types of adhesive can be seen through the vellum.  However, I discovered that applying Stick It to the back of the vellum before it is cut (so the adhesive covers the entire die cut) eliminates this problem.  (Stick It is great for adhering intricate dies to your project as well.  Check out this video to see how it works.)

Thanks for checking out my card project!

This content uses referral links as described in the disclosure policy on my sidebar.