Special Delivery Corner Flip Card

Special Delivery Corner Flip Card

xDSC_3861

One die set, 5 different card designs…

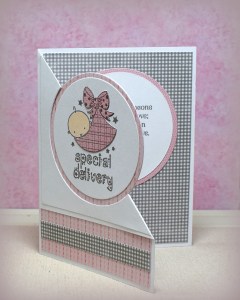
I recently purchased the Circle Flip Die from Creek Bank Creations after watching a few of their videos on YouTube where the versatility of this die set was illustrated.  (Hard to believe I had never even heard of this company until recently!)  I own several flip dies from other companies, but what I like about this one is that the die to create the “flip” part of the card is a separate piece.  This allows you to place it wherever you want on a standard card base which is how it can be used to create a corner flip card as I did here.  I have several card variations made with this die set (including a traditional flip card) to share in the coming days.

In case anyone is interested, Creek Bank Creations is currently offering 15% off with coupon code RAINBOW, and shipping is free with $50 order.  (I believe this coupon is good until October 31, 2020.)

Here is a better photo of what the corner looks like:

xDSC_3864

I’ve made corner flip cards “from scratch” before, but using the dies from the Circle Flip Die set made the card base construction super easy!   Here is a video showing how to do it.

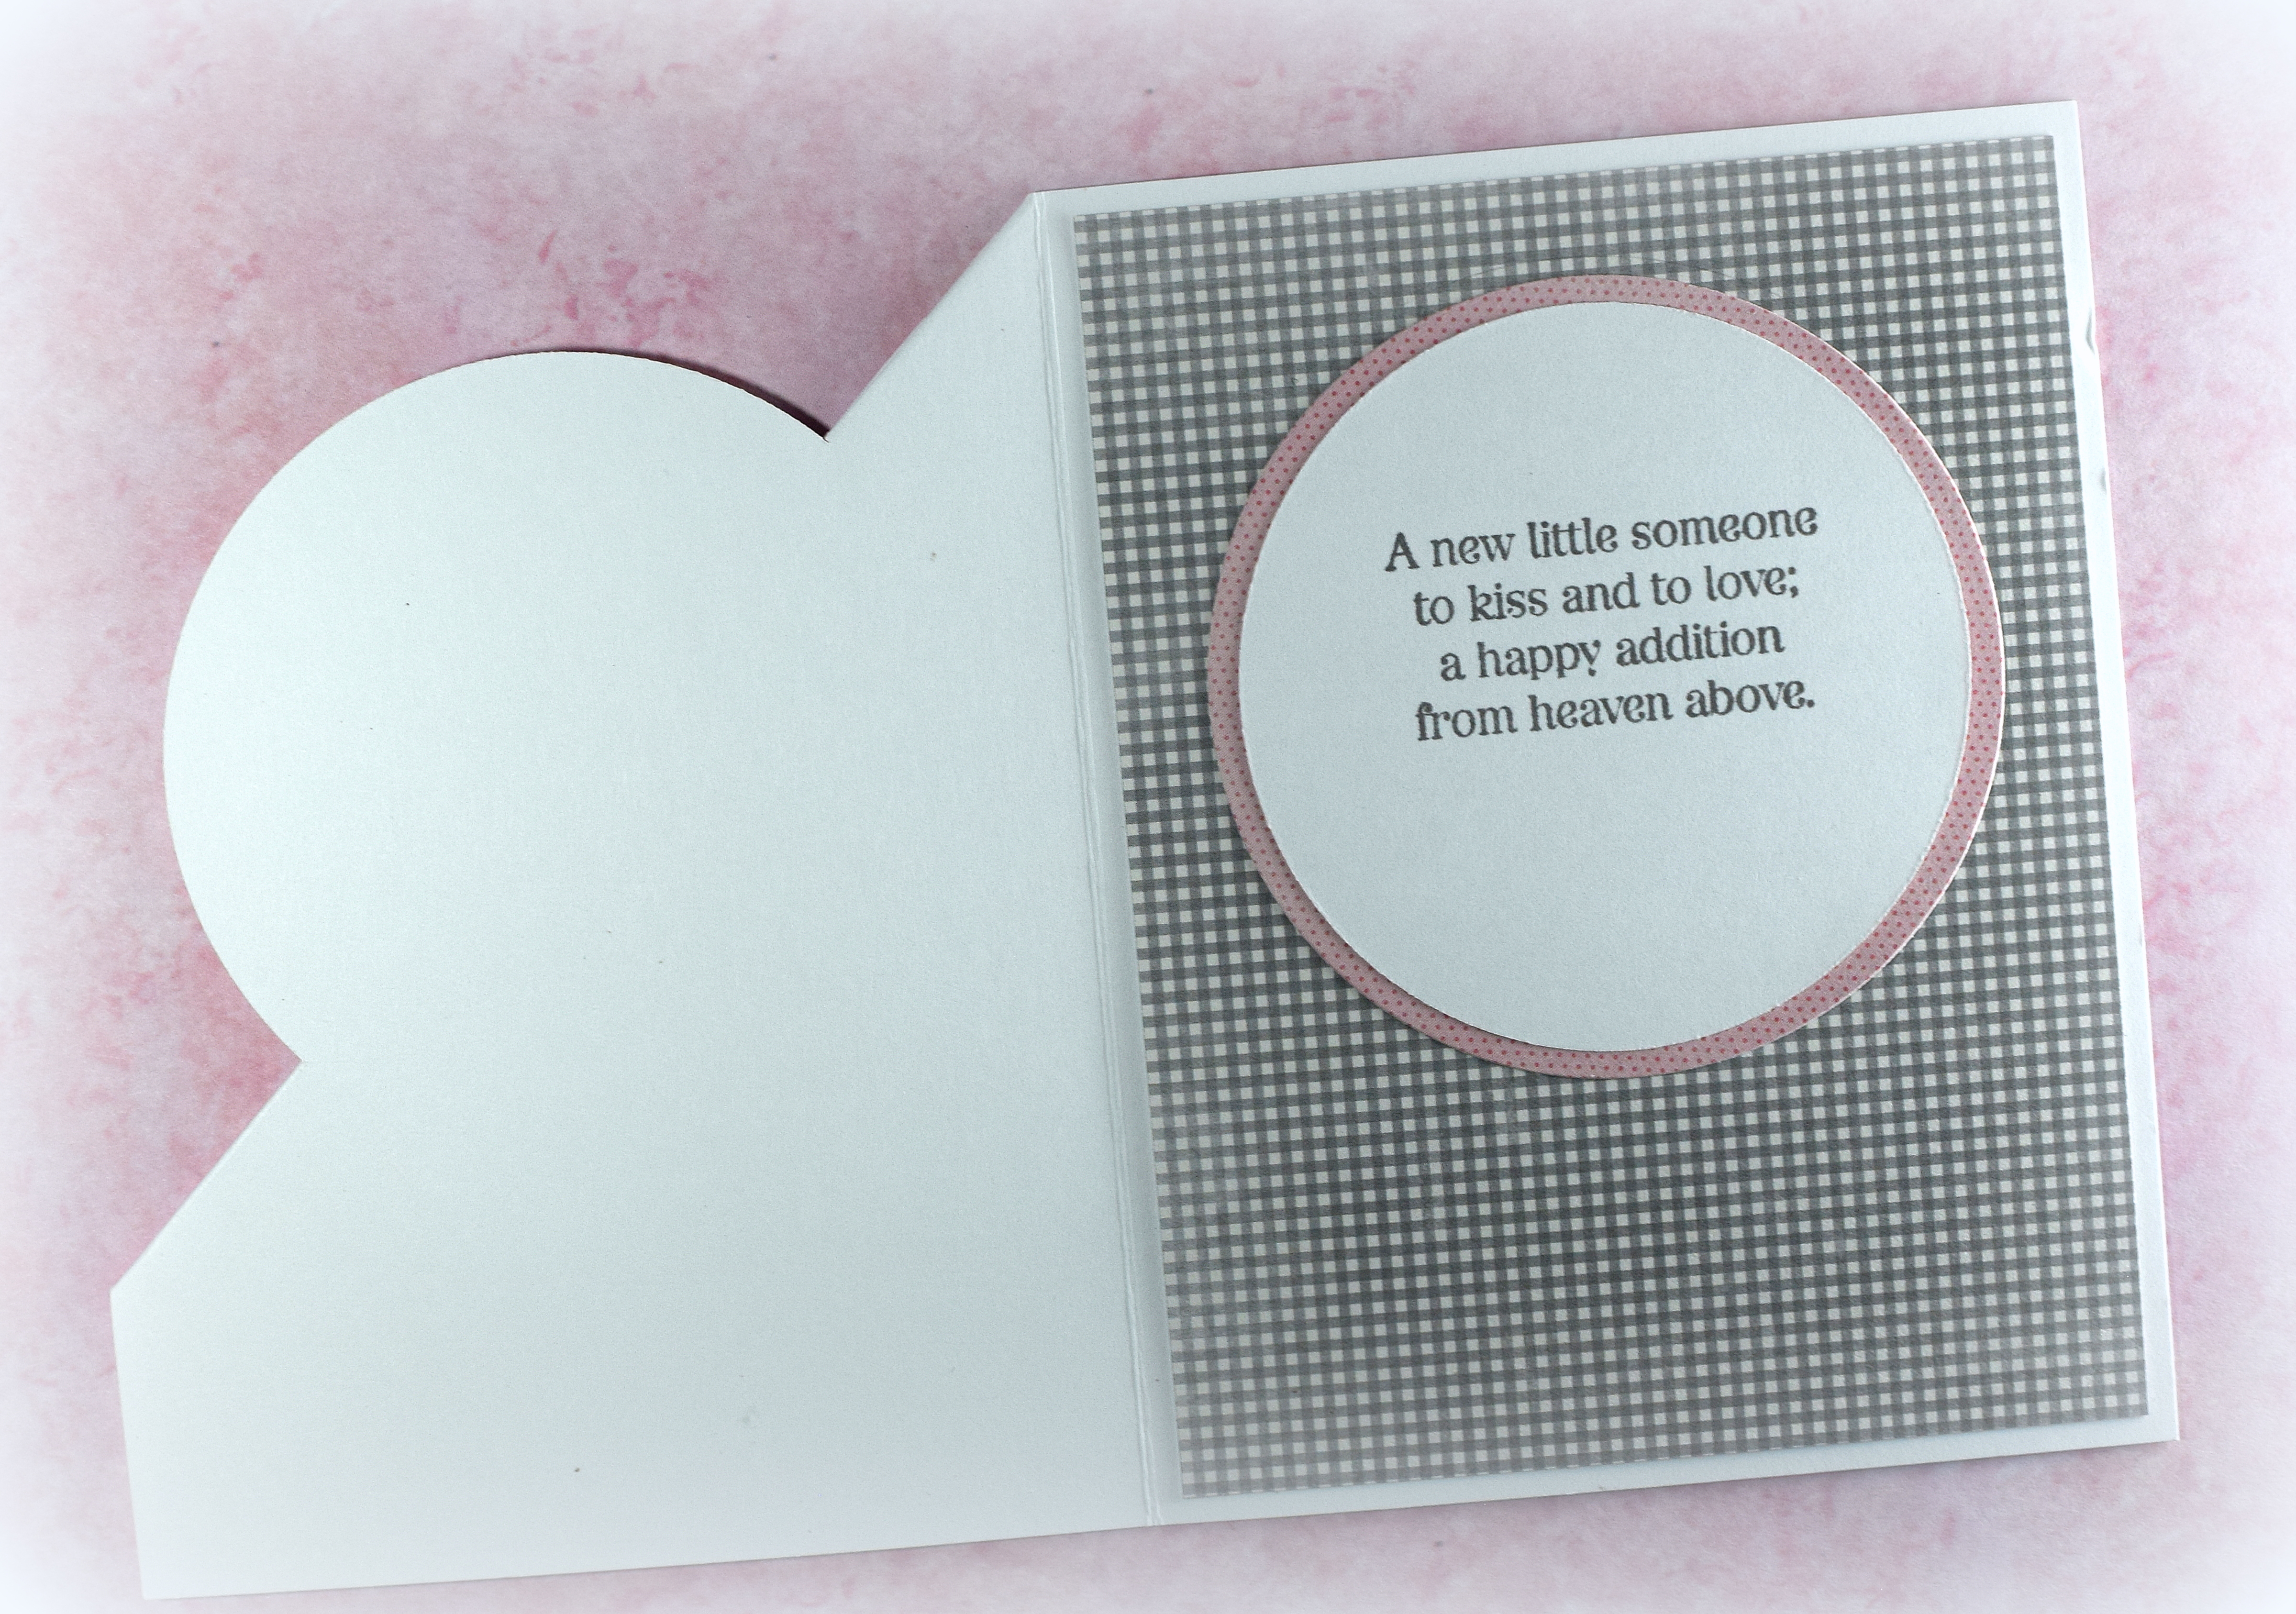
This cute baby image is a cling stamp from a set I’ve had for years.  I no longer have the original packaging, but I think it’s called “Baby” (#227909) by Recollections.  I stamped it on the white circle die cut with Gina K Designs Story Sky ink and colored the baby’s head with Copic marker E000.

All of the patterned paper came from the 6×6 “Special Delivery” paper pad by pebbles.  In addition to using it for the decorative panels, I also stamped the image again on a scrap, fussy cut the blanket and bow, and paper pieced it back onto the white panel which tied the background colors in with the focal panel nicely and added a little dimension to the stamped image.

The inside sentiment is from the “Cuddles & Kisses” set from Stampin’ Up (retired).

zDSC_3867

Thanks for checking out my card project!

This content uses referral links as described in the disclosure policy on my sidebar.

Congratulations On Your Sweet New Arrival

Congratulations On Your Sweet New Arrival

This card features stamps from the “Baby Talk” set by Stampin’ Up (retired).  I masked off the greeting that was part of the carriage image stamp, and I cut the greeting stamp I actually used in half so I could use the two lines separately.  Nothing like a little stamp surgery to get your heart racing – lol!! (I almost always take my rubber stamps off their wood blocks and remount them on cling foam so I can use them with my stamp positioner; I occasionally cut the stamps themselves, although I usually have to work myself up to that!!)

The joy fold card base and decorative panels were cut with (my trimmer and) the “Angel Side Circle Card Die” set which is by Creek Bank Creations.

The inside sentiment is from the “Cuddles and Kisses” stamp set by Stampin’ Up (retired).

The card stand (that will be included with the card) was cut with the “Card Stand Die” which is also by Creek Bank Creations.  The faux ribbon was cut with Poppystamp’s “Grosgrain Ribbon” die.

Thanks for checking out my card project!

Baby Carriage Z-Fold Card

Baby Carriage Z-Fold Card

wDSC_0010.jpg

Here’s one last baby card I made a week or so back…

This card features the Cottage Cutz “Fancy Baby Carriage” die and the Light Aqua Plaid card stock from Core’dinations.  I wanted the focal panel to to be white with just a bit of color so I smooshed Mint Macaron ink (stampin’ up) onto my craft mat, spritzed it with water, and dipped my white card stock into it.  (I love the splotchy, water color effect you achieve with this technique!)  In addition to the white card stock, I also used Bazzill Chiffon and a sheet from the Earth value pack by Recollections for the solid colors.

The panel on the inside for stamping or handwriting a sentiment is hidden behind the focal panel when the card is closed.

wDSC_0014

Thanks for checking out my card project!

This content uses referral links as described in the disclosure policy on my sidebar.


Paper Pieced Baby Card

Paper Pieced Baby Card

wDSC_9997.jpg

Here’s one more baby card (along with a quick “paper piecing” tutorial) I made while playing with the papers and supplies I had pulled out for the cards in my last post…..

This cute baby image is a cling stamp from a set called “Baby” (#227909) by Recollections.  (I purchased this set at Michaels a while ago and can’t seem to find it in the store or online anymore.)

baby stamp set label front

I used the Darice “Quilt Blocks” embossing folder and a scrap of Core’dinations “Light Aqua Plaid” (#320009) card stock for my background along with a pierced circle (and plain circle) die cut to frame the stamped images.

The greeting is from the “Bundle of Love” stamp set from Gina K Designs (retired?) and was stamped with “Mint Macaron” ink from Stampin’ Up.  I’m not sure why my camera “sees” blues differently than I do; the ink and these papers match so much better in person than on the photo.  (The papers are more greenish, and the ink is more bluish in real life.)  Oh well!

I “paper pieced” scraps of card stock to my baby image to add the color.  I really like this technique because you can easily match whatever card stock you are using on your project.

HOW TO PAPER PIECE:

To do this technique, you stamp the image onto the panel you plan to use on your card.  (For my card, I wanted the baby and greeting to be on a white panel, so I stamped him on white making sure I had enough space around him to die cut the panel with the pierced circle die.)


Next, decide what colors you want to “color in” the image and stamp the image on a scrap of each of those colors.  (I couldn’t decide if I wanted his pj’s to be solid or plaid, so I stamped it on a scrap of each.)

002 DSC_0048

With scissors, cut out the portions of the colored pieces you need to “fill in” your image.  I cut out the whole body from the peachy paper and just the pj’s from the aqua pieces.  Notice that I did not worry about cutting out the line for the baby’s hair on the peach piece.  (The hair is too thin to cut out and is not supposed to be peach; it is supposed to be black and is still on the image on the white panel.)

003 DSC_0050

The final step is to glue the layers on to the white panel.  Line up the black stamped portions when doing that.  You can see how the hair “reappears” in this step!  (I was still deciding what he should wear in the photos below.  Ultimately, I decided to use the solid piece and removed the plaid one.)

004 DSC_0053     005 DSC_0053


Thanks for checking out my card project!

This content uses referral links as described in the disclosure policy on my sidebar.

A Few Baby Card Variations

A Few Baby Card Variations

wDSC_0015.jpg

In a recent post, I shared a few easel cards with negative framed scenes which were samples I had made for one of the classes in the 8-week card making course I am teaching through the Haddonfield Adult School.  One of my students had asked me (prior to that class) if I had any baby shower supplies as she needed a card for her daughter-in-law who is expecting.  I went through my stash at home and adapted the easel card lesson to include some baby shower elements and offered this variation as an option along with the others.  The above sample is the same basic card as the others but has patterned paper behind the negative (instead of the scene) and different greeting stamps.

Once my baby supplies were out, I got to playing with them along with a few scraps of paper that seemed appropriate and came up with a few more designs.  Below are a few cards using the negative of a “baby” word die cut.

xDSC_0090

wwDSC_0081  wwDSC_0065


For two of the samples, I embossed the stitched rectangle frame with a wafer thin stitched rectangle die using my Cuttlebug and a Spellbinders embossing mat.  (The “sandwich” I use for embossing with a thin die is A-plate, B-plate, embossing mat, card stock, die with cutting edge facing paper and embossing mat, B-plate, and a chipboard shim.)  For the other two, I cut out the rectangle instead.

This is a pretty easy card design that could be customized with whatever colors and printed papers you desire.  And once the front panel is created, it can either be adhered to an easel card base or to a plain folded card base.  (I show how to create the easel card base in the post mentioned above.)

The “baby” die is called “In a Word: Baby Cutaway”  and the “happy” die is called “In a Word: Happy Cutaway” which are both by Winnie & Walter.  The “Baby Shower” stamp is from the “Mommy-To-Be Diva” set and the “a blessing from above” stamp is from the “Blessing From Above” set which are both by Gina K designs.

The patterned paper I used was Green/Pink Plaid HOTP-200210 (Paper Pizzazz/Hot off the Press) and several prints by Core’dinations called Light Aqua Plaid, White Plaid, and Light Aqua Small Dot.  The solid colored card stock was Chiffon (Bazzill), April Lovely (Core’dinations), Grey Kraft (Recollections), and a sheet from the Earth value pack (Recollections).

Thanks for checking out my card project!

This content uses referral links as described in the disclosure policy on my sidebar.