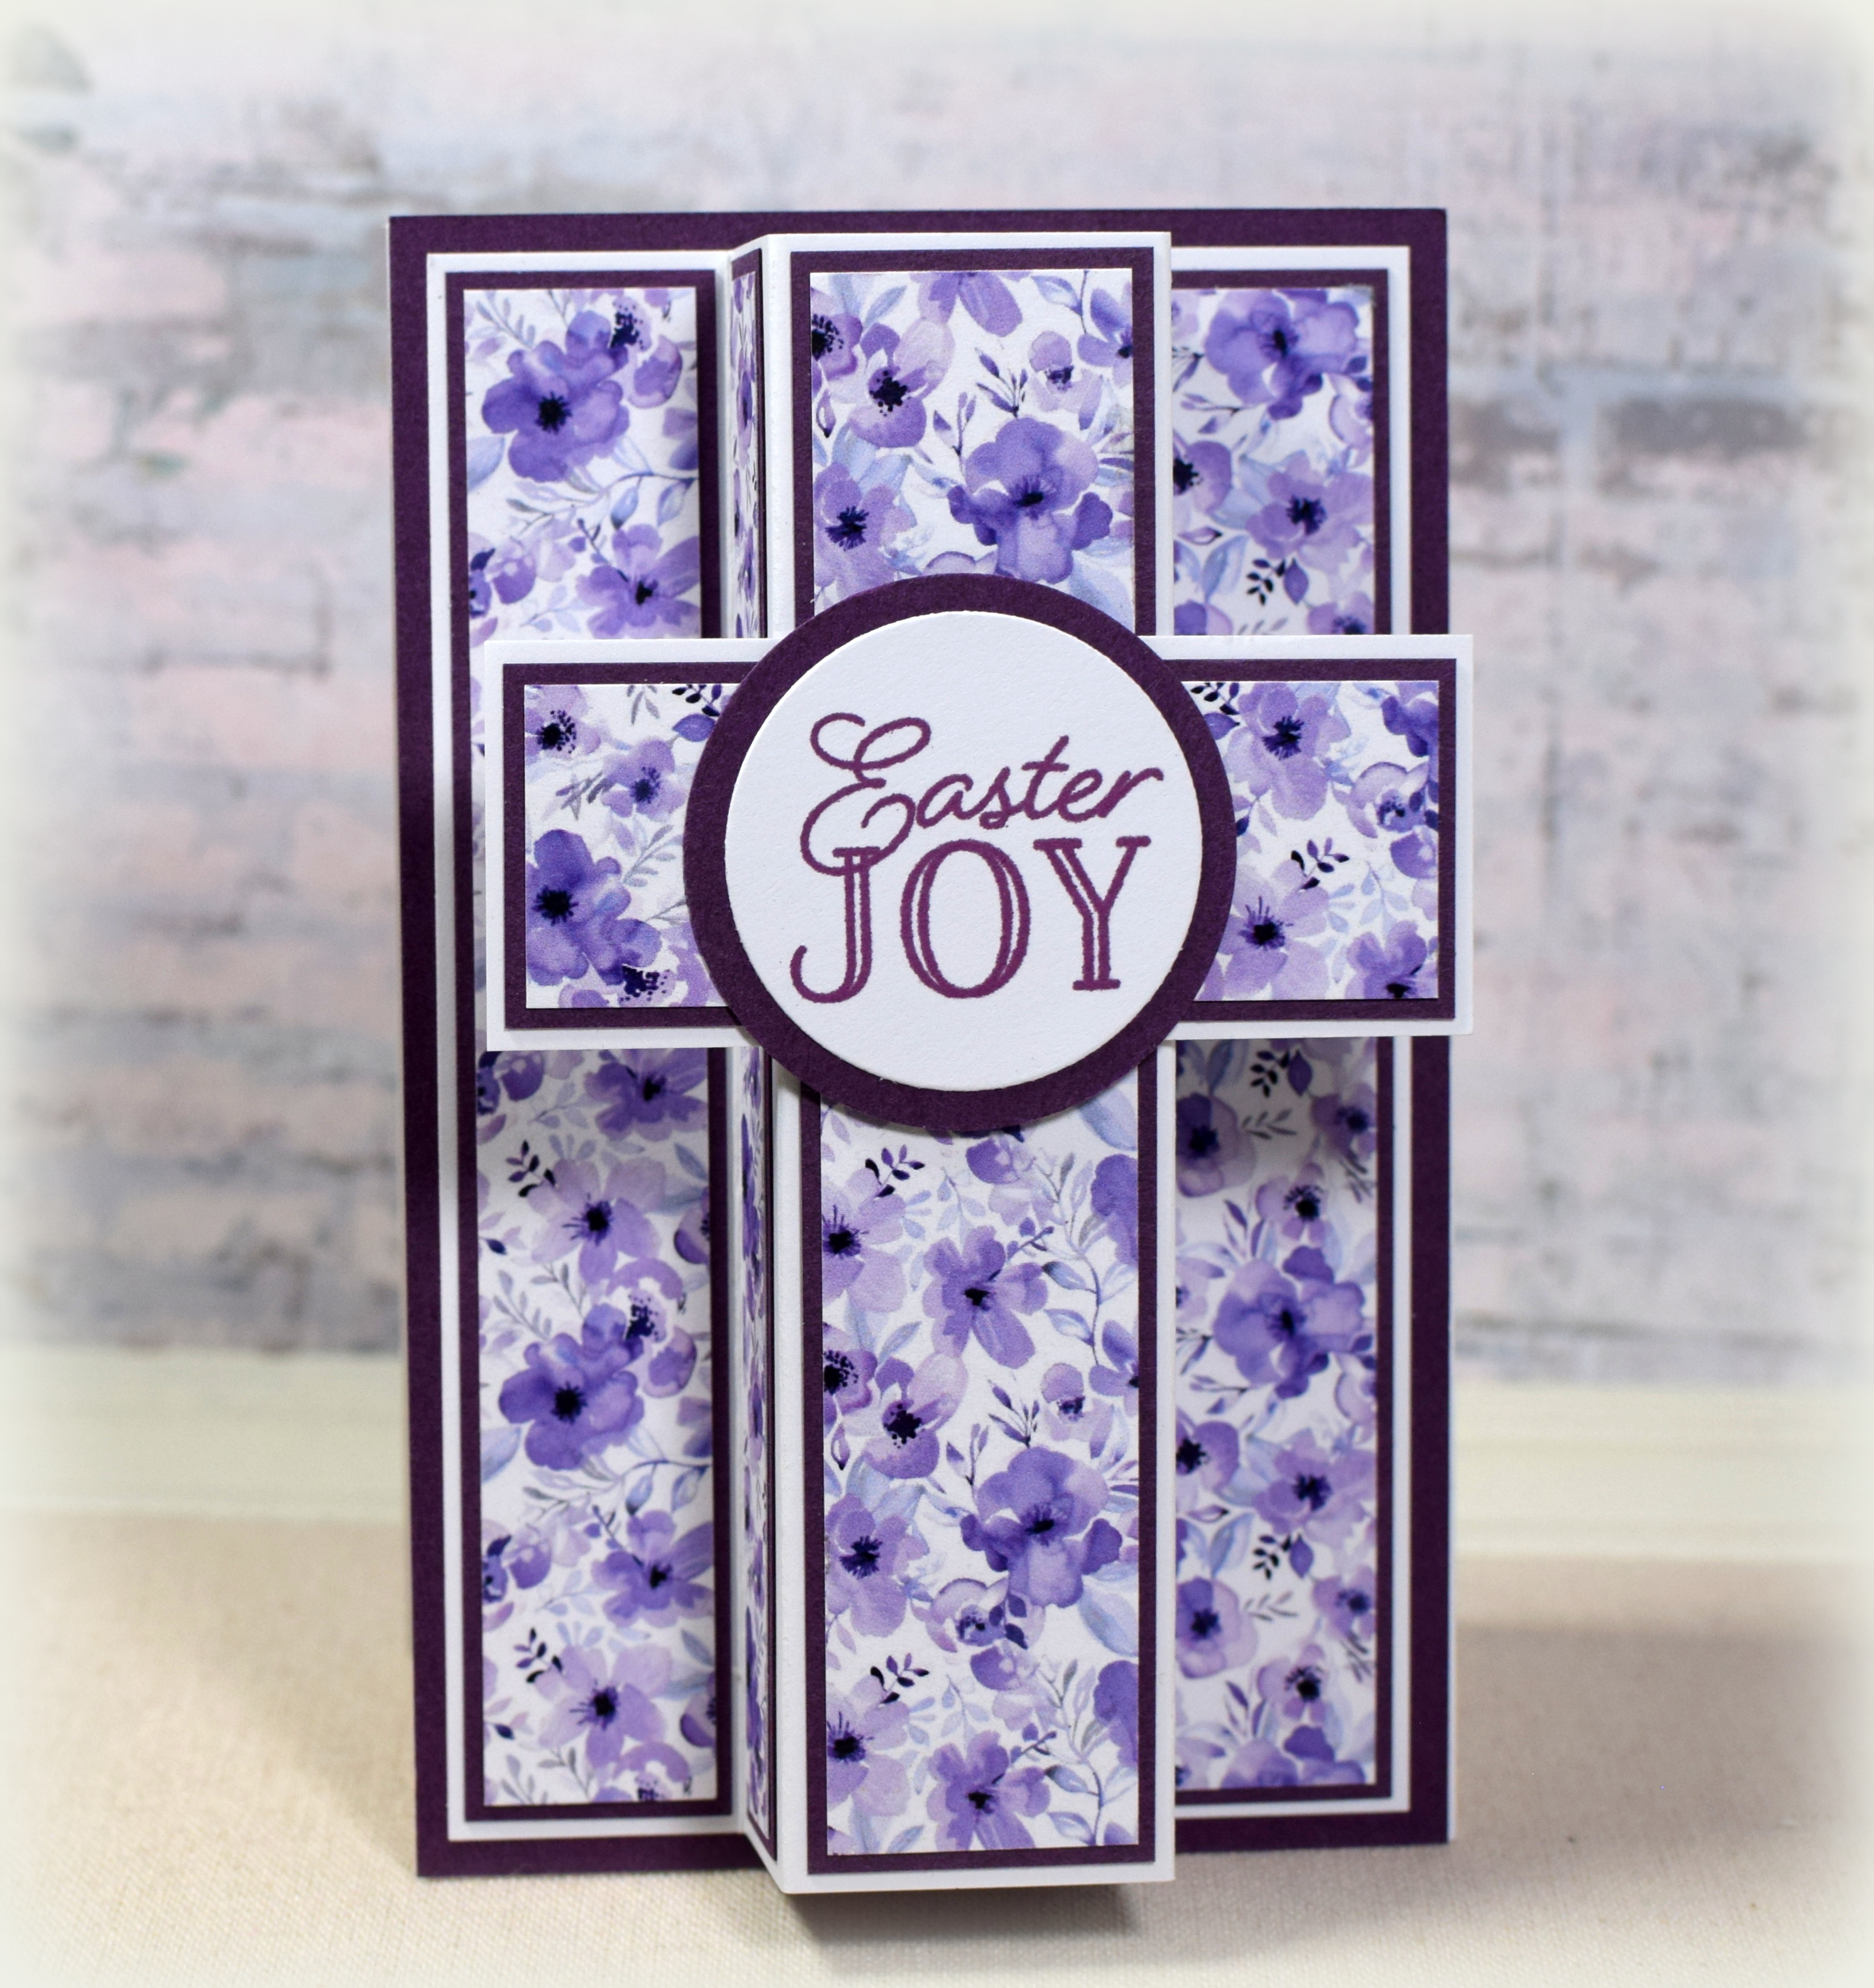
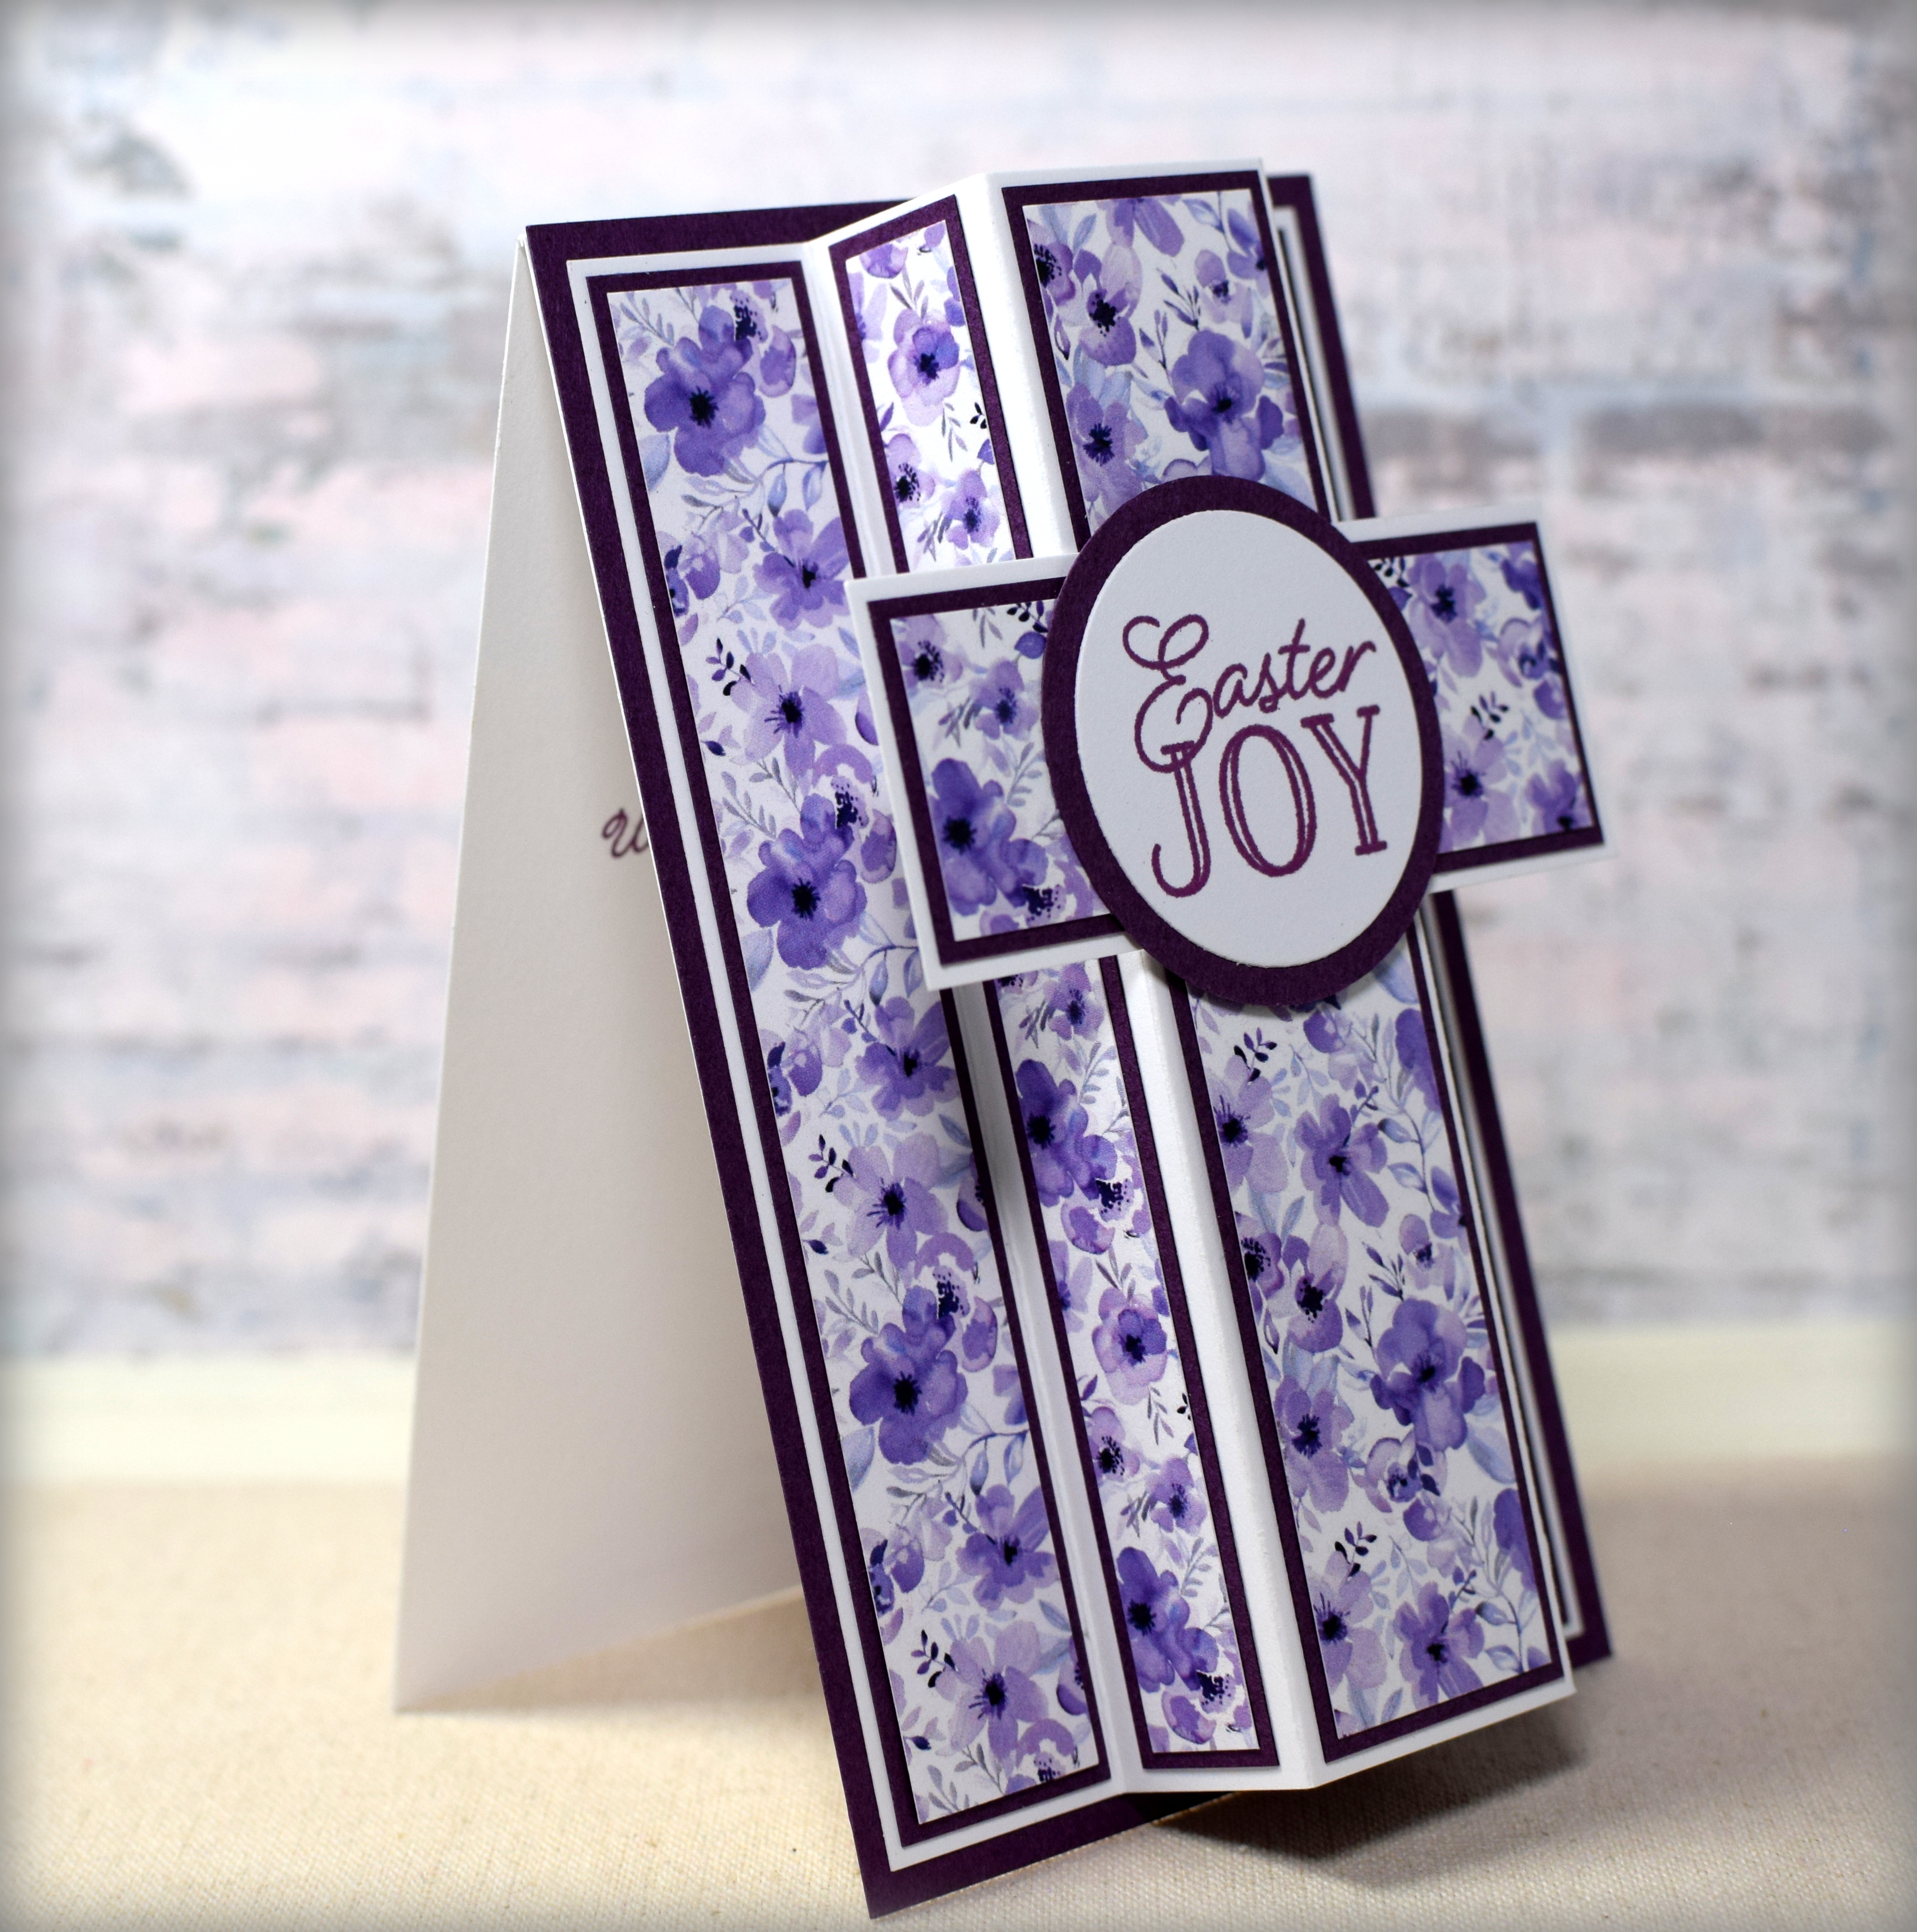
I saw this video to make a dimensional cross card and thought I’d give it a try.
Bethany’s instructions show how to make what I used as my card front. I added a top folding card base behind that panel (measuring 3 1/2 x 11 inches folded in half) to allow it to stand up better (it leans forward without the added base) and to have an “inside” for my sentiment/personal message (she put her message on the back).
The patterned paper is from the “Linen Floral” paper pack from Creek Bank Creations. American Crafts Velvet and white card stock was also used.
Both the greeting on the front and the sentiment on the inside were from the “Just Sentiments: Easter” stamp set from Ink to Paper and were stamped with Gina K Designs Plum Punch ink. I used a 1 1/2 inch and a 1 3/4 inch punch for the circles.
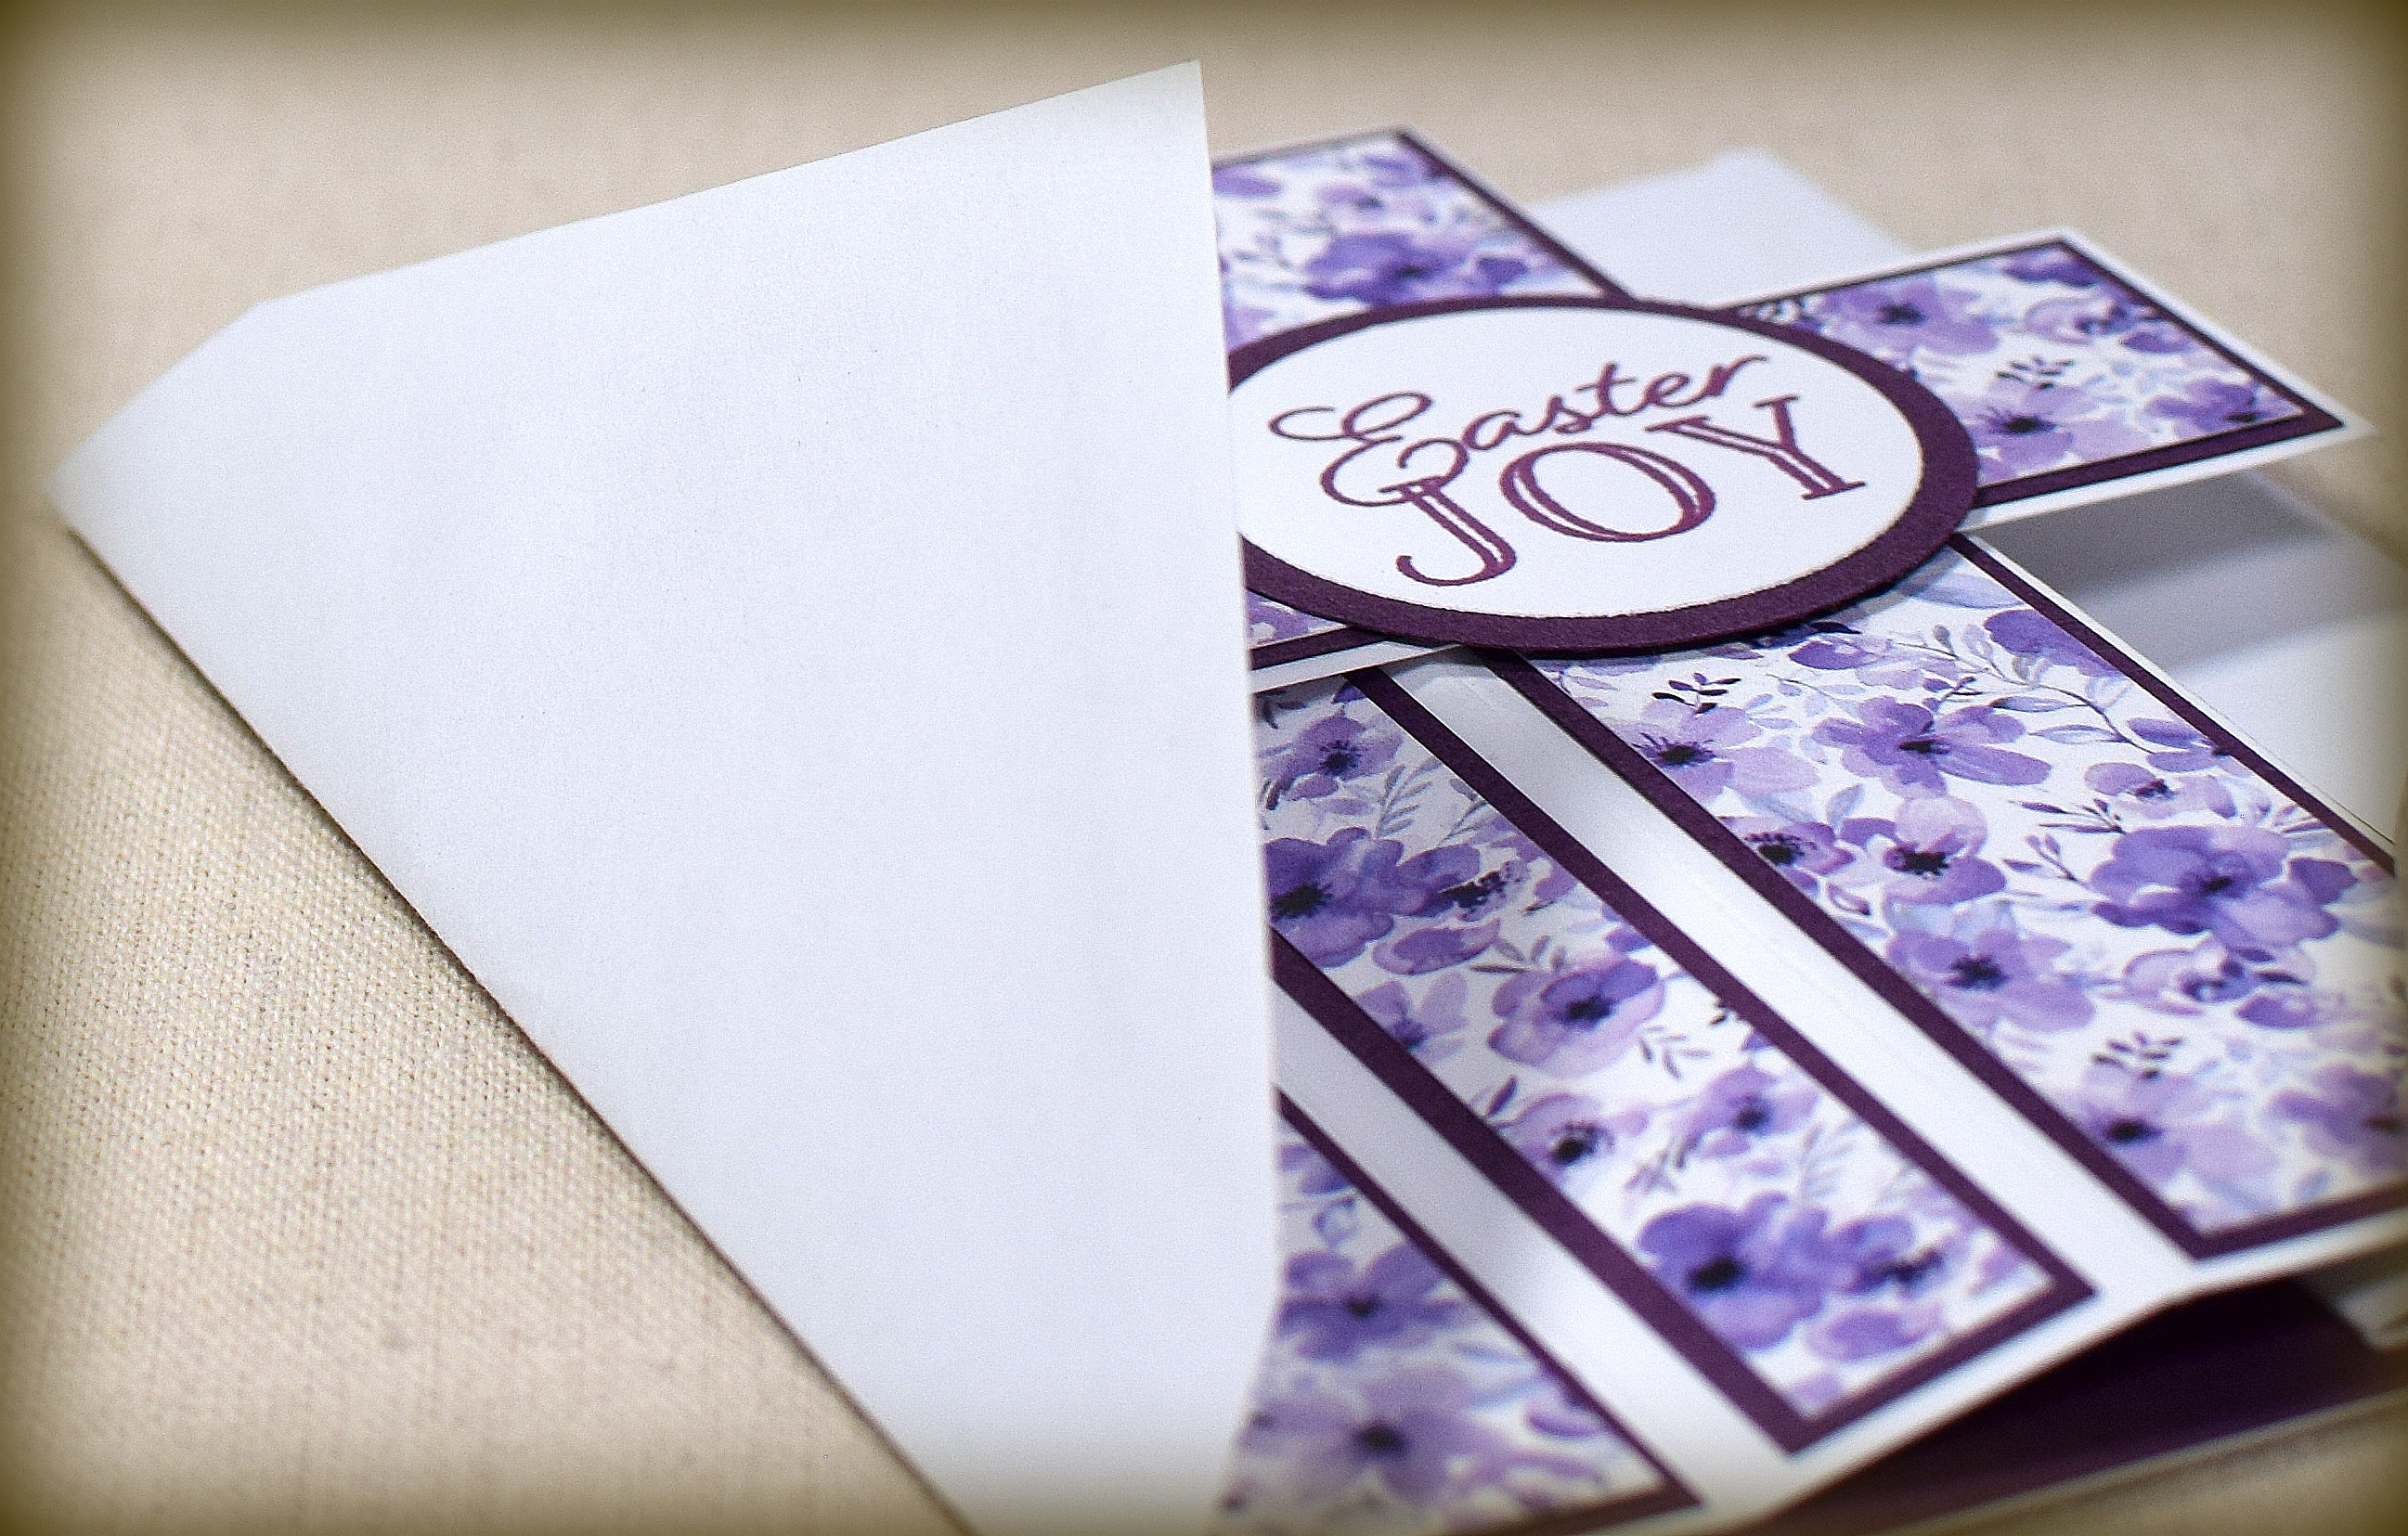
This card folds flat (to A2 size) for mailing.
Thanks for checking out my card project!
This content uses referral links as described in the disclosure policy on my sidebar.
Today is Kelly, Kevin, and Keith’s 25th birthday – Happy Birthday!! (I am feeling a bit old – lol!)
I made these cards for them a few weeks ago when we had back-to-back snow storms (after two years of nothing!), and I was inspired to create a snow themed card! (Creating cute snowmen in the warmth of my craft room was so much more fun than shoveling!!)
This card design features a few different products from Creek Bank Creations. The snowman and the first part of the sentiment is from the Snowmania Stamp and Die Set (S23019). The glitter paper is Snowfall White. The pop-out panel on the inside was made with the mechanism from the Z Fold Accessory Die Set (D23012), and the scalloped and stitched squares were from the Blanket Stitched Panel Die set (D23049). Again, all from Creek Bank Creations.
Here’s a better look at the inside sentiment panel that pops up a bit when the card is opened:
Recollections Navy and white card stock were used along with various scraps from my stash. The Happy Birthday part of the sentiment is from the Dance Life set from Fun Stamper’s Journey (no longer available?). Gina K Designs Blue Denim and Memento Tuxedo Black inks were used for the stamping.
Z Fold cards display nicely and fold flat for mailing.
Thanks for checking out my card project!
This content uses referral links as described in the disclosure policy on my sidebar.
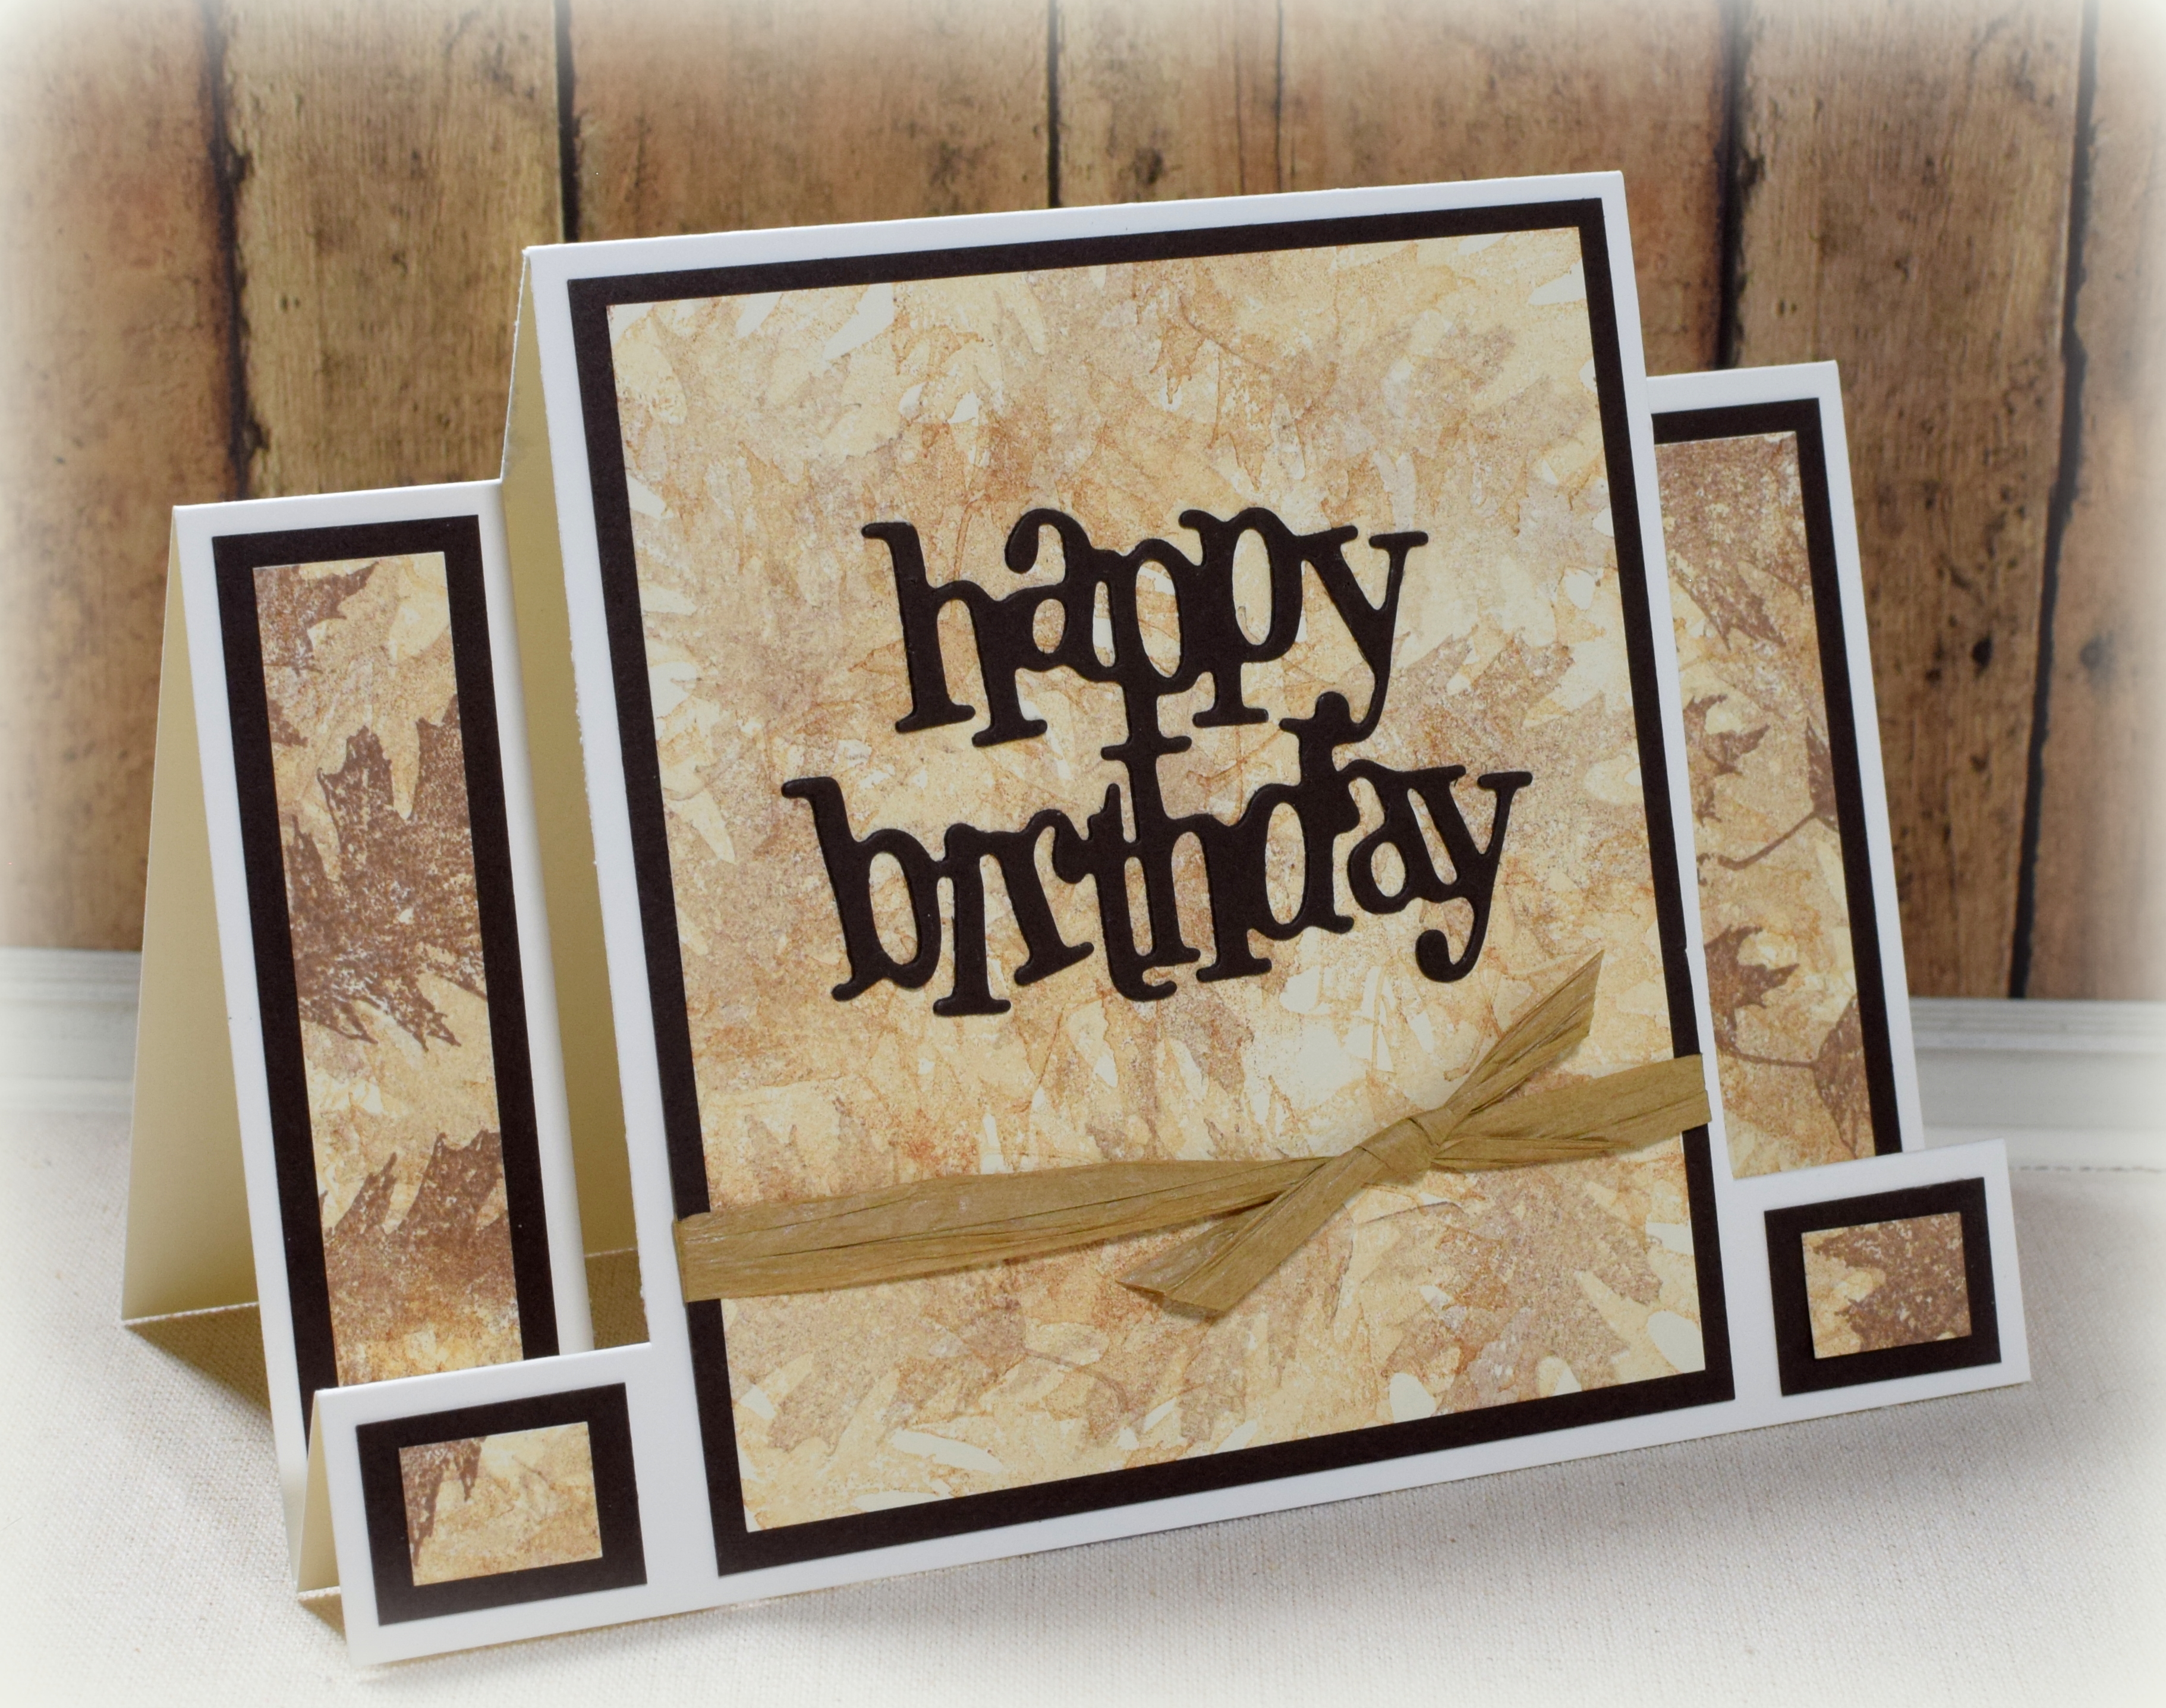
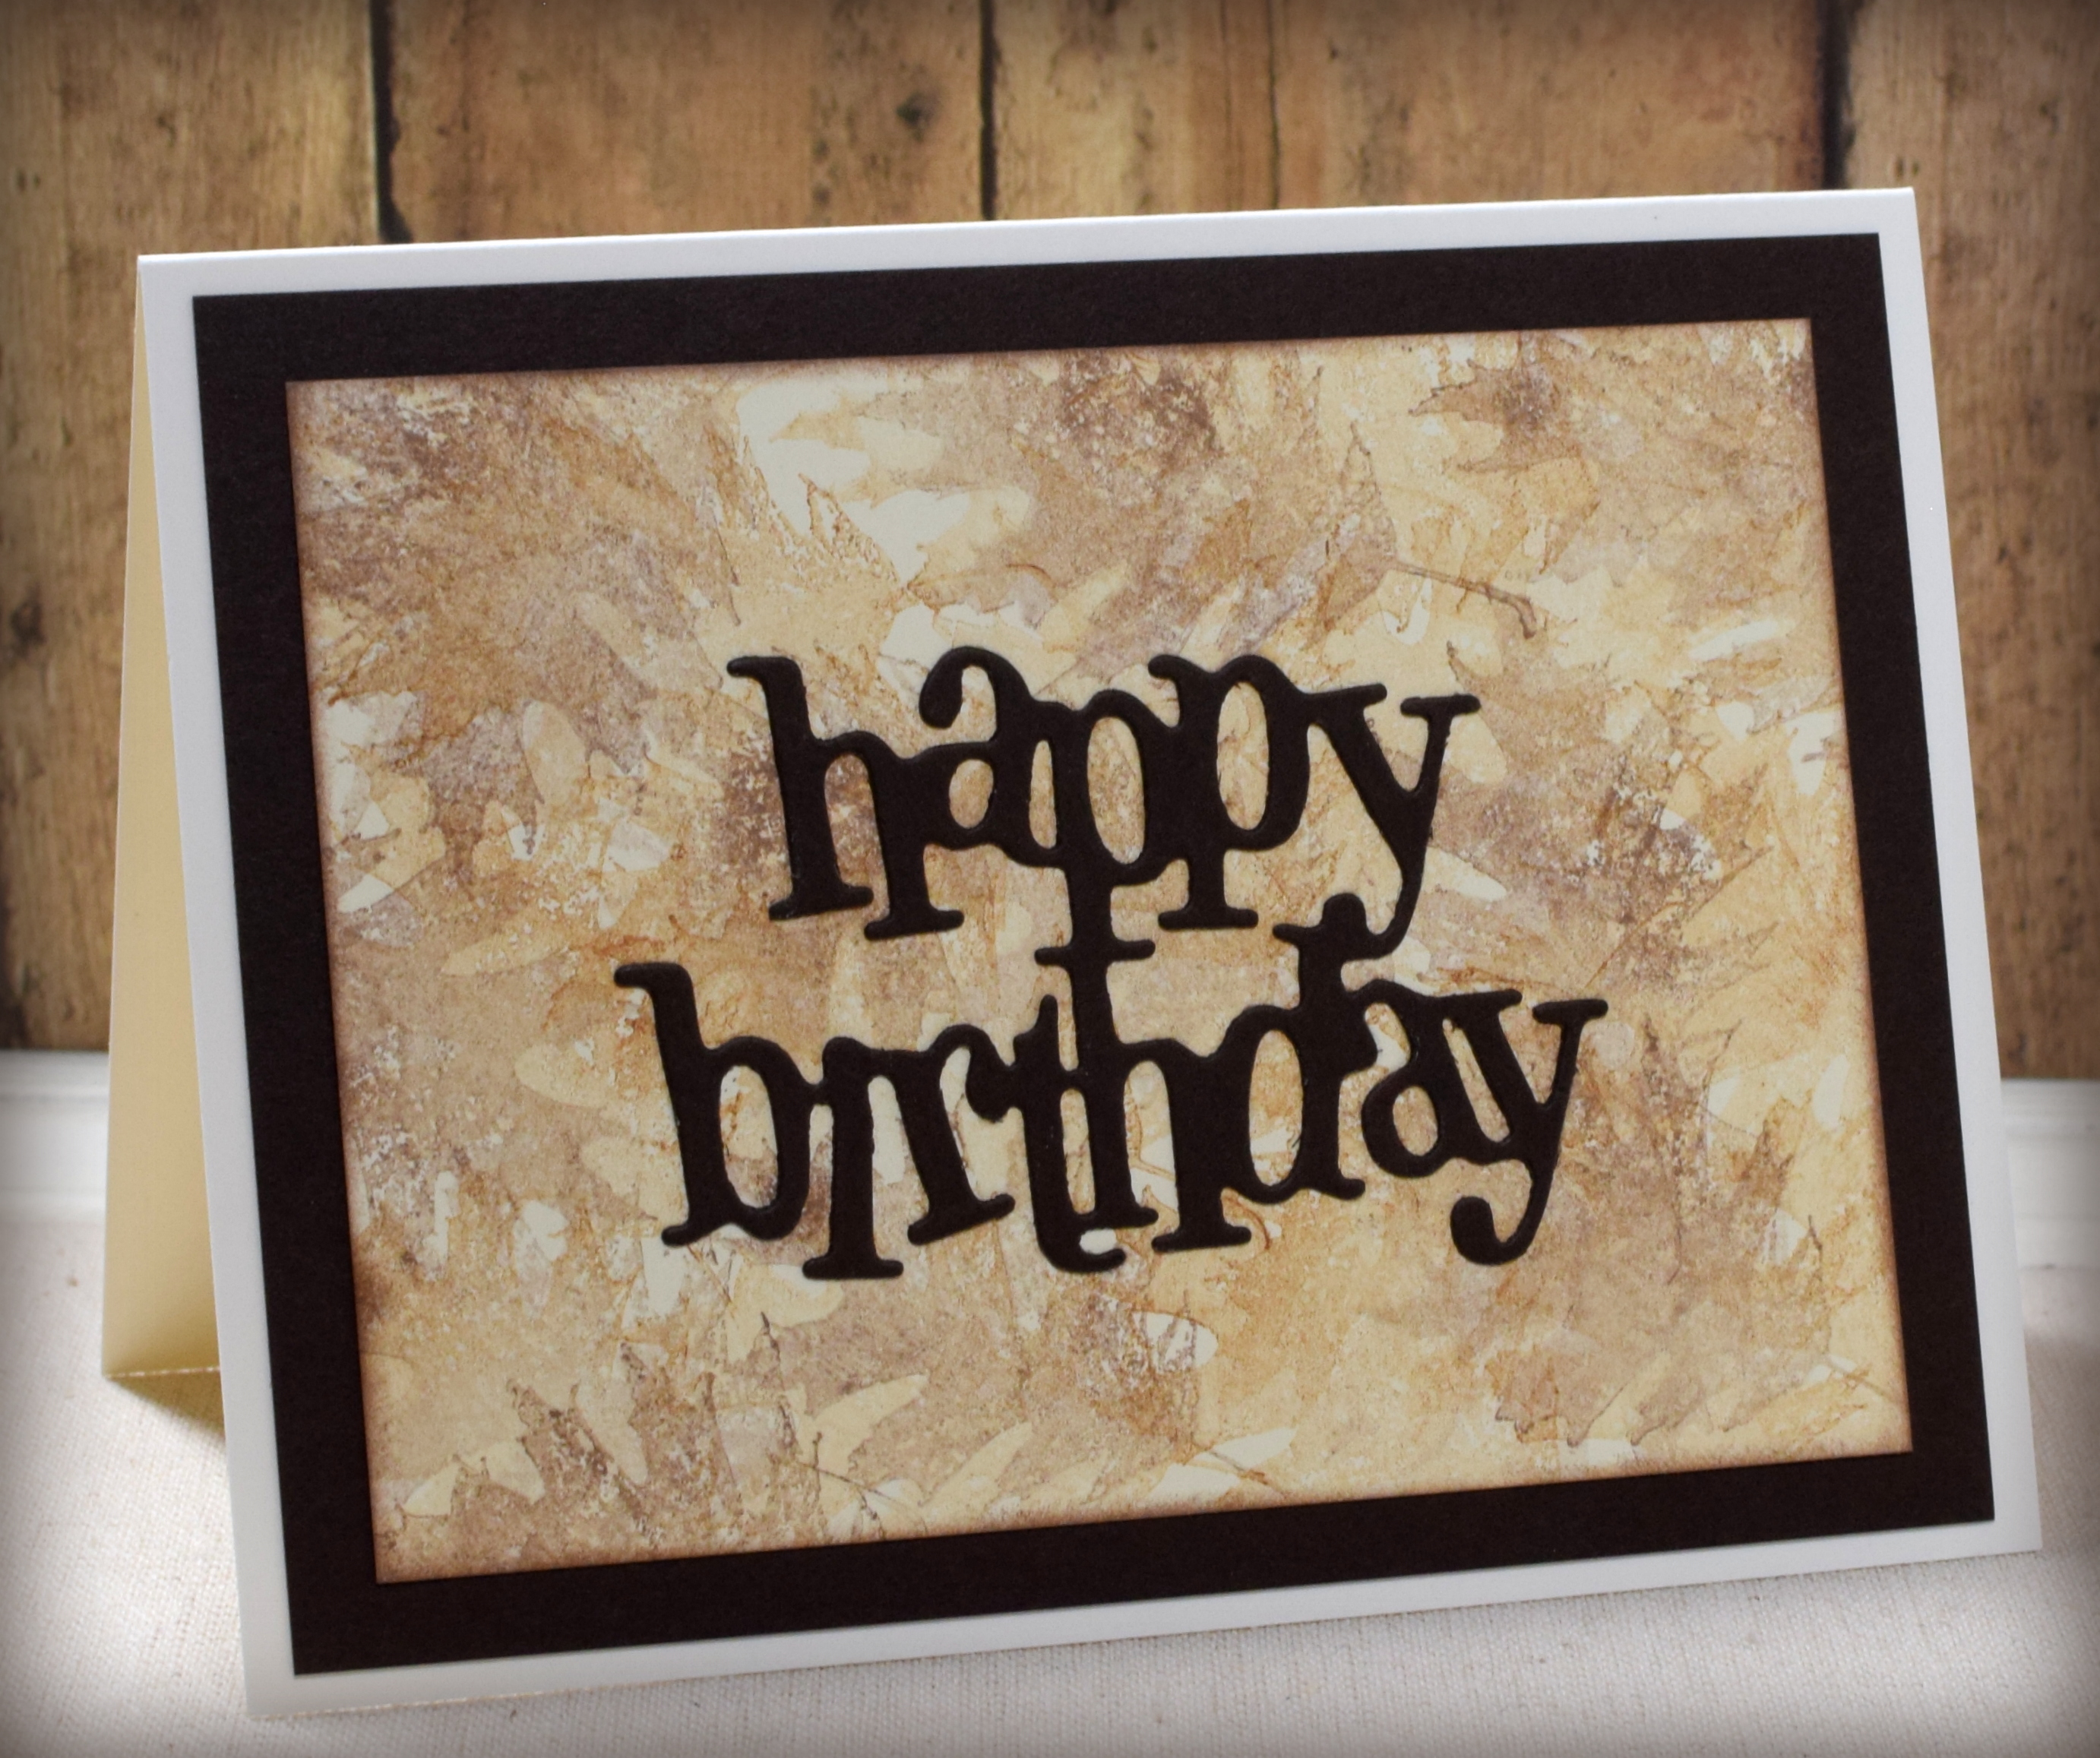
It’s that time of the year again for brown cards – my favorite – lol!
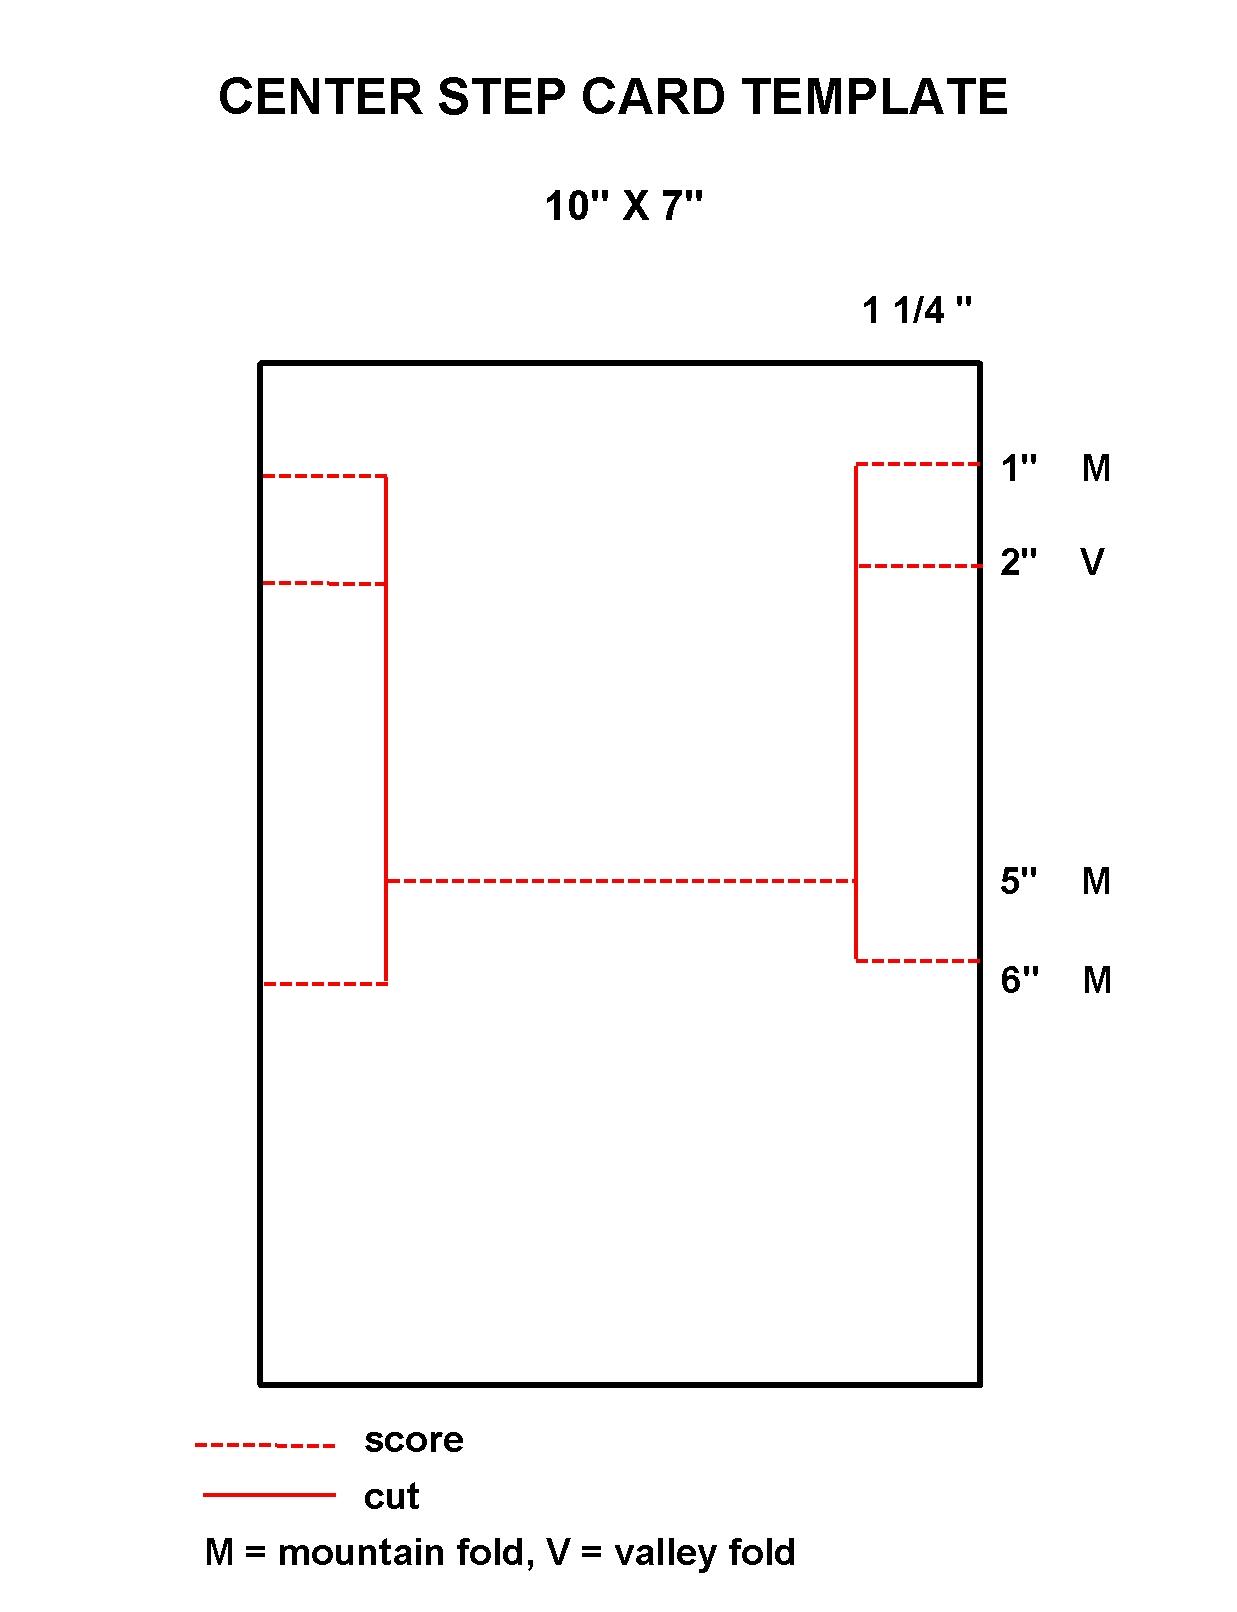
I created the panels by repeatedly stamping the leaf from the “Nature” set by Momenta (lot #0005702) with Vintage Photo distress ink and Memento Rich Cocoa ink. For the lighter pattern in the center, I “stamped off” each time before stamping on the panel. For the side panels, I stamped over a “stamped off” layer with the ink at full strength.
The happy birthday die cut was cut from Gina K Desings Dark Chocolate card stock as were the mats. Recollections Heavy Weight Ivory was used for the base. A piece of raffia finished off this simple design.
Here is the template to create the base:
Here is a similar design on a traditional A2 card base:
Thanks for checking out my card projects!
This content uses referral links as described in the disclosure policy on my sidebar.
Easel cards look like you fussed a little more than a traditional, folded card, but they are actually SUPER easy to make! Simply create a folded card base as usual and then fold the front in half. Basic easel cards are folded in half parallel to the fold. For a twisted easel, fold the front in half on a diagonal instead of parallel to the fold. Then, add a focal panel to your decorated base. (More detailed instructions are included below.)
You can see the two (diagonal) halves of the card front in this photo:
The base is also the “inside” of the card.
And this is what it looks like when it comes out of the envelope (folded flat):
Here’s how I created my twisted easel card:
Create the base. (Decorate as desired.)
(click on image to enlarge)
Cut and decorate your focal panel and adhere to card base as shown. (DO NOT put adhesive on the entire back of the focal panel. While the panel will ultimately be centered on the card front, the adhesive should not cross the fold.)
(click on image to enlarge)
Use the diagonal score line to help you line up your focal image.
(click on image to enlarge)
With the closed card flat on the table, open the card and fold the front down (mountain fold). The attached focal panel stands up creating the easel effect.
*
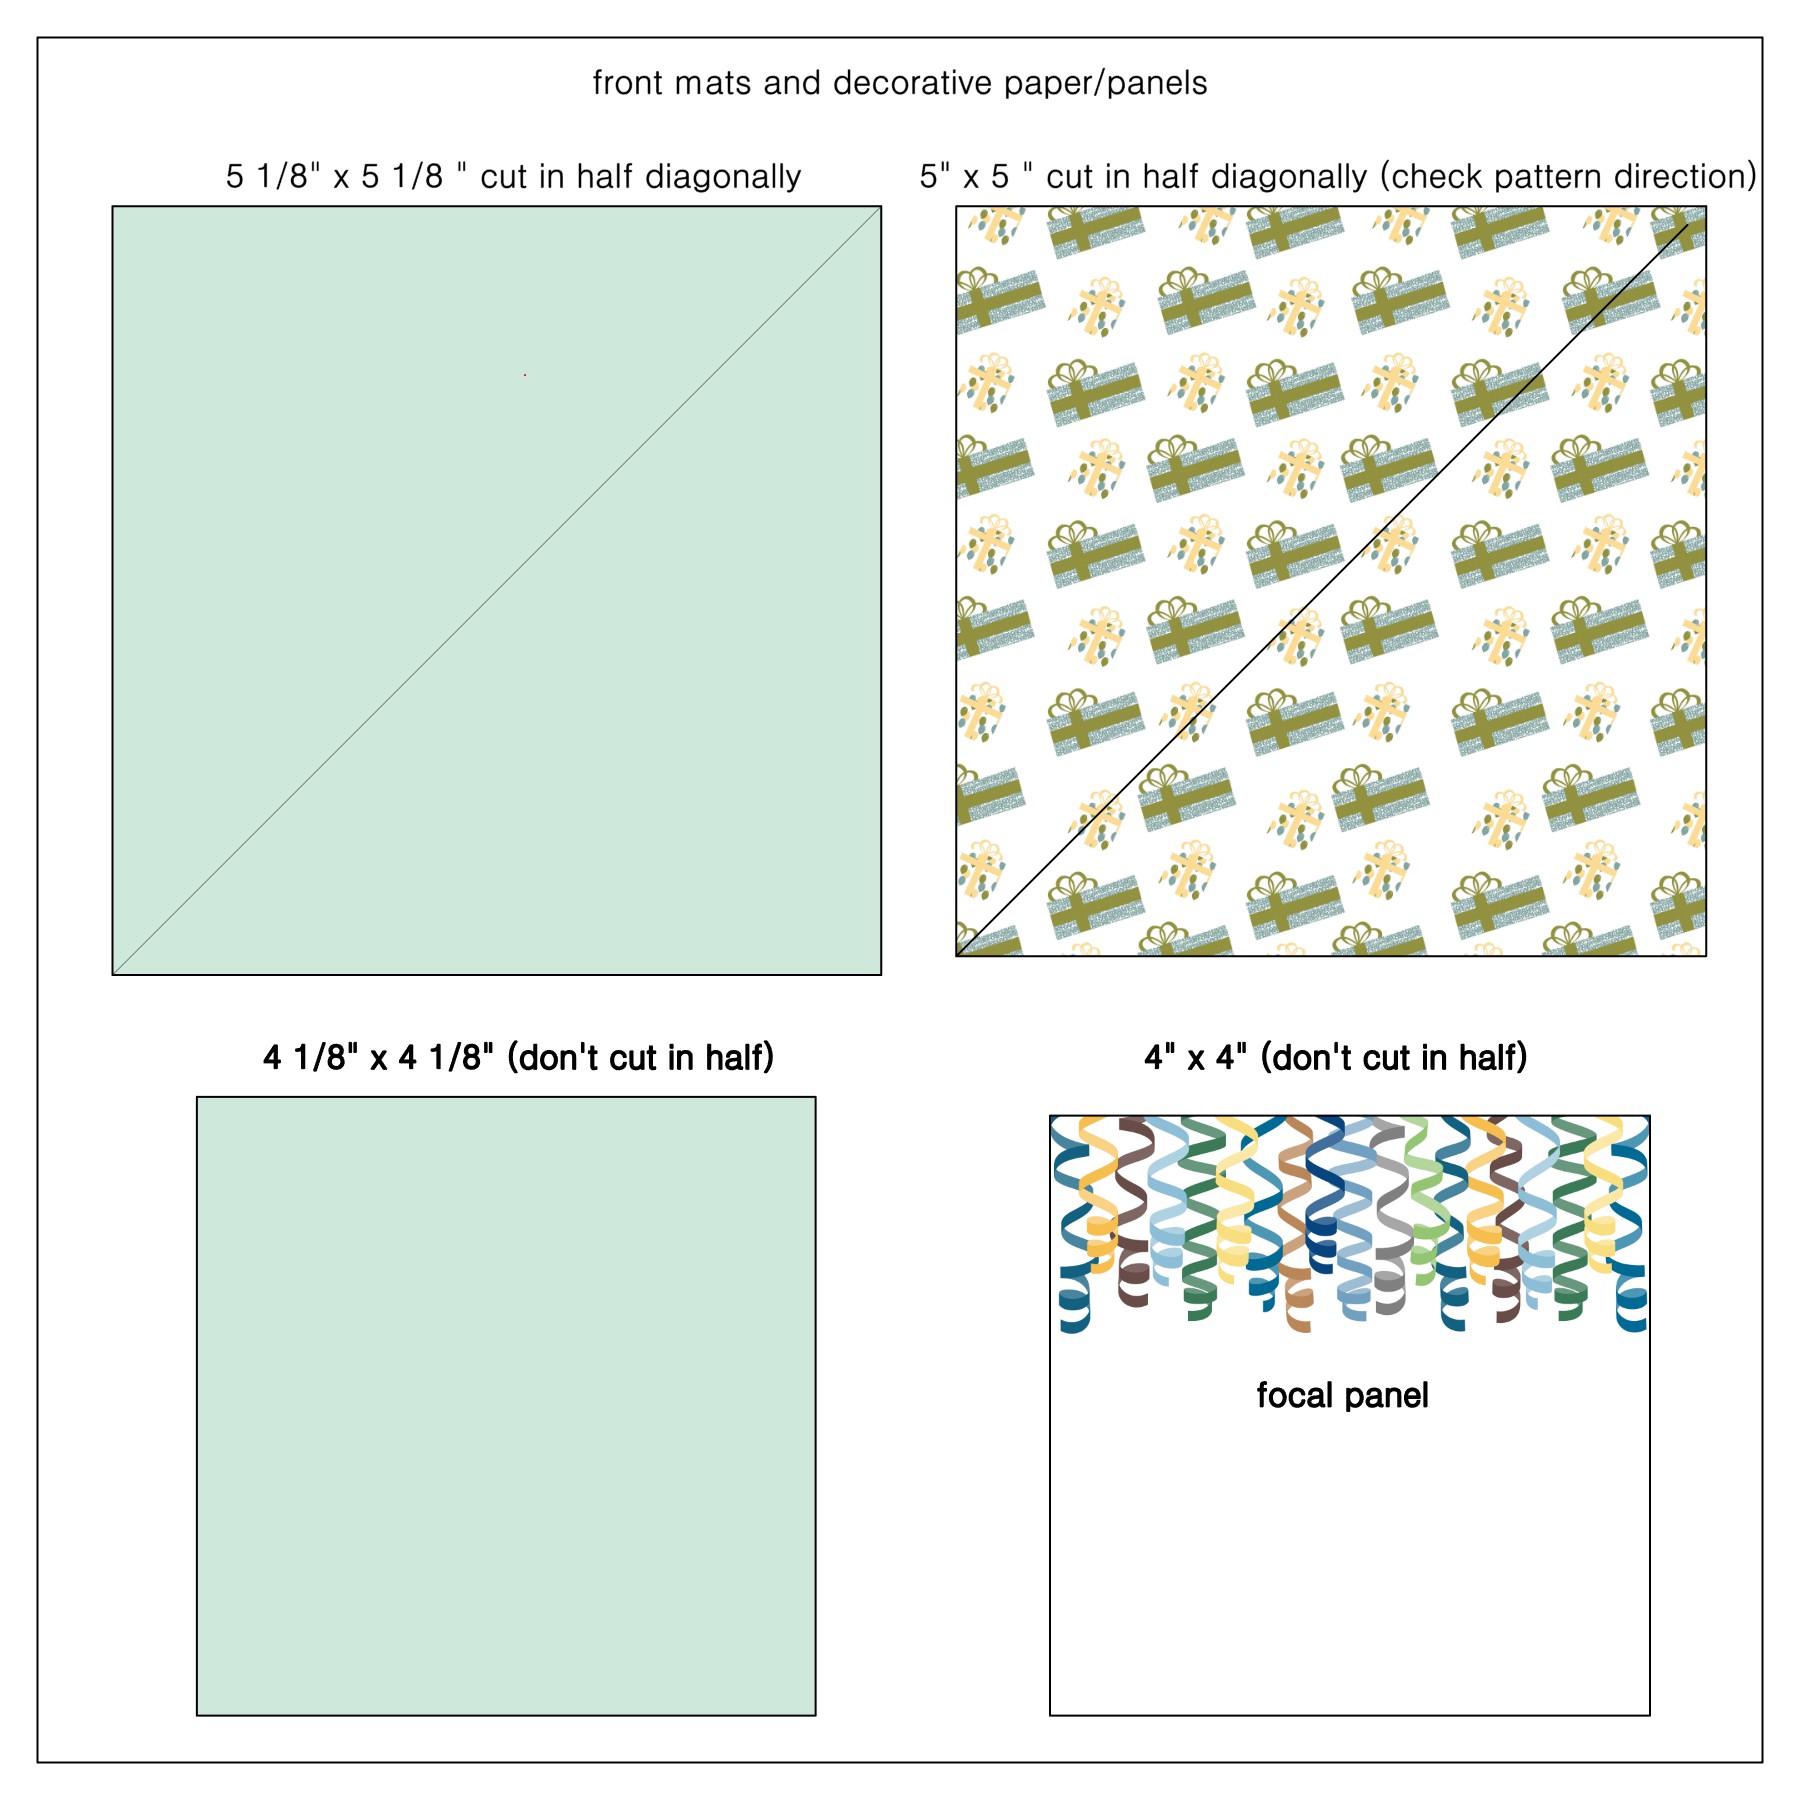
Here are my panel measurements:
For the front:
(click on image to enlarge)
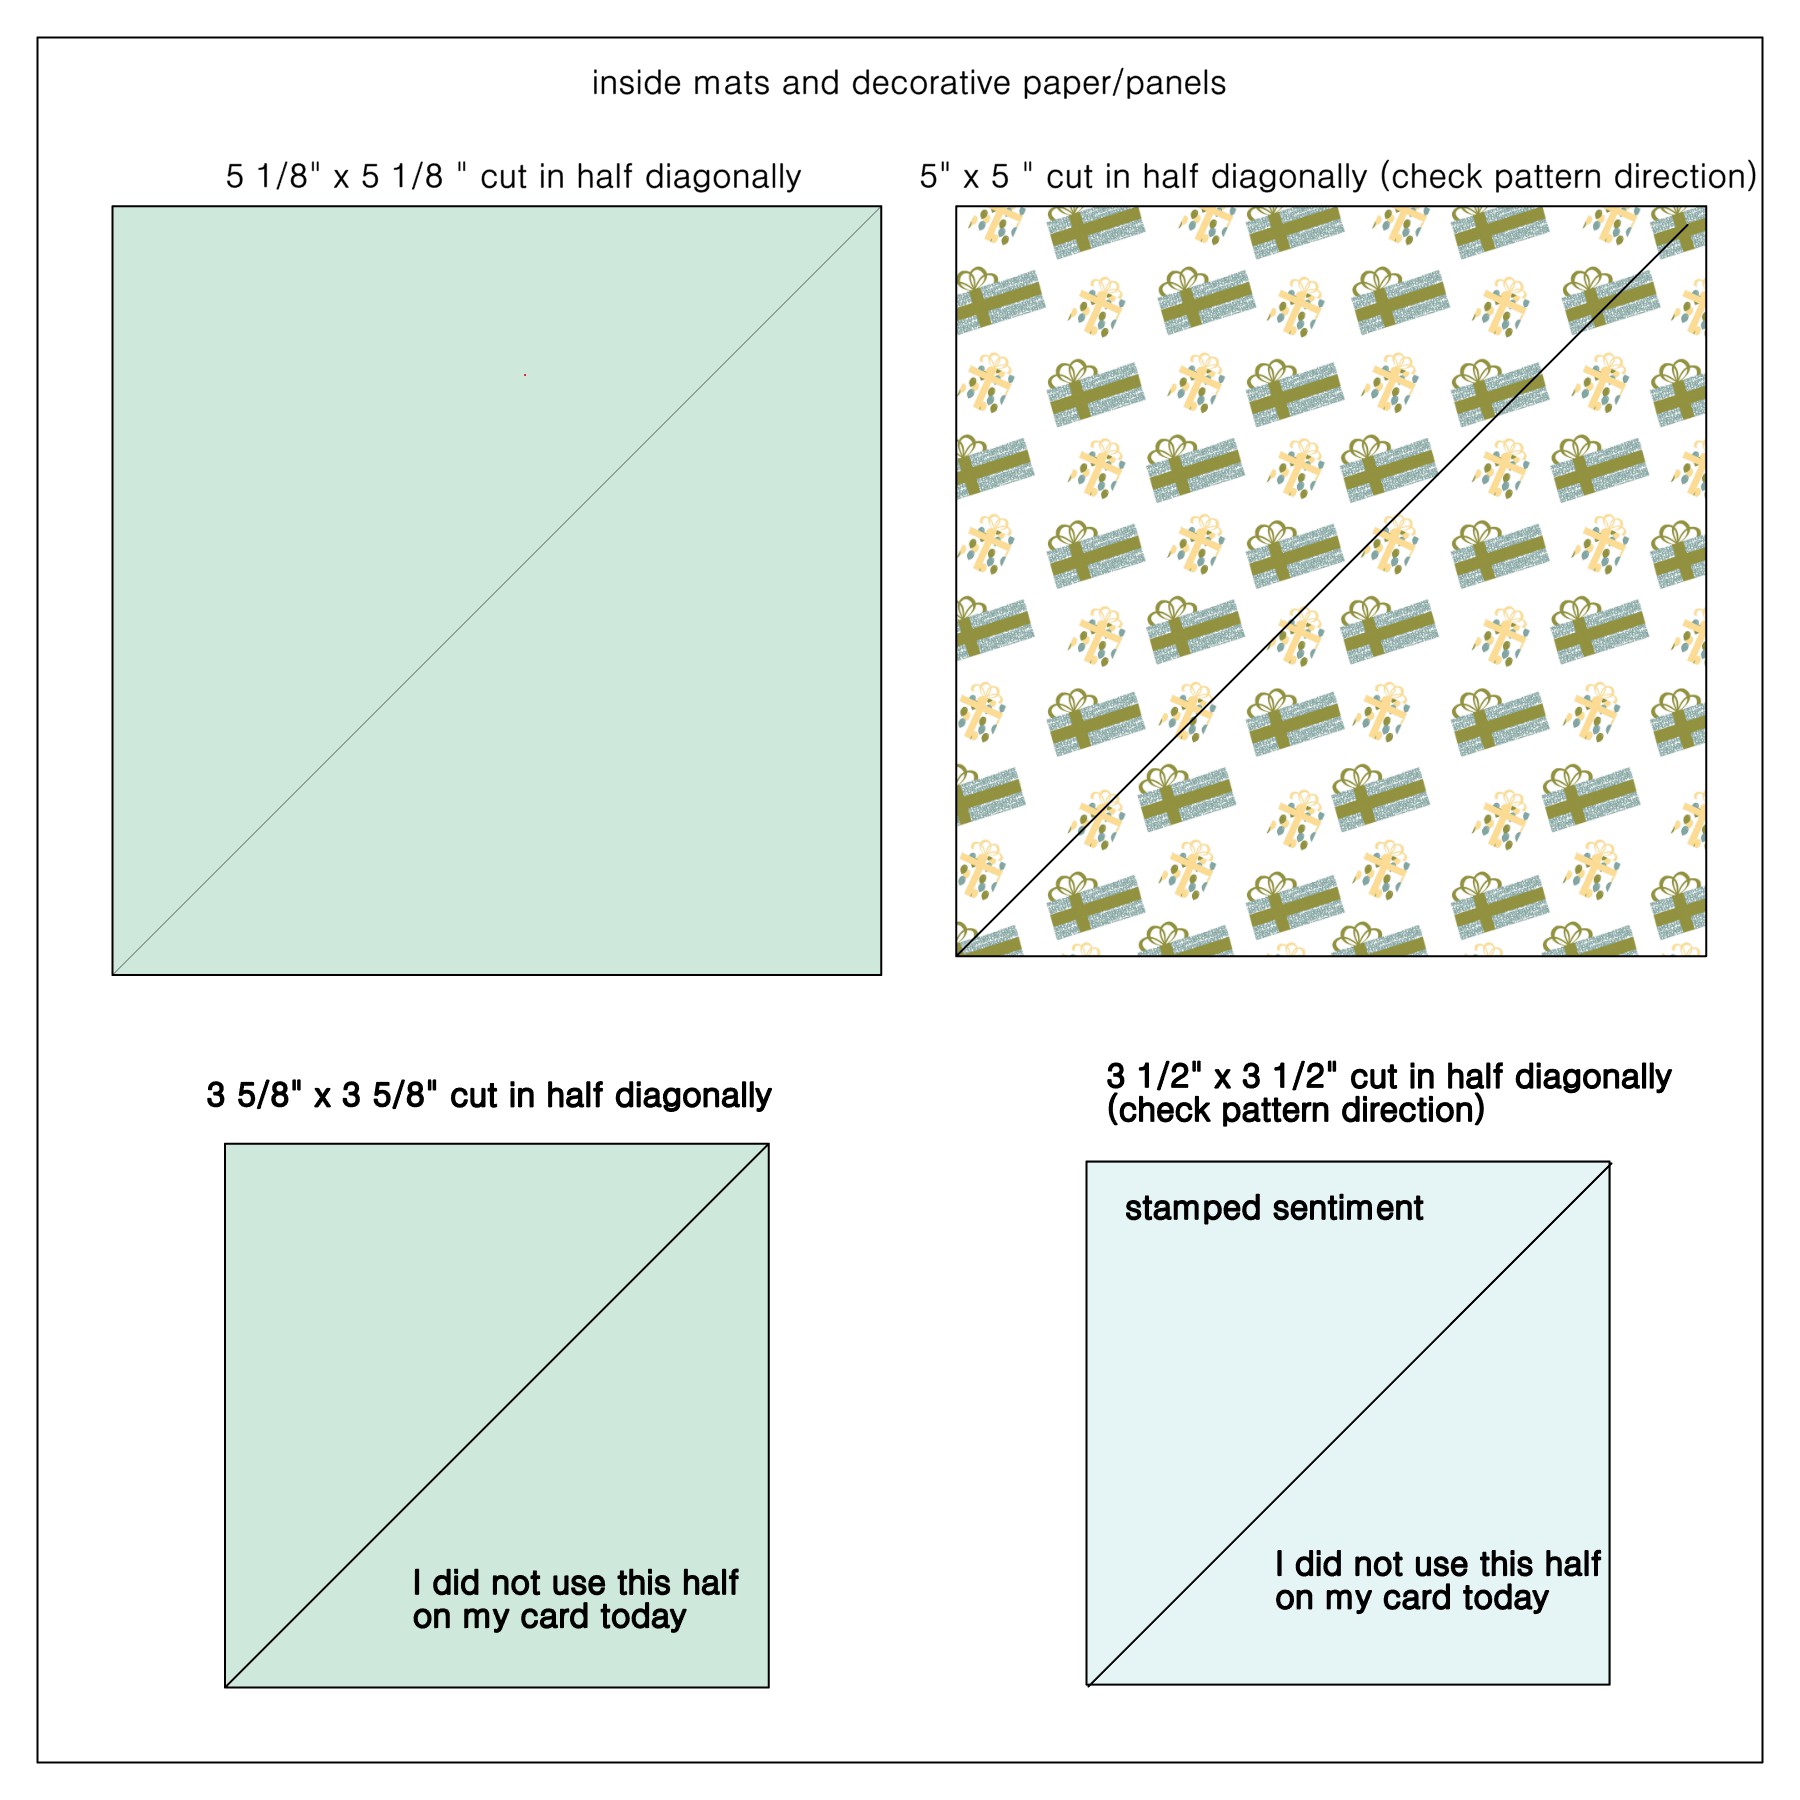
For the inside:
(click on image to enlarge)
I used a square for my focal panel, but other shapes could also be used.
Originally, I had a square panel on the inside, and then I struggled with what to add as a “stopper” so the easel stayed up when opened. In the past, I’ve popped up a sentiment or die cut to sit in front of the opened easel. I had already made my sentiment panel and everything else I tried to add to the patterned paper interfered with the soft print. I ended up splitting the inside panel into triangles, and now the easel can sit in the center channel.
The paper I used is from the “Our Family Tree” 12 x 12 paper pad from The Paper Studio. I wanted to use silver card stock for the mats to add some elegance, but the paper is kind of vintage looking, so I made my borders super thin for just a touch of silver. My focal panel is pretty big to accommodate the large greeting die cut. Measurements can be adjusted if you want larger borders or a smaller focal panel.
The greeting was cut with the “Happy Mother’s Day Phrase” die by Cottage Cutz. The circles were made with my “Bubbles Border Punch” by Fiskars (no longer available?). The inside sentiment is from the “Fabulous Holiday Fillers” stamp set by Gina K Designs (no longer available).
I came across this video showing how to make a W-V fold card and thought it was another great way to use up some of my patterned paper. I think it’s a pretty cool fun fold as well!
If you look at the overhead view, you can see where the fold got its name.
I’ve had this beautiful fruit themed paper for years and have no idea where I bought it. Unfortuate since there is not a single bit of info (name, company, etc.) on it. Hmmm…
As many of you know, I love earthtones so my first thought was to pair this paper with Recollections Kraft and Bazzill Butter Mints.
I also tried one with the beautiful Bazzill Velvet (plum) card stock.
In the video, Janie made her card 5 1/4 inches tall (and her panel measurements reflect that). I made mine 5 1/2 inches tall so I adjusted my measurements accordingly:
(click on above to enlarge)
You could decorate all four of the tall skinny panels, or you could just decorate the first and third to make it less bulky. (You don’t really see the second and fourth panels when looking at the card head-on.)
I wasn’t sure how I was going to decorate the front when I made the measurement sheet above so the smaller two squares (with my greeting) aren’t on there. (My embossed panel with greeting is 2 1/4 x 2 1/4, and the mat is 2 3/8 x 2 3/8.) I used the Subtle embossing folder from Stampin’ Up (retired) or the Tapestry embossing folder from Gina K Designs for texture and the “Mini Expressions – Happy Birthday” die from Creative Expressions or the “Doodle Happy Birthday” die from Poppy Stamps for the greetings. There’s a panel on the “inside” to write or stamp a sentiment.
And I used just one sheet of patterned paper, but you could use several different prints (or solids) on the same card. So many possibilities to make use of your patterned paper with this card design…
This card folds flat to 5 1/2 x 4 inches so it fits in a regular A2 size envelope. However, it could be a bit heavy or bulky depending on the papers and card stock you use and may require extra postage (if it weighs more than an ounce) and/or a trip to the post office to mail (if it is more than 1/4 inch thick).
Thanks for checking out my card project!
This content uses referral links as described in the disclosure policy on my sidebar.