Graduation Slider Card

Graduation Slider Card

zDSC_1326.jpg

It’s that time of the year again…

I found this fun stamp at DRS Designs called “Culmination Graduation Greeting” (#1126K) which I thought was good for college (or grad school) graduates since they were “done” with their education.

This interactive card has a die cut graduate that “runs” across the inside of the card when it is opened.

graduation slider card gif.gif

I needed several of these cards for both female and male graduates.  This is the inside for the guys:

wDSC_1271

This is actually a card design I made last year but hadn’t shared.  By the time I was ready to photograph and post it, it was well past graduation season so I decided to wait until now.  In addition to the design above, I had also made some with the year.  Change the year, and it works for any graduating class!

yDSC_1320

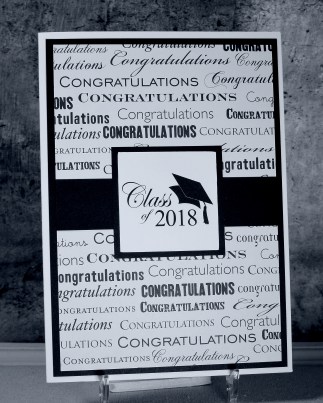
The “Class of  2018” was from a digital file that I purchased on Etsy.  (My saved link for that file no longer works.)  The same file for 2019 can be purchased HERE at ThankYouDadDesign.

I purchased the die cuts for the insides of the card from the Silhouette store and cut them with my Silhouette electronic die cutting machine.  The female graduate is from a file called “Graduation” (design #82728) by Studio Ilustrado, and the male graduate is called “Jumping Graduate Boy” (design #197569) by Sarah Bailey.

The background paper is “Black Congrats” (0S-003-00093) from DCWV (retired?).  The sentiment on the inside is from the “Flower Builders” set from Gina K Designs.

I made two other slider cards in the past (an anniversary card, and a football themed birthday card).  If you care to see how to make a card like this with a sliding element, check out my tutorial HERE.

I had a little trouble getting the white to look white in the photos.   😦

Thanks for checking out my card projects!

This content uses referral links as described in the disclosure policy on my sidebar.

Embossed Wedding Bells

Embossed Wedding Bells

wwDSC_1252.jpg

Two embossing folders were used to create this CAS, 5 1/2 inch square wedding card.  The bells were from the Sizzix Textured Impressions “Together Forever” set (#661488).  The background was made with the “Dotty Floral” folder by Apple Blossom Designs (#EFOB0056).  This folder is large – 6 x 6 inches.  (I trimmed my panel down to 5 x 5 inches for this card.)  The embossing effect on these folders is very strong, and so it is recommend that thick card in excess of 250gsm be used.  However, the card stock I wanted to use was light weight, so I lightly spritzed the card stock with water before running it through my machine which seemed to prevent it from cracking.  I used my Big Kick with the multi-purpose platform ( no shims/tabs) and 2 cutting plates.

The background card stock is from the Recollections Shimmer Silver & Champagne pack and has a beautiful, subtle shimmer to it (which you can see a bit better below).  I love this paper for “elegant” card designs.

wwDSC_1257

I embossed the wedding bells on water color paper (I love the texture!) and added a few pearls to finish it off.

Thanks for checking out my card project.

This content uses referral links as described in the disclosure policy on my sidebar.

Tropical Birthday Wishes

Tropical Birthday Wishes

ccDSCN7696

(a blast from the past…)

The tropical scene on this 5 x 7 card was inspired by Theresa Momber’s “You & Me Card Making Tutorial” from her blog.

The palm tree stamp is by All Night Media. (I can’t take credit for the details on this image; the stamp did all the work!  I just ran a green and brown marker over the fronds and trunk.)

ALL NIGHT MEDIA PALM TREE STAMP

The sentiment, stamped on vellum, is from the “Birthday Label” duo by GKD.  I needed a shorter sentiment, so I masked the end half and just used the birthday wishes part of the stamp.

This project was originally posted in my StampTV gallery on July 2, 2014.  (Sadly, this site is no longer active.)

(The above description came from the original post in which I failed to include the details for the ink colors, embossing folder, paper/card stock, and additional tools and products used.)

Thanks for checking out my card project!

Sealed With A Kiss Anniversary Card

Sealed With A Kiss Anniversary Card

wDSC_1189.jpg

(inside: In all you dream and in all you do, may the love you share bring joy to you…)

This amusing, kissing couple image is from a stamp set called “Sealed with a Kiss” by Paper Pretties.  Sadly, the online store closed, but I contacted the owner who actually still had the stamp set, and I was able to purchase it from her.  Yay!!

I used a die from the Spellbinders Labels 2 set (S4-162) to create my focal panel on this z-fold card.  I sponged GKD Dark Chocolate ink over/around my stamped image while the die cut was still in the die.  To create the z-fold card base, I scored my 8 1/2 x 5 1/2 inch panel at 4 1/2 and 2 1/8 inches.

wDSC_1193

The image was stamped with Memento Tuxedo Black ink and colored with Copic markers (woman: B32, B34, RV02, E57, E47, E13; skin: E50, E13, E21; man: E44, E59, E55, E51, E57).

wDSC_1185

The greeting is unnamed (#97219) by Inkadinkado.  The sentiment inside is called “In All Your Dreams” from Print Words by Annette Allen Watkins.  (I masked off the “happy wedding day” part of this stamp.)

American Crafts (#320337) patterned paper was used along with Recollections kraft and white card stock.

Z-fold cards fold flat for mailing.

wDSC_1181

Thanks for checking out my card project!


Thank You with Polka Dots

Thank You with Polka Dots

cDSCN8383

(a blast from the past…)

This card was made for a StampTV  challenge (several years ago) where we were to use Polka Dots and black, white, and/or gray with one other color.  My additional color was tattered rose (peach).

I started with a piece of Basic Grey polka dotted paper (the back side of “Grapevine”) and added a bunch of images to create my own patterned paper.  The stamps I used for the background were all from the Gina K Designs and came from the following sets:  If I Had a Flower, Sympathy Label, Hope is Faith, Time, and Vintage Backgrounds (all retired?).  I used Memento Gray Flannel ink to stamp the images and then lightly sponged Memento London Fog ink over the whole thing.

For the focal image and greeting panels, I inked white card stock with Tim Holtz Tattered Rose distress ink. (I then stamped the floral image from If I Had a Flower randomly all over these panels in Tattered Rose ink to try to create a subtle background, but the ink soaked right in and you can hardly see it!  This was made pre-MISTI, so I couldn’t re-stamp the images to make them darker.)  Next, I stamped my focal image and sentiment using Memento Gray Flannel ink.  The stamps used were from GKD Hopeful Flowers and Thank You duo (both retired?).

Satin and sheer ribbon, a hat pin, and some self-sticking gray pearls were added.  I created a mat for the gray background panel by sponging the Tattered Rose ink on white card stock. White and black mats were also used.

This project was originally posted in my StampTV gallery on August 13, 2014.  (Sadly, this site is no longer active.)

Thanks for checking out my card project!