Inside-Out Chef Card

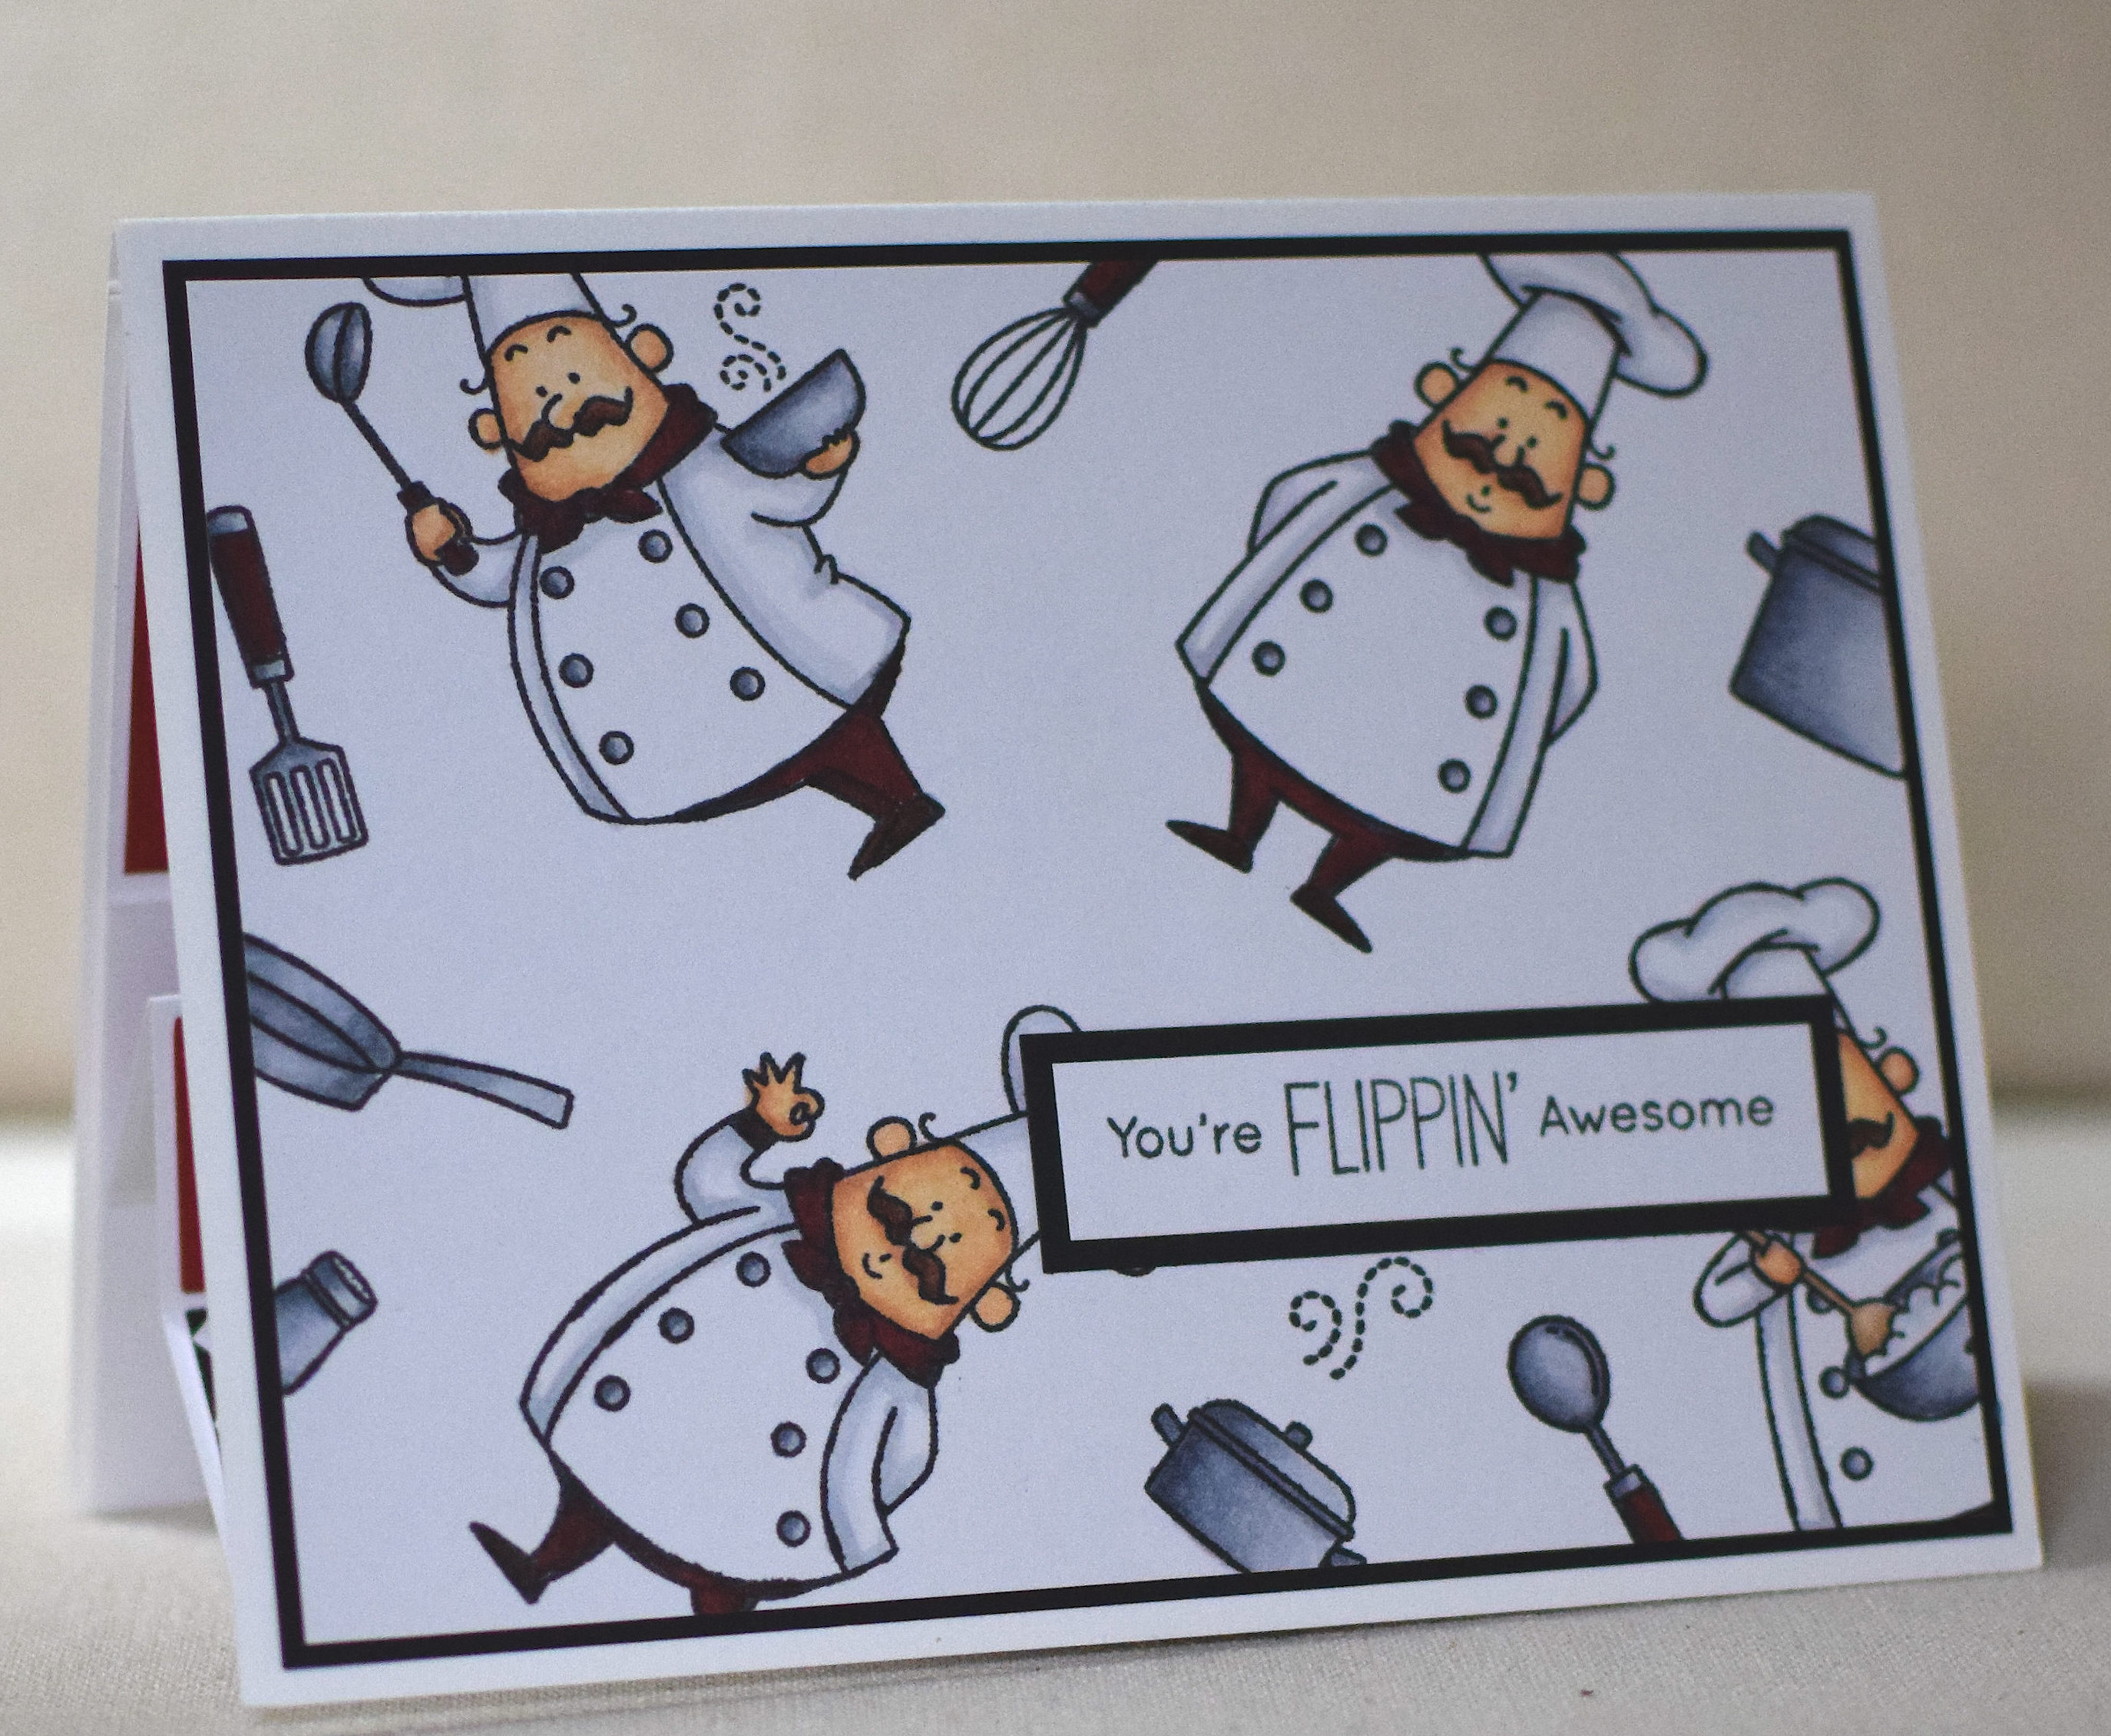
I called this card an “Inside-Out” card because the card front is pretty simple, but the inside is the more elaborate part and the part meant to be displayed. The above photo shows the inside of the card after the card is opened and the front is flipped over. Below is the front of the card before it is opened:
I think the images in this stamp set called “Recipe for Happiness” by My Favorite Things are just the cutest ever, and I had loads of fun making this card!

The nice thing about a step card is that it has a lot of dimension but folds flat and usually fits in an envelope. (This particular card is a bit thick even when folded so it requires a trip to the post office to mail.)

This card is being entered in the My Favorite Things – “You Could Be a Card Design Superstar Contest – 2016!”
*
The rest of this post is a detailed description of how I created this card. If you wish to keep reading, grab a cup of coffee and get comfy – it’s a bit long!
I created the patterned paper on the front by randomly stamping the images on white card stock with Memento Tuxedo Black ink and coloring them with Copic Markers (jacket and hat: C0, C1, C2; buttons: C5, C3, C1; shoes: E29, C7; red areas: C7, R89; Mustache:E25, E27, E29; skin: E50, E21, E13; wooden spoon: E41, E42, E43; batter: C0, C1, C2; metal on cooking utensils and pots/pans: C1, C3, C5).
The chef image on the inside was cut with one of the dies from the coordinating Die-namics die set (also called Recipe for Happiness) by My Favorite Things (sold separately). He was colored with Copic Markers using the colors listed above. I cut 3 additional blank die cuts and layered them together and glued them to the back of the stamped and colored image to make him sturdier.
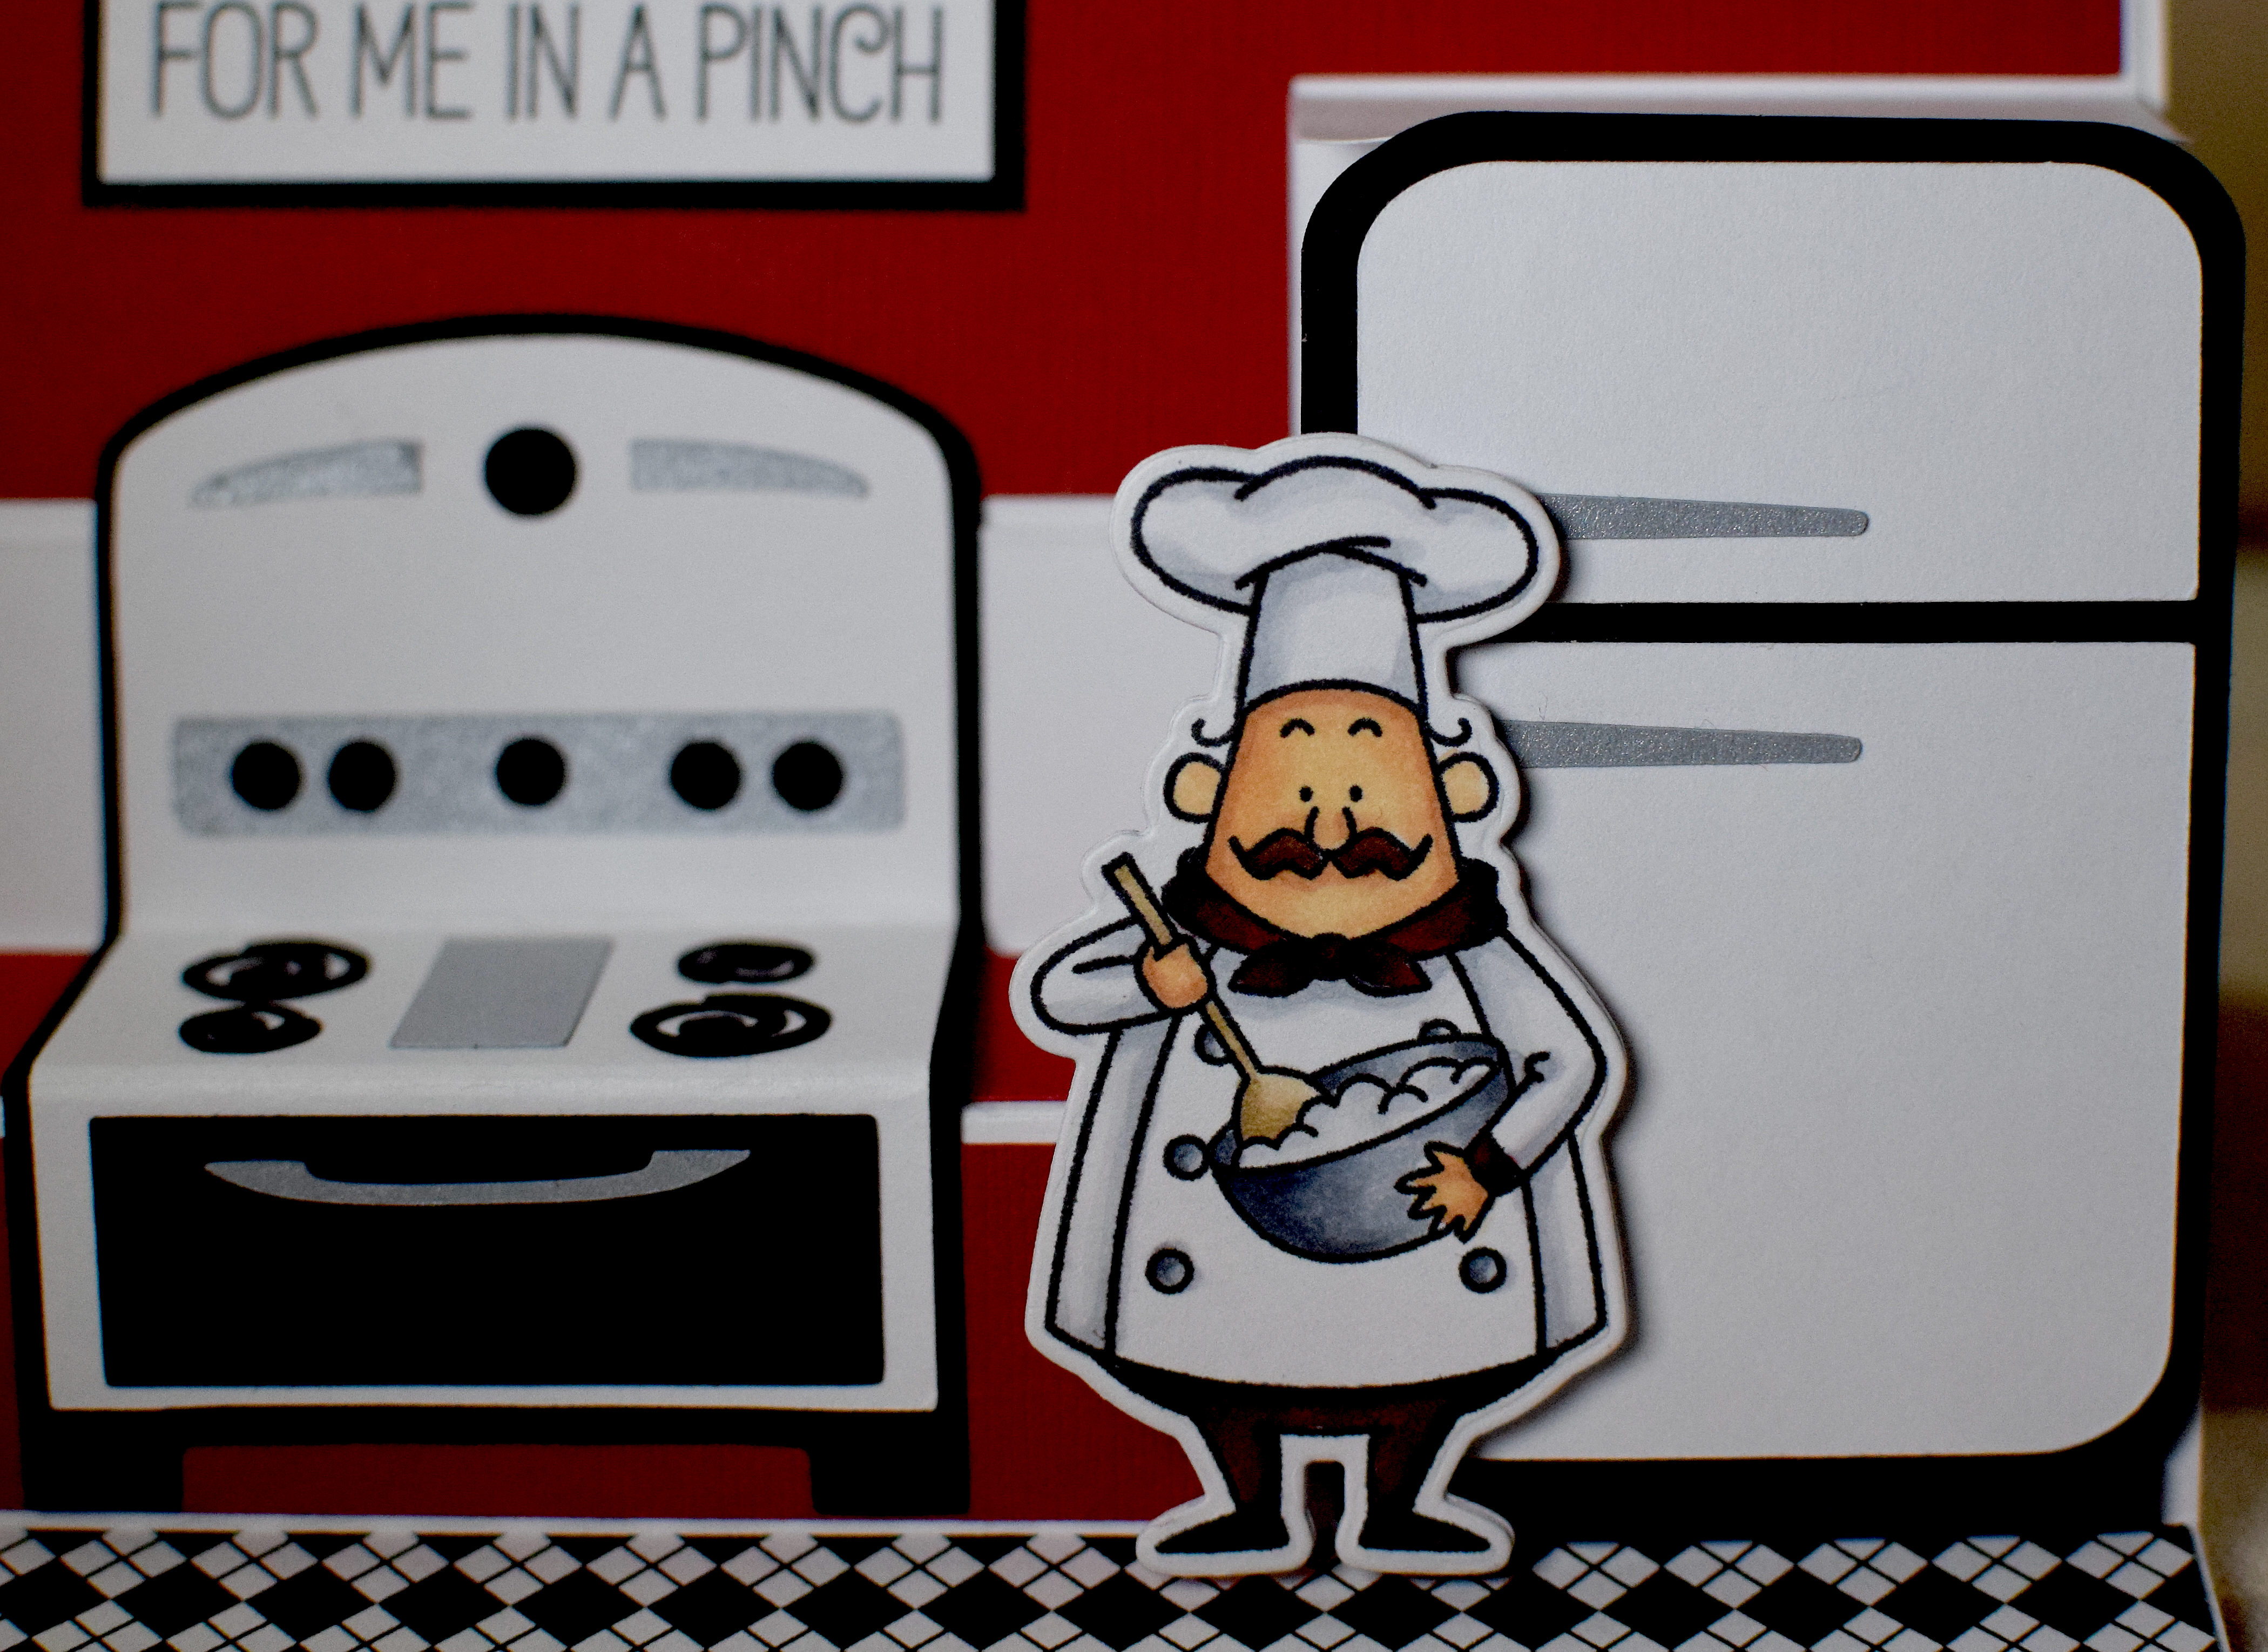
I designed the kitchen scene using a piece of white card stock and scraps of white, black, silver, and red I had in my stash. I used 2 files I purchased from the Silhouette store (“1950’s stove” and “1950’s fridge”) as a model and for a few of the elements, but most of the pieces needed to be resized or shaped to fit my design, and I created most of the geometric shapes myself.
*
The floor panel was made with a digital paper file I purchased on Etsy from a set called “Yankee Fan” by Happy Heart Studios. It is intended to be blue and white, but I printed it with all black ink so it matched my kitchen better. I created a print and cut file and cut this with my Silhouette so the pattern would be smaller.

*
There is room “in the refrigerator” to write a personal message or to stamp a sentiment if desired. I adhered a magnet to the door (and a paper clip to the back) to keep the door closed.

*
I knew I had wanted to make a 3D card and started off thinking I might use a step-card format. Then I saw THIS adorable card and was inspired to create “a kitchen” for my chef image. After playing around with folds and cuts, I came up with this modified step card design:
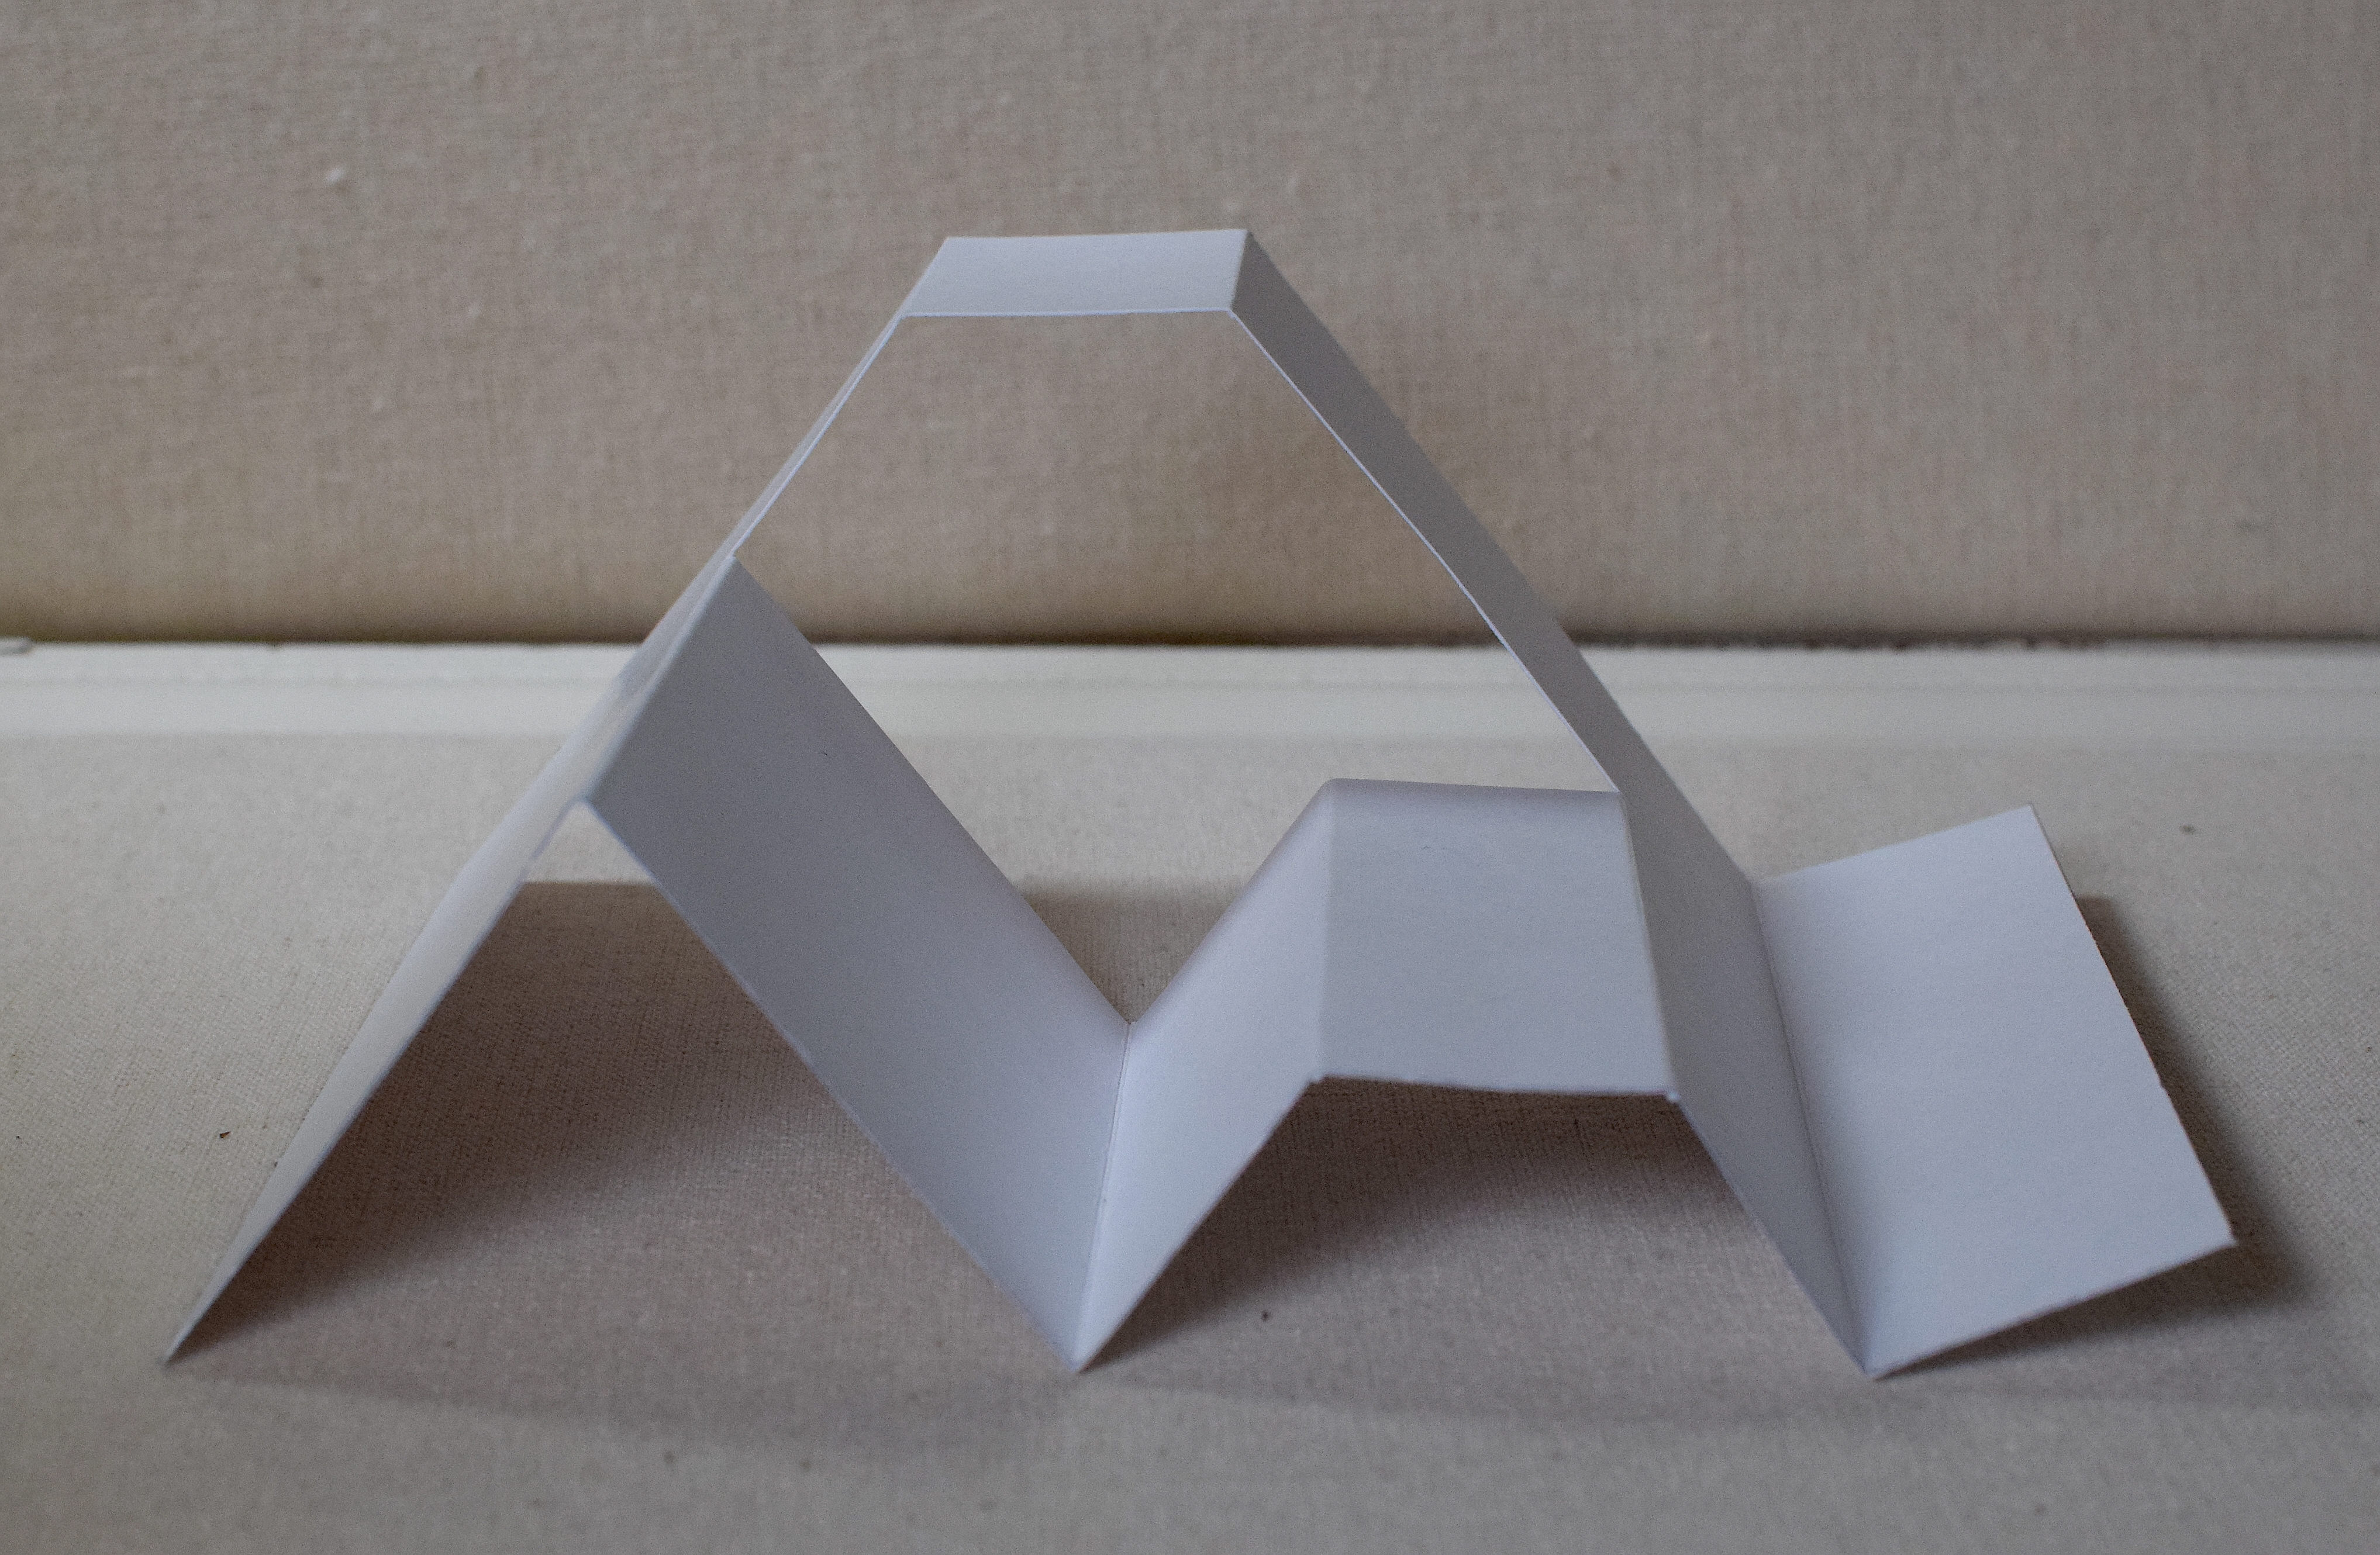
I glued two of the folds together to help my kitchen keep it’s shape.

*
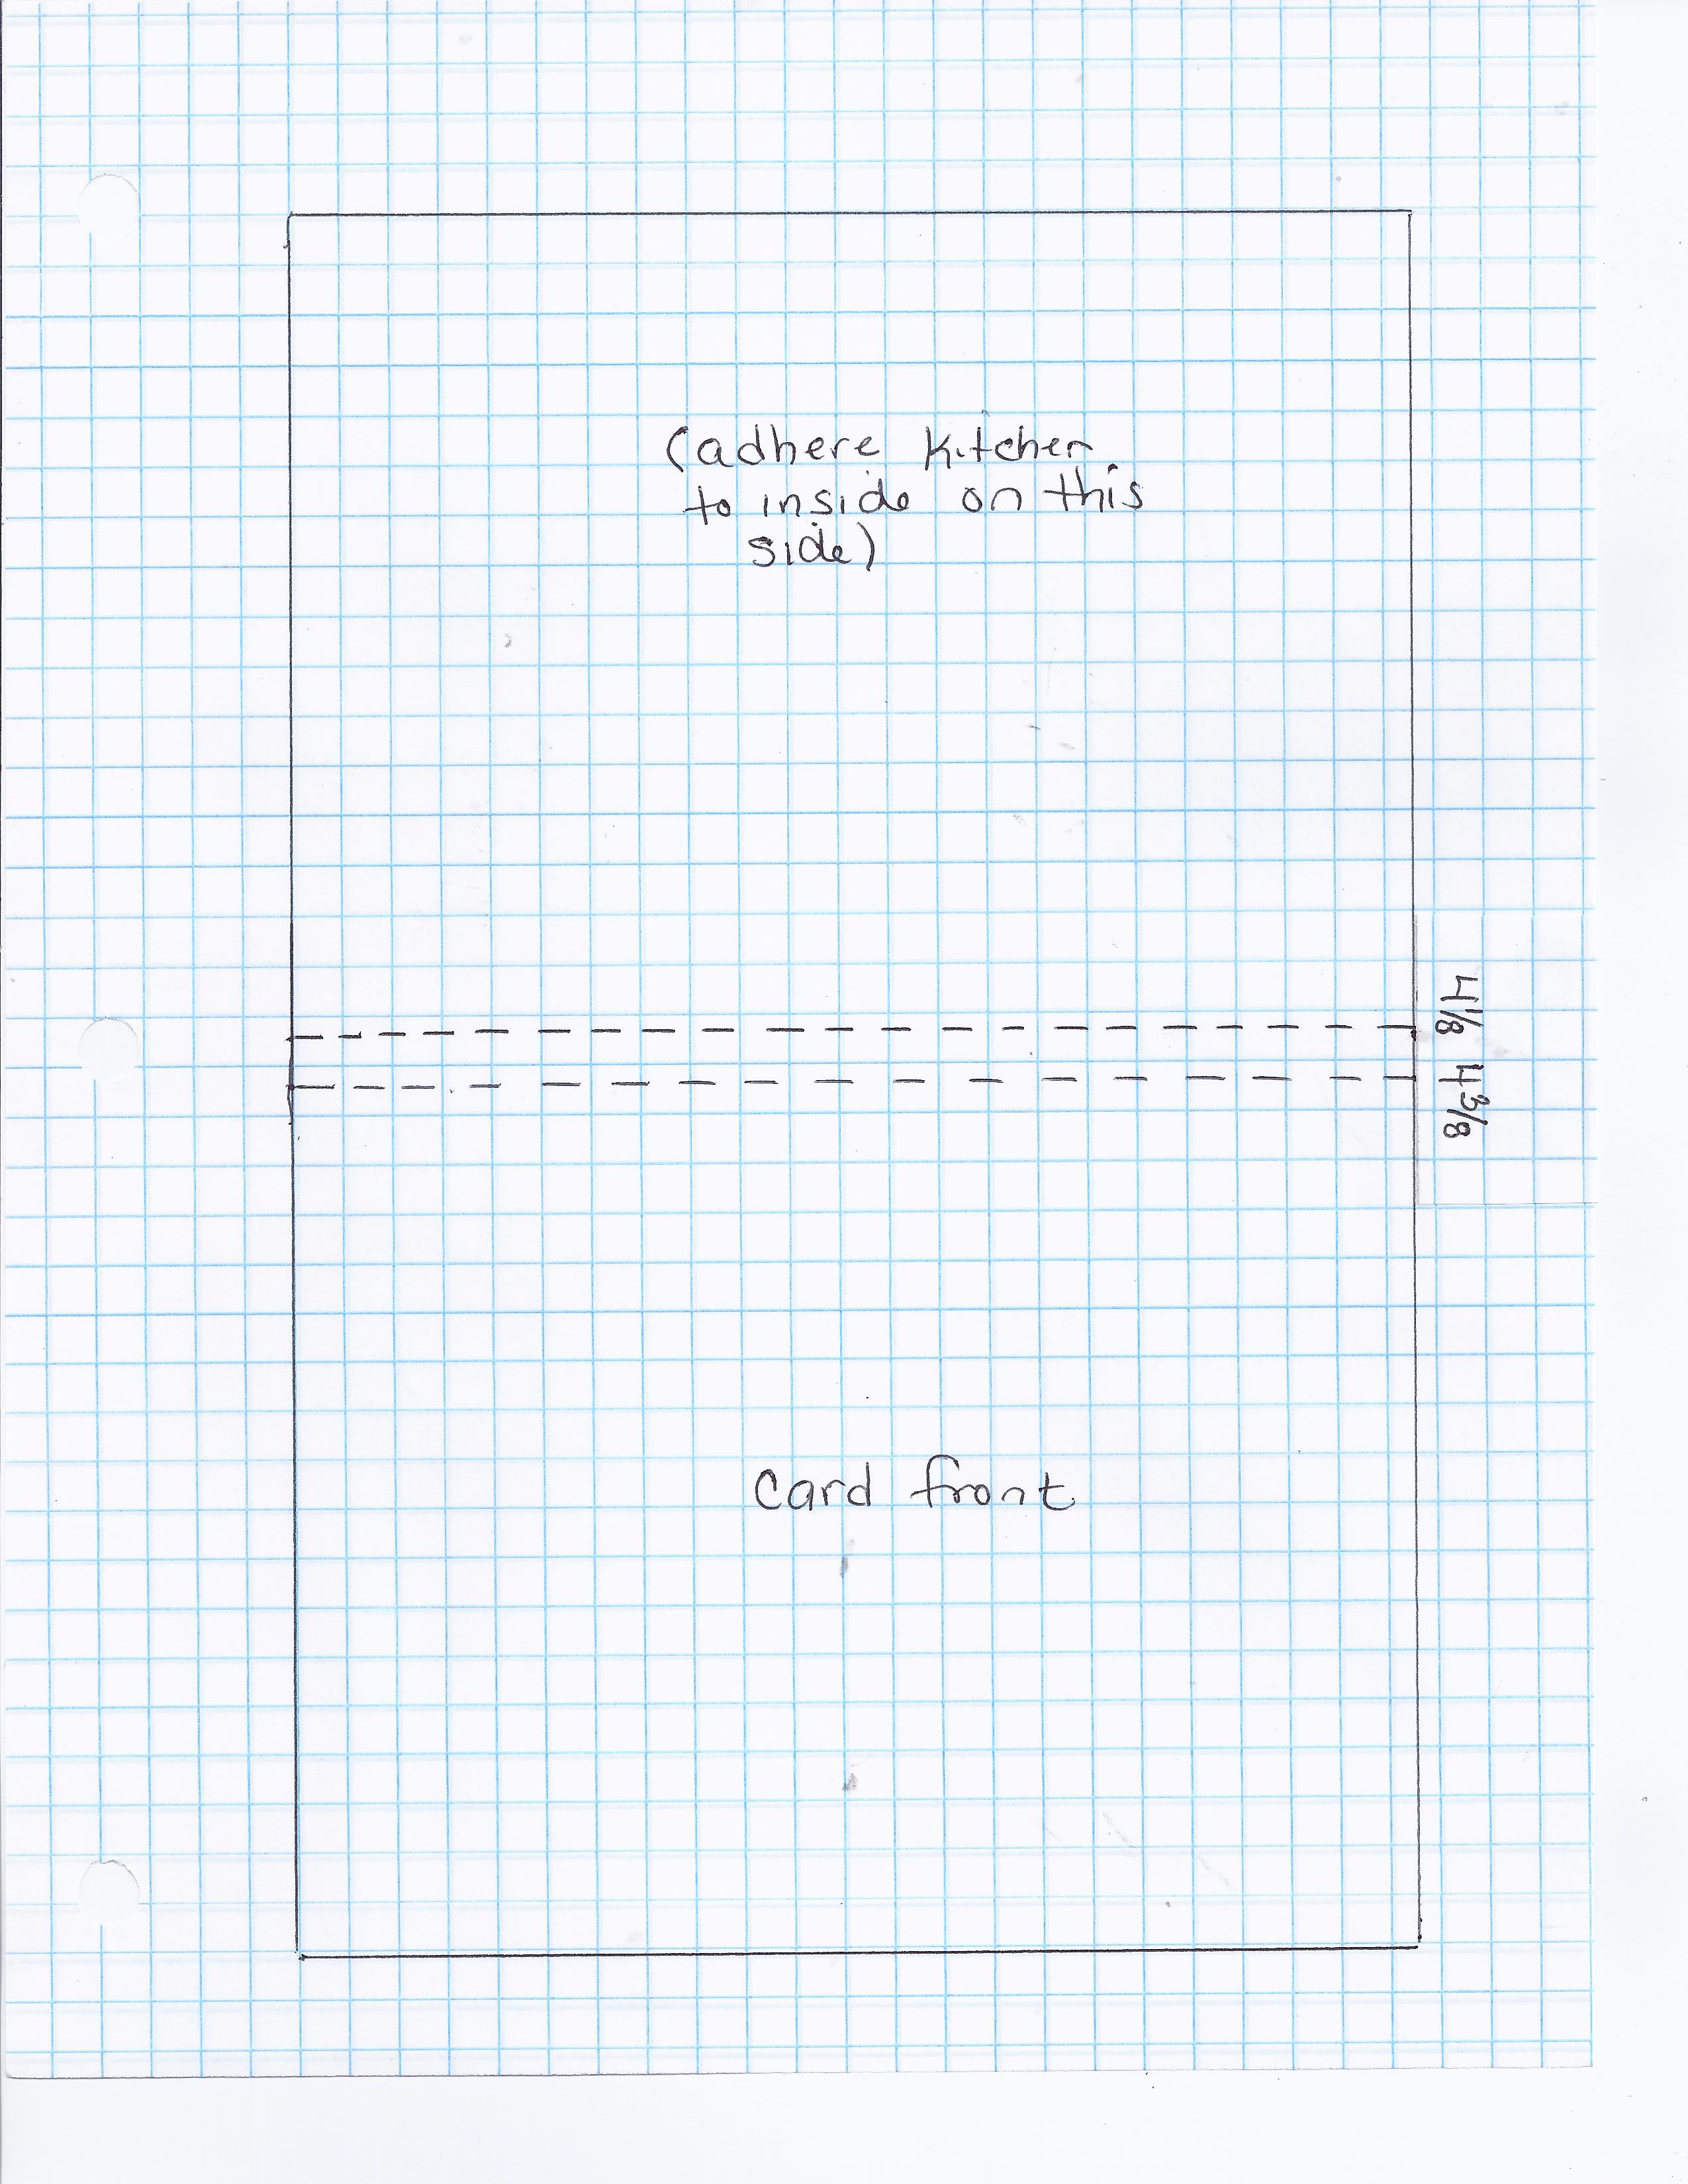
I started with a piece of card stock measuring 5 1/2 x 8 1/2 inches. I lined up the card stock vertically on my trimmer at 2 inches and then made a 4 1/4 inch cut starting at 2 1/8 inches from the top and going down to 6 3/8 inches. (Click on diagrams to make them larger if desired.)

*
Then I turned my card stock counter clockwise to the horizontal position (cut is closer to bottom now) and scored from the top edge to the bottom at 1 1/8 and 4 1/4 inches. With the panel still in same position on score tool, I scored from top edge to the cut at: 2 1/8, 3 1/8, and 6 3/8 inches. The last score line goes from the cut to the bottom edge, but since it is difficult to start scoring in the middle of the paper and there are no measurements on the bottom of my score tool, I flipped the card stock over so I was scoring on the back and now from the “new” top to the cut line. The final score line is at 5 3/8 inches.

*
To fold the panel on the score lines, notice the M’s and the V’s on my diagram below. “M” is for a mountain fold where you fold away from you to create a peak. “V” is for a valley fold where you fold toward you to create a dip or valley.

*
Then I created a card base with a piece of heavy weight card stock measuring 5 5/8 x 8 3/4 inches. (It’s a little bigger than a standard card base, but I needed a little extra room to accommodate the bulkiness of the card when closed. It still fits (snugly) in a standard A2 size envelope.) I scored and folded the base at 4 1/8 AND 4 3/8 inches. The slightly longer side is the card front, and the slightly shorter side is the side I adhered my folded kitchen panel. As I mentioned above, the card is meant to be displayed “inside-out” and I found it stood up straighter when the slightly longer front piece was opened and folded over.
*
Thanks for checking out my card project!


Wow! What a cool step card and a great kitchen design I might add. You are amazing girl!
LikeLike
All I can say is WOW!
LikeLike
Man, did this take a lot of planning, time and work. But, so worth the effort! Great card and good luck on the contest. I am sure you will be a contender!
LikeLike
Wowsers! How cool is this card! I love all the dimension! Saw your post on the MFT challenge and had to come take a look. Fantastic!
LikeLike
Pingback: For Your Bridal Shower | I Played With Paper Today!
I sure hope you won that MFT contest, because this card is awesome!
LikeLike
I love your card it is superb!!!
LikeLike