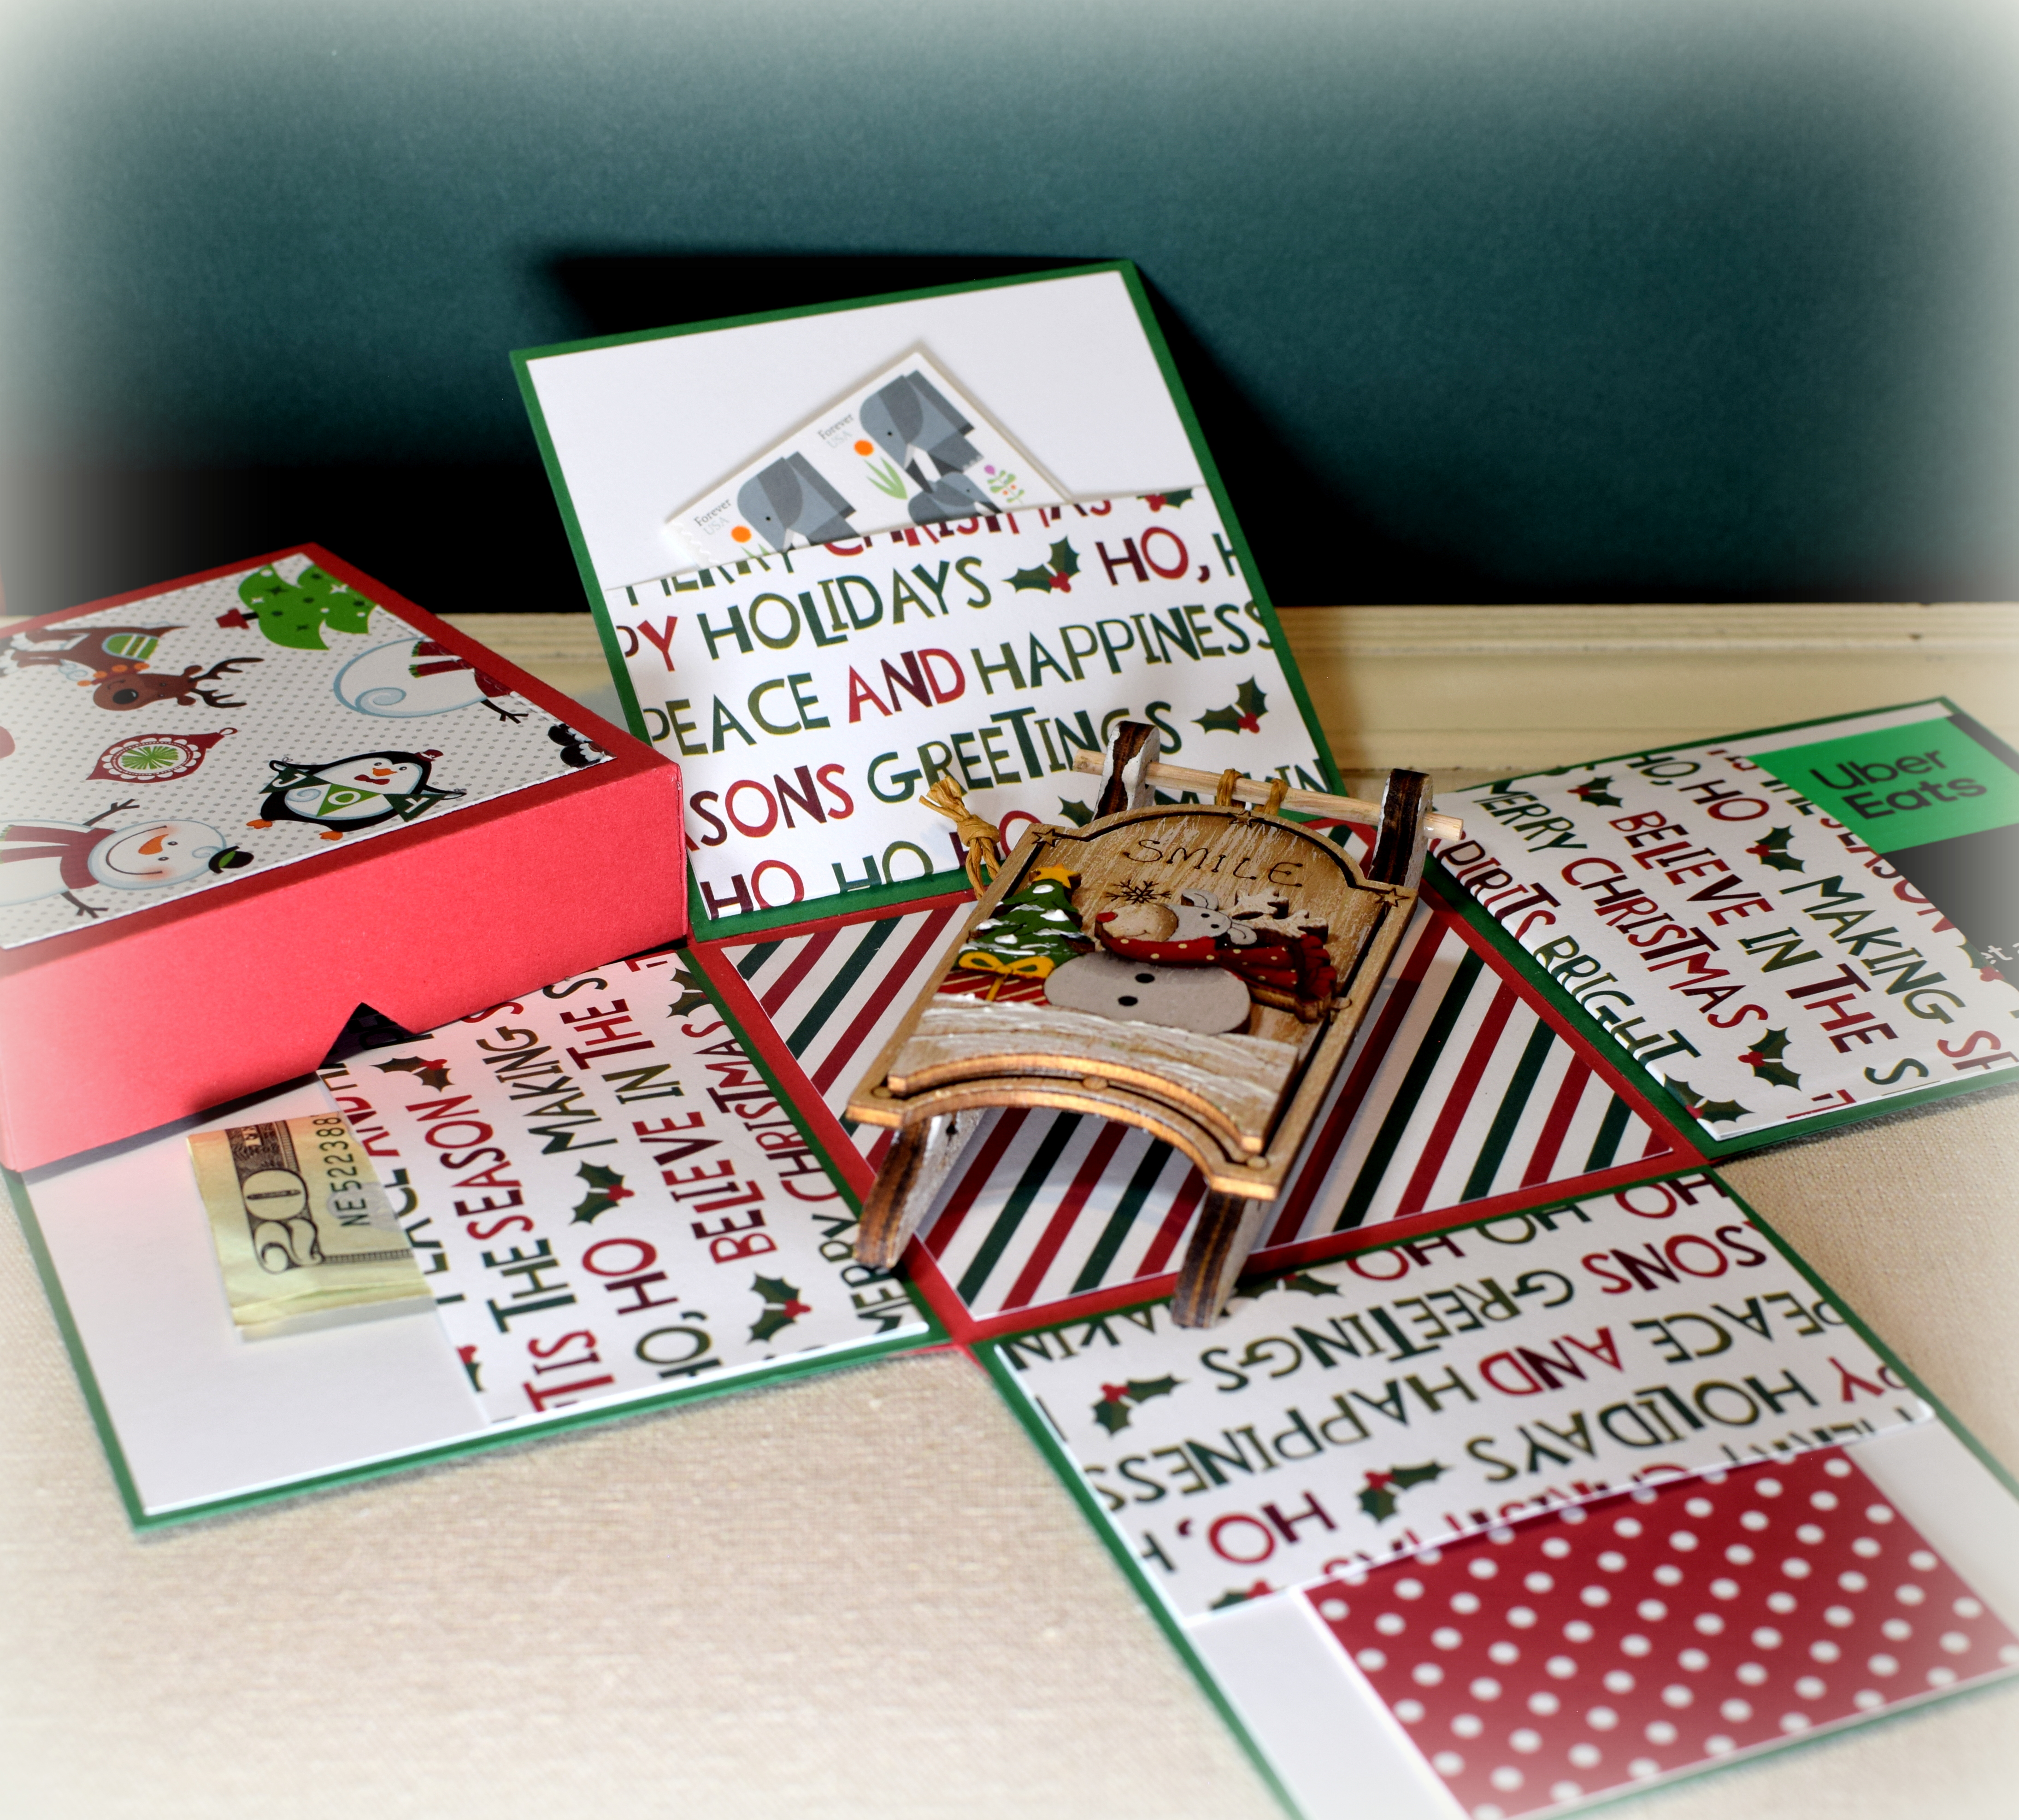
Here’s another explosion box with pockets on the inside for gifting cash or gift cards (or anything small and flat).
I used the CREAlies “Create A Box Large – Explosion (or not) box Large” die set (#CCABL27) to create the 3 3/4″ square box. For this one, I used red and green card stock along with card stock from several retired Recollections Christmas themed packs that I bought years ago.
Instead of the tree in the center (as I did on my previous sample), I left the inside clear of die cuts so I could include a small gift along with the monetary gifts.
Change up the paper, and this box could work for any occasion! And as I mentioned previously, this die set also comes with connectors to create a non-exploding, traditional box if desired.
I’d like to wish you all a very Merry Christmas and a Happy New Year!
I’d also like to take a moment to thank you all for taking the time to visit my blog and for all your support and encouragement this past year. I really appreciate it!
(The above image was found HERE and is not my own.)
(inside: A holiday wish to bring you Cheer, a Merry Christmas and a Happy New Year!)
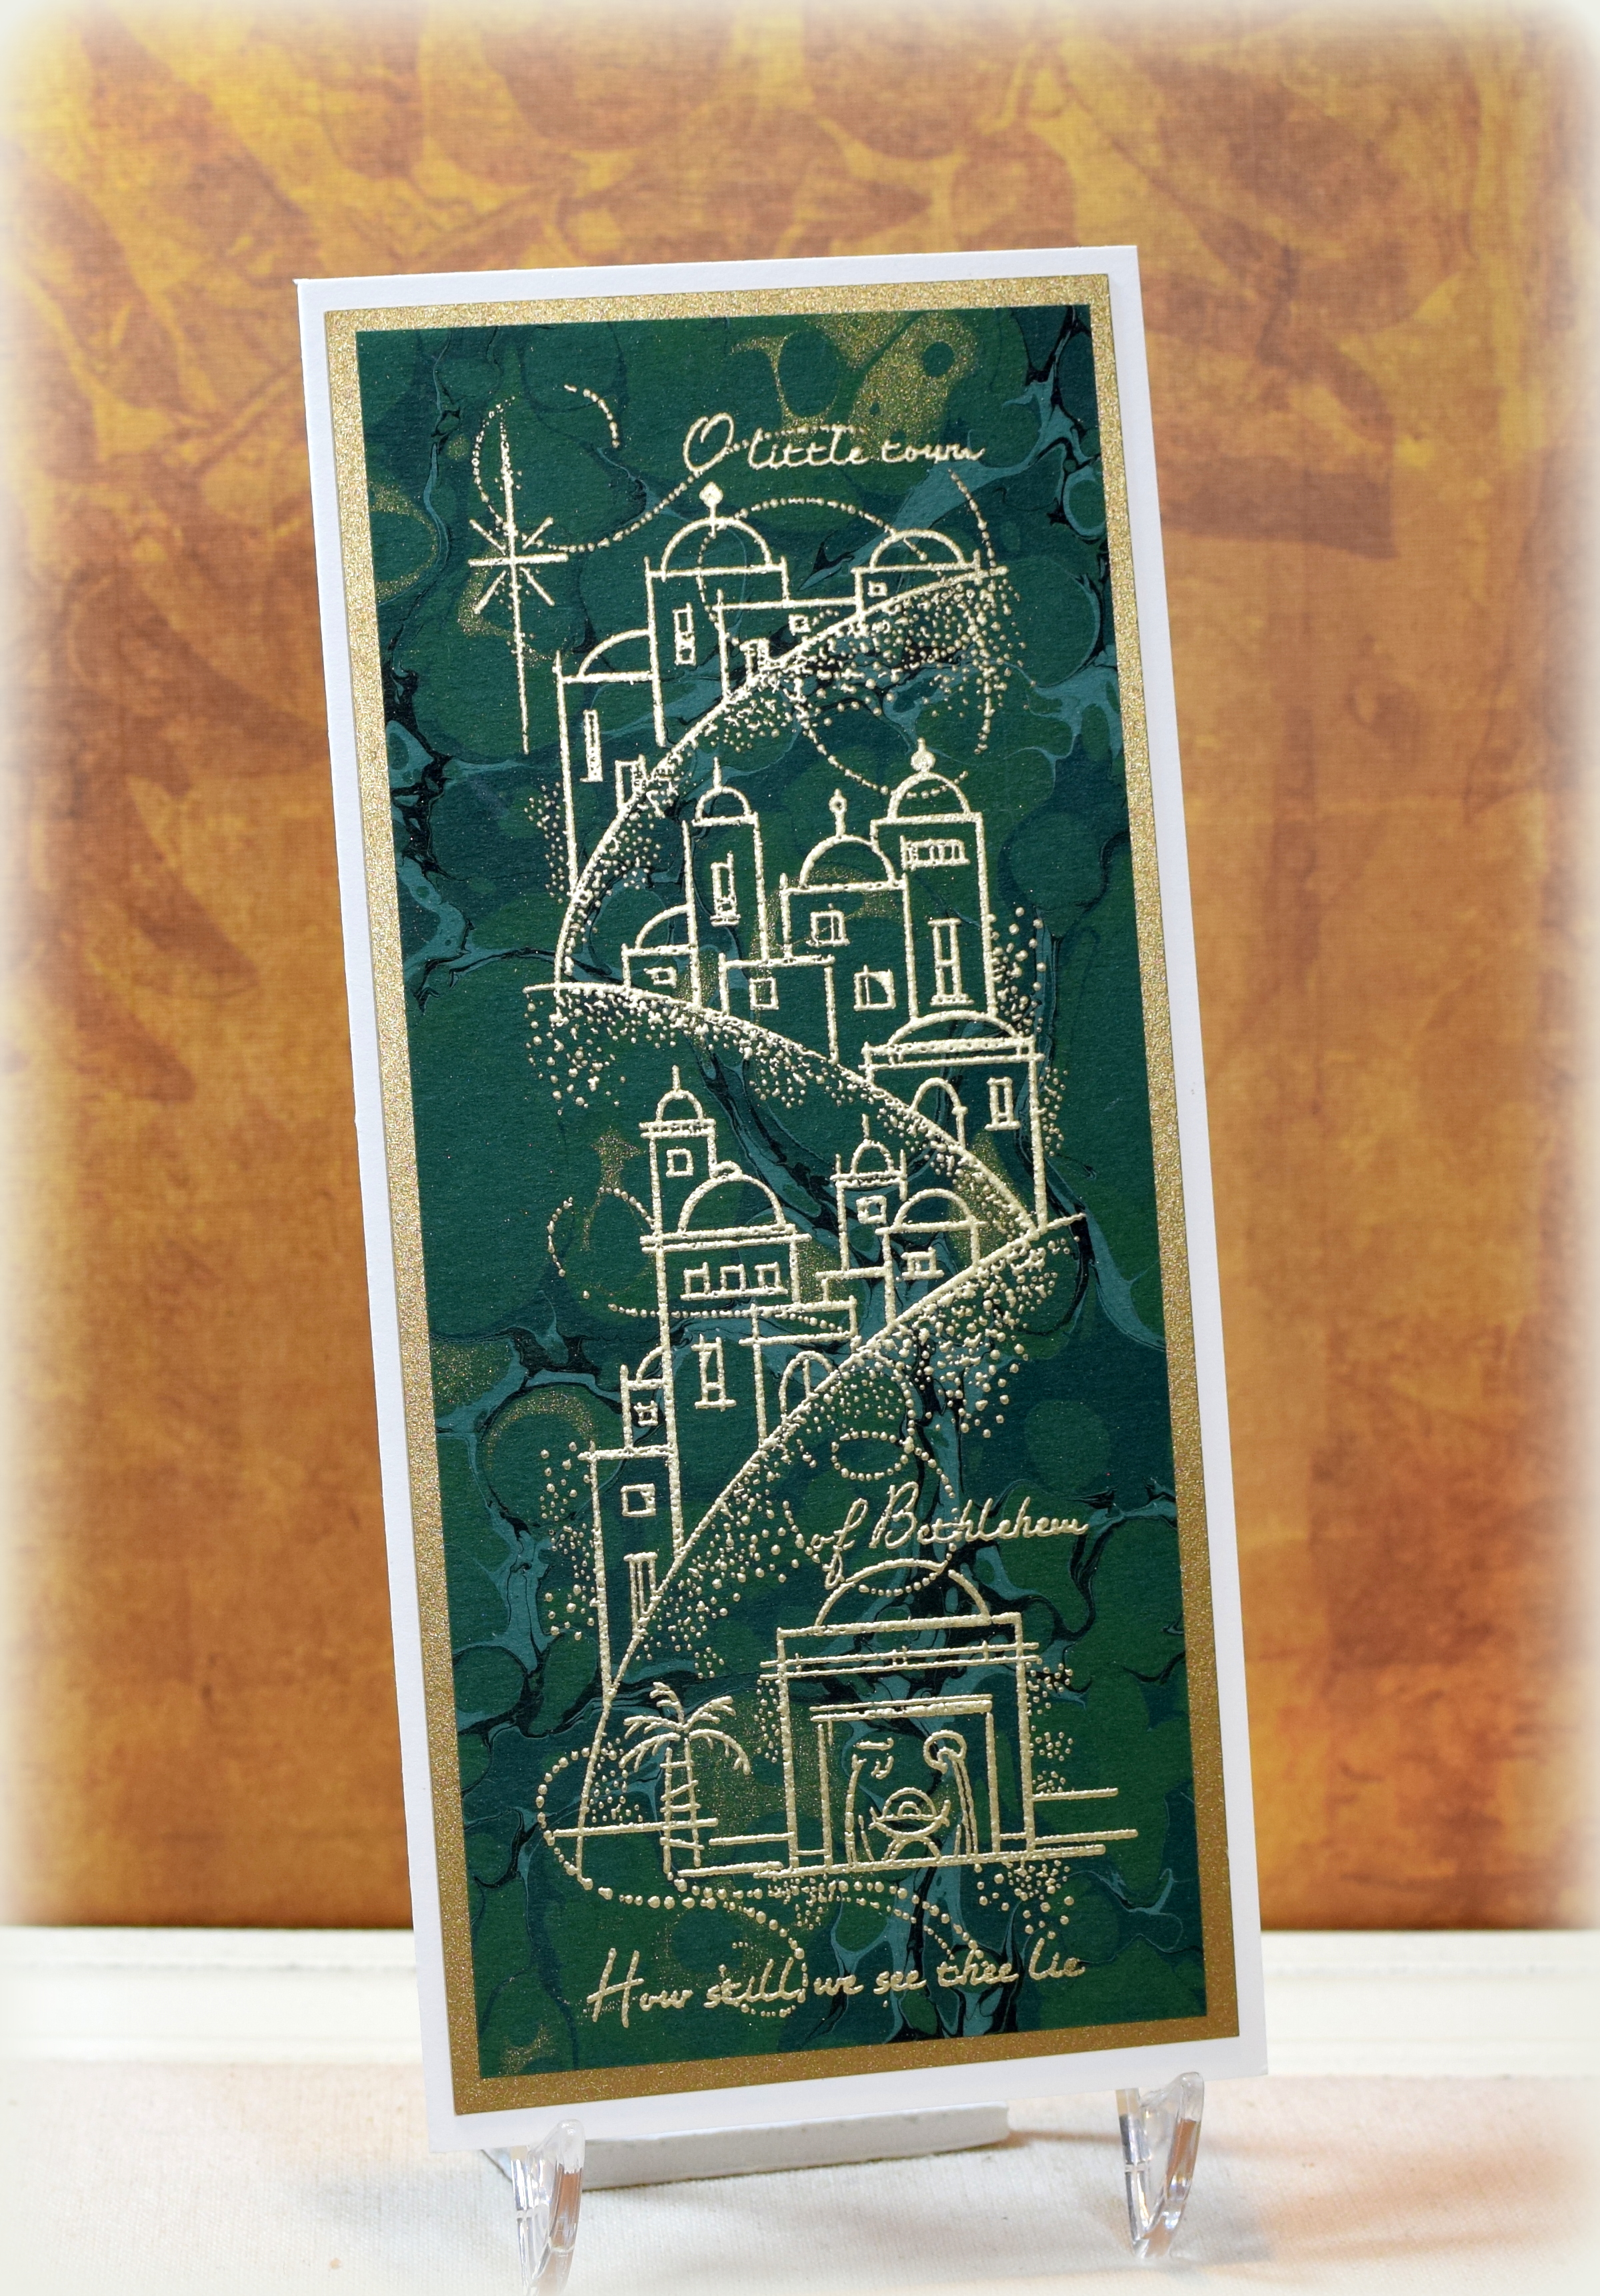
Back in July, I attended the Creating Keepsakes Scrapbook Convention in Lancaster, Pa, and I took a super fun class taught by Jennifer (from Stamplistic) where we played with Guilders Paste Wax. I love the metallic look achieved with this product and decided to use it to create the background for this Christmas card design.
The focal stamp is called “Country Nativity” by Uptown Rubber Stamps (no longer available?). The image was stamped with Memento Tuxedo Black ink, was colored with Copic markers (E00, E18, E40, E41, E42, E43, E44, E47, G29, Y23, B95, and B97), and was then embossed with the “Subtle” embossing folder from Stampin’ Up (retired). The inside stamp is called “Holiday wish to bring cheer greeting” by DRS Designs.
Nutmeg “History” Medallions Paper from the Indie Chic Collection by My Minds Eye (#IC0204) was used along with Recollections white and black.
The image used on this card is one I had used on a card I made (more than!) a few years back. At that time, I stamped a pile of panels with the intention of making several of that card design. I guess life got in the way, and the pile of uncolored images ended up in a “to be finished later” box. I ended up coloring them (now) the same way I had on that card, but I changed up the rest of the design using the background panels I created with my newly discovered wax. Good to finally finish those panels – lol!
I made a few of these explosion boxes with pockets on the inside for gifting cash or gift cards. I actually had 4 gift cards, but if I needed fewer pockets, the other flaps could just be decorated.
I used the CREAlies “Create A Box Large – Explosion (or not) box Large” die set (#CCABL27) to create the box. The set includes one die to create the top/bottom, a square to create the side panels and several more dies for the decorative panels. There is also a die to create “connectors” if you want the box to stay together and not “explode” when opened.
In addition to this large box (3 3/4″ square), there is also a medium box and a small box (sold separately).
The 3D Christmas Tree in the center was created with the CREAlies “Varia 3D Christmas Tree” die set (#CLVAR09).
I was inspired to create this box with the tree in the center after watching Karen’s videos (HERE and HERE). She shows a partial exploding box in her video which is another way to use this die set.
Just a note – The top and bottom of the box are created with the same die. Usually, the top of a box is slightly larger than the bottom half. As a result, the lid is very tight and a bit tricky to get on, especially if the sides want to keep falling! I ended up using my trimmer (instead of the included die) to create the panels for the sides, and I made these panels 1/16 inch smaller than the die would have made them. This helped a bit. I still used one of the additional (stitched) dies to create the decorative panels. Also, I created my own pockets as there is no die for that. (Karen cut one of the squares in half on the diagonal to create hers.)
The card stock for the base of my box is “French Roast” by Core’dinations. The patterned card stock for the outside is by American Crafts #368494 (no name given), and the paper used for the inside panels/pockets is “Christmas Joy” by Reminisce. The Christmas tree was made with “Merry, Merry” which is also by Reminisce. All of this paper has been in my stash for years, and it felt good to finally use it!
Handmade cards are a joy to make and a pleasure to give, but sometimes it’s hard to find the time with everything else that needs to be done to prepare for the holidays. But cards don’t need to be complicated. Here are a few “simple” cards I made that came together pretty quickly…
Someday, I’d like to sit down and color this image, but for now, white embossing powder on blue card stock makes a simple but fun card for golf enthusiasts! The stamp is called “Hole in One” by Gary Patterson/Stamps Happen.
White Warm Wishes
Dry embossing and a stacked die cut greeting were used to make this white on white card design. The embossing folder is “Swirl Baubles” by Crafts-Too, and the greeting was cut with the “Festive Mini Expressions – Warmest Wishes die” by Sue Wilson/Creative Expressions.
Joy
This final sample was made with one die cut and the same papers from the first card above. The die is “Joy Nativity Die” from Cottage Cutz.
Heat embossing on patterned paper (or plain), dry embossing and die cutting – simple techniques but so many possibilities!!
Thanks for checking out my “simple” card projects!
This content uses referral links as described in the disclosure policy on my sidebar.