Die Cut Golfing Santa

Die Cut Golfing Santa

Die Cut Golfing Santa wwDSCN7388.jpg

(Inside text:  Wishing you every happiness this Holiday Season and throughout the coming year!)

I’m still trying to get caught up with some of my holiday project posts.

This holiday golf scene was created using cut files from the “Father’s Day Mega Pack” SVG Kit from  svgcuts and the “Santa – design#1513” cut file from the Silhouette store.  I cut all the pieces with my Silhouette and paper pieced the scene together.  I used the Darice 5×7 Dots embossing folder for the background to create a golfball-like pattern.  The greeting is from the Gina K Designs “Sentimental Holidays” stamp set (retrired?) and was stamped with Gina K Christmas Pine ink.  The inside text was computer generated. (The card is 5×7.)

The card stock I used was Gina K Christmas Pine and Sandy Beach, Bazzill (textured) Avalance and Blackbird, red from the Recollections Jewel Card Stock paper pack, and scraps of gray from my stash (from Recollections single sheets on clearance; no name on label).  The putting green and vertical banner were cut from digital paper from a pack (HERE) containing “Green Textured Digital Paper” by thepaperpegasus shop on etsy.

I have been searching for a mid-weight card stock to use for my card bases.  The 65lb card stock is too flimsy for a card this size and with this much paper piecing and layers.  The 110 or 120 lb card stock makes a nice card but is so heavy and almost always makes it necessary to add extra postage when the cards are 5×7 – even when there are minimal layers.  For this card, I tried the Neenah 80 lb Cover Stock in solar white.  I found it at staples in the “Neenah 80lb Astrobrights Texture Premium Cardstock” pack, but a ream of just the white can be found on Staples.com.  It was a nice weight and was sturdy enough for this card, but it has a rough surface with a faint stripe pattern on it (which is hard to see in photo above).

Neenah Solar White Cover Stock

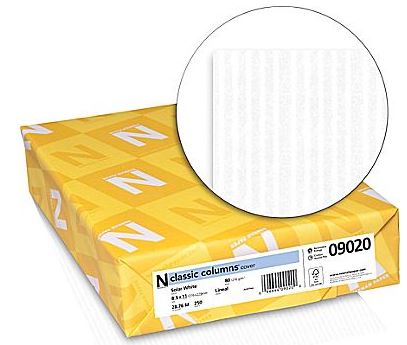
I did like it for a change, but I will continue to look for an affordable 80lb cover stock with a smoother surface.

Thanks for checking out my card project!

This content uses referral links as described in the disclosure policy on my sidebar.

Sandy Claws

Sandy Claws

Sandy CLaws zDSCN7072.jpg

(Inside text:  A crab in the sand trap at Christmastime is called “Sandy Claws” – Holiday Greetings and all good wishes for a Happy New Year!)

I created this golf scene from an image I found online at pixabay.com which I “traced” and cut with my Silhouette.  The crab and the Santa hat are from the Stampin’ Up “Crab & Company” stamp set which I stamped on pieces I also “traced” and cut with my Silhouette.  The riddle on the front and the sentiment on the inside were computer generated.

The crab and hat were stamped with Memento Tuxedo Black ink and colored with Copic marker R59.

The card stock I used was Gina K Sandy Beach, the red and green from the Recollections Jewel paper pack, Recollections black, white, and ivory, and a scrap of lighter green I had in my stash. The plaid background mat was from the Recollections “Christmas – Cozy Lodge” paper pack and was adhered to an ivory card base.

Thanks for checking out my card project!

Happy Ho-Ho-Holidays

Happy Ho-Ho-Holidays

Happy Ho-Ho-Holidays wwwDSCN7042.jpg

(Inside text:  May every joy be your this holiday season!)

The stamps for this card are from the Gina K Designs “Funky Christmas” set (retired?) and the Stampin’ Up “Ho Ho Holidays” set.  The inside text was computer generated.

The “feet” image was stamped with Memento Tuxedo Black ink and was colored with Copic Markers (R59 & C7, G29, and Y17).  In order to create the darker sections on the chimney, I added the C7 to the R59. Adding gray is an easy way to create darker shades of colors you already own without needing to purchase additional markers.  The greeting was stamped with Gina K Christmas Pine ink.

I used red and green card stock from the Recollections Jewel Card Stock paper pack and printed paper from the Recollections Christmas – City Sidewalks Card Stock paper pack.  White card stock was used for the card base behind the red panel.

The snow-covered roof parts were cut files from the “Santa on Roof – design #52189” set by Michelle Renee which was purchased in the Silhouette store and cut with my Silhouette.  I used Gina K Christmas Pine and Recollections White Gold Shimmer card stock to create the roof.

This card was one of three designs in a boxed set:

Humorous Card Insert

Thanks for checking out my card project!

Does This Make My Butt Look Big?

Does This Make My Butt Look Big?

Does This Make My Butt Look Big wwDSCN7047.jpg

(Inside Text:  Never mind, don’t answer that!  Merry Christmas!)

The stamps on this card are all from the Beary Christmas stamp set by Sweet ‘n Sassy Stamps.

Beary Christmas Stamp Set

The images were stamped with Memento Tuxedo Black ink and colored with Copic Markers (R59 and G29).

The bear and greeting piece were cut out using cut files I created for my Silhouette and were adhered to my card with pop dots.  I used my MISTI to line up the stamping on the die cuts.  (HERE is a tutorial I previously posted to show how I stamp on die cuts.)

I used the Darice Snowflake Swirls embossing folder on white card stock along with Gina K Cranberry Tart card stock and a white card base.

This card was one of three designs in a boxed set:

Humorous Card Insert

Thanks for checking out my card project!

This content uses referral links as described in the disclosure policy on my sidebar.

Missing Elf

Missing Elf

Missing Elf zDSCN7040

(Inside Text:  Enjoy the time you spend with family and friends this Christmas and in the coming year!)

This card features the amusing stamp called Santa Claus Missing Elf (Item K-28903) from RubberHedgehog Rubber Stamps.

missing elf stamp

I created two custom made stamps from RubberStamps.net for the greeting.  The inside text was computer generated.

The image was stamped with Memento Tuxedo Black Ink and colored with Copic Markers (sign: C1, E31; clothes: G29, R59, C0; elf: G29, YG63, E50).

I wanted Santa’s bottom to stick off the card a bit so I started by masking his bottom and stamping the top portion of the image on plain white card stock.  Then I stamped the image again on heavy weight card stock and cut out his bottom which I adhered with foam tape.  I stamped the image a third time, cut out the elf, and adhered him to Santa’s bottom.  Because I was making multiple copies of this card for boxed sets, I ended up creating cut files for my Silhouette to make the cutting easier, and I used my MISTI to line up the stamping with the pieces.  HERE is a tutorial I previously posted to show how I stamp on die cuts.  (I had originally planned to attach Santa’s bottom to the card with an Action Wobble spring which is why I masked the bottom half of the stamp on the white panel; it looked weird to have the whole image there as the bottom half moved.  But I ended up using the foam tape instead because the spring made his bottom stick out too much, and I was trying to make it easier/less expensive to mail.  If I knew I was going to adhere the bottom with the foam tape from the beginning, I probably would not have needed to do the masking!)

The stamped panel was mounted on red card stock from the Recollections Jewel Card Stock paper pack and then on paper from the Recollections Christmas – Holiday Basics Card Stock paper pack.  White card stock was used for the card base.

This card was one of three designs in a boxed set:

Humorous Card Insert

Thanks for checking out my card project!