Don’t Lose Hope Card – “Make It Better”

Don’t Lose Hope Card – “Make It Better”

Don't Lose Hope Original and New 3

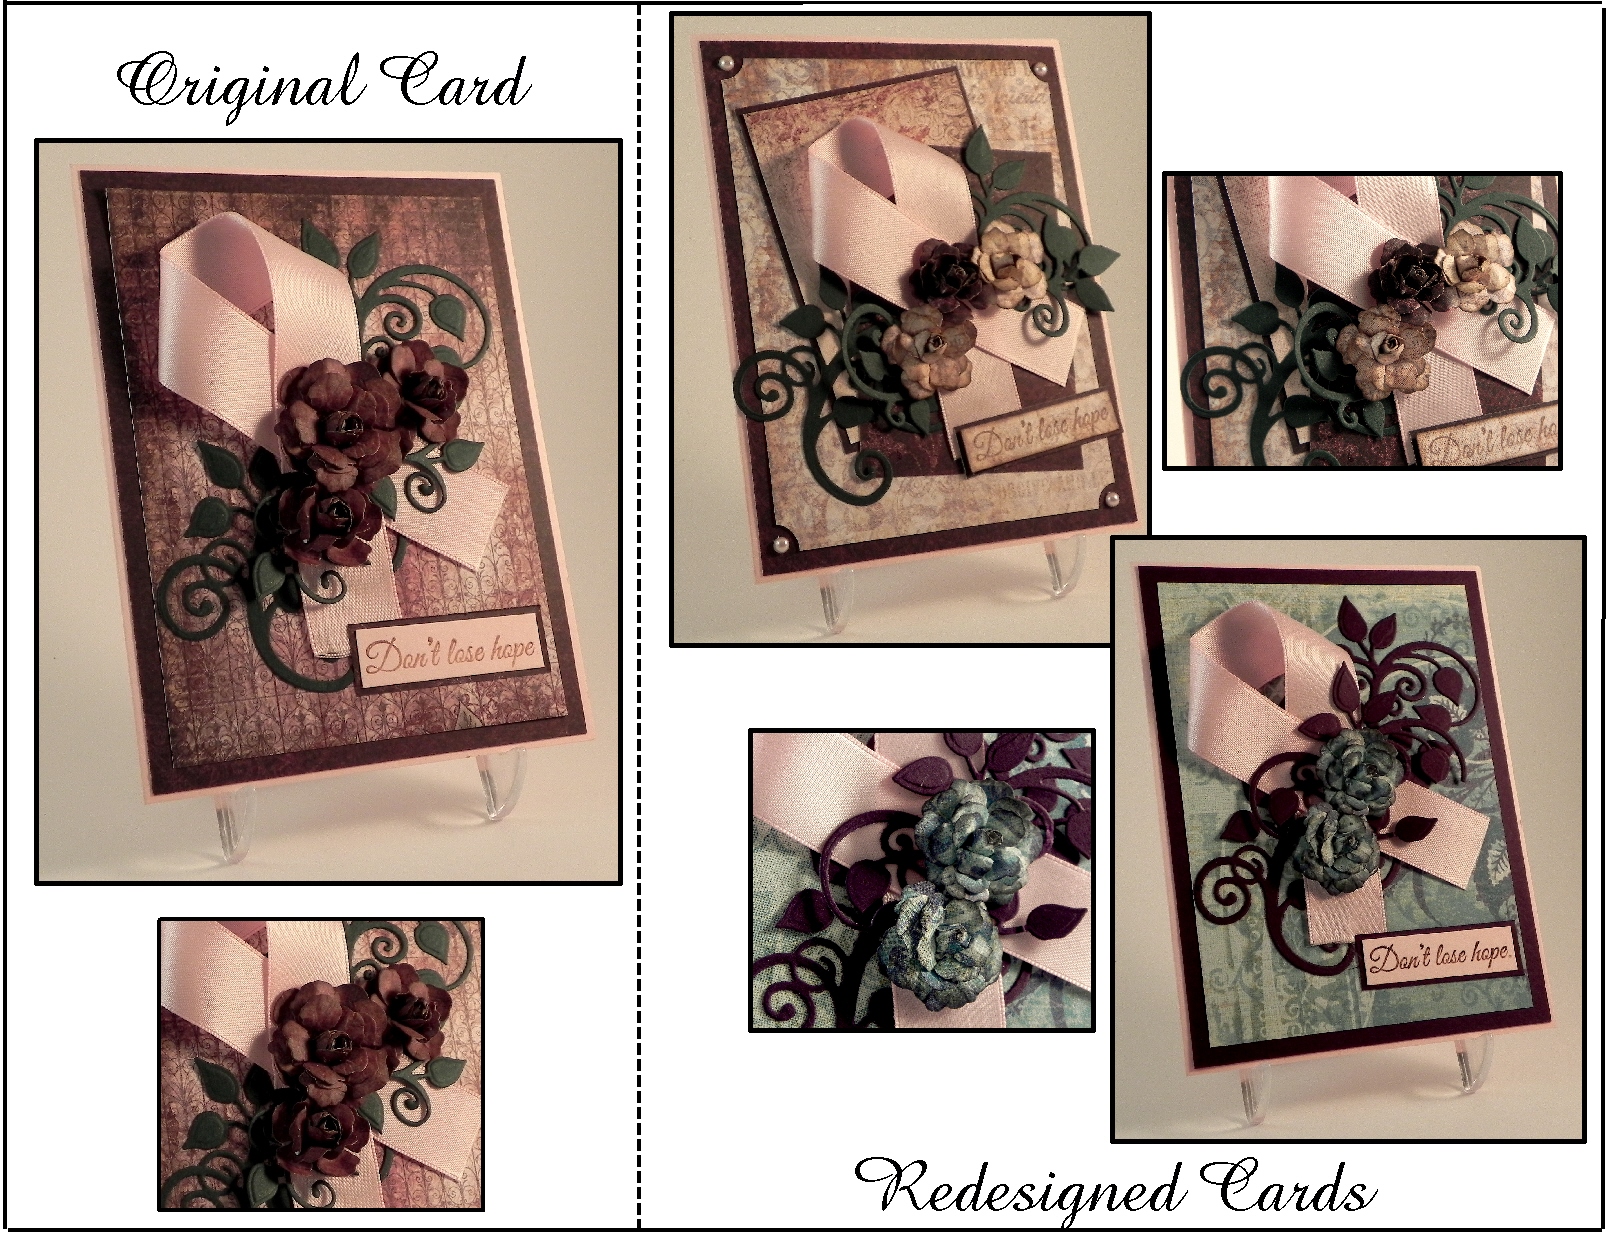
I am so excited to be sharing my first card project as a member of the Perfectly Rustics Design team! This fortnight, the challenge is called “Make It Better” (challenge no. 43) where we are to improve on a project that we have done in the past while making sure to keep some elements of the original project the same.  (See challenge post HERE.)  The card I chose to re-do is a card I did last October called “Don’t Lose Hope” which was a card of encouragement for someone battling breast cancer.  I like the layout of the original, but I was going for a vintage look, and I feel it ended up a bit dark.  Here is the original card:

uu DSCN7754

(click HERE to see original post)

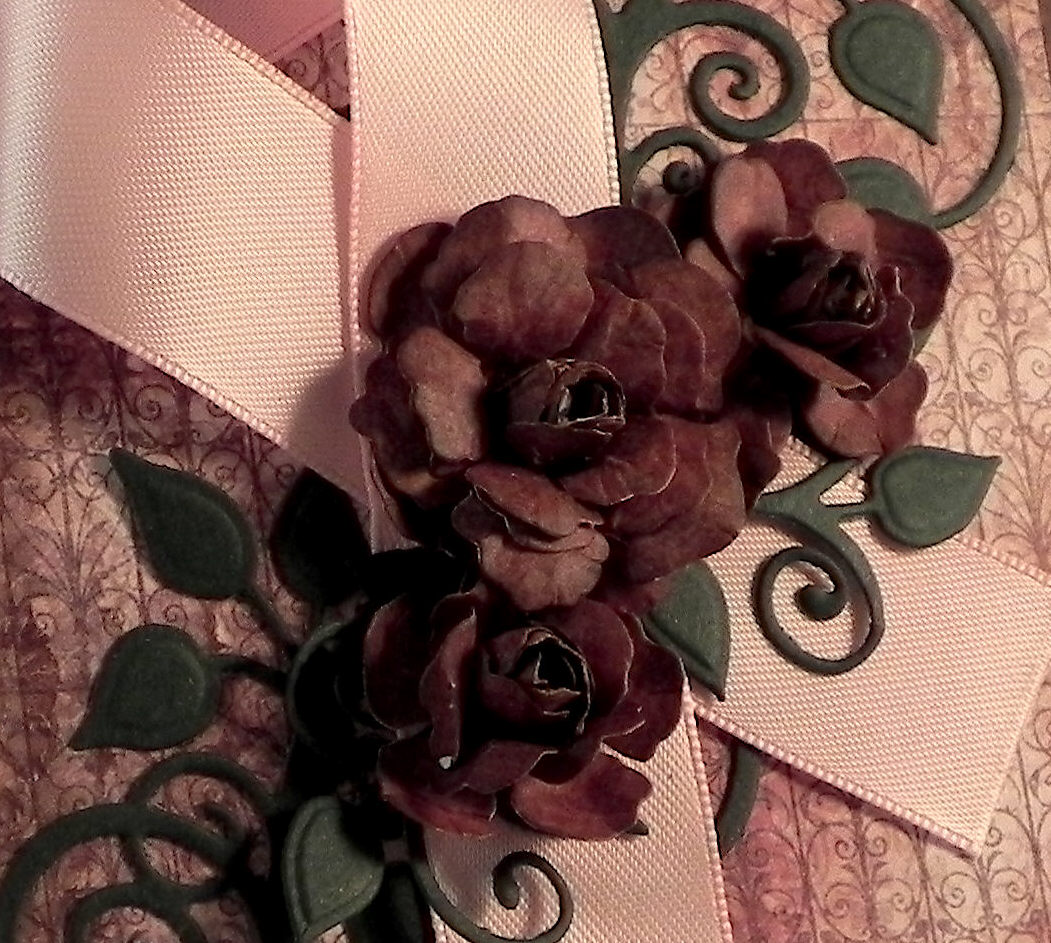
In addition to the background being on the dark side, I felt the flowers were much too dark.  I thought the paper I used was burgundy, but it really seemed dark brown once it was on the card.

uu DSCN7754 cropped

For my first attempt at a re-do, I decided to try it in lighter shades while still keeping the layout and vintage style similar.  Here is the card I came up with:

Don't Lose Hope Redo 1 v20d DSCN7756


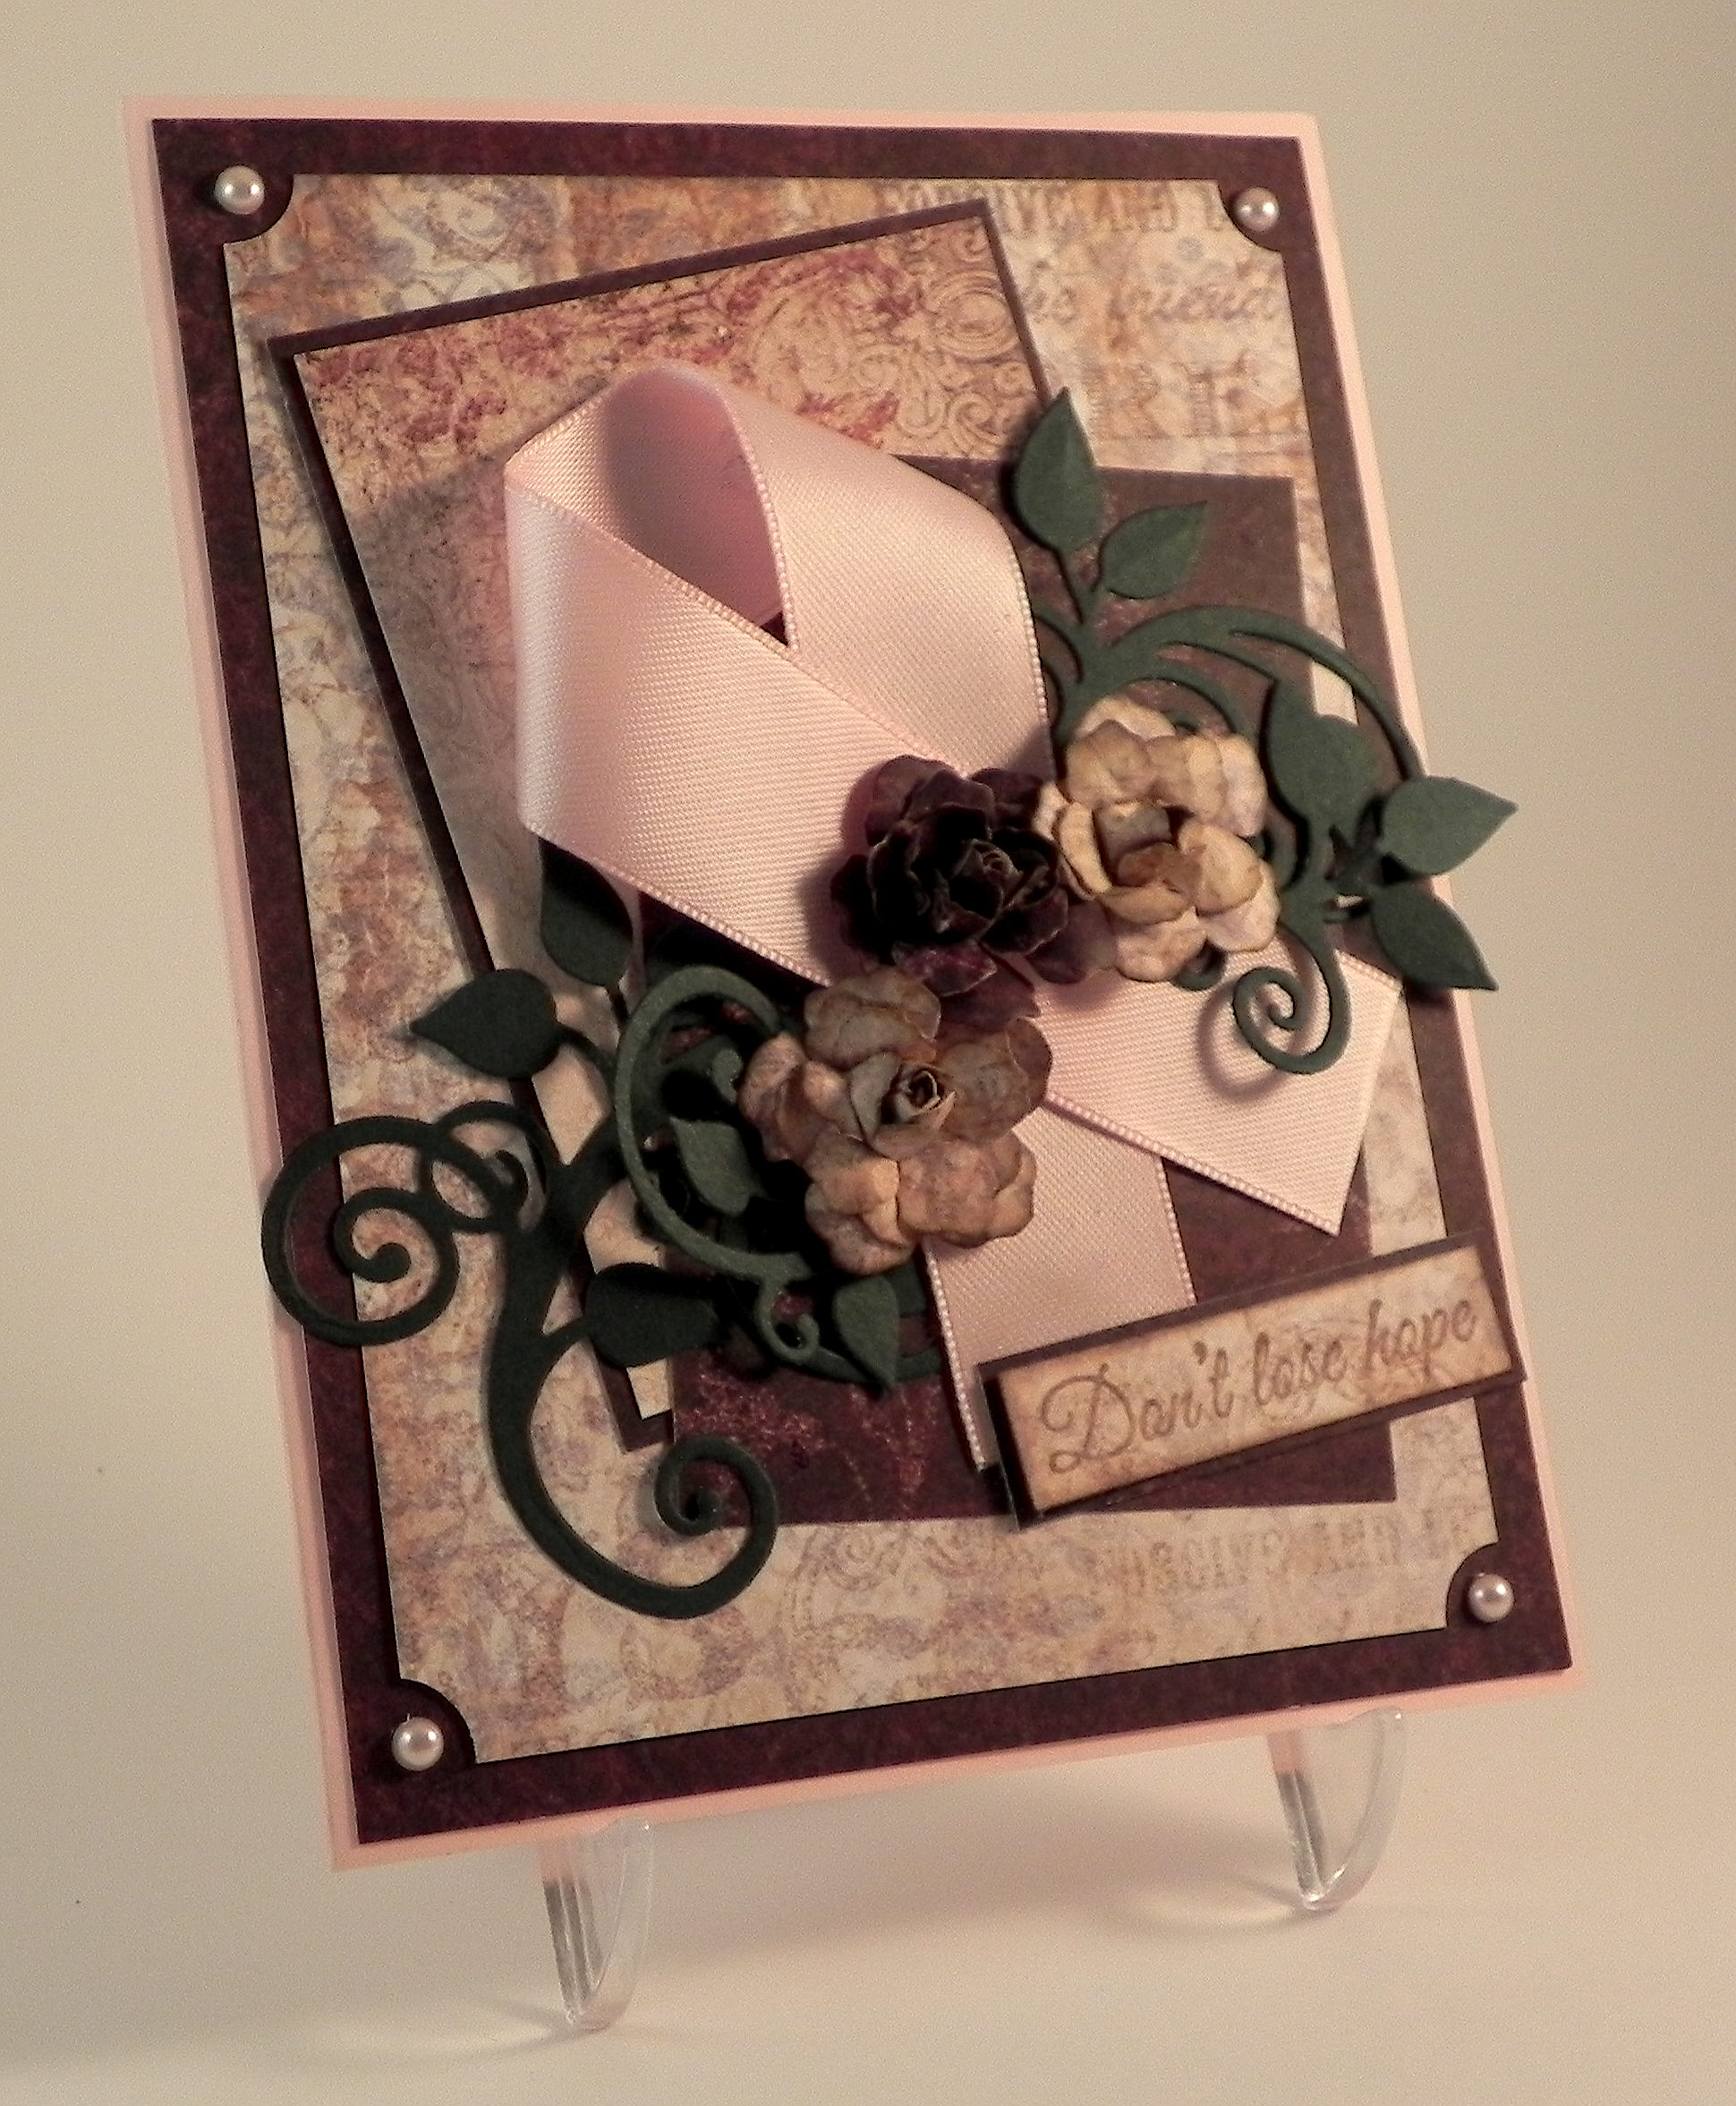
I changed the background paper, used a piece of the original, darker paper as an accent, added a smaller, light panel for added interest, and spruced up the corners with a ticket punch and pink pearls. I also made two of the three flowers lighter to match the new background.

w DSCN7726

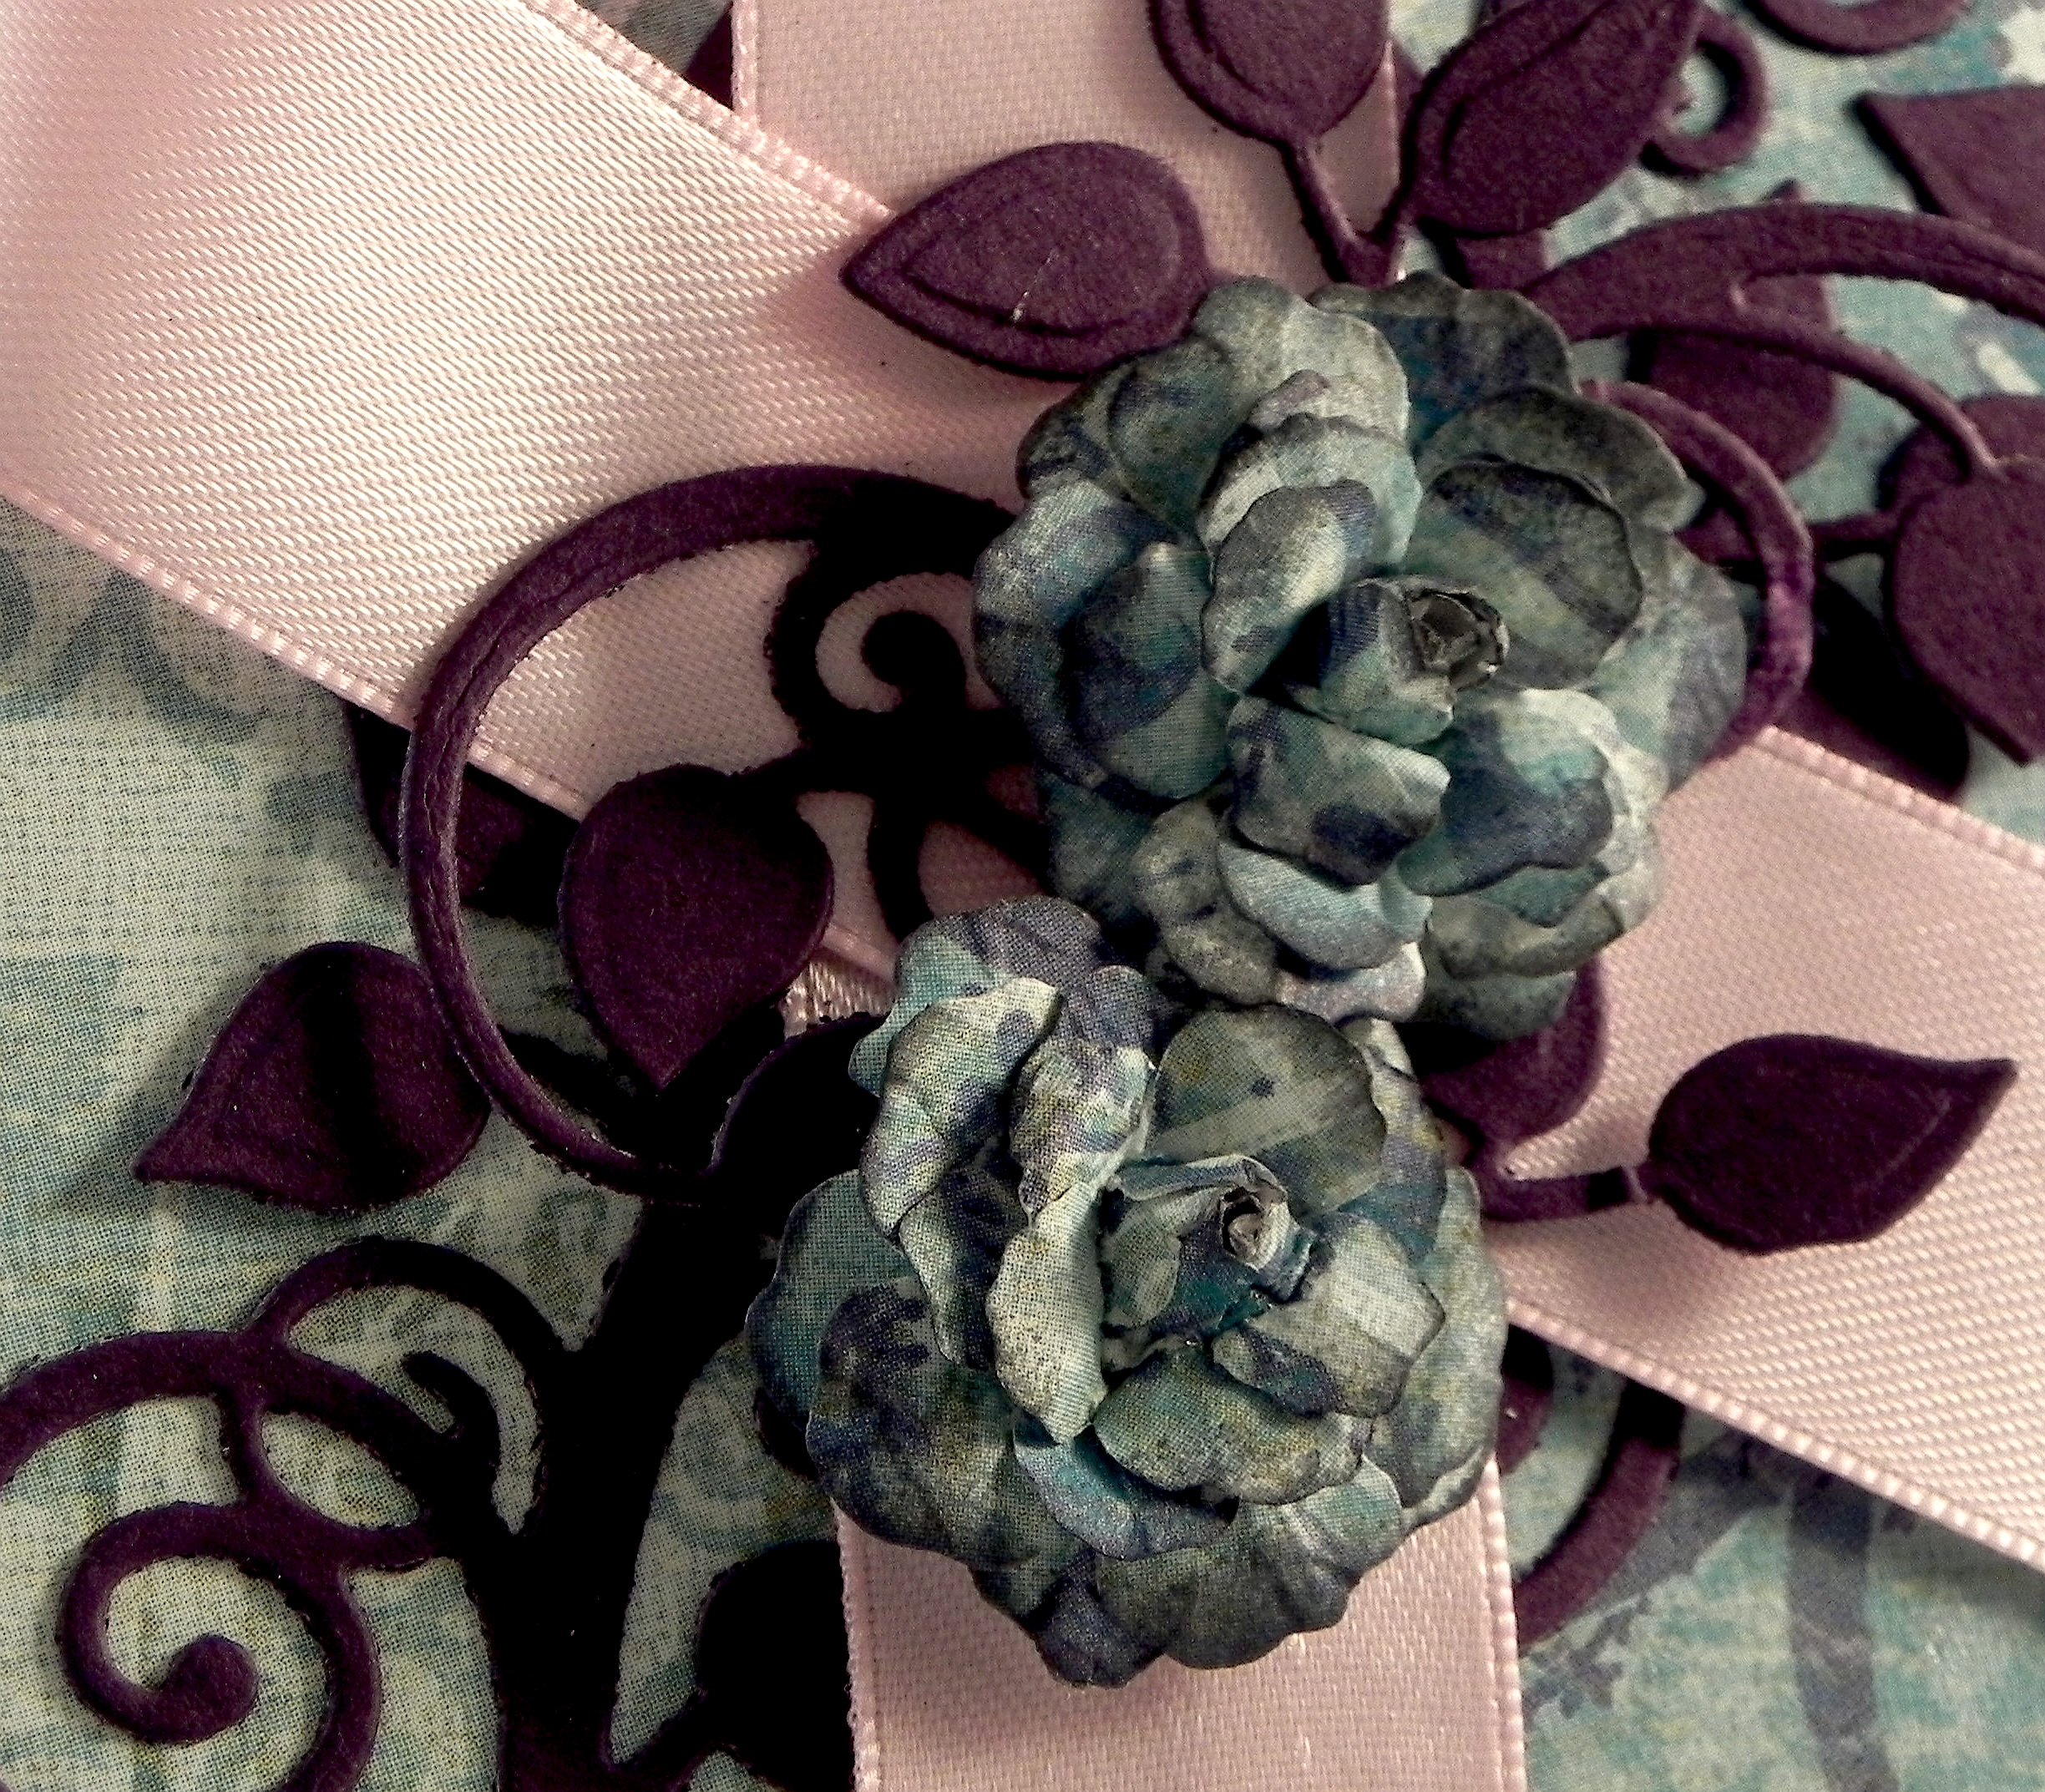
Personally, I like these new, lighter shades better, but I know brown tones aren’t for everyone!  So, just for fun, I thought I’d try a completely different color scheme and changed the background and flowers to a bright greenish-blue.  The leafy flourish now matches the eggplant mat.

Don't Lose Hope Redo 2 w20zx DSCN7758

This version has only two flowers.

ww DSCN7727

The two re-done cards are definitely not as dark, and I am happy with the results.  I probably like the first attempt with the warm tones better, but that should not surprise anyone who knows me! (I do like my browns!!!)  It was really neat to see how changing a few aspects of the card really changed the whole look of it.

Now it’s your turn!  Choose a project you did but are not crazy about.  While keeping some of the elements the same, change some of them to “Make it Better!”  (You only need to make one new version.)  Link your new version for the challenge, but be sure to include the “before” photo somewhere in your blog post along with your new version.  I can’t wait to see what you create!  (This challenge will close at 11:59 pm Saturday 21st March 2015 (AEST) Australian Eastern Standard time.  Here is a Time Zone Converter to figure out when they end wherever you happen to live!)

Thanks for checking out my card project!

[The greeting stamp for these cards came from the Gina K Designs “Don’t Lose Hope” duo and was stamped with Tim Holtz walnut stain distress ink. (Clear embossing powder was used on the original and greenish-blue cards.)  The flowers were handmade using dies from the Heartfelt Creations (Spellbinders) Vintage Floret set. The leaves were made using dies from the Heartfelt Creations (Spellbinders) Cut Mat Create 2A Die set.  Cardstock used was a pink from a Recollections paper pack, Recollections Evergreen, and Gina K Edible Eggplant. The printed card stock came from two Heartfelt Creations Paper pads: Floral Key Collection and Antiquity Collection.  The greenish-blue paper is K & Company Addison Blue Garden Swirls.  The ticket corners were made with a Tonic Ticket Punch.]

This content uses referral links as described in the disclosure policy on my sidebar.

Quilled Iris

Quilled Iris

w Quilled Iris DSCN8105

It had been a while since I had done any quilling, so I thought I’d make a quilled card to enter in this week’s Mod Squad Challenge called “Spring Forward” where we are encouraged to use flowers, birds, butterflies, hummingbirds, etc. and bright, beautiful colors to make a Spring themed card.  (Sadly, this site is no longer active.)

I sponged Gina K Wild Lilac ink on white card stock and glued my quilled iris and decorative swirls on this panel.  Then, I created a recessed frame with thick fun foam and Spellbinders oval dies.

zDSCN8176

The printed paper is from a digital set I bought from a store on Etsy called The Pixel Posy. The set is called “Vintage William Morris digital paper designs//Art Nouveau background paper pack//Blue and purple flower digital paper.”   HERE is the link.

This card used a number of quilled shapes:  teardrops, half circles, marquises and wheatears (leaves).  I used instructions by “Quilled Creations” to create the iris.


I had made a few other quilled cards in the past that I had posted in my StampTV Gallery.  (Sadly, this site is no longer active.)  I’m including them here as well.

Quilled Sympathy Card DSCN5557

This sympathy card was the first one I did back in May 2013.  I used a basic marquise shape for the flowers and leaves.  The sentiment was from the Gina K Designs “All Occasion Tags” Stamp set.  The tag was cut with a die from the Spellbinders Grommet Tag set, and the embossing folder is Darice Corner Scroll.

I used the same embossing folder and marquise shapes to create two more – a wedding card and a confirmation card.

Quilled Wedding Card DSCN5602.jpg

DSCN5609

The sentiment on the wedding card is from the Gina K Designs “Always and Forever” duo stamp set.  I purchased the stamp for the confirmation card on Ebay, and it is unmarked so I have no idea what company made it.

The next card I made was for a bridal shower.  I used teardrops to make the umbrella.

Quilled Bridal Shower Card DSCN5666.jpg

The bride and groom stamp is called “Happy Couple” by Stampendous!  The greeting was done on the computer.  I used the Darice Stripe embossing folder on this card.


Quilled Creations makes a great tool called “Circle Template Board” that makes it easy to create consistent and perfectly proportioned quilled shapes. I also use their slotted quilling tool to roll the circles; the slot makes it easy to get the paper rolls started.

circle template board  slotted tool

I forgot how much I LOVE quilled designs; I will definitely need to do this more often!!

Thanks for checking out my card projects!

This content uses referral links as described in the disclosure policy on my sidebar.

Sympathy Card with Alcohol Inked Background

Sympathy Card with Alcohol Inked Background

Sympathy Card with Alcohol Ink Background zDSCN7490.jpg

This card was made for the Mod Squad Challenge – Teal and Purple.  In addition to using teal and purple on our card, we are also encouraged to use stamps designed by Melanie Muenchinger who is the sponsor for this week.   (Sadly, this site is no longer active.)

To make the background, I used glossy card stock and the following Tim Holtz Adirondack alcohol inks: sailboat blue, silver mixative, purple twilight, eggplant, stream, and meadow along with the alcohol blending solution.  It was mounted on Gina K edible eggplant card stock and then on a white card base.

The panel in the center was stamped with a sentiment from the Gina K Designs “A Beautiful Life” set in Gina K wild lilac ink.  I went over the text with a Sakura Stardust clear glitter pen to add a bit of sparkle.  The flowers in the background came from the Gina K Designs “A Year of Flowers 2” set and were “stamped off” first (with the wild lilac ink) before stamping on the panel.  They were then sponged lightly with the wild lilac ink.  The panel was double matted with Gina K wild lilac and edible eggplant card stock.

(click on photo to see the sparkle)

uDSCN7610

Both of the stamp sets used on this card were designed by Melanie Muenchinger.

Because I sponged color onto the flower and leaves with a sponge dauber, I am also entering this card in the StampTV Release Party Challenge where we are to color with a sponge.   (Sadly, this site is no longer active.)

Thanks for checking out my card project!

This content uses referral links as described in the disclosure policy on my sidebar.

Flowers in Vase Sympathy Card – Original Post

Flowers in Vase Sympathy Card – Original Post

Flowers in Vase Sympathy Card DSCN6075.jpg

I have a lot of trouble coming up with ideas for sympathy cards in general, and my mind basically shuts down when I actually need one.  I probably should make a few (when I don’t actually need them) just to have on hand.  I really struggled with this one for our neice whose father recently passed away.  But I finally finished it.

A mask was made using the Spellbinders Deckled Rectangles.  The background panel was then stamped (using the mask) with the Rubbernecker Stamps “French Script BKG” stamp and Tim Holtz Frayed Burlap Distress Ink on Gina K Pure Ivory card stock.  Then, a second mask was used to create the two squares over the script to add a bit of color.  The inks used were Memento Elderberry and Stampin’ Up Pistachio Pudding.  Using the deckled rectangle mask again, the area over the script and squares was lightly inked using Memento Elderberry.  The sentiment stamp was from the Gina K Designs “With Love and Prayers” stamp set and was stamped with the frayed burlap ink.

The flowers were made using the Heartfelt Creations “Sun Kissed Fleur” die and the “Sun Kissed Fleur PreCut Stamp” for detail.  They were stamped and sponged with Stampin’ Up Soft Suede ink on Stampin’ Up Pistachio Pudding card stock.  Buttons and jute were added to the centers.  I made several of these flowers when I made my Thinking of You Card back in October and had saved the extras to use later.  (Originally, I had stamped flowers directly onto this card base over the inked squares but decided to use these 3D flowers and the vase instead.  I may have positioned the squares differently had I thought of this earlier.)

The two layers of the vase were cut with the Spellbinders Filigree Vase dies from Gina K Edible Eggplant card stock.  The vase and the flowers were adhered to the ivory panel using pop dots.

I hand-embossed the lines around the edges of the ivory panel using a score board.  The card base was made from Gina K Edible Eggplant card stock.

Thanks for checking out my card project.

This content uses referral links as described in the disclosure policy on my sidebar.

You Are So Beautiful – Purse Card

You Are So Beautiful – Purse Card

You Are So Beautiful Purse Card

This project was made for Joyce’s “Stamp Out Cancer – Challenge #7 – No Rectangles or Squares” for StampTV.  For this challenge, we are to make a card that is not square or rectangle and to use designer paper (can be custom made).  (Sadly, this site is no longer active.)

This card was made with elements from a kit from svgcuts called Luxury Handbags SVG Kit.  CLick HERE  to check it out at svgcuts.com.

I cut the pieces out with my Silhouette electronic die cutting machine.  The 2 pieces of designer paper I used for this project came from the Recollections “Memories Documented” paper pad.  The solid card stock is gina k sandy beach.  The greeting stamp came from the Gina K Designs “Fight Like A Girl” set and was stamped with gina k charcoal brown ink on the sandy beach card stock.  The circle was cut using a Spellbinders standard circle die, and it was adhered to the center of the flower.  The greeting was the only stamp used on this project. The metal heart charm, jute and raffia were in my stash.

Choose any (small) greeting to put on the flower and select coordinating card stocks, papers, and embellishments, and this card design can be used for a variety of occasions!

Thanks for checking out my card project!

This content uses referral links as described in the disclosure policy on my sidebar.