Above Par Birthday Card

Above Par Birthday Card

Above Par Birthday Card uvDSCN7604.jpg

The Mod Squad Challenge this week is “Fast & Easy” for those times where you “just need to get a card done quickly.”   (Sadly, this site is no longer active.)

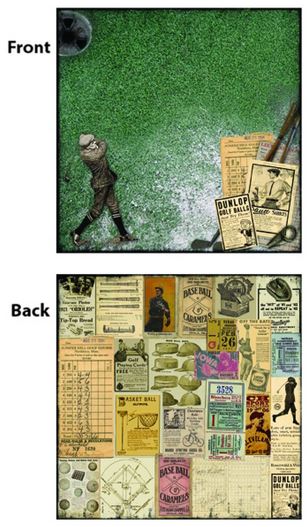
I was on vacation with my family and returned home realizing I needed a birthday card which needed to be mailed the next day in order for it to arrive on time.  (I seem to have trouble with birthdays that are on the 1st of a month; it was the end of June, and I forgot July was right around the corner!!)  I decided to take advantage of an awesome piece of scrapbook paper by 7gypsies called “Vintage Varsity:  Putt” and used the corner of the sheet as my card base.  Here is what the whole sheet looks like:

7gypsies Vintage Varsity Putt paper

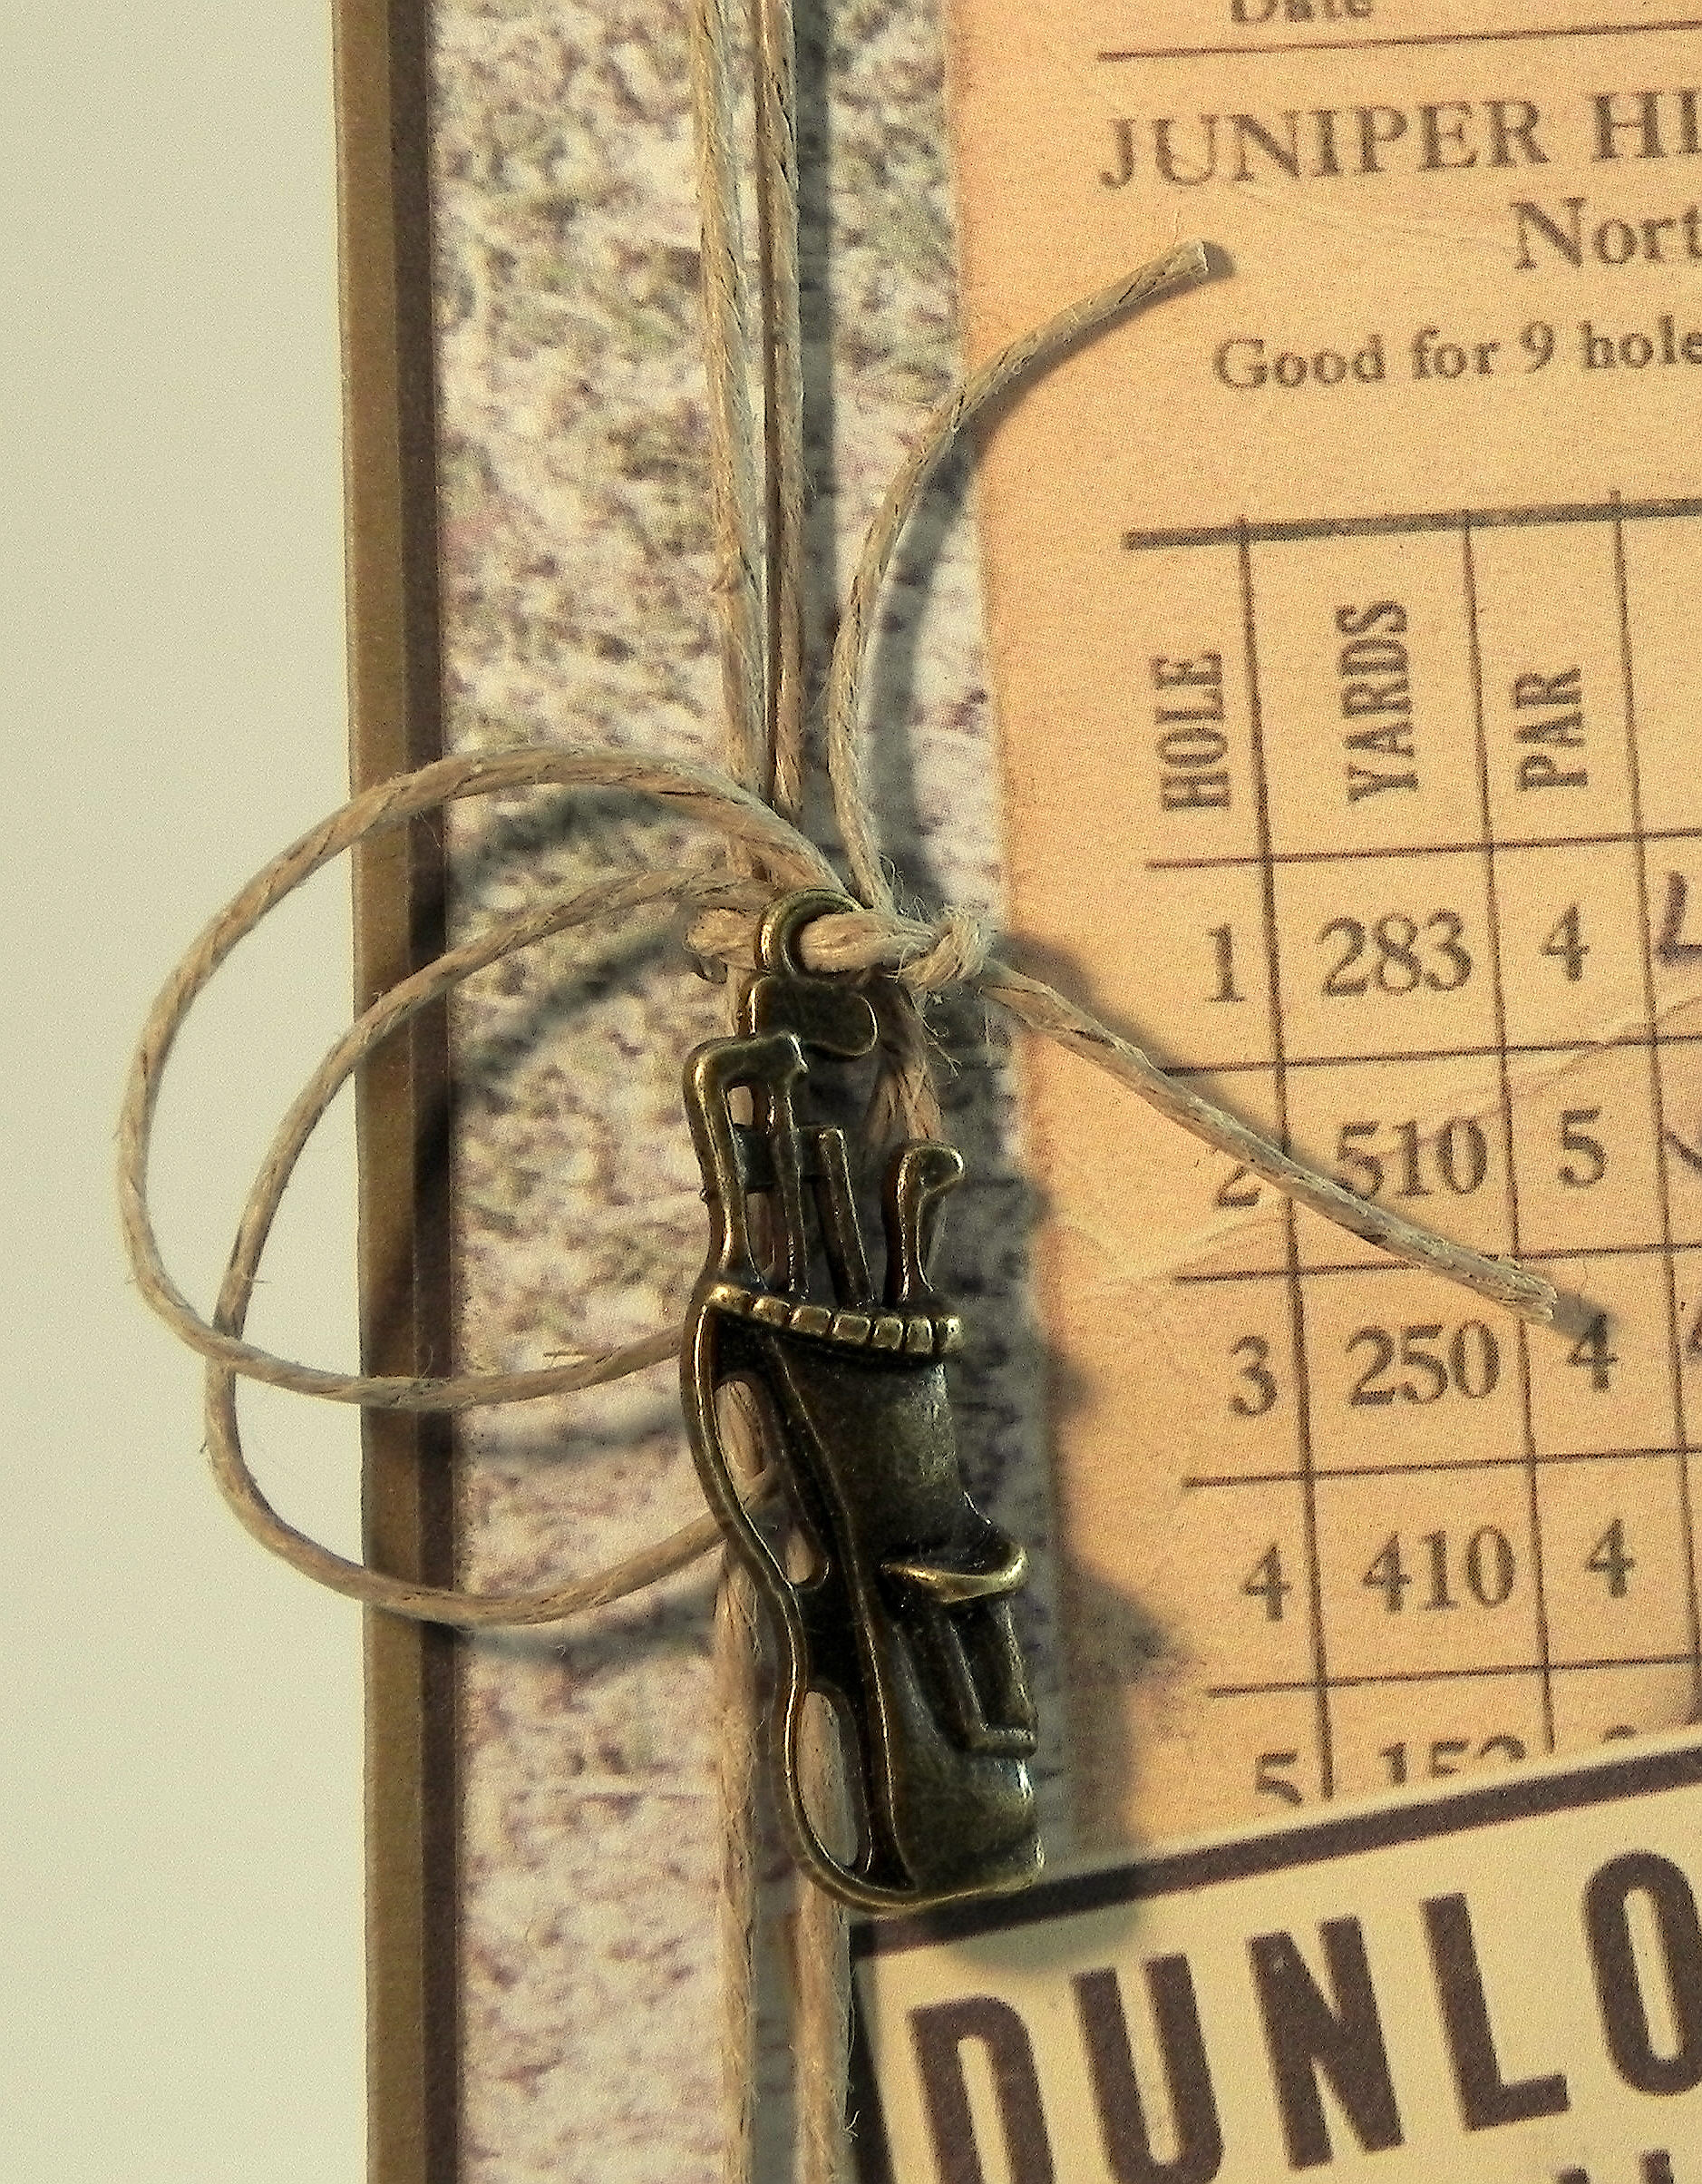
The printed panel was mounted on Gina K Charcoal Brown card stock and then on a Recollections Kraft base.

The greeting was stamped with Gina K Charcoal Brown ink on the kraft and charcoal brown as well. The stamp is called Above Par Birthday Greeting by DRS Designs and actually says, “May your Birthday be like your golf game – way Above Par!” but I wasn’t sure if the “joke” would be appreciated so I masked out the “like your golf game” part!

To finish off the card, I added some jute and a metal golf bag charm I had in my stash.  (I had ordered these HERE a while back.)

zDSCN7619

Thanks for checking out my card project!

(photo of printed paper was a google image photo and not my own)

With Love Triple Layer Card

With Love Triple Layer Card

With Love Birthday Card wwwDSCN6404.jpg

Normally, I stamp my panels when making a triple layer card, but I had this beautiful printed paper and wanted it to be the focus of my card.  The dark layers add interest without covering up the print.

This card was done with patterned papers (floral and brown) from a pack by Momenta.  (There is not a name on the package so I don’t know what it called.)  Once I cut and layered the panels, I adhered them to an ivory card base so the card was sturdier.  The stamp used  for the greeting is from the “Vertical Greetings 2” stamp set by Gina K Designs.  I heat embossed it with versamark ink and Ranger’s Liquid Platinum embossing powder.  The ribbon by Recollections – Celebrate It #215813 matches the embossing powder beautifully.  I stamped a birthday sentiment on the inside, but this card could be used for a variety of occasions. To cut my panels, I used dies from the Spellbinders “5×7 Matting Basics B” for the dark panels and “5×7 Matting Basics A” for the floral panels.  (The center panel was cut with a paper trimmer.)

This technique could be used with any printed paper for any occasion, and I will definitely use it again!

Thanks for checking out my card post!

This content uses referral links as described in the disclosure policy on my sidebar.

Best Wishes – Color Challenge

Best Wishes – Color Challenge

Best Wishes Color Challenge wwDSCN6186.jpg


Join us this fortnight over at Perfectly Rustics for Design Challenge No. 50 – Colour Combo. For this challenge, we are to use three Stampin’ Up! colors (Pear Pizzazz, Pool Party, and Smoky Slate) to create our project. Equivalent colors in different products and neutrals are allowed! (http://perfectlyrustics.com/2015/06/15/prdc-no-50-colour-combo/)

color challenge 50 chips

The stamps I used for this project came from the Gina K Designs “Fleur de Lis” and “Birthday Blessings” sets.

The butterflies were heat embossed with versamark ink and Recollections “Snow” embossing powder. The greeting and flowers were stamped with Gina K Ocean Mist ink (substitute for Stampin’ Up Pool Party), and the leaves were stamped with Tim Holtz Peeled Paint distress ink (substitute for SU Pear Pizzazz). With a sponge dauber, I applied a bit of Memento London Fog ink (substitute for the SU Smoky Slate) over the white embossed butterflies and around the edges of the white panels.

My white stamped panels were mounted on Stampin’ Up Smoky Slate card stock.

Measurements for my panels:  (2″ x 3 1/4″), (3″ x 4 1/4″), (4″ x 5 1/4″),  and the mats:  (2 1/4″ x 3 1/2″), (3 1/4″ x 4 1/2″) and the card base (4 1/4″ x 5 1/2″)

I’ve done triple stamping before, but I had never used multiple colors or the emboss-resist technique for my focal images.  I was inspired to do so on this project after viewing THIS video tutorial.

Now it’s your turn!  Create a project using these colors, and share it over at Perfectly Rustics  I can’t wait to see what you create!

Thanks for checking out my card project!

This content uses referral links as described in the disclosure policy on my sidebar.

Autumn Tree Birthday Card (and other “Positively Negative” cards)

Autumn Tree Birthday Card (and other “Positively Negative” cards)

Autumn Tree Birthday Card wDSCN8814.jpg

I was asked to be the guest hostess for this week’s Mod Squad Challenge, and my challenge, called Positively Negative, is to create a project using the negative of a die (manual or electronically cut), punch, or hand-cut shape.  (Sadly, this site is no longer active.)

This card was originally posted in my stamptv gallery   (Sadly, this site is no longer active.), but I’m posting it here to show an example of a card where I did reverse masking (using the negative of a die) to create the sponged background for my tree image.

I used the Gina K Designs “The Giving Tree” set. Card stock used was gina k ivory and dark chocolate, and ink was gina k dark chocolate and memento desert sand. I used Flower Soft (autumn and nut brown) for the leaves. As mentioned above, a mat was made with the Spellbinders Wonky Squares die (discontinued?) to create the background for the tree. Yarn, a button and a gina k wood leaf finished it off.

Two more cards using the negative to sponge the background for my stamped images are below:

Floral Get Well cDSCN7706.jpg

You can see the original post in my stamp tv gallery.   (Sadly, this site is no longer active.)

The sentiment and floral image on this card are from the “With Love & Prayers” set by GKD. Gina K Wild Lilac and Moonlit Fog inks with a square mask were used to create the background. The image and sentiment were stamped with Gina K’s Edible Eggplant ink.

and

Thank You Challenge card DSCN5976c

 My card was originally posted in my stamp tv gallery.   (Sadly, this site is no longer active.)

This is a card I CASED after watching Melanie Muenchinger’s tutorial (HERE).   The stamp sets I used are Gina K Designs “A Year of Flowers 2” and “All Occasion Tags” (retired?) for the sentiment.  I used the Spellbinders Wonky Square die for this reverse mask as well.


I also did a card a few weeks ago where I used the negative of a flower die cut to create the template for my image using the Confetti Cluster Stamping technique.

Confetti Cluster FLower Card DSCN9112

You can see my original post (HERE).


And finally, here is a sample of where I used the actual negative on my card of a heart I created and cut with my Silhouette.

With Love Anniversary Card DSCN5803

You can see the original post in my stamptv gallery.   (Sadly, this site is no longer active.)


I can’t wait to see your “Positively Negative” creations over at the Mod Squad Challenge Blog this week!

Thanks for checking out my post!

This content uses referral links as described in the disclosure policy on my sidebar.

Tissue Paper Flowers

Tissue Paper Flowers

1 tissue paper flowers with embossed background zDSCN9331.jpg

 Over at Perfectly Rustics this week, the challenge is to try a new technique. (http://perfectlyrustics.com/2015/04/20/prdc-no-46-new-technique/)

This is the second card I tried using the tissue paper technique.

For this card, I used blue tissue paper from an American Greetings super value pack and Gina K heavy base weight blue denim card stock, and I used decoupage (with a satin finish) to adhere the crumpled tissue paper to the card stock and also for a top coat to seal it.   Instead of using this panel for the background as I did previously, I wanted to try to cut it with a die to use as my focal images.  I used the Sizzix Flowers Layers #3 Original Die (which is a steel rule die), and it cut beautifully!  I then made another tissue paper panel (with tissue paper that I did not wrinkle but left smooth) and used Spellbinders Classic Square (large) dies to cut the frames, and that worked well also!  I was surprised because I thought it would be hard to get through several layers of decoupage on tissue and card stock, but it was no problem at all!  I love the texture of the flowers with the tissue paper; it almost looks and feels like leather, and the decoupage made them bright and shiny.

zzzDSCN9563

I created the centers of the flowers with my Epiphany Crafts Shape Studio Bubble Cap maker , Clear Round (14) epoxy shapes, and the same yellow card stock used for the card base.  This tool is pretty cool because you can use whatever paper you want to create custom embellishments for your projects.

The polka dotted paper behind the flowers was from the Recollections All Girl 6×6 paper pack, and the solid yellow card stock was from the DCWV Brights 12×12 card stock stack.  The white panel was Gina K heavy base pure white card stock which I embossed using the Darice Flower Frenzy Embossing Folder.  My greeting was from the Gina K Designs “Birthday Label Duo” stamp set (retired?) and was stamped with Gina K Blue Denim ink. I used a scrap of the tissue paper panel behind my greeting.  A piece of American Craft ribbon finished it off.

Because these flowers with the frames were too big to fit on an A2 sized card, this card is 5×7.

If you’d like to learn and try a new technique,  join us over at Perfectly Rustics and share your project! We’d love to see it!!

Thanks for checking out my card project!

This content uses referral links as described in the disclosure policy on my sidebar.