Mod Squad Challenge – Tag Time – (WINNER – Third Place)

Mod Squad Challenge Winner (Honorable Mention)

Mod Squad Challenge Winner (Third Place)

 (November 18, 2014)

Lots of Dots Christmas Tree Tag aDSCN5700

(The host/hostess picked the “Top 3” which will be featured on PINTEREST.)

Click HERE to see the winning announcement.  (Sadly, this site is no longer active.)

Click HERE to see the original challenge post.  (Sadly, this site is no longer active.)

Click HERE to see the original tag post.

Thanks for checking out my post!

Tea Bag Fold Christmas Tree Tag

Tea Bag Fold Christmas Tree Tag

Tea Bag Christmas Tree Tag

This tag was made for the Mod Squad Challenge – Tag Time – where we are to make a Christmas tag.  (Sadly, this site is no longer active.)

And it is also being entered in the Perfectly Rustics Challenge No. 36 – Embossing – where we are to use wet or dry embossing on our project.  (http://perfectlyrustics.com/2014/11/17/prdc-36-embossing/)

It is also being entered in the Simon Says Stamp Wednesday Challenge – We’re Seeing Stars – where we are to include a star on our project. (http://www.simonsaysstampblog.com/wednesdaychallenge/simon-says-were-seeing-stars/)

For this tag, I created a Christmas Tree using the tea bag folding technique.  Click HERE to see how it is done.  The paper used to make the tree was Pine Green Plaid by Paper Pizazz.  The trunk was made with a scrap of Gina K Christmas Pine card stock and embossed with the Tim Holtz Alterations wood grained embossing folder.  The polka dotted card stock behind the tree is the back of Basic Grey’s Grape Vine from the Plumeria collection.  The large tag itself was cut from Gina K Christmas Pine card stock using the Tim Holtz alterations Moves & Shapers Bigz Die – Tags and Bookplates and embossed with the Sizzix (Stampin’ Up) Stripes embossing folder, although it’s hard to see that it is embossed in the photo.  The greeting is stamped from a portion of the sentiment stamp from the Gina K Designs “A Gift For You” duo stamp set (retired?).  (The whole sentiment didn’t fit on my mini tag.)  The greeting was stamped with versamark and gina k Christmas pine embossing powder.  The mini tag that it is mounted on is cut from a Heartfelt Creations die from a set called Decorative Flower Pot (HCD 732).  The silver star charm was colored with Copic Marker E49 to make it match the rusty pin better.  It was pinned to the ribbon along with the mini tag.  The back is covered with a white panel which covers the ribbon and provides a place to write the “to” and “from” information for this gift tag.

Here is the tag on a card base.  For the red panel, I used Gina K Cherry Red card stock and embossed it with the Cuttlebug D’Vine Swirls embossing folder.   The card base is more of the Basic Grey paper used on the tag.

aDSCN5980

Thanks for checking out my project!

This content uses referral links as described in the disclosure policy on my sidebar.

How to Make a “Tea Bag Fold” Christmas Tree

How to Make A “Tea Bag Fold” Christmas Tree

 tutorial tea bag fold


To make this Christmas tree, you need 3 squares of paper; a 3″ x 3″ square, a 2 1/2″ x 2 1/2″ square, and a 2″ x 2″ square.  Card stock will work, but it is much easier to fold paper.  Also, you will only see one side of the paper when you are done folding each piece so it does not have to be printed on both sides.  In my paper above, the back of the plaid paper is white.


Start with any one of the squares you cut.  You are going to make 4 folds.  You can either fold it by hand or use a scoring board.

First, fold the square in half.  (For this fold, it is easier later if you fold the paper in both directions – fold it once, then open it up and fold it back the other way.)

010 DSCN5732   020 DSCN5740   025 DSCN5740


Unfold it.  Turn it a quarter of the way around and fold it in half again.  (For this fold also, it is easier later if you fold the paper in both directions – fold it once, then open it up and fold it back the other way.)

030 DSCN5730   040 DSCN5742   045 DSCN5742


Unfold it.  Now fold it from corner to corner on a diagonal.

050 DSCN5733   060 DSCN5743


Unfold it.  Do the same with the other corners.

070 DSCN5736   080 DSCN5745


When you are done, you should have these folds.

090 DSCN5747


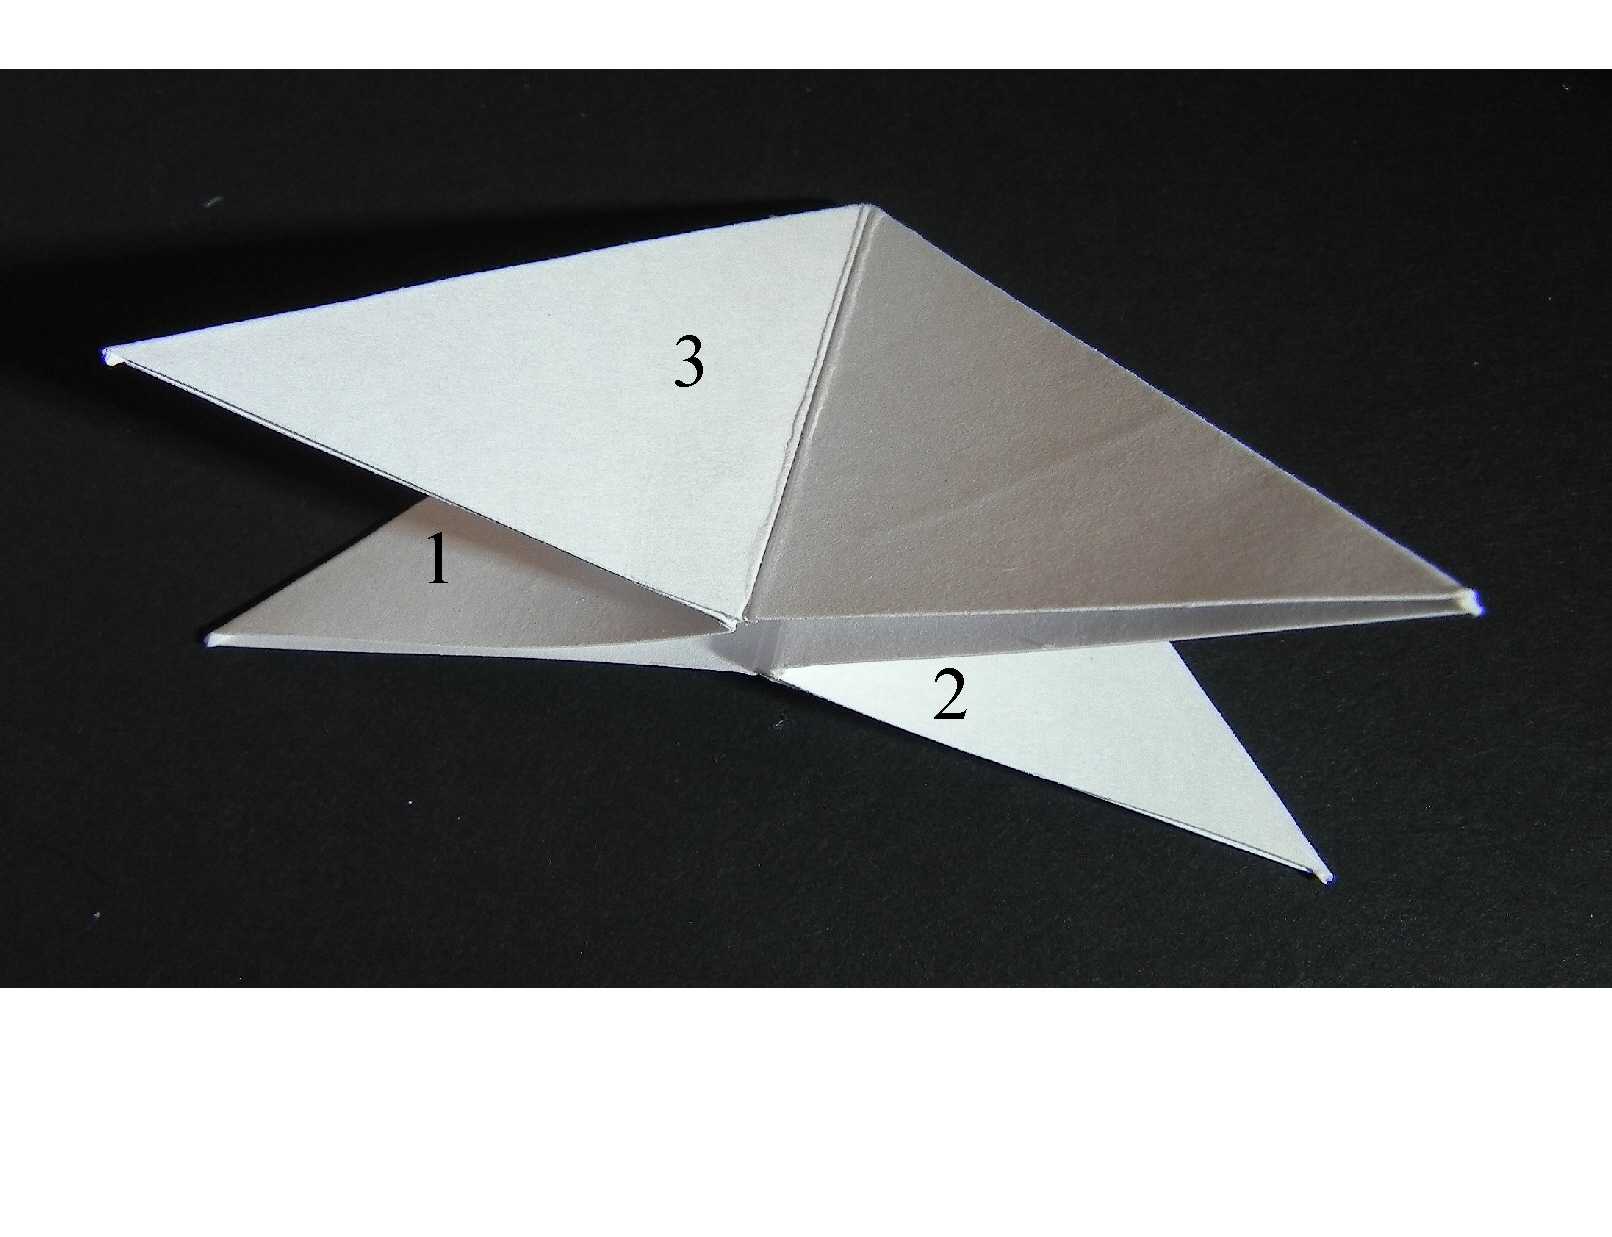
Pinch each of the corners so it looks like this.

100 DSCN5748


You want to push in the sides labeled 1 & 2 in while flattening sides 3 & 4 as shown standing up in the overhead view.  (It is easy to push in sides 1 & 2 if you folded the first fold both ways as instructed above.)

numbered sides to pinch and fla   110 DSCN5750 with numbers


This is what it should now look like, lying flat on the table.  (I’m including a photo of the printed paper I used on my sample from this point on to make it easier to see the folds.)  From this point, it is much easier to work with it lying on the table.

 120 DSCN5751 with numbers  125 DSCN5760


Take the top panel (on either side) and fold it to the center.  Look at the third photo before you fold it to see how this fold looks when it is done.  (You are lining up the outside, diagonal edge with the middle line.)

130 DSCN5763   140 DSCN5770   150 DSCN5765


Do the same with the other side.

160 DSCN5773


This piece is complete.  Do the same with the other two squares you originally cut out.  Then arrange them into a tree by tucking the points of each into the slightly smaller piece and attach with a bit of adhesive.  Make a trunk from a scrap if desired.

tutorial tea bag fold


Here is the gift tag I made using this technique.

final Tea Bag Christmas Tree Tag DSCN5886.jpg

(Click HERE to see the original project post with this tree.)


Thanks for checking out my tutorial!

Lots of Dots Christmas Tree Tag

Lots of Dots Christmas Tree Tag

Lots of Dots Christmas Tree Tag aDSCN5700

This tag was made for the Mod Squad Challenge – Tag Time – where we are to make a Christmas tag.  (Sadly, this site is no longer active.)

This tag is also being entered in the StampTV MIUM Challenge – “All Things, Great and Small” – where we are to incorporate both large stamped images and very small stamped images into our card design.  I used the small polka dotted circle stamp to build my tree and a larger greeting stamp.  (Sadly, this site is no longer active.)

And it is also being entered in the Perfectly Rustics Challenge No. 36 – Embossing – where we are to use wet or dry embossing on our project.  (http://perfectlyrustics.com/2014/11/17/prdc-36-embossing/)

Finally, it is being entered in the Simon Says Stamp Wednesday Challenge – We’re Seeing Stars – where we are to include a star on our project. (http://www.simonsaysstampblog.com/wednesdaychallenge/simon-says-were-seeing-stars/)

I used the larger polka dotted circle stamp from the Gina K Designs “Fabulous Holiday Fillers” stamp set and gina k Christmas pine ink to create the Christmas tree on ivory card stock.  I used a stamp-a-ma-jig and graph paper to line up the circles.  Then I colored self-sticking rhinestones with Copic marker R89 and adhered them in the spaces between the stamped circles.  The greeting is from the Gina K Designs “Merry Tree” duo (retired?) stamp set and was also stamped in the Christmas pine on ivory card stock.  Gina K red hot and Christmas pine card stock was also used.  The cream colored background card stock is My Mind’s Eye Nutmeg “Boy” Southwest Paper from the Indie Chic collection and was embossed with the Hobby Solution Lattice embossing folder.  Red raffia and a silver star charm finished off the tag.

Thanks for checking out my project!

This content uses referral links as described in the disclosure policy on my sidebar.

Karate Scrapbook Layouts

Karate Scrapbook Layout

As I mentioned earlier, the scrapbooks I do are for each of my kids, starting from birth and documenting everything and anything until … well, I guess that depends on how far I get!  The idea is to go through high school, but we’ll see!  Anyway, in addition to their general books, I had planned to also make a karate themed book for each of them when they earned their black belts.  I finished Eric’s when he earned his junior black belt and need to add pages now that he earned his adult 1st degree.  I still need to do Kelly’s, Kevin’s and Keith’s books.

These are the layouts in Eric’s book so far.

"Title Page"

“Title Page”

"Karate Kid"

“Karate Kid”

"Older Candids"

“Older Candids”

"Part 1 of Black Belt Testing"

“Part 1 of Black Belt Testing – Curriculum”

"Part 1 of Black Belt Testing pg. 2"

“Part 1 of Black Belt Testing – Curriculum (pg. 2)”

"Sparring Test"

“Sparring Test”

"Belt Flipping Ceremony"

“Belt Flipping Ceremony”

"Ticket to the Black Belt Extravaganza"

“Ticket to the Black Belt Extravaganza”

"Extravaganza Performance"

“Extravaganza Performance”

"Belt Graduation Ceremony at Extravaganza"

“Belt Graduation Ceremony at Extravaganza”

"Sensei Eric Receives his Diploma:

“Sensei Eric Receives his Diploma”

a120 Scrapbook page_ portrait single

a130 Scrapbook page_ portrait pg 1

a140 Scrapbook page_ portrait pg 2

"Eric's Thoughts"

“Eric’s Thoughts”

"The Creeds"

“The Creeds”

a170 Scrapbook page_ last page misc

Several of these pages were featured on martialartspartystore.com.


What was very difficult about doing these pages back in 2005 was the lack of martial arts materials and supplies.  After much searching and frustration, I found a woman (who owned a scrapbook supply store which has since closed, I think) who had an electronic die cutting machine (which I had never heard of before).  I’m not sure what kind she had but it was a huge machine, and she had CD’s with tons of images from which to choose.  Luckily, she had quite a few karate images.  She cut 4 of everything for me so I have all the dies ready for Kelly’s, Kevin’s and Keith’s books when I am able to do them.  (I was there all afternoon; that poor woman!!)  I also was fortunate to find the website martialartspartystore.com (no longer in business) which had a lot of great stuff.  I laugh now because I could cut my own stuff out with my Silhouette, and there seems to be so much more online, but back then… very little!


This page was not in the karate scrapbook but was in Eric’s regular scrapbook showing his first belt test.

"First Belt Test"

“First Belt Test”


Thanks for checking out my post!