Wild Birthday Card

Wild Birthday Card

Wild Birthday Card aaaaDSCN7205

This card is being entered in the Perfectly Rustics – PR Design Challenge No. 39 – Animals, where we are to “go wild” with animals in our creations. (http://perfectlyrustics.com/2015/01/12/prdc-no-39-animals/)

In addition to the animal fur prints on the outside of my card, I also included some giraffes on the inside.

Wild Birthday Card aaaaDSCN7200

Wild Birthday Card DSCN7184

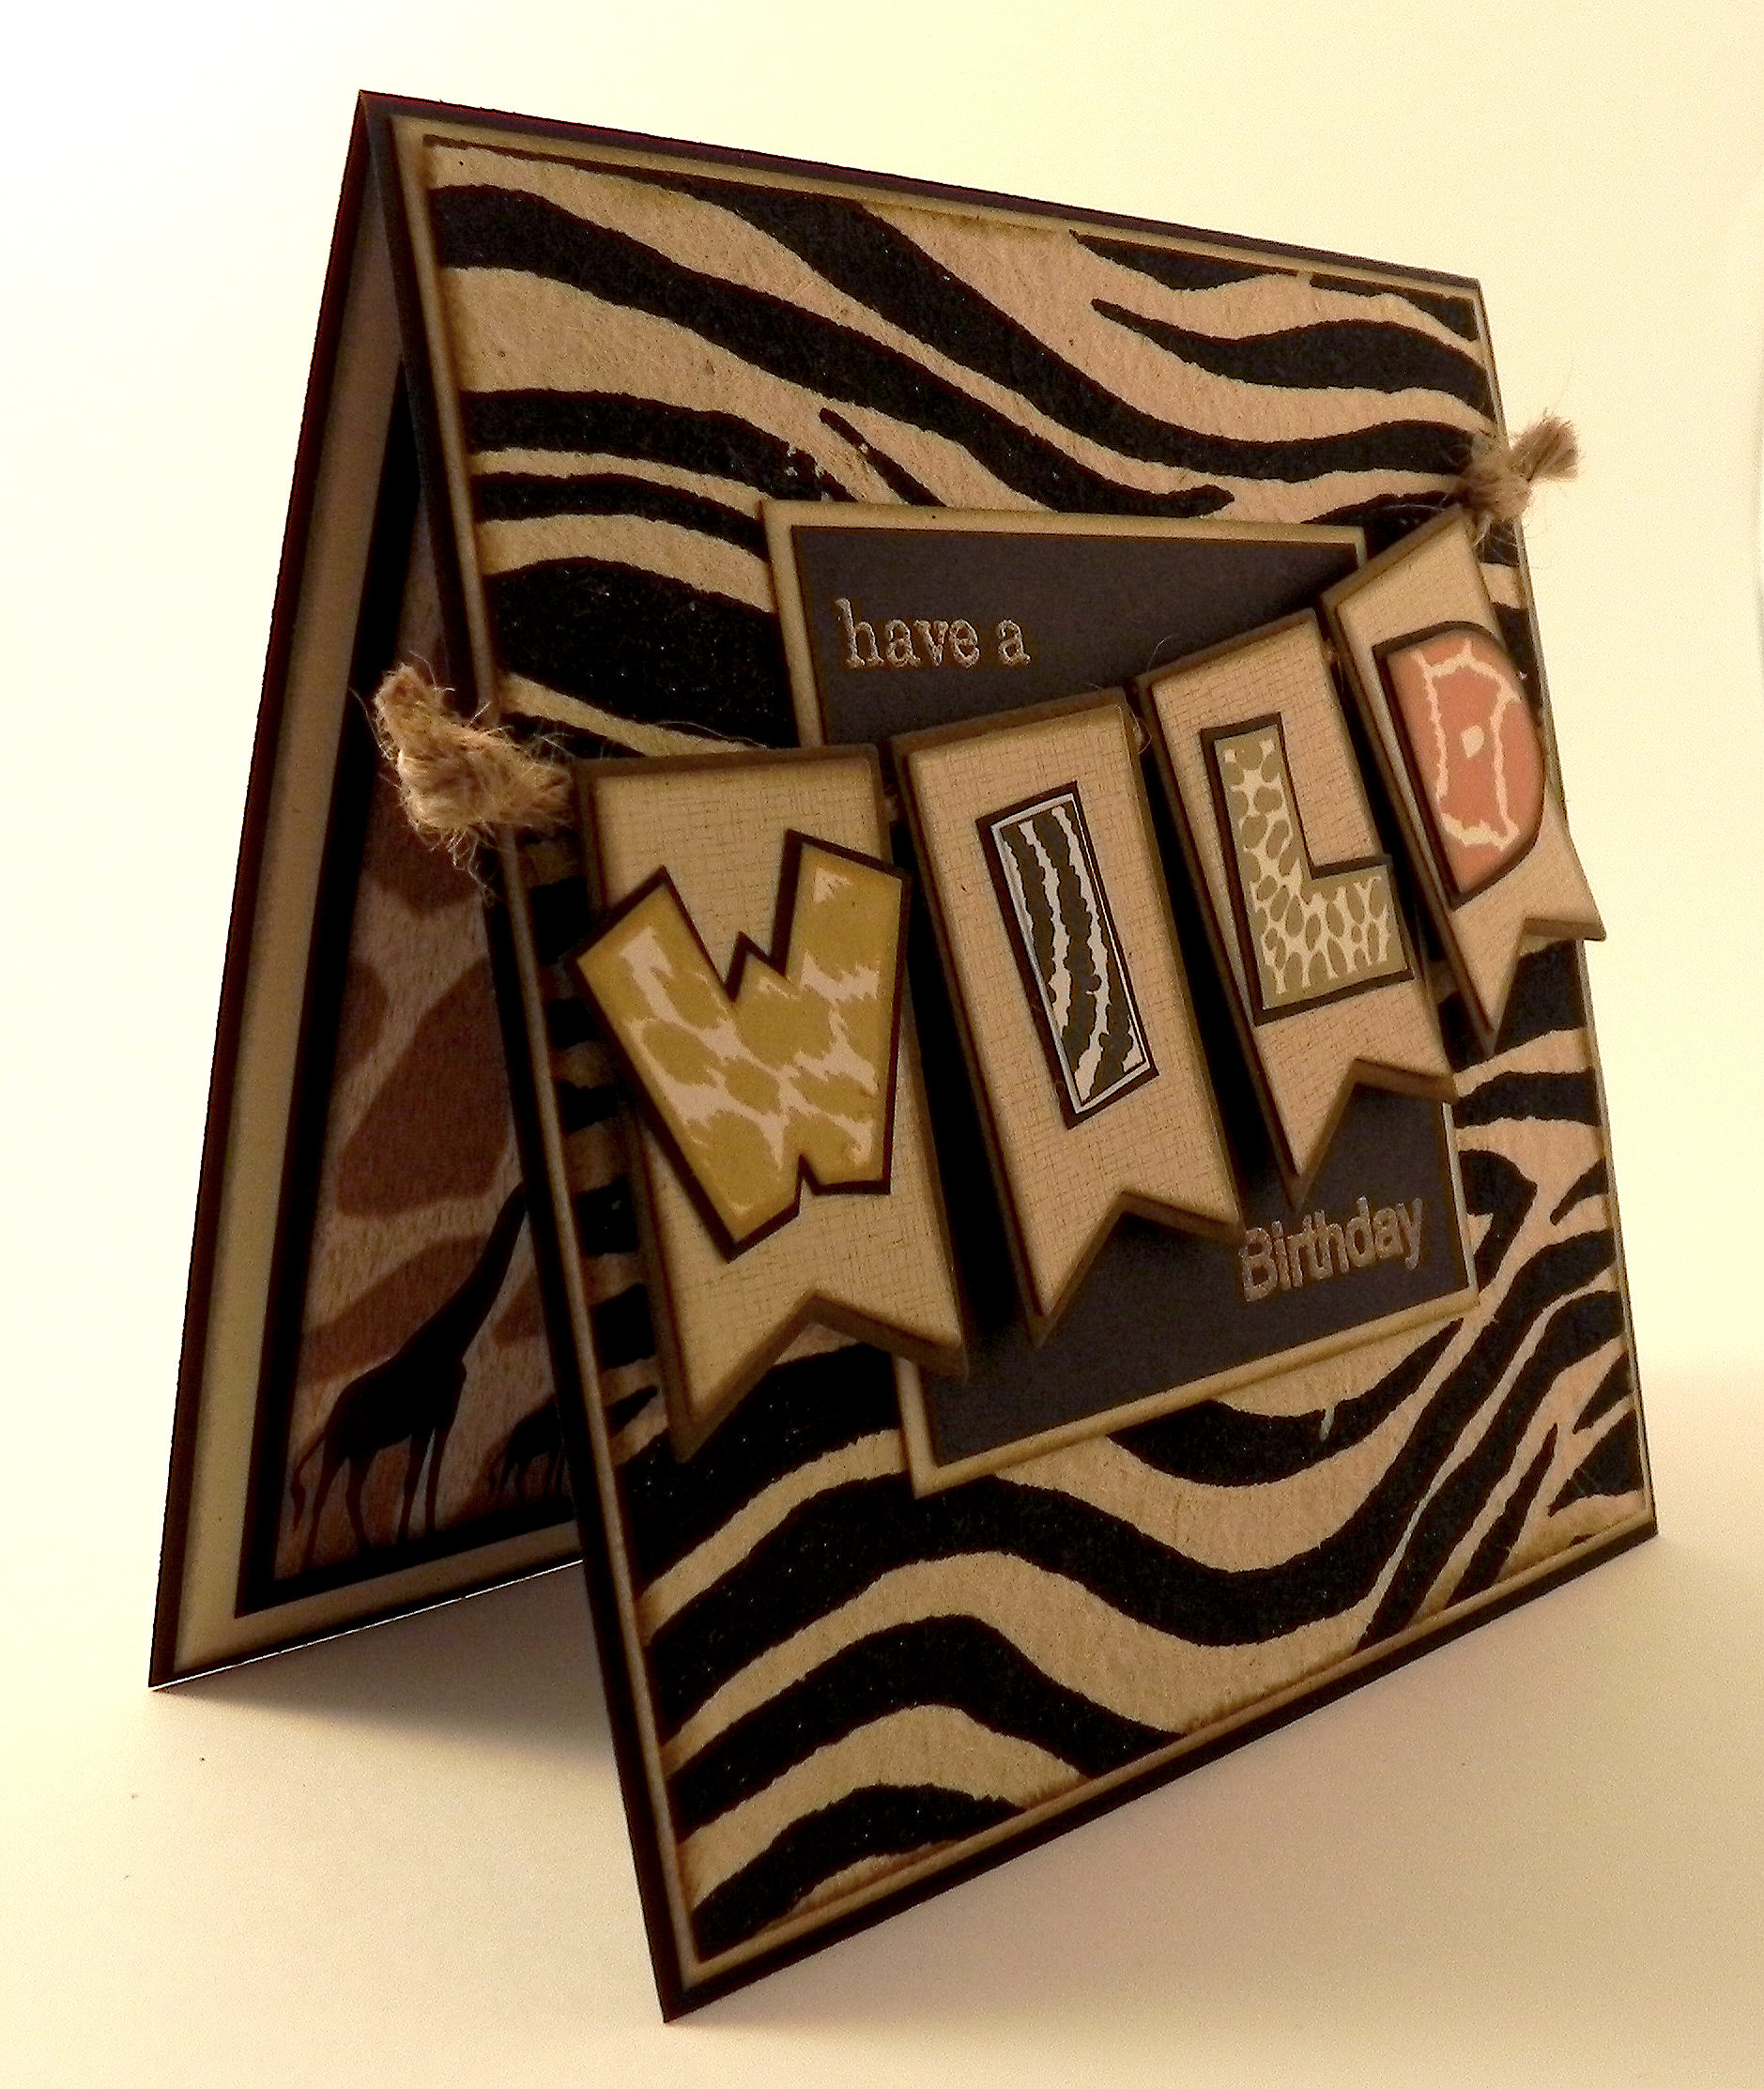
For this card, I used the “WILD” stamp from the Playful Posh Jungle set (retired?).  This “Wild” stamp is vertical, and all the letters are attached on the same stamp.  This was problematic because each letter had a different, solid animal print so each letter needed to be a different color.  I could have done a bit of masking I suppose, but I ended up just inking and stamping it four times in the colors I needed.  Then, I hand cut the one letter from each of them (and the black mats) and adhered them to my banner pannels.  Additional stamps used came from the Gina K Designs “Stamp It Big” set, “A Beautiful Life” set, “Keep Calm” set, the “Frame and Filler” duo, and the exclamation point came from a Gina K grab bag (I think from the “Little Tees” set – retired?).

The banner was made with dies from the Sizzix Triplits Pkg-Banner Dies.  I stamped my images and inked my edges with Gina K dark chocolate, warm cocoa, and honey mustard inks along with Memento tuxedo black and potters clay.  The “have a” and “birthday” were stamped with Versamark ink and heat embossed using the Recollections champagne embossing powder.

The card stock I used was Gina K warm cocoa, sandy beach and black.  The giraffe printed paper on the inside is Hot off the Press Paper Pizzazz Wild Things Giraffe.

The cool zebra paper on the front of the card was purchased in a store near me called Tuesday Morning where they sell a variety of discounted and closeout items, including crafting supplies.  This particular paper was in a pack that did not have an original label so I have no idea where it came from, but their store label said it was handmade paper made in India.  It has such a cool texture and looks amazing in real life!  I love stopping into this store periodically because you never know what they will have on any given day, and I usually find neat things at a great price.

Since I’ve never used this handmade paper or the WILD stamp (or anything from the set) before, I am also entering this card in the NBUS (never-before-used-schtuff) Challenge at djkardkreations.com. http://www.djkardkreations.com/2015/01/happy-new-year-2015-nbus-challenge-3.html

NBUS button

Thanks for checking out my card project!

This content uses referral links as described in the disclosure policy on my sidebar.

Pink Shaker Birthday Card

Pink Shaker Birthday Card

Pink Shaker Birthday Card dddDSCN7093.jpg

I made another shaker card similar to the snowman shaker thank you card  I made last week.  Again, I used the recessed window technique Theresa Momber shows HERE.  Instead of leaving it open as she suggests, I added some beads and sequins, covered the recessed window with acetate, added a cover frame, and used a few pop dots to adhere it to the card base.

aDSCN7151

The stamp I used is from the Stampin’ Up “Simple Wishes” set.  I stamped it with Memento Tuxedo Black ink on white card stock and then added color with Copic Markers V17 and V12.  I used the Spellbinders Classic Squares Large dies to create the recessed window, the image panel, the cover frame and the glitter border frame.  While the focal panel was still in the die, I lightly sponged the edges with Tim Holtz Milled Lavender Distress Ink.  The pink printed paper is Recollections Lavender Lines, and the glitter paper is Recollections Foil Paper.  The pink and silver yarn is by Martha Stewart, and the button is American Craft.

I don’t usually use pink or so much glitz, but once I got going, I really had fun with this!

Thanks for checking out my card project and my 100th post!

This content uses referral links as described in the disclosure policy on my sidebar.

Welcome Baby!

Welcome Baby!

Welcome Baby bDSCN7081.jpg

Congratulations to Kim and her family over at Perfectly Rustics on the birth of their daughter, Abbey! This week’s Perfectly Rustics Challenge (PR Design Challenge – No. 39 – Animals) is to make a card using an animal, so I thought I’d use this rocking horse image on a baby card as my entry.  Welcome Abbey!!  (http://perfectlyrustics.com/2015/01/12/prdc-no-39-animals/)

The rocking horse image was stamped and paper pieced.  The 8 piece stamp set, which contains baby sentiments and images, is by Recollections.  I am not sure of the name of the set since I don’t seem to have the original packaging anymore.  The hanging hearts stamp is from the Gina K Designs “Love You” mini stamp set, and the greeting is from the “Bundle of Love” mini stamp set, also by Gina K Designs.  I stamped the greeting and hearts twice with both Memento Tuxedo Black and Memento Rose Bud inks.  The black seemed too harsh, and the pink didn’t pop enough, so I thought I’d layer the two colors.  The large background die is the largest of the 5×7 Detailed Scallops by Spellbinders (S6-004), and one of the Spellbinders Long Classic Rectangles – large (S4-142) was used for the image panel.  The patterned papers are from the DCWV 6×6 Girl Stack paper pack, and the solid pink is Gina K Bubblegum Pink which was sponged with a little bit of the rose bud ink. The corners of the card were rounded to follow the corners of the die.

Since I’ve never used this scolloped die or the stamps before (all new), I am also entering this card in the NBUS (never-before-used-schtuff) Challenge at djkardkreations.com. http://www.djkardkreations.com/2015/01/happy-new-year-2015-nbus-challenge-3.html

NBUS button

I haven’t made too many baby cards before, so it took me a little while to get this one to come together.  I’m going to work on this type of card more since I think they are so cute!

Thanks for checking out my card project!

This content uses referral links as described in the disclosure policy on my sidebar.

Snowman Shaker Thank You Card

Snowman Shaker Thank You Card

Snowman Shaker Card bDSCN6959.jpg

I recently saw a video tutorial by Theresa Momber making a Recessed Window Card.  She showed how to make the recessed window using a Spellbinders die and a craft knife, and I thought this recessed window card could be easily adapted to make a shaker card.

After I created the recessed window and inserted my stamped panel, I simply added my “shakers” and taped a piece of acetate (cut slightly larger than the window) over the recessed window.  I then cut a frame (using the same size die that I used to create the window) and adhered it over the acetate and window panel.  For the card above, I created a second frame with the patterned paper (with the next larger sized die) and adhered it on the blue frame.  The whole thing was attached to a card base with 4 small pop dots in the corners.  (I used to use lots of pop dots to create the enclosed window to keep in the shakers.)

bbDSCN6978

To create the snowman panel, I used stamps from the following Gina K Designs stamp sets:  Fabulous Holiday Fillers, Let’s Talk, Winter Cheer, and Fabulous Frame Fillers.  I stamped the images using Memento Tuxedo Black and used Gina K Blue Denim ink (and masks) to sponge the background. The snowflakes (hard to see) were stamped with Color Box Frost White pigment ink, although I’m not real happy with the way they came out.  (Heat embossing or versamark resist may have been better.)  I added color to the snowman with Copic Markers B39, B95, and Y17.  Spellbinders Classic Squares (Large) dies were used to make the recessed window and the frames around it.  The printed paper I used is “Winter Freeze” by Melissa Frances along with Gina K Blue Denim and Pure White card stock. To photograph the card, I rubbed the acetate with a piece of wool to build up a little static to make the sequins “stick” to appear to be shaken around; they usually sit on the bottom!

bDSCN6969

Thanks for checking out my card project!

This content uses referral links as described in the disclosure policy on my sidebar.

Chalkboard Thank You Card

Chalkboard Thank You Card

Chalkboard Thank You Card ccDSCN7025

Melanie Muenchinger recently posted a tutorial on the Chalkboard Technique on stamptv, and I thought I’d give it a try.

This card is being entered in the StampTV MIUM Challenge – Thank You, where the challenge is to make a 4″ x 4″ Thank You Card.   (Sadly, this site is no longer active.)

It is also being entered in the Mod Squad Challenge – Thank You.  For this challenge, the thank you card could be any size.   (Sadly, this site is no longer active.)

This card was made using all products by Gina K Designs.  I created the chalkboard look with black card stock and white pigment ink.  The mini snowflake frame is from the “Winter Blocks” set (retired?).  I masked a portion of the frame to stamp the greeting from the “Lots of Lines” set.  The long, straight line under the cord is from the “Perfect Plaids” set (retired?).  The printed paper is from Winter Cheer 6″ x 6″ Paper Pack.  I finished it off with silver cording.

Since I’ve never used stamps from the Winter Blocks set, I am also entering this card in the NBUS (never-before-used-schtuff) Challenge at djkardkreations.com. http://www.djkardkreations.com/2015/01/happy-new-year-2015-nbus-challenge-3.html

NBUS button

Thanks for checking out my card project!

This content uses referral links as described in the disclosure policy on my sidebar.