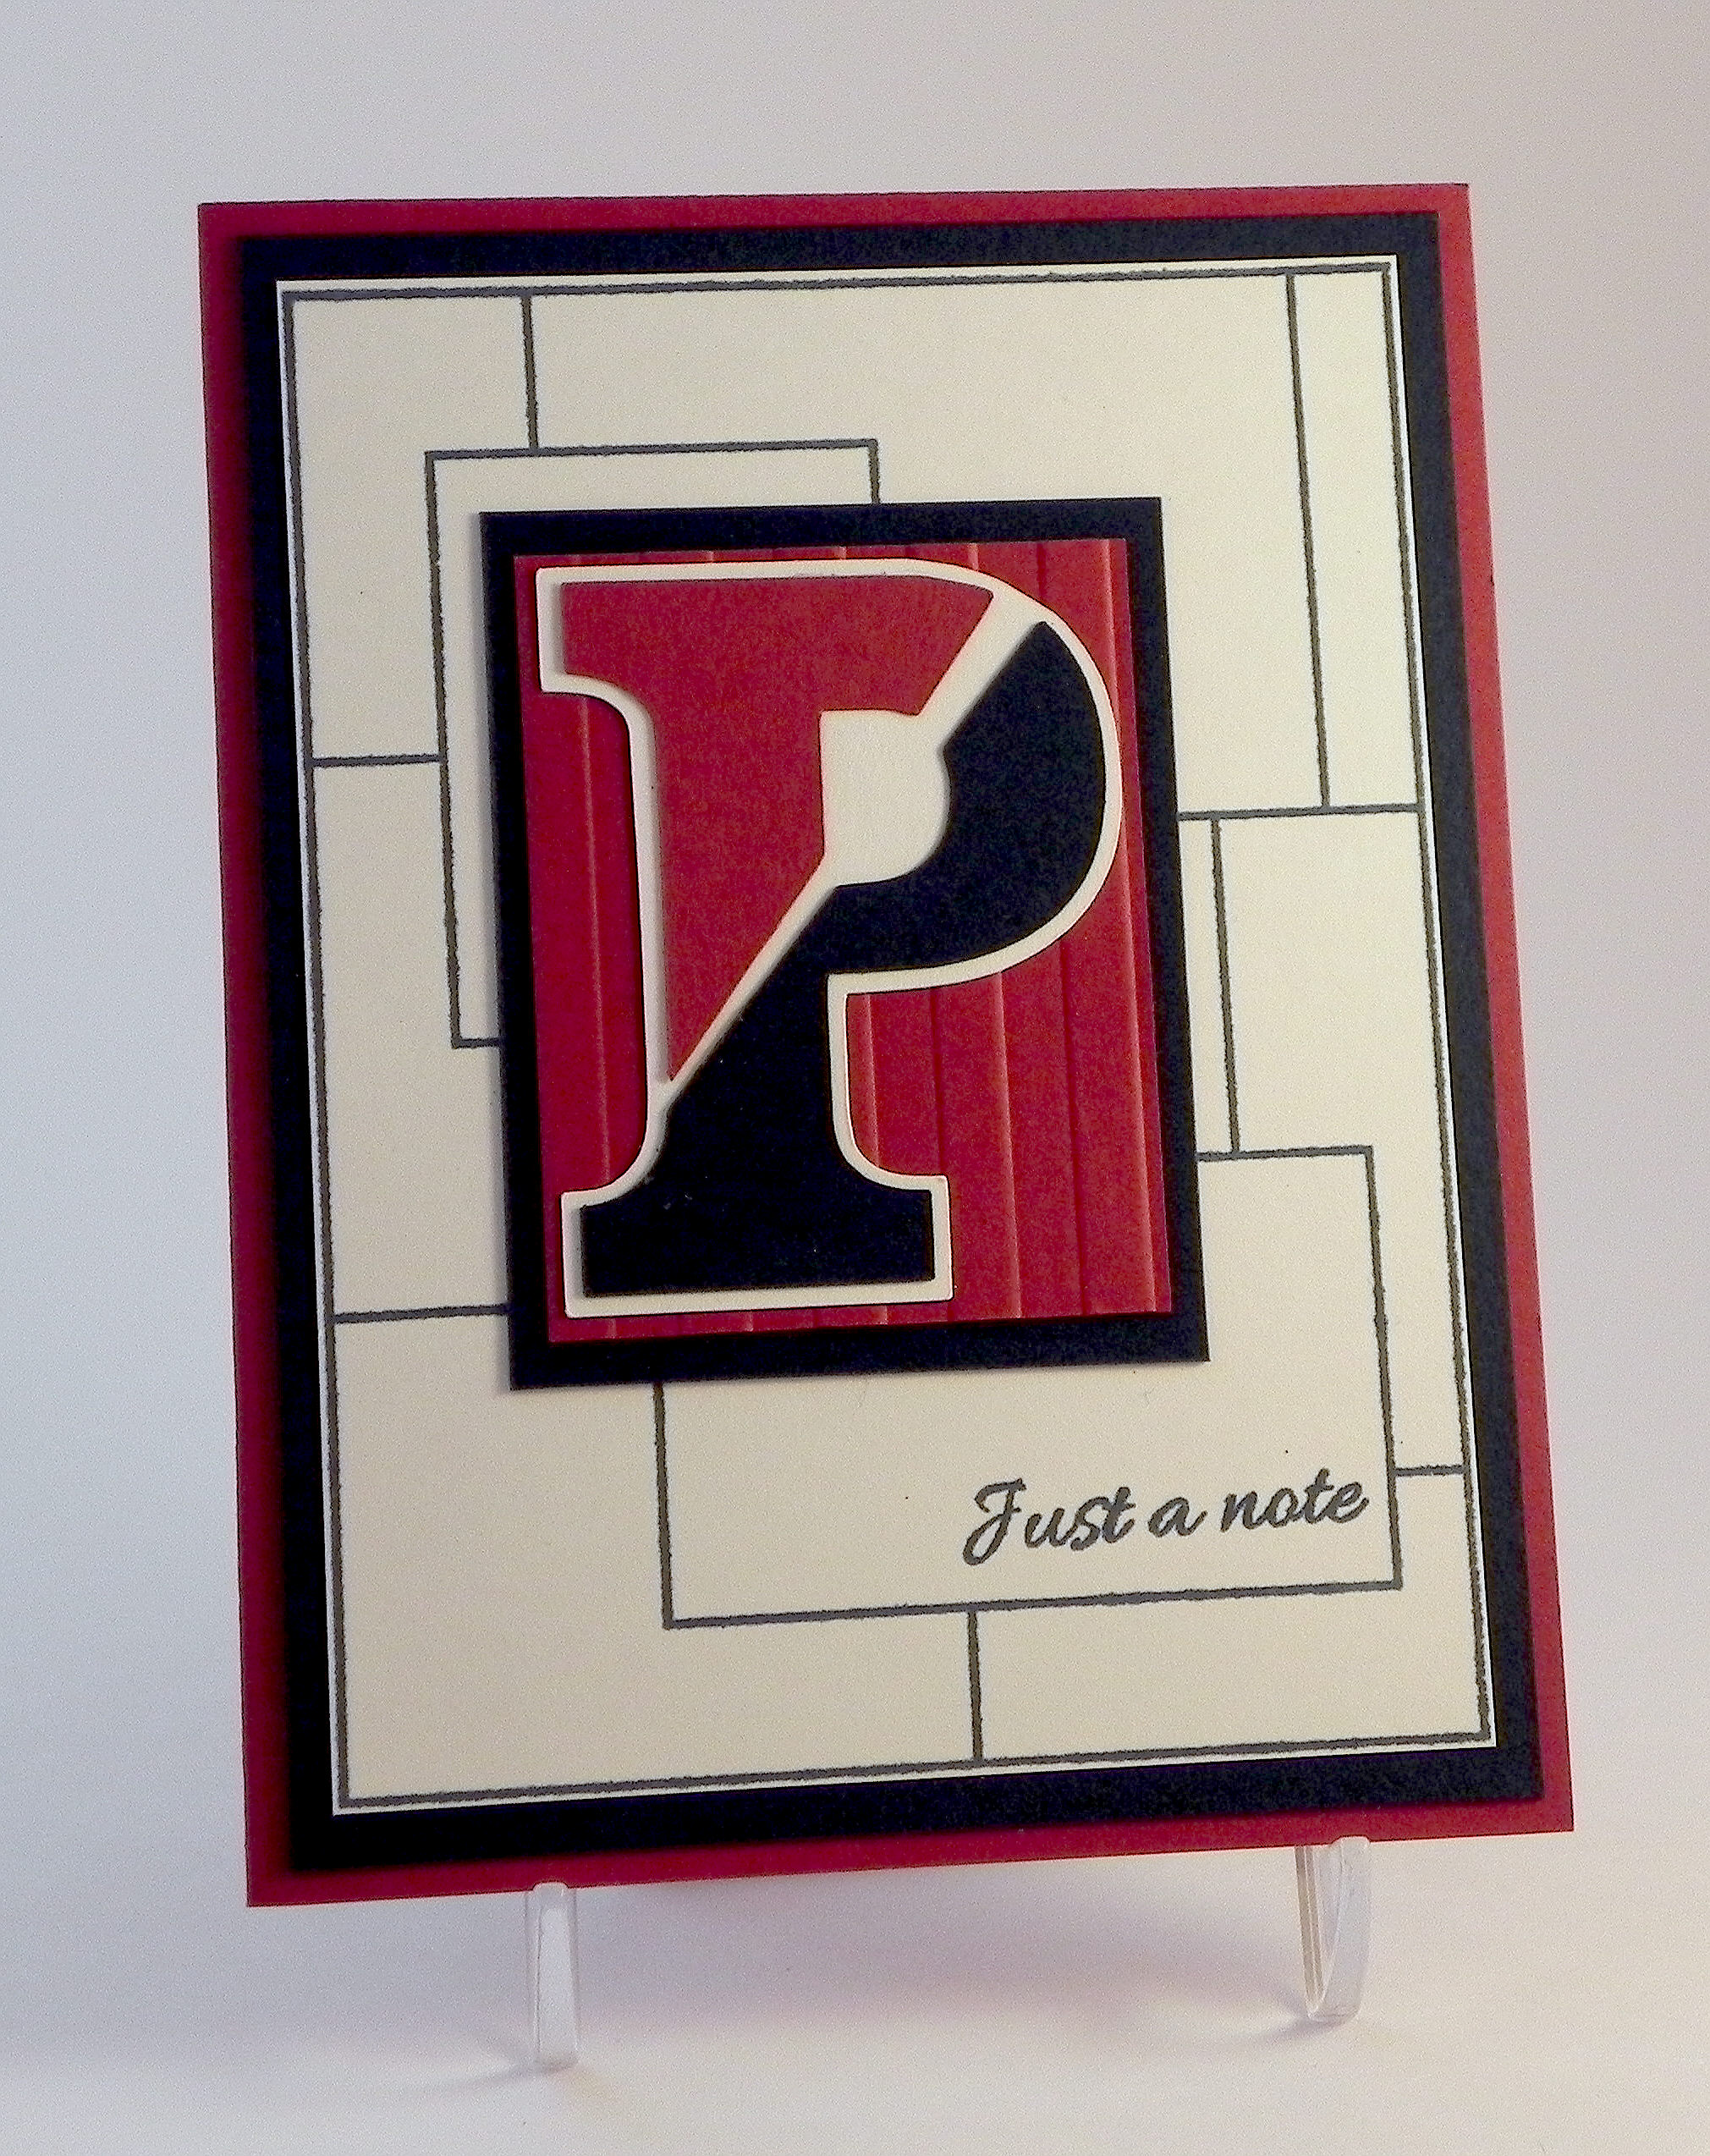
Penn Note Card

Penn Note Card

Penn Note Card wwwDSCN9900.jpg

Join us this fortnight for a new challenge over at Perfectly Rustics.  The challenge is “Letters or Symbols” where you are to make a letter or symbol the hero of your project.   For example, if you were making a card with the word love on it, make the letters big, emboss them, have them in patterned paper etc. (http://perfectlyrustics.com/2015/06/01/prdc-no-49-letters-or-symbols/)

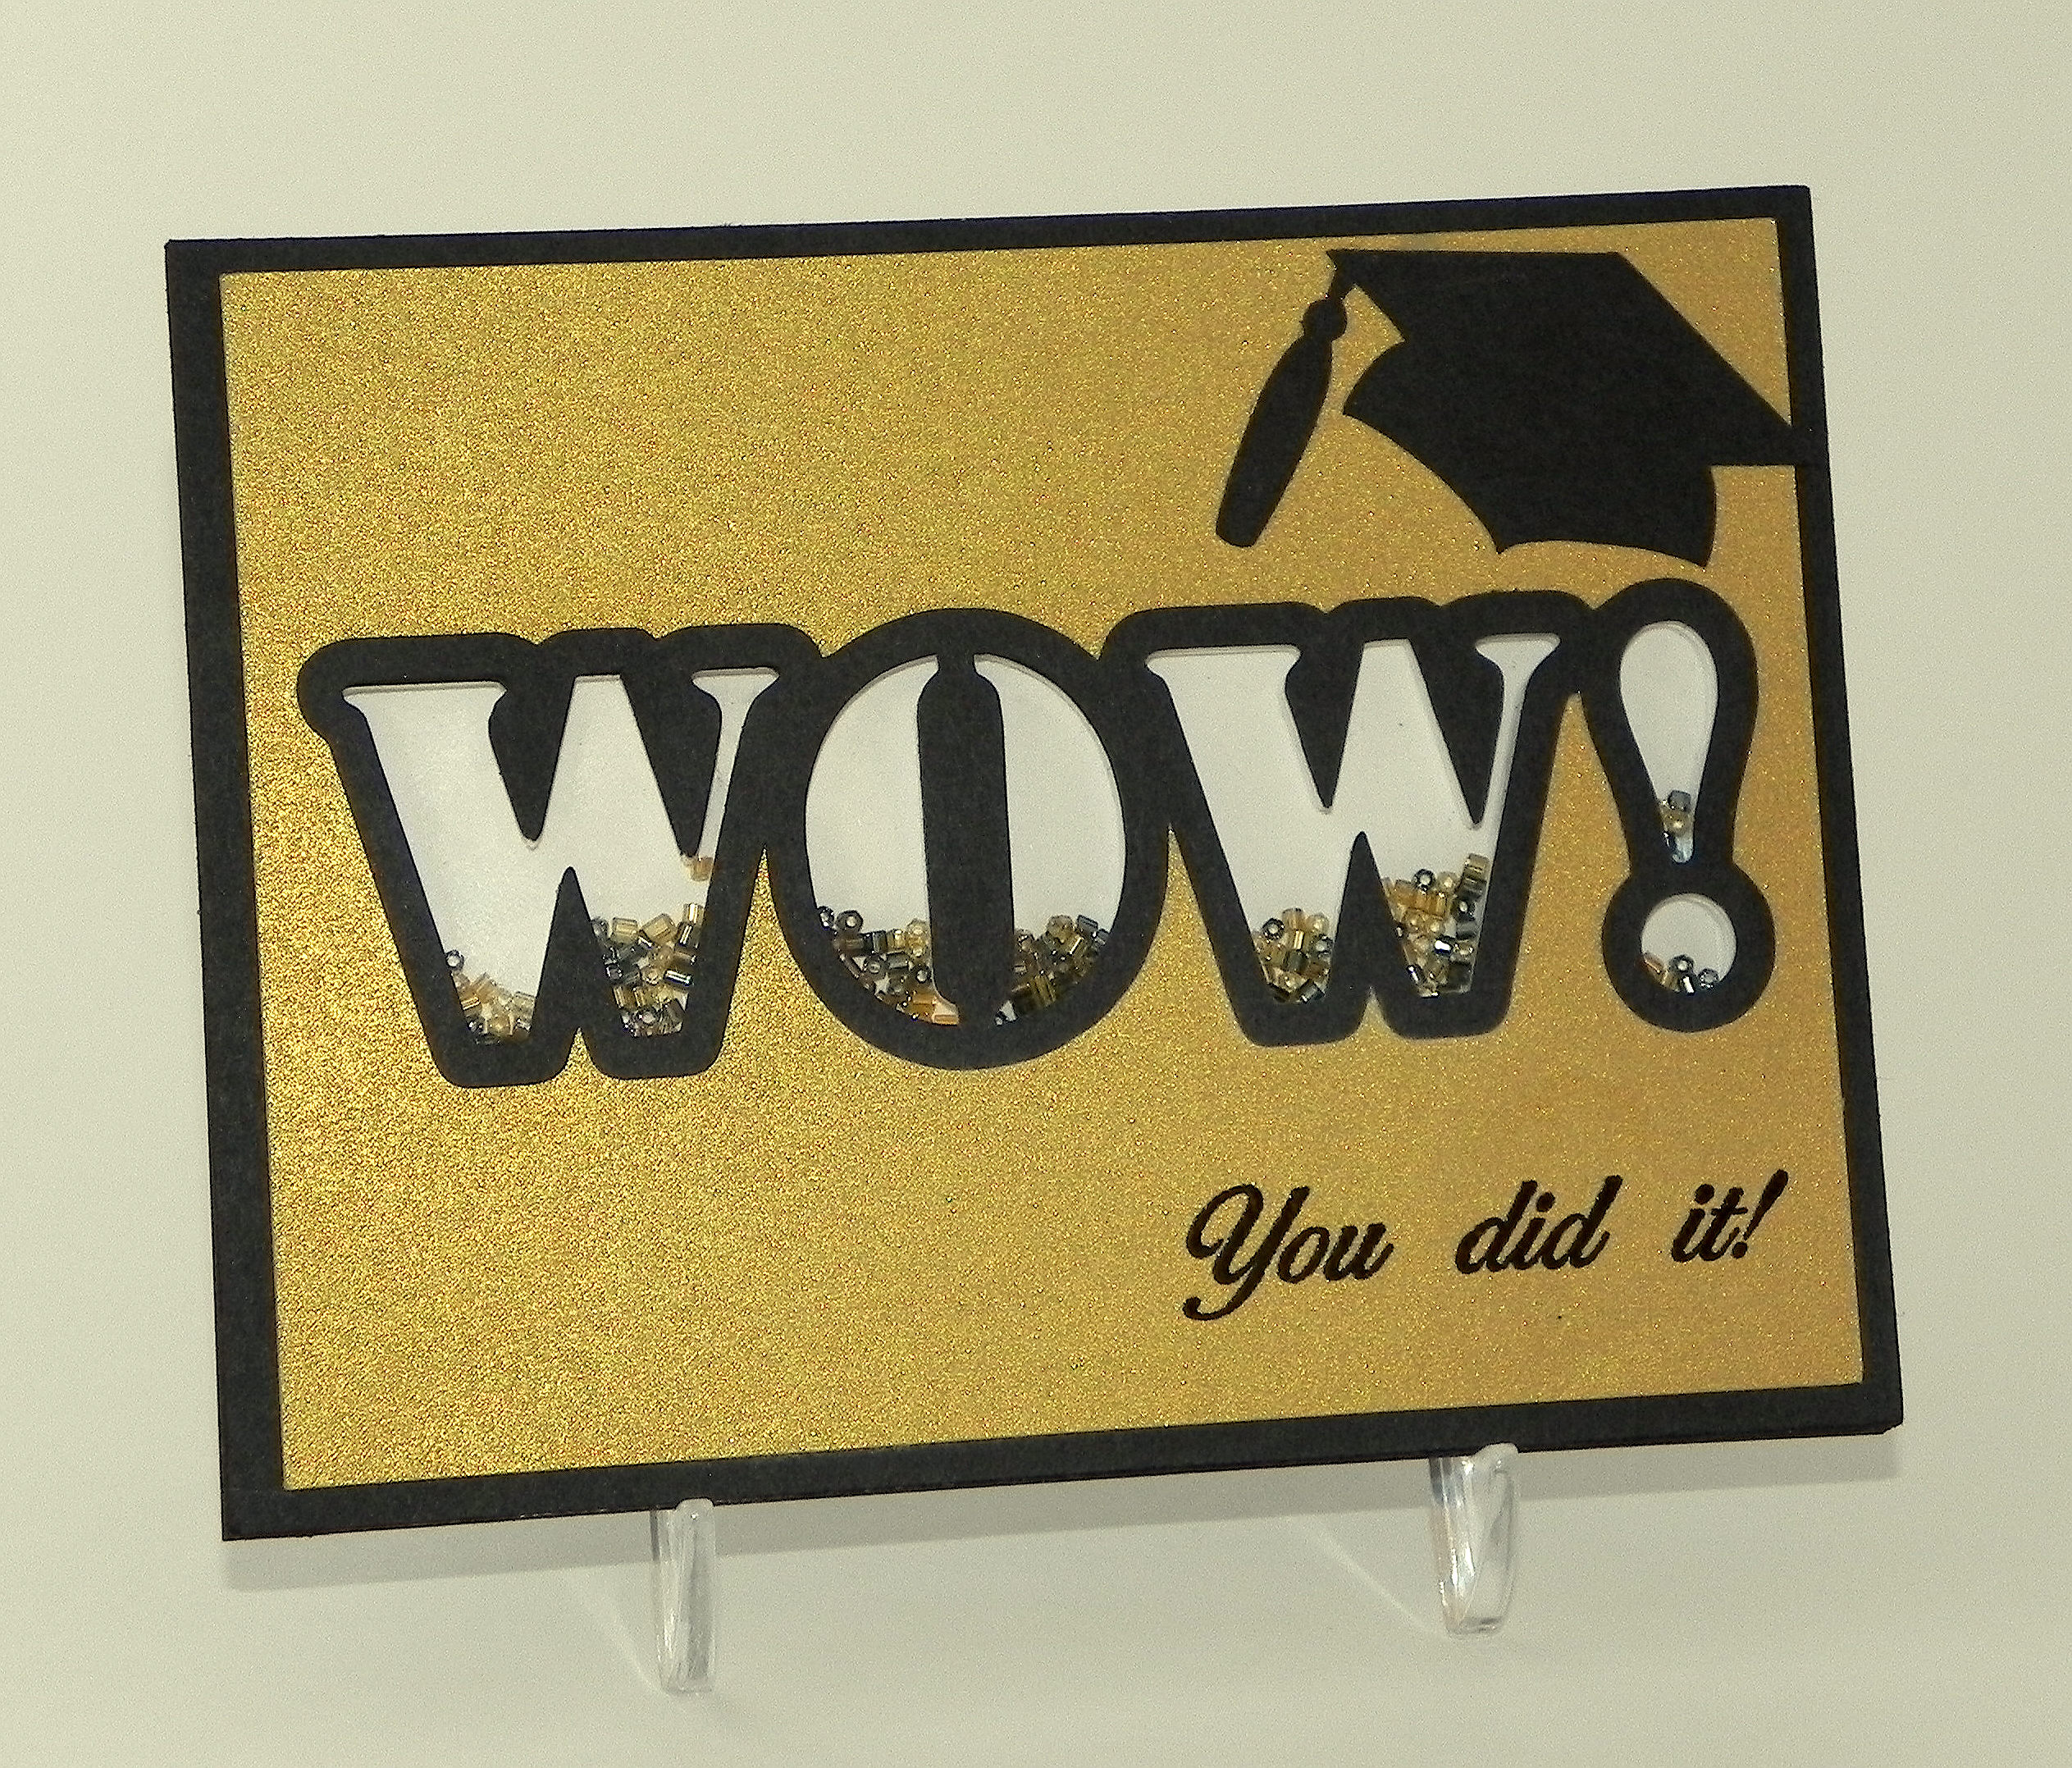
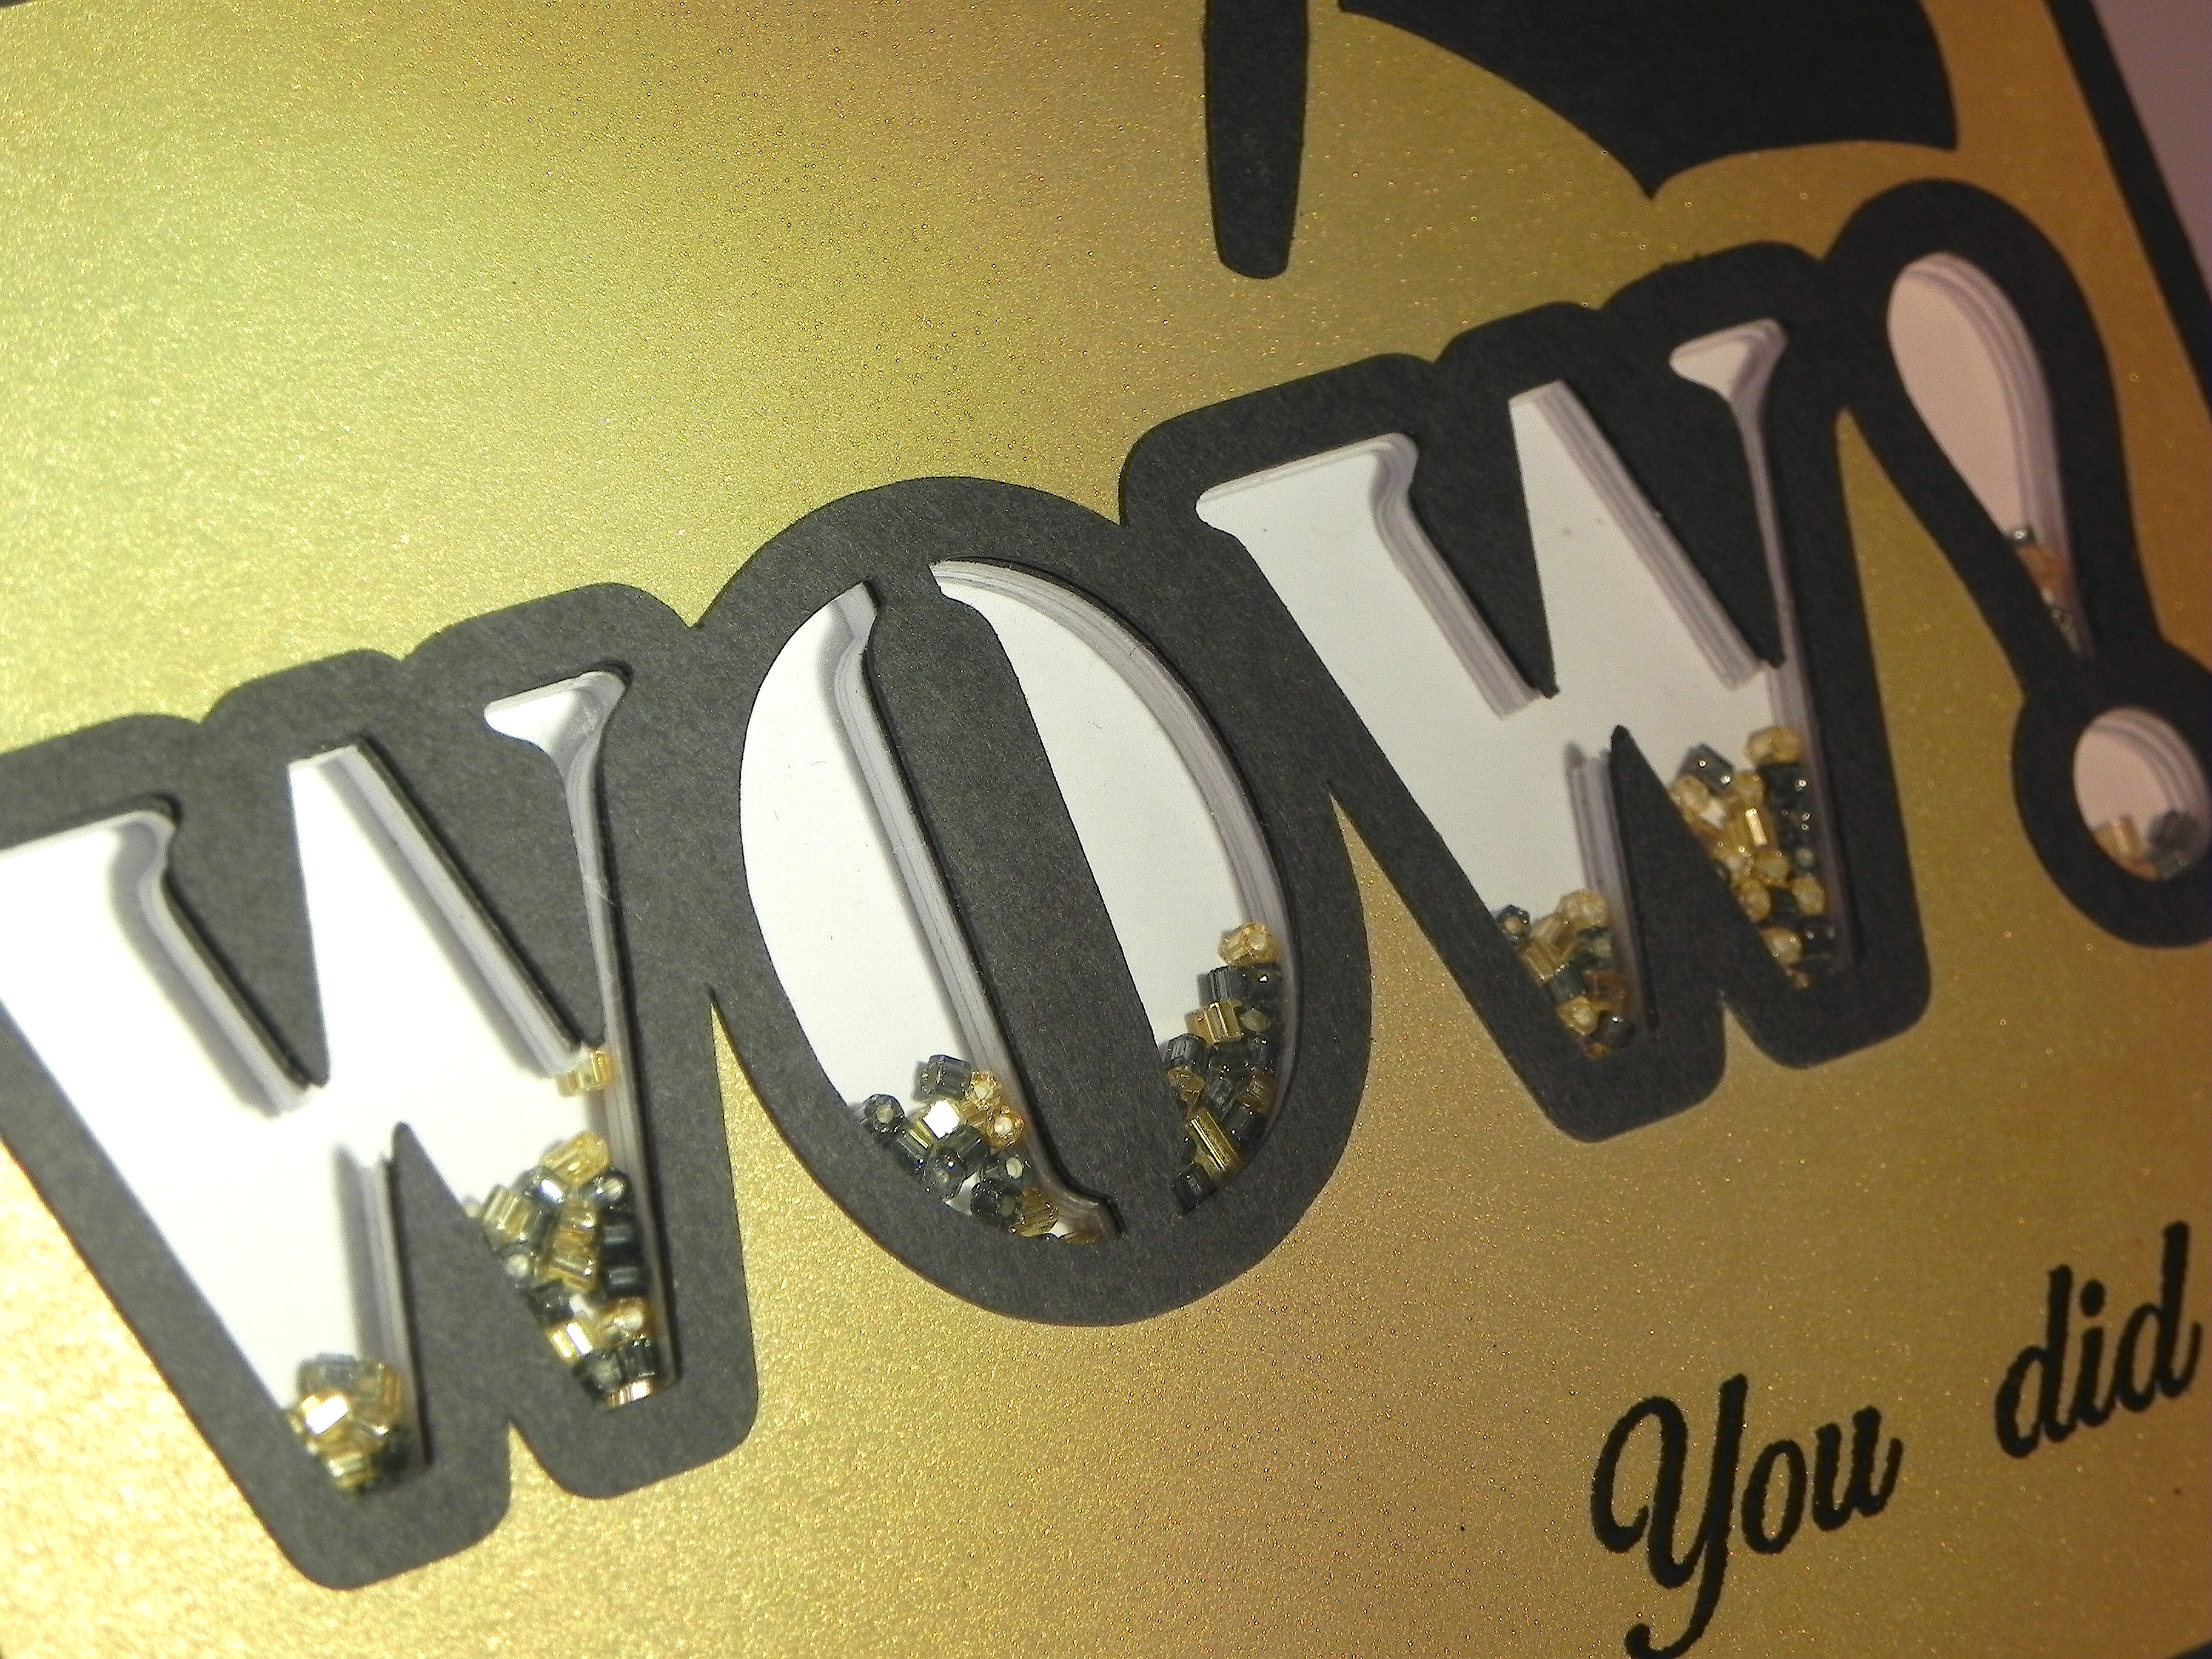
This is a card I created last September which had a letter or symbol as the focus of my card.

This card was originally posted in my Stamp TV Gallery but had not been posted here on my blog yet.   My son just finished his freshman at the University of Pennsylvania this year, and when he first started, I thought it would be fun to make some Penn stationery so I could send notes to him throughout the year.  I ended up making some of these for my husband as well, who needed to send a few “Penn related” thank you notes at the time. One of the recipients of this note from my husband recently asked if I’d create a set of thank you notes for her to send to the volunteers of a Penn event she was organizing.  This is the card design I made for her. (This is the first time I was ever asked to make cards for someone!)

I stamped the background with the frame from the GKD “Inspiration Mosaic” set and the greeting from the GKD “Just A Note” set (retired?) in Gina K In the Navy ink.  The Penn emblem was paper pieced using Gina K Cranberry Tart, In the Navy, and white cardstock.  (I googled the emblem and “traced” it using my Silhouette.)  The same cardstock was used for the card base, background, and mat.  The panel behind the “P” was embossed with the Sizzix (Stampin’ Up) Stripes folder.  This card design was so much easier to duplicate this time around since I now have the MISTI.  (Once I lined up my stamps, I was able to stamp all the panels quickly.)

This simple design using this frame stamp could easily be made with different emblems, personal initials or monograms, or other symbols, and with a variety of color combinations.

Now it’s your turn!  Create a project making the letters or symbols the star of your card and share it over at Perfectly Rustics!

Thanks for checking out my card project!

This content uses referral links as described in the disclosure policy on my sidebar.

Celebrate – Graduation Card

Celebrate – Graduation Card

Celebrate - Graduation Card wwDSCN6149.jpg

Join us this fortnight for a new challenge over at Perfectly Rustics. The challenge is “Letters or Symbols” where you are to make the letters or symbols the hero of your project. For example, if you were making a card with the word love on it, make the letters big, emboss them, have them in patterned paper, etc. (http://perfectlyrustics.com/2015/06/01/prdc-no-49-letters-or-symbols/)

I created a graduation card featuring the word “celebrate” where I embossed and glittered my stamped image, cut it out, and adhered it to multiple layers to make it thick/3-dimensional.

xxDSCN6137

(click on photo to see sparkle)

The stamps I used are from the Gina K Designs “Lots of Lines” set (retired?).  I started by stamping a star on my white panel with versamark ink and Ranger “Rich Red” embossing powder.  While the embossed image was still hot, I sprinkled on some Artsyfartsy Crafts “Sunrise Red” microfine glitter and applied a touch more heat (first from behind and then on top) to remelt the embossing a touch so the glitter would “stick” to the embossed image.  (I did one star completely and then went back to do the other one.)  To see a video on how to add glitter to your embossed image, click HERE.

I created a cut file with my  Silhouette for the greeting stamp.  On plain white card stock, I cut this multiple times (5-6) and glued each of these cuts together to make a thick version of the cut.  I created one additional cut that I embossed and glittered to glue to the top.

The graduation cap and diploma/scroll are die cuts from the svg.cuts “Graduation Elements” SVG Collection.  I added a bit of embroidery floss and ribbon to the cuts to spruce them up a bit.

For added color, I added a mat and strip across the center of 7 Gypsies “Antiquaries Postale Collection: Post” card stock as well as some black.

Clean and Simple has always been tough for me, and while there is more on my card than CAS allows, I was having a lot of trouble walking away from this project with all the plain white showing in the two corners.  (Before the strip of color, there was even more!!)  Baby steps towards CAS!!!

Now it’s your turn!  Create a project where the letters or symbols on your card are the focus, and share it over at Perfectly Rustics.  I can’t wait to see what you create!

I’m entering this card in the Mod Squad Challenge this week which is “Masculine” where we are encouraged to make a Masculine card/project.   (Sadly, this site is no longer active.)

Thanks for checking out my card project!

This content uses referral links as described in the disclosure policy on my sidebar.

WOW Graduation Shaker Card

WOW Graduation Shaker Card

WOW Graduation Shaker Card (embossed version)zDSCN9829.jpg

Join us this fortnight for a new challenge over at Perfectly Rustics.  The challenge is “Letters or Symbols” where you are to make a letter or symbol the hero of your project.   For example, if you were making a card with the word love on it, make the letters big, emboss them, have them in patterned paper etc. (http://perfectlyrustics.com/2015/06/01/prdc-no-49-letters-or-symbols/)

I created a graduation card featuring the word WOW.  Each of the letters is its own shaker window filled with small, glass beads.  I added a small graduation cap and sentiment to show it is a graduation card, but the main focus of the card is the word WOW.

The first version I did was a clean and simple design with a plain gold front.

wwDSCN9763

Here is another view of the individual shaker window letters:

xDSCN9786

I used a Silhouette file called “wow! word art cog wheel, star tail, stencil” (Design ID #53295), and used just the letters from the stencil image. I closed up the w’s so they would only have one part for their shaker windows.

To create my shaker windows, I cut the letters out of white card stock (centered on a rectangular panel) with my Silhouette – 10 times.  I stacked (and glued) these 10 panels on top of each other, lining them up perfectly.  This created a very thick panel.  I glued a solid panel on the back, added the beads, and glued a piece of acetate over the letters.  I cut one more panel with the letters cut out from a piece of black card stock and another (slightly smaller) from gold paper to create my card front and mat.  Since the cardstock I stacked was white, I used a black Copic marker to color the edges black to match the black mat and the black card base I used.

Then I created the outline letters (using the Silhouette software and the same file) to place on the card front to further highlight the letters.

The graduation cap is from an svg file called Graduation Cards and Tags from svgcuts.com (HERE).

I purchased the stamp from Ebay; it is unmarked so I have no idea what company makes it.  The stamp actually says, “Congratulations, You did it!” but I masked the “congratulations” part and just stamped the rest using versamark ink and black embossing powder.

I really like the clean and simple design of the first card, but I was curious to see how it would look if I embossed the front panel so I made this second version (pictured at the top of this post also).

WOW Graduation Shaker Card (embossed version)zDSCN9829

The embossing folder I used is the Sizzix Stars & Swirls.  I covered the WOW outline and graduation cap with black embossing powder to make them more vivid on this version.  Since I embossed the panel before I added the stamped greeting (I was waiting for the stamp to arrive in the mail!), I needed to stamp it on a separate panel so I created the matted banner.  I’m wondering how it would have looked if I had stamped it first directly on the card front and then embossed it since I am not crazy about the banner (I REALLY like the stamped image directly on the card on my first version!), but I like the stars and swirls.

Now it’s your turn!  Create a project making the letters or symbols the star of your card and share it over at Perfectly Rustics.  I can’t wait to see what you create!

Over at the Mod Squad Challenge Blog, the challenge this week is “Masculine” where we are encouraged to make a Masculine card/project.  This card was made for my (male) neighbor who is graduating this year, so I decided to enter.   (Sadly, this site is no longer active.)

Thanks for checking out my card project!

This content uses referral links as described in the disclosure policy on my sidebar.

Autumn Tree Birthday Card (and other “Positively Negative” cards)

Autumn Tree Birthday Card (and other “Positively Negative” cards)

Autumn Tree Birthday Card wDSCN8814.jpg

I was asked to be the guest hostess for this week’s Mod Squad Challenge, and my challenge, called Positively Negative, is to create a project using the negative of a die (manual or electronically cut), punch, or hand-cut shape.  (Sadly, this site is no longer active.)

This card was originally posted in my stamptv gallery   (Sadly, this site is no longer active.), but I’m posting it here to show an example of a card where I did reverse masking (using the negative of a die) to create the sponged background for my tree image.

I used the Gina K Designs “The Giving Tree” set. Card stock used was gina k ivory and dark chocolate, and ink was gina k dark chocolate and memento desert sand. I used Flower Soft (autumn and nut brown) for the leaves. As mentioned above, a mat was made with the Spellbinders Wonky Squares die (discontinued?) to create the background for the tree. Yarn, a button and a gina k wood leaf finished it off.

Two more cards using the negative to sponge the background for my stamped images are below:

Floral Get Well cDSCN7706.jpg

You can see the original post in my stamp tv gallery.   (Sadly, this site is no longer active.)

The sentiment and floral image on this card are from the “With Love & Prayers” set by GKD. Gina K Wild Lilac and Moonlit Fog inks with a square mask were used to create the background. The image and sentiment were stamped with Gina K’s Edible Eggplant ink.

and

Thank You Challenge card DSCN5976c

 My card was originally posted in my stamp tv gallery.   (Sadly, this site is no longer active.)

This is a card I CASED after watching Melanie Muenchinger’s tutorial (HERE).   The stamp sets I used are Gina K Designs “A Year of Flowers 2” and “All Occasion Tags” (retired?) for the sentiment.  I used the Spellbinders Wonky Square die for this reverse mask as well.


I also did a card a few weeks ago where I used the negative of a flower die cut to create the template for my image using the Confetti Cluster Stamping technique.

Confetti Cluster FLower Card DSCN9112

You can see my original post (HERE).


And finally, here is a sample of where I used the actual negative on my card of a heart I created and cut with my Silhouette.

With Love Anniversary Card DSCN5803

You can see the original post in my stamptv gallery.   (Sadly, this site is no longer active.)


I can’t wait to see your “Positively Negative” creations over at the Mod Squad Challenge Blog this week!

Thanks for checking out my post!

This content uses referral links as described in the disclosure policy on my sidebar.

Positively Negative Thank You Note

Positively Negative Thank You Note

xDSCN6243.jpg

I am so excited to have been asked to be the guest hostess for this week’s Mod Squad Challenge!  (Sadly, this site is no longer active.)

My challenge, called Positively Negative, is to create a project using the negative of a die (manual or electronically cut), punch, or hand-cut shape. (http://modsquadchallenge.blogspot.com/2015/05/positively-negative.html

The negative is the piece of paper (or other medium) from which the shape or shapes were cut. There are many different ways you could use the negative. You could do Confetti Cluster Stamping using the negative as your template. You could do Reverse Masking to create a background for your images.   You could use the actual negative on your project.   Stencils are negatives, too!   These are just a few examples of ways to use the negative on your project.

I needed to make a few thank you notes and wanted to create something that was easy to duplicate and wouldn’t require extra postage or a trip to the post office!

Using Gina K “Edible Eggplant” ink, I stamped my flourish (from Inkadinkado’s “Dot Flourishes“) and greeting (from Gina K Designs “Thank You Duo” – retired?) on a piece of Bazzill “Infatuation” card stock.

I wanted my flowers cut from this panel with the patterned paper showing through the “holes” left by the dies, and I also wanted a darker inner border showing around the inside border of each flower.  The problem was that I don’t have smaller dies to make the borders , so I placed this panel on a slightly larger panel of Gina K “Edible Eggplant” card stock, lining them up in the lower right corner (as shown)

wwDSCN6224

… and die cut the flowers (through both panels at once) using dies from the Momenta Flowers 2 (Lot 004798) die set.  (I added a bit of repositional adhesive to keep the two panels in place temporarily.)  Once the flowers were cut, removed (and saved for a later project!), I centered the lighter purple panel on the darker one.  This caused the cut-outs to be slightly offset creating a partial “shadow” effect.  It didn’t go around the flowers perfectly or completely, but it was enough to add a little contrast between the light panel and the patterned paper.  This matted panel was adhered to the patterned panel (“Dark Plum Damask” – Sonnets by Sharon – Creative Imaginations) and then to an Edible Eggplant card base. Lavender Gem Stickers  (Martha Stewart Crafts) were added to the centers of the flowers and on the flourish.

wDSCN6260

The Mod Squad Challenge prize (for a randomly drawn winner) is “stuff” from my stash [Spellbinders “Circles” Impressabilites (which can be used as a stencil if you don’t have a machine for embossing), two packs of metal embellishments, and silver foil tape.

Prize Photo

Join us for the Mod Squad “Positively Negative” Challenge this week.  (Details on the rules can be found HERE.)  I can’t wait to see what you create!  (Sadly, this site is no longer active.)

Thanks for checking out my card project and post!

This content uses referral links as described in the disclosure policy on my sidebar.