Monkey with Balloons Birthday Card

Monkey with Balloons Birthday Card

Monkey With Balloons vDSCN7738.jpg

This card features the Monkey with Balloons stamp by Great Impressions. It was stamped with Memento Tuxedo Black ink and colored with Copic Markers (monkey:  E31, E25, E27, E29; balloons:  E30, E35, R59, G99). The greeting is from a set called “Just Fore You” by C.C. Designs. The white cardstock was cut with a die from the Spellbinders “Pierced Rectangles” set (#SCD-012) and mounted on Gina K Designs Honey Mustard and a sheet from the GKD “Autumn Wishes” patterned paper pack.

HAPPY BIRTHDAY, KEITH!

Thanks for checking out my card project!

This content uses referral links as described in the disclosure policy on my sidebar.

Elephant Birthday Wishes

Elephant Birthday Wishes

Elephant Birthday Wishes zzzDSCN7917

I used the Elephant with Kite stamp from Great Impressions and masked the kite so I could add a birthday balloon instead.  The single balloon was part of a trio of balloons on a stamp from the “Happy Birthday to You” set by Gina K Designs.  These were stamped with Memento Tuxedo Black ink and colored with Copic Markers (elephant:  YR00, W1, W3, W5; balloons:  YR000, YR00, Yr04) and a Faber Castell White Pitt Pen.  The greeting is from the “Just Fore You” stamp set by C. C. Designs.  The white cardstock was cut with a die from the Spellbinders “Pierced Rectangles” set (#SCD-012) and mounted on Gina K Designs Blue Lagoon and a sheet from the GKD “Made With Love” patterned paper pack.

HAPPY BIRTHDAY, KEVIN!

Thanks for checking out my card project!

This content uses referral links as described in the disclosure policy on my sidebar.

Happy Valentine’s Day

Happy Valentine’s Day

Happy Valentine's Day zDSCN7485.jpg

I made a pink card today.  I know… it’s not my usual color scheme!  And when I told my daughter that I was planning a pink card, she joked that I would still probably manage to get some brown on there… and I did!  It’s light, but it’s there!!  🙂

I purchased the beautiful patterned paper for my center three panels from Etsy.  It is part of a digital pack called “Textured Valentine Grunge” from a store called TheDigitalStash.  These panels were mounted on Gina K Designs Cranberry Tart card stock.  The print had a touch of tan running through it, so I added a bit of Recollections paper from a pack called Neutrals.  I also used a piece of pink from the DCWV Brights textured card stock pad.

I added a bit of texture to the tan panel with my crimper.

The greeting was a stamp by Craftsmart that I picked up in a bargain bin at one of the craft stores (AC Moore, I think?) and was stamped with Gina K Cranberry Tart ink.

I used to laugh when I was teaching 5th grade when Valentine’s Day would roll around.  This was one of the holidays for which our PTA would “host” classroom parties.  Prior to the big day, I had my students create and decorate folders to hang on the fronts of their desks so they had a place to deposit the Valentines that they brought in for all their classmates.  Imagine… a bunch of 5th graders exchanging “love notes” with every student!  (It was quite a hoot watching them open them in class. Some of them seemed to take it so seriously, making eye contact with and smiling at the senders as they opened their cards.)  Anyway, I always made a sample or two of these folders to get their creative juices flowing, and now, every time I create a Valentine’s Day card, I remember that silliness all those years ago!!  Fun times!!!  🙂

Thanks for checking out my card project!

This content uses referral links as described in the disclosure policy on my sidebar.

Another Wine & Cheese Thank You

Another Wine & Cheese Thank You

Stamped Wine and Cheese zDSCN7601.jpg

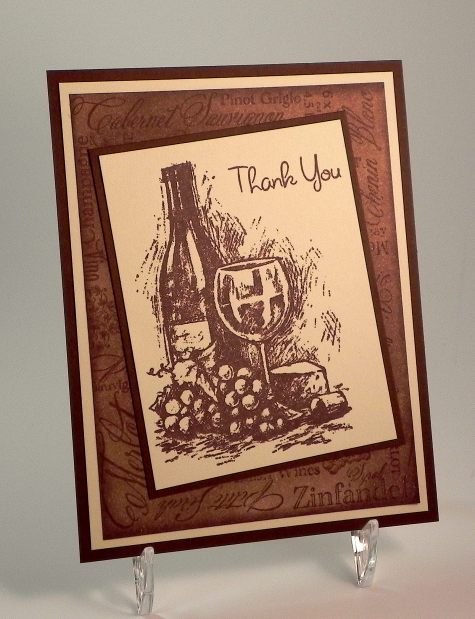
This card (above) was actually my 3rd attempt at a thank you note with this wine and cheese stamp by Inkadinkado (and not completely planned).  As I mentioned in a previous post, I had an idea I had wanted to try which was inspired by a card project called “Peace, Love, Joy Holiday Card” using an emboss resist technique that I saw on StampTV.  This 2nd attempt is here:

embossed wine and cheese zzDSCN7583

I followed the “recipe” in the video.  I began by stamping the background stamp called “Wine Labels” by Stampendous with Memento Warm Cocoa ink on ivory card stock.  Then I embossed the wine and cheese image on top of that with versamark ink and clear embosssing powder.  Finally, I sponged Memento Toffee Crunch and Warm Cocoa ink over the whole panel.  (I needed to go much darker than Gina did in her video because I couldn’t see the embossed image.)  This panel was layered on ivory card stock and brown card stock from a Recollections pack called Neutrals.

I felt like the wine and cheese image was a little too small, that it was difficult to see all the image’s details, and that the words behind it were completely lost.  (With this technique, you should see the brown words through the clear embossing.)

I was kind of annoyed at this point, because I was sure I would like this version better than I did.  I then decided to stamp the thank you and wine & cheese images on a scrap of ivory card stock with the Warm Cocoa ink just to see how that would look.  When I placed that panel on my desk, it happened to “land” on the other card.  Much better!!  I created another background panel, adhered my new stamped panel, and was good to go – finally!!

I don’t think I would have come up with that background had I not tried the emboss resist technique first.  (I had actually ordered that stamp specifically for that technique.)  But that was exactly the look I had in mind before my chalkboard technique attempt.  It took me a while, but I finally got there!!

Thanks for checking out my card projects!

This content uses referral links as described in the disclosure policy on my sidebar.

Stamped and Sponged Masculine Birthday Card

Stamped and Sponged Masculine Birthday Card

Stamped and Sponged Masculine Birthday Card zDSCN7570.jpg

Over at the Mod Squad Challenge this week, we are encouraged to make a Masculine Birthday card.   (Sadly, this site is no longer active.)  I’ve not participated in a challenge in quite some time and have been struggling with getting back into the card-making mood so I thought I’d give this one a try!  I decided to go with a “back to basics” approach with some basic sponging and stamping.

For my background panel, I sponged Memento Warm Cocoa, Toffee Crunch, and Gina K Blue Denim inks on a piece of white card stock.  The mask I used to create the border pattern on the left is from a set called “Borderline Masks” by Tim Holtz.  I used the Warm Cocoa ink to stamp a portion of the “Musical Collage” stamp by Hero Arts onto my inked panel along with some speckles with a stamp from the Tim Holtz “Visual Artistry Collection Nature’s Elements” stamp set.  The greeting is from the “Pleasant Plurals” stamp set (retired?) by Gina K Designs.  In addition to the white card stock for my base, I also used a few sheets from a paper pack called “Neutrals” by Recollections.  A piece of twine finished off my card.

Thanks for checking out my card project!

This content uses referral links as described in the disclosure policy on my sidebar.