Autumn Heron Card

Autumn Heron Card

Autumn Heron Card

Did you ever have this idea for a card project in your head, and when you look at the finished card, you realize it was nothing like what you started out creating?!  That is this card.  It was supposed to be a single layer card with the beach scene (completely different from this design!) sponged in the leaf mask. Several “start overs” ending with a smudge on the background, a masking mishap when the background was being sponged to cover the smudge, and discovering that a spot that previously had glue on it can’t be inked all led to this design!  Perhaps I will attempt the first design again at some point.  We’ll see…..

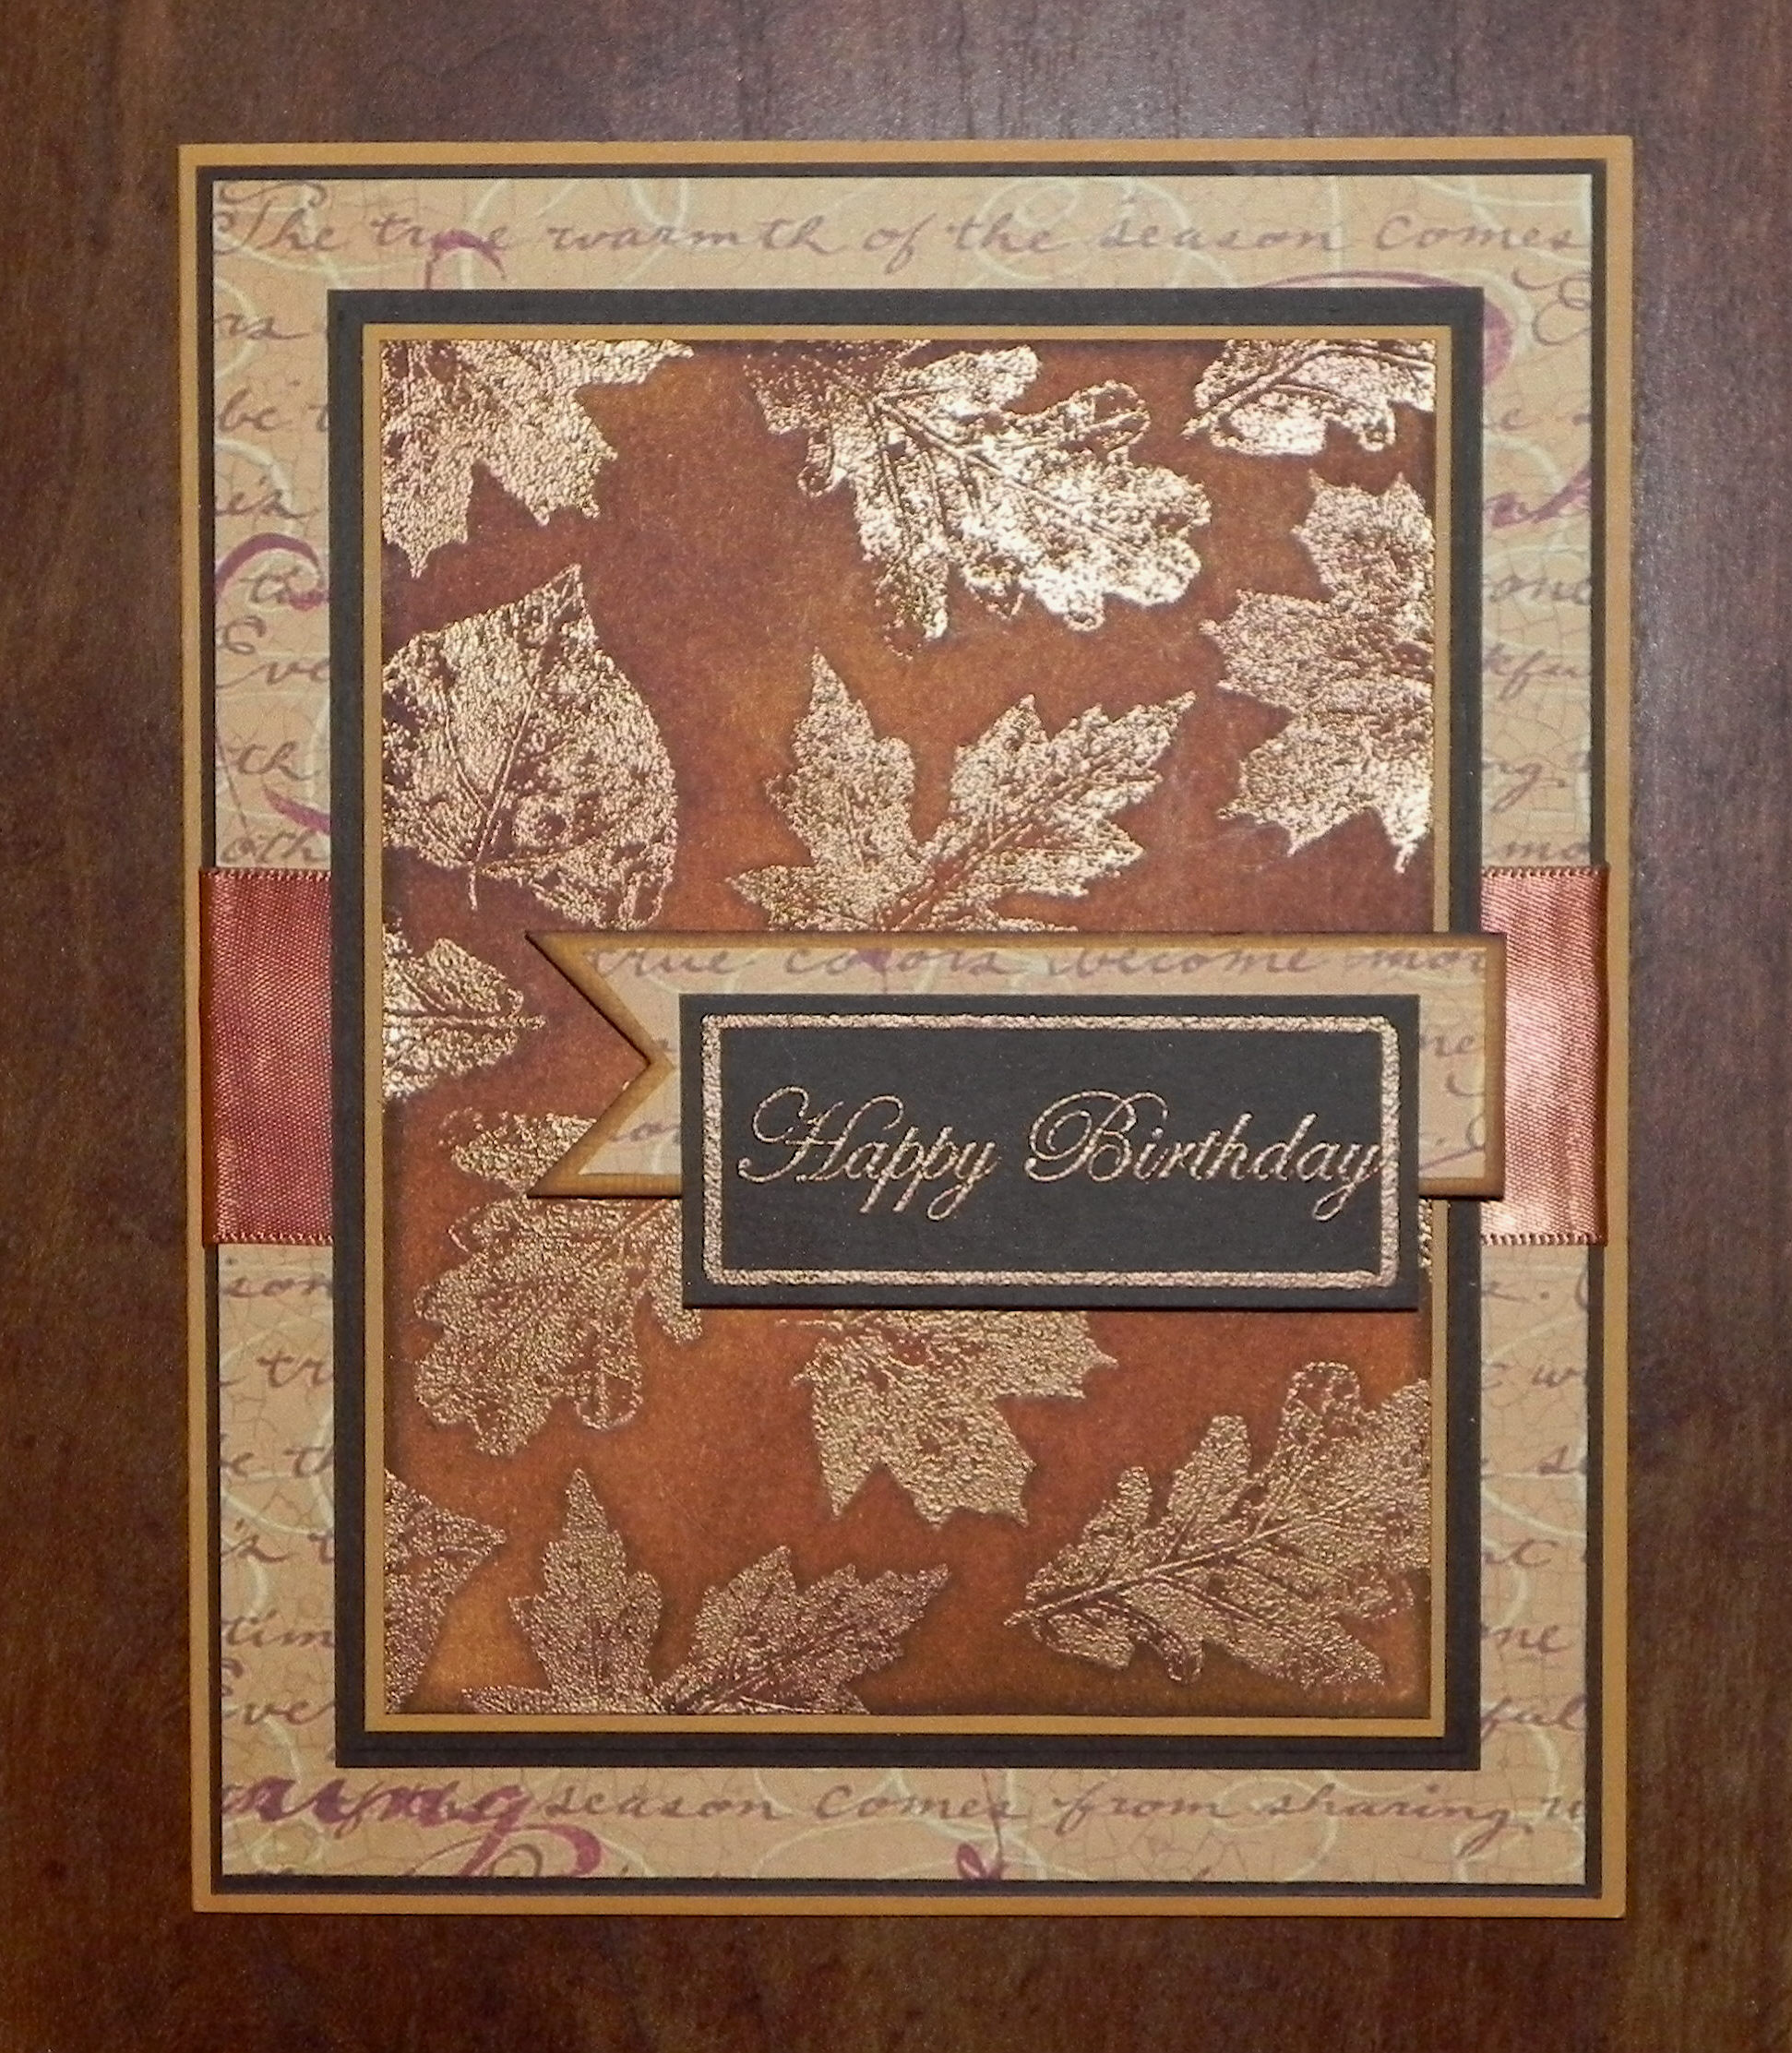
Anyway, for this card, I used the heron from the Gina K Designs “Follow Your Dreams” set and the greeting from the Gina K Designs “By the Sea” set.

The leaf shape was a mask I traced and hand cut out from an old stencil/tracer I had in my collection. There is no label on the stencil, and I no longer have the original package so I’m not sure who designed it.

I created masks and sponged ink to create the tranquil beach scene.  In trying to create a peaceful autumn feel to the card, I chose warm colors and made it a sunset scene.  The inks I used were Memento desert sand and tuxedo black, and Tim Holtz gathered twigs, scattered straw, rusty hinge, brushed corduroy, frayed burlap and chipped sapphire distress inks.

To add details, I used Copic markers Y00, B91, 0 and Y28 and a Faber-Castell white pitt pen.

The card stock I used was gina k sandy beach, warm cocoa, and white.

To add texture, I used a Sizzix (Stampin’ Up) Textured Impressions “Stripes” embossing folder.  I also used “Mudd Puddles – Tahiti Beach” for the sand.  I found this at a scrapbook expo I went to last month.  The Mudd Puddles come in a variety of textures, and I bought one of the sand ones to try.  It’s basically glue with the texture stuff mixed in.  I tried to apply it with a paint brush, but it probably would have been easier to “rub” it on or spread with a small knife, a popsicle stick or something similar.  A toothpick would probably  have been helpful to get it in the small spots.  Originally I tried to cover the entire area, and then I ended up removing some of it.  I’ll have to continue to play with it to really get the hang of how best to apply it.

This card is being entered in the StampTV MIUM “Critter Card” Challenge where we are to use a critter of any kind … if it flies, flutters, hops, walks or swims, it’s usable. My critter is a heron that flies.  (Sadly, this site is no longer active.)

It is also being entered in Lee’s StampTV “Stamp Out Cancer – Challenge #1 – Comforts” where we are to use an image that brings comfort. (I delayed originally adding this tag until I checked with Lee to make sure entering two challenges with the same card was ok!) My card has a tranquil beach scene at sunset which I find very soothing and comforting. The sentiment reminds the recipient that he/she is being thought of by a loved one which is also comforting when one is sick.  (Sadly, this site is no longer active.)

Thanks for checking out my card project!

This content uses referral links as described in the disclosure policy on my sidebar.

Primitive Thank “Ewe” Card

Primitive Thank “Ewe” Card

Primitive Thank Ewe Card

The sheep image I used for this project is from the Gina K Designs “Primitive Blessings” set, and the greeting is from the Gina K Designs “Fleece Navi-baa” set. Card stock used is Gina K kraft, cranberry tart and black. Inks used are Gina K kraft, warm cocoa, and in the navy, Memento tuxedo black and desert sand, and Tim Holtz aged mahogany and walnut stain distress inks. Copic markers used are R59 and E59.

The star was cut with a Sizzix Bigz die called Star, Primitive #2 which I cut with my Cuttlebug (using the die and 2 “b” plates). I rubbed Tim Holtz aged mahogany distress ink directly from the ink pad onto the card stock and then sponged more on the edges.

The berries were originally white (part of a small rose piece that I found in the wedding aisle at AC Moore). I removed the berries and air brushed them with my Copic Airbrush System and Copic Markers R59 and then E59. I added these to the jute and moss embellishment.

The “wood” background panel is kraft card stock, scored every 3/4 of an inch and inked with Gina K kraft ink. Once it was dry, I went over the panel lightly and sparingly with Tim Holtz walnut stain distress ink. I sponged this on the edges as well. It was then matted with black card stock.

The sheep was stamped with Gina K in the navy ink on kraft card stock. He was then masked so I could sponge on the background with Gina K warm cocoa ink on the bottom and Memento desert sand on the top. The red on the flag is copic R59. For the frame, I used 2 Spellbinders classic rectangles (large) dies and then needed to trim the edges slightly so it would fit on the card. The frame was inked first with walnut stain ink directly from the pad, and then sponged around the edges inside and out. Then I went over the whole frame with Gina K warm cocoa ink with a sponge. The sheep was cut to fit behind the frame and adhered with pop dots.

A scrap of kraft card stock was sponged with Gina K warm cocoa ink. The greeting was then stamped in Memento tuxedo black. The tag is a Heartfelt Creations die from a set called Decorative Flower Pot (HCD 732). Once it was cut, I inked the edges with walnut stain ink and pinned it to the ribbon.

The card base is kraft sponged with warm cocoa ink and finished with walnut stain on the edges.

This card is being entered in the StampTV MIUM “Critter Card” Challenge where we are to use a critter of any kind … if it flies, flutters, hops, walks or swims, it’s usable. My critter is a sheep that walks!  (Sadly, this site is no longer active.)

This card is also being entered in the Simon Says Stamp Monday Challenge: Finishing Touch where we are to finish off our project with a stamp. I finished my project with my greeting stamped on a mini tag and pinned to my ribbon. (http://www.simonsaysstampblog.com/mondaychallenge/?p=1935)

Thanks for checking out my card project!

This content uses referral links as described in the disclosure policy on my sidebar.

Snowman From Above

Snowman From Above

Snowman from Above.jpg

The snowflake layers were cut with an svg file from a set by svgcuts called Winter Bliss SVG Collection.  (Click HERE to see the kit.)  The stamp is called “Snowman From Above” by Sylvia Yu, Rubber Soul.

This card is being entered in the Simon Says Stamp Wednesday Challenge- Anything Goes (http://www.simonsaysstampblog.com/wednesdaychallenge/simon-says-anything-goes-8/).

Thanks for checking out my card project!

This content uses referral links as described in the disclosure policy on my sidebar.

Mod Squad Challenge Blog Simply Stripes Spotlight Seven WINNER!

Mod Squad Challenge WInner

Mod Squad Challenge WInner

 (September 16, 2014)

csDSCN8735

(The host/hostess picked the “Top 3” which will be featured on PINTEREST.)

Click HERE to see the winning announcement.  (Sadly, this site is no longer active.)

Click HERE to see the original challenge post.  (Sadly, this site is no longer active.)

This card was originally posted in my StampTV Gallery.  (Sadly, this site is no longer active.)

Thanks for checking out my post!

Perfectly Rustics Masculine Card Challenge WINNER! & Mod Squad Masculine Birthday Challenge WINNER!

Perfectly Rustics Challenge WInner

Perfectly Rustics Challenge WInner

(August 25, 2014)

Mod Squad Challenge WInner

Mod Squad Challenge WInner

(August 19, 2014)

acDSCN8454

Click HERE to see the Perfectly Rustics Challenge winning announcement.  (Sadly, this site is no longer active.)

Click HERE to see the original Perfectly Rustics challenge post.  (Sadly, this site is no longer active.)

Click HERE to see the Mod Squad Challenge winning announcement.  (Sadly, this site is no longer active.) 

The host/hostess picked the “Top 3” which will be featured on PINTEREST.

Click HERE to see the original Mod Squad Challenge post.  (Sadly, this site is no longer active.)

This card was originally posted in my StampTV Gallery.  (Sadly, this site is no longer active.)

Thanks for checking out my post.