Fun Daisies

Fun Daisies

xDSC_8567.jpg

Recently, a friend of mine wanted to give card making a try. She found a few cards online that she liked and asked if I could show her how to make something like them.  This is my version of one of those cards.

Here’s the card I CASED:

100471123.jpg.rendition.largest

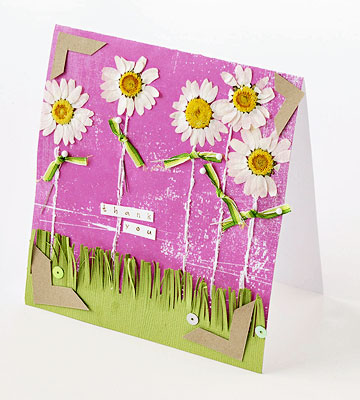
(from: Better Homes and Gardens, March 10, 2016)

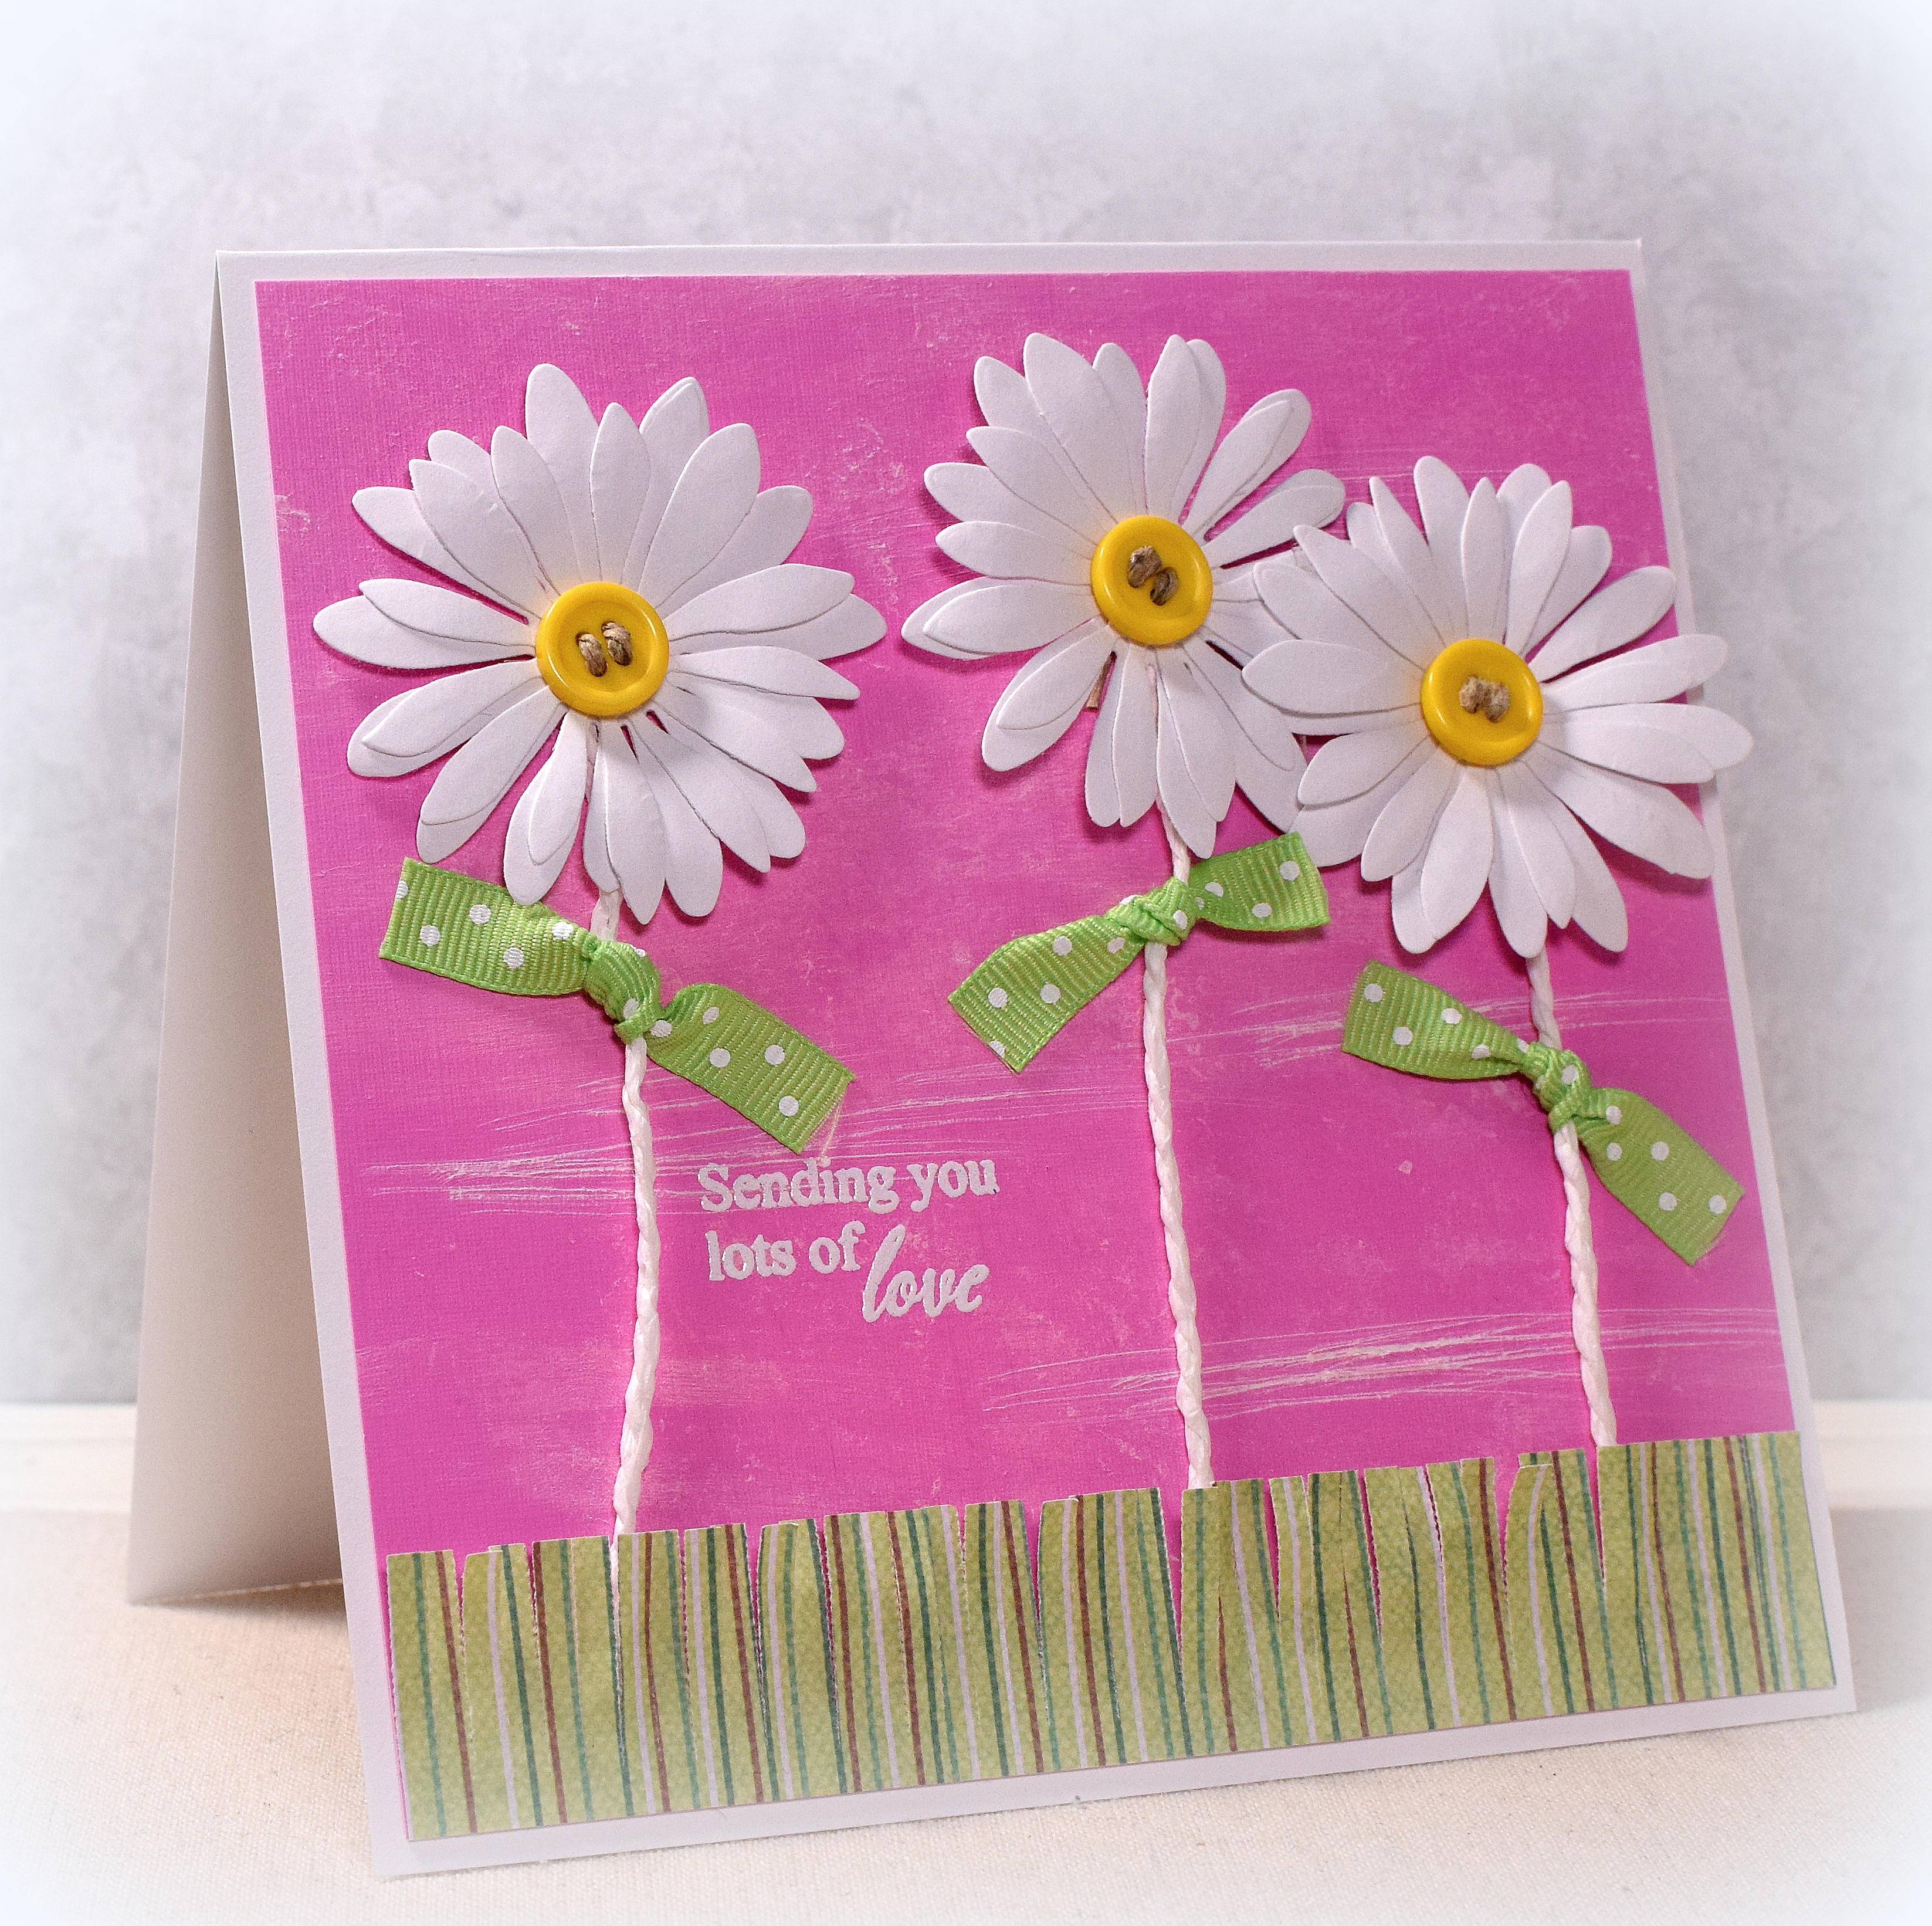
The original sample was adorable the way it was laid out, but if you are at all familiar with my style, you know I wouldn’t be able to glue my pieces down so randomly or crookedly … LOL!!  Also, the flowers on the sample were real daisies that were dried and pressed.  I used die cut flowers instead.

I played around with different stems, grass and the yellow central florets.  Here are two more versions.

xDSC_8571     xDSC_8582

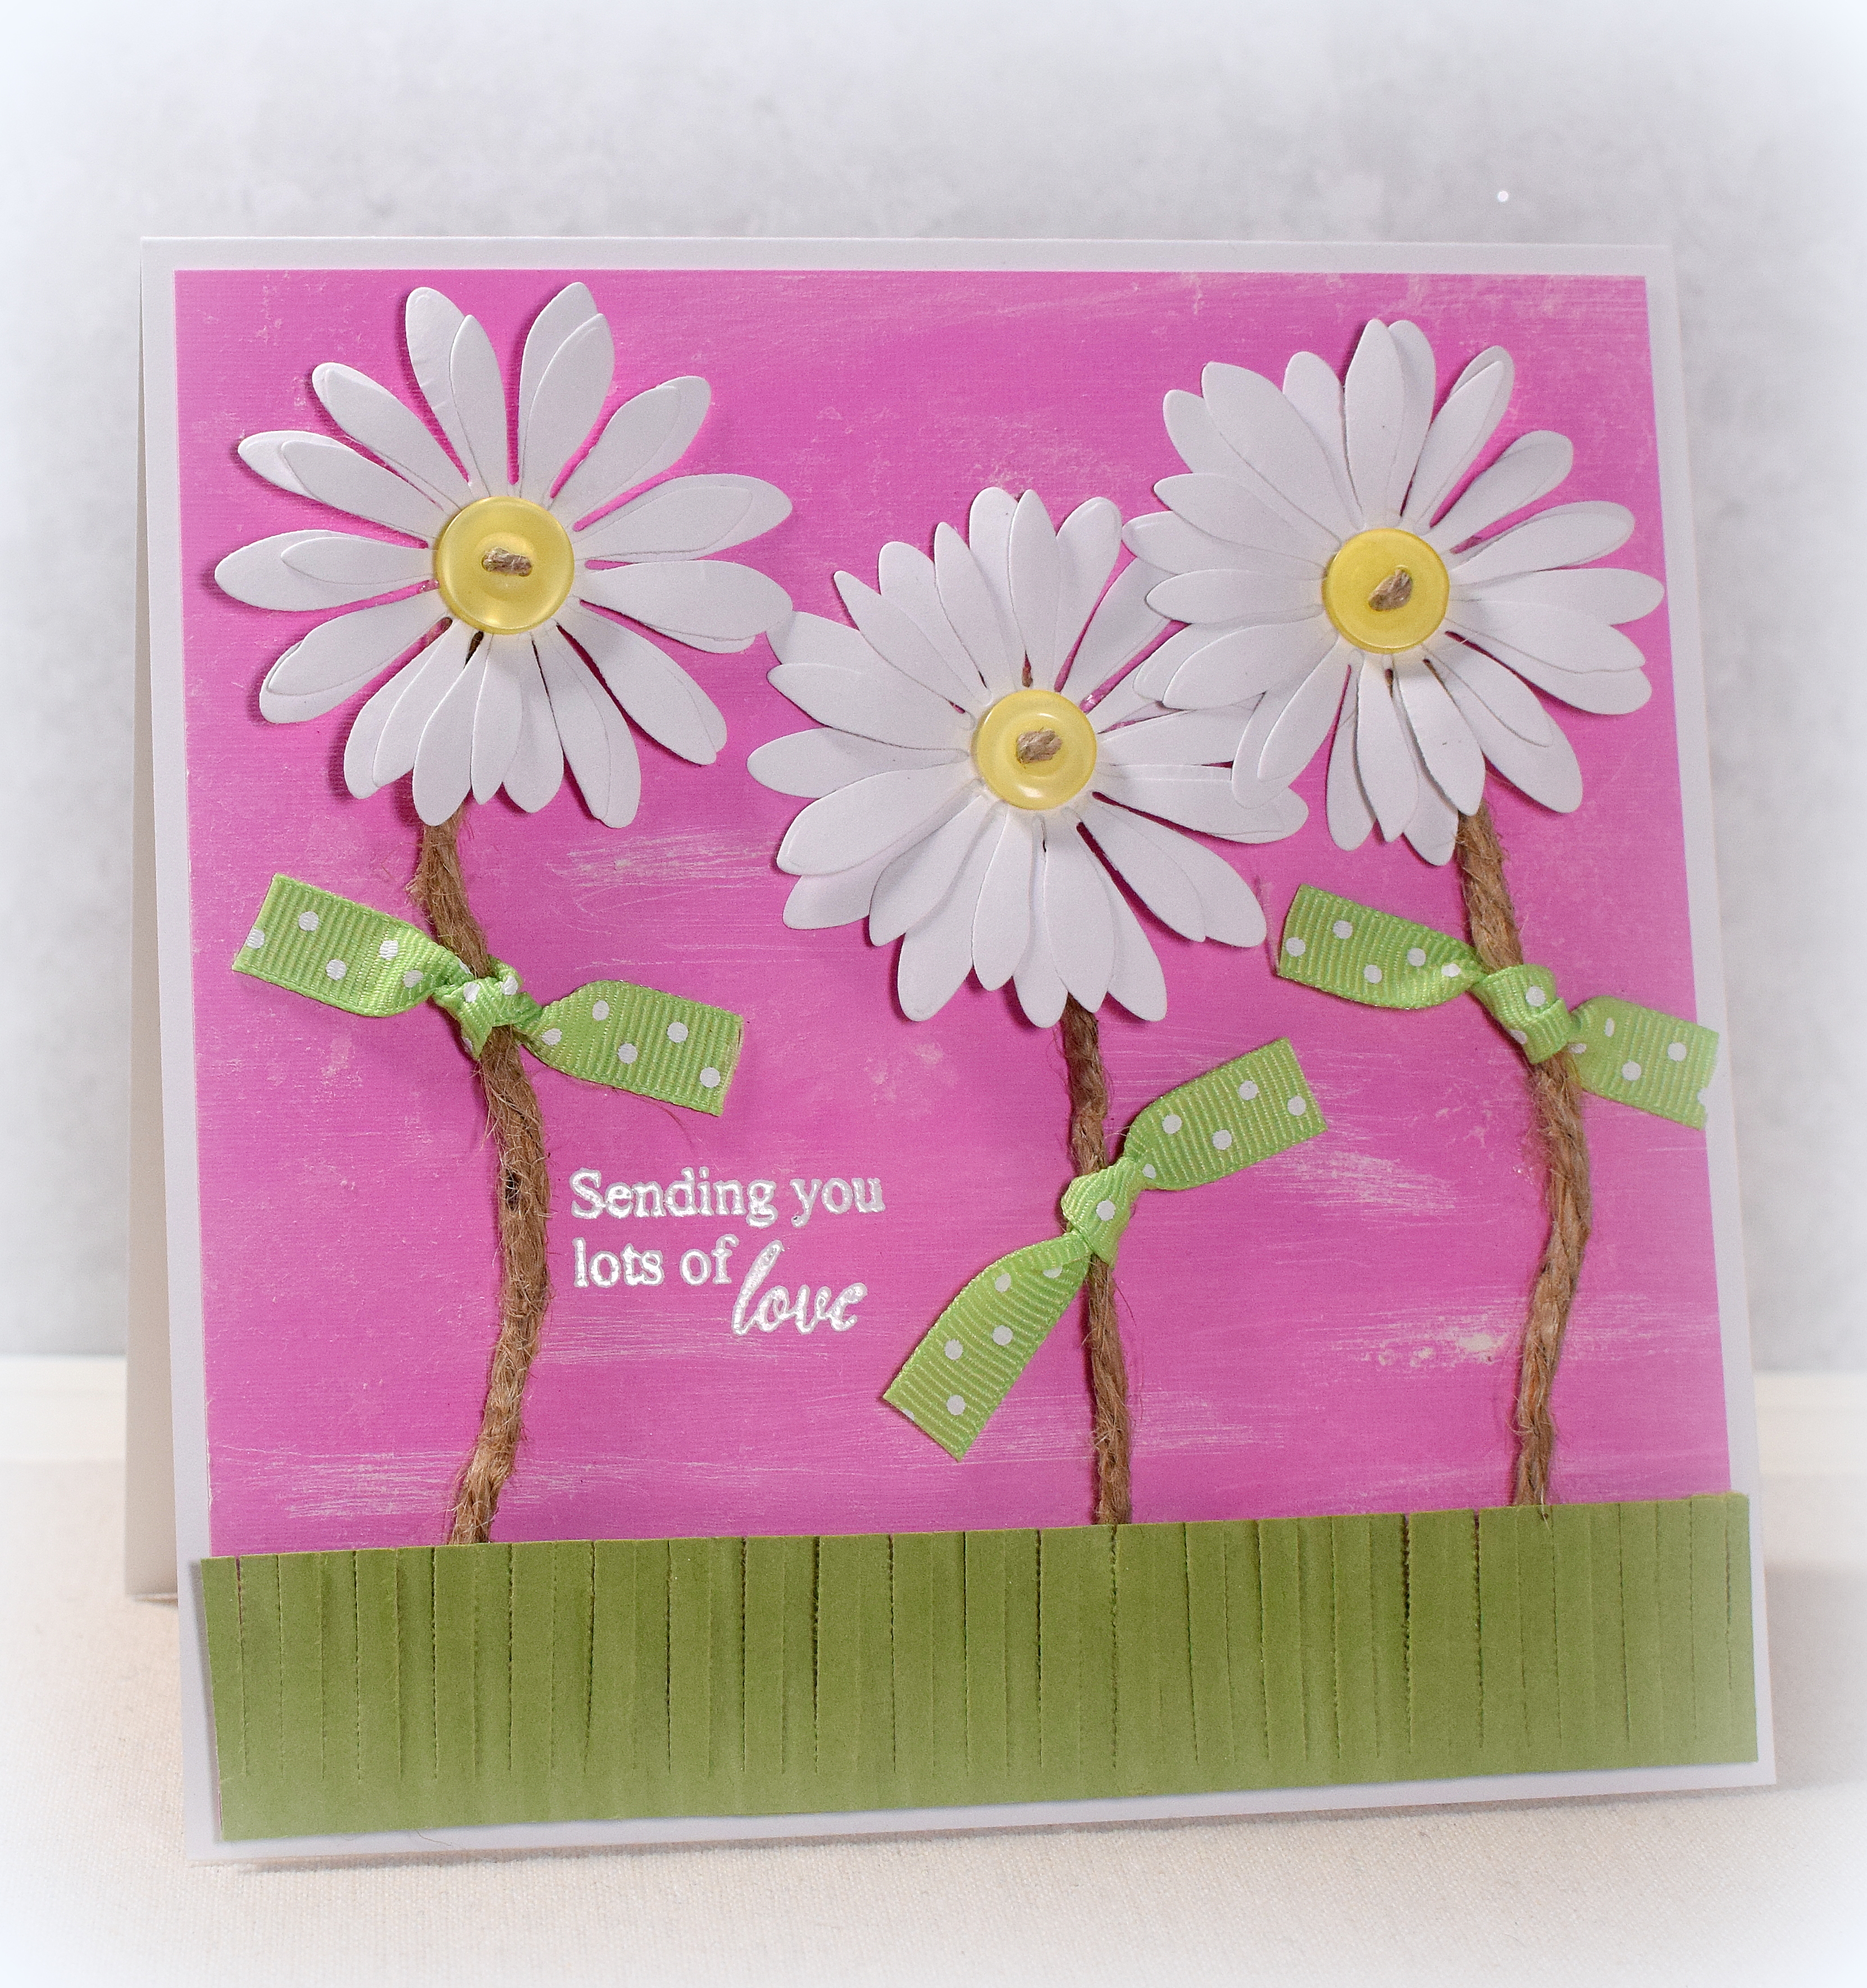
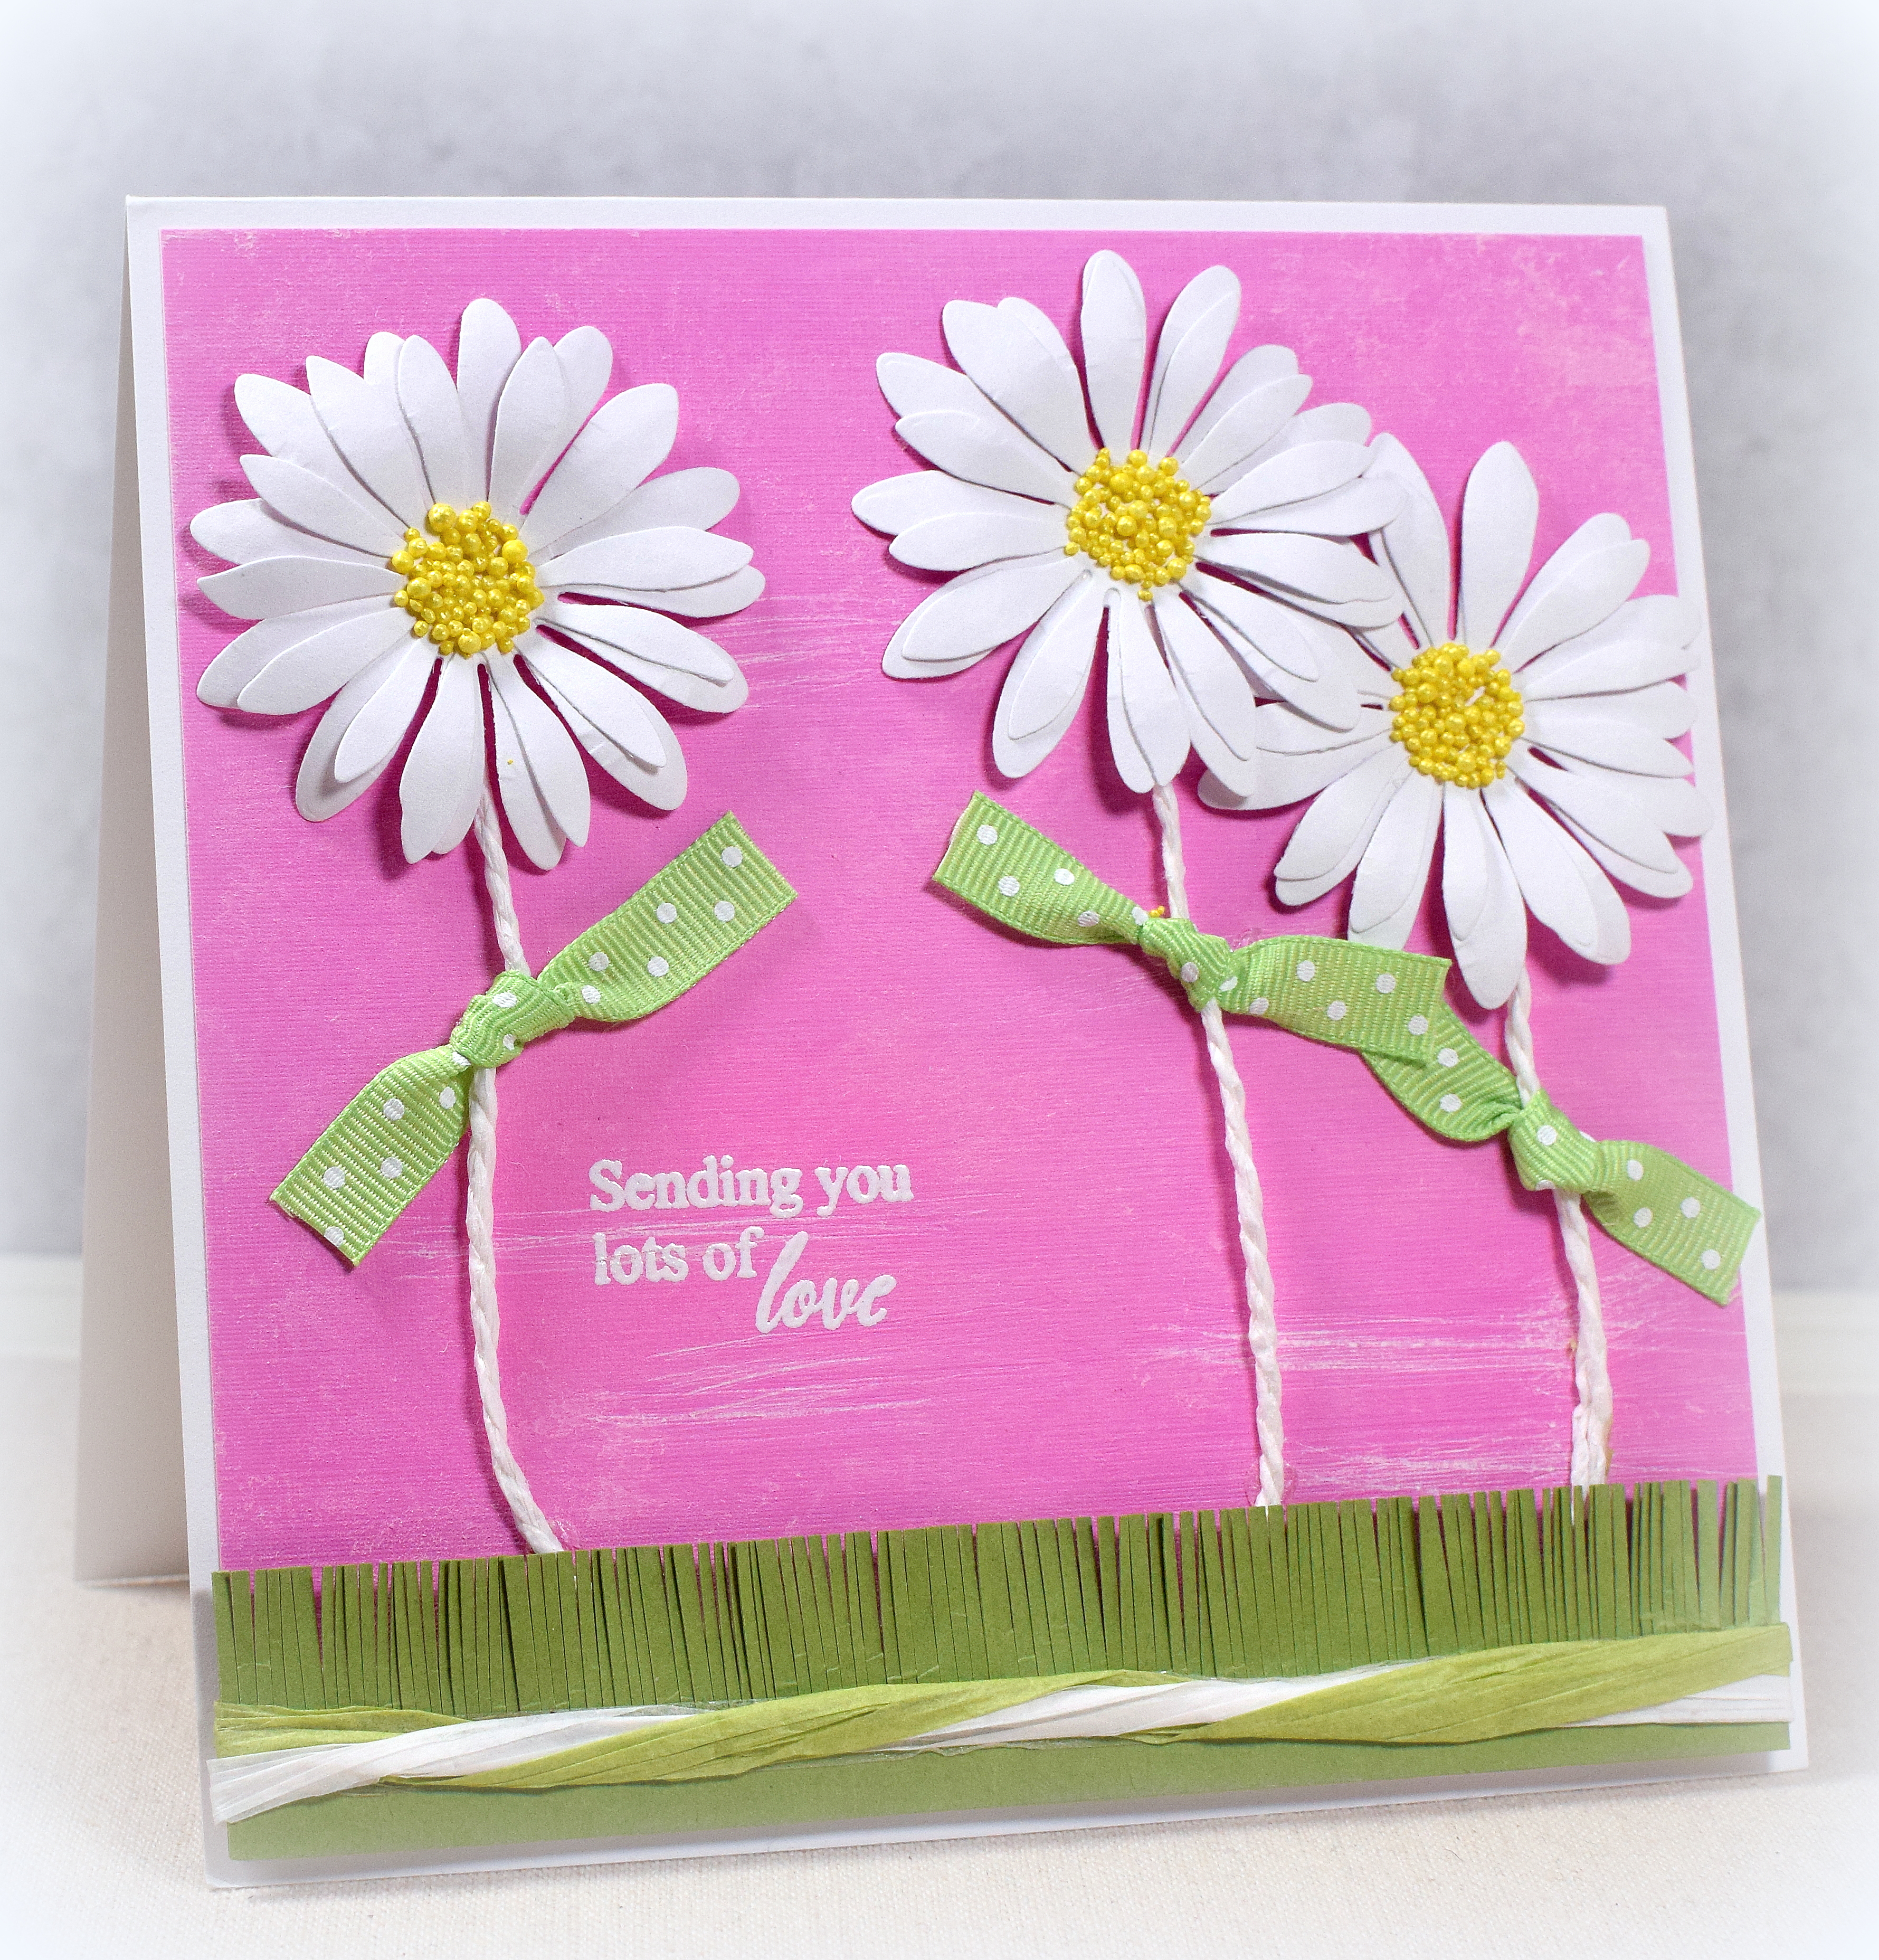
I couldn’t find the paper or ribbon used on the sample so I improvised.  The paper is from the “Pinks & Corals” pad by Craft Smith.  The paper has a white core so I was able to sand and scrape it up a bit.  I also rubbed white Gesso on the surface with a paper towel.  I was afraid to use too much, and now I feel like there is not enough white.  Next time…

For the stems, I used Recollections Jute Twine or white Darice Paper Rope.  The leaves are Celebrate It Swiss Dot ribbon from Michaels.  For the central florets, I used buttons from a mixed bag I purchased online or “You Had Me At Yellow” mini prills.

The daisies were cut with dies by Whitelotous.  The grass is Gina K Grass Green card stock or a scrap of printed paper from my stash (not sure which paper pad it came from).  Whaline Green and Celebrate It White raffia were also used.

The greeting is from the “Nurturing Blooms” set by Gina K Designs and was heat embossed with Ranger White embossing powder and versamark ink.  (You can see the shine a little better on the second sample.)

Thanks for checking out my card projects!

This content uses referral links as described in the disclosure policy on my sidebar.

Quilled Flowers in Vase

Quilled Flowers in Vase

Quilled Flowers in Vase wDSC_4805c picasa

(inside:  May your birthday be filled with love, laughter and everything that makes you HAPPY)

I made this 5×7 card for a birthday, although with no greeting added to the front, this design could be used for a variety of occasions.

I thought I’d try the circle shaping tool from the Border Buddy set by Quilled Creations for this project.  I started with 4 inch strips for the petals.  The purple petals were made by wrapping the strips around the smallest step, and after the circle coils were removed from the tool, I pinched each one flat and then gently pushed on the ends to create the opening in the centers.  The white petals were made with the second step and were barely pushed in on the sides to create ovals.  The swirly stems and leaves were hand coiled with a basic slotted quilling tool.  The loose yellow coils were made with the Quill Ease motorized quilling tool (which I talked about HERE).

The vase was made with the Spellbinders Shapeabilities Filigree Vase D-Lites Dies.  Because the quilled flowers are 3mm thick and needed to be tucked behind the vase, I made a few quilled coils using the same size strips to put behind the vase to raise it up to the level of the flowers.  It was like using foam squares but perfectly sized for this project.

The oval frame was cut with one of the Grand Ovals dies by Spellbinders and embossed with the Cuttlebug Swiss Dot embossing folder.

The pre-cut paper strips were from a pack by Quilled Creations.  The card stock used for the vase, card base and frame was Gina K Pure Pure White and Sweet Mango.  The sentiment on the inside was from the “Happy Birthday to You” set by Gina K Designs.

Over at Die Cut Divas, the challenge this month is to make your project sentiment free.  Dies and/or embossing folders must also be used.

The challenge over at The Paper Players is “Clean and Simple: flowers” where we are to use a flower on a CAS design.

Thanks for checking out my card project!

This content uses referral links as described in the disclosure policy on my sidebar.

Quilled Flowers and Swirls

Quilled Flowers and Swirls

wwDSC_4810c picasa.jpg

(inside: May your birthday be filled with sunshine, smiles, laughter, love and cheer!  Happy Birthday)

I’ve tried some basic quilling in the past and thought I’d give it another try here.

I used a few new (to me) quilling tools and techniques for this project.  The purple petals (marquise/eye shape) and round accents (tight coils) were made with the Quill Ease motorized quilling tool (which I talked about HERE).  The swirly “stems” were too thick for my slotted quilling tool so I held the ends with tweezers and hand coiled them.  I tried out a quilling comb for the leaf.

This is the first time I attempted the large swirls, and I found it challenging to glue them down exactly as I wanted them (the basic shape and to get the strips evenly spaced).  The problem is that once the piece (with glue) touches the paper, you can’t really move it or you have blobs of glue everywhere.  I have a whole new appreciation for the amazing, intricate designs I see on Pinterest!  I definitely need more practice!!

The pre-cut paper strips were from a pack by Quilled Creations.  The card stock used for the card base and panels was Gina K Pure Ivory and Wild Lilac.  The sentiment on the inside was from the Birthday Duo stamp set by Gina K Designs.

The challenge over at The Paper Players is “Clean and Simple: flowers” where we are to use a flower on a CAS design.

challenge

Thanks for checking out my card project!

This content uses referral links as described in the disclosure policy on my sidebar.

Vintage Waterfall Card

Vintage Waterfall Card

w a DSC_0822.jpg

A Waterfall Card is an interactive card that has a strip with cascading images.  When you pull on a tab, you can make hidden messages or images appear, while pieces of card stock fold over and look like a waterfall.   

w l DSC_0848

HERE is a tutorial for making one.

I created this vintage style waterfall card with a Mother’s Day greeting..  The “Happy Mother’s Day” greeting appears, along with a new image, when the tab is pulled.

      w a DSC_0822  w a DSC_0823  w e DSC_0831

For this project, I used paper from two digital paper packs I purchased on Etsy.  The floral background paper is from the “Floral Digital Paper Pack” (006) by AphroditaShop.  The images on the waterfall panels are from the “Vintage Ephemera Digital Paper Pack” by VintageLeChocolate.  The solid card stock was Gina K Innocent Pink and Sandy Beach.  Inks used were Gina K Innocent Pink, Warm Cocoa, and Kraft. The “Happy Mother’s Day” stamp is by Studio G, and I used the Stampendous Marble Texture Cube stamp on the greeting panels.  Recollection brads and some kraft ink on the edges added to the vintage look of the card.

Thanks for checking out my card project!

Pleated Skirt Fold – Mother’s Day Card

Pleated Skirt Fold – Mother’s Day Card

Pleated Skirt Fold Mother's Day Card yyDSC_0352.jpg

I was asked to co-host the Mod Squad Challenge again this week with the very talented Peggy Timmerman.  The theme of the challenge is MOTHER’S DAY.  (Sadly, this site is no longer active.)

For this card sample, I used two stamps from the Newton’s Nook Designs – Versatile Vases stamp set along with a die from the Gina Marie Designs – Stitched Rectangle Dies set and the Happy Mother’s Day border die by Lawn Fawn. All of these items are available at Kat Scrappiness who is one of the Mod Squad Challenge sponsors this week .

Versatile Vases Stamp Set

Kat stocks the products that she loves and uses as well as what her customers request.  If you don’t see it in her store, feel free to contact her.  She is happy to do special orders for you!  And she offers a DISCOUNT CODE for The Mod Squad Challenge: MSC10!

I had recently seen a card made with the Pleated Skirt Fold technique and thought I’d give it a try. For this technique, a two-sided piece of patterned paper works best since you see both patterns once the pleats are created.  I started with a 5 1/2 x 12 inch panel and scored it at 1 then 1/2 inch intervals.  (I wanted a tall panel with narrow pleats.)  HERE is the tutorial I found and adapted for my measurements.  The two-sided patterned paper I used is called “Mail Poste Correo” from the “From Me to You” collection by Pebbles.  The “white” on this paper was not pure white so I created my own matching card stock by coloring a plain piece of white card stock with Copic W1 for the stamped panel and the die cut greeting.  (The greeting die cut was cut apart so it would fit in the space on the bottom corner of the card.)

I stamped the flowers and vase with Memento Tuxedo Black ink and colored it with Copic Markers (BG78, V000, and R14).

I also created a mat for my card front by coloring the edges of a plain white piece of card stock with Copic Marker (BG78) to match the vase.  This panel was adhered to a white card base.

Here is another sample with different paper and a different stamp:

Pleated Skirt Fold Mother's Day Card wwDSC_0353

For this one, I used the tulip stamp from the Lawn Fawn – Fairy Friends stamp set along with a die from the Gina Marie Designs – Stitched Square Dies set and the Happy Mother’s Day border die by Lawn Fawn.  All of these items are also available at Kat Scrappiness.

Lawn Fawn Fairies Stamp Set

The two-sided patterned paper is called “Garden Walk” from the Happy Day collection by Pebbles.  The tulip was stamped with Memento Tuxedo Black ink and colored with Copic Markers (YG03, YG93, and R14).  I placed a piece of vellum behind my stamped panel to “separate” it from the busy background.

Now it’s your turn!  Head on over to the Mod Squad Challenge Blog, and show us your Mother’s Day projects. I can’t wait to see what you create!

Thanks for checking out my card project!