Silhouette Daisies

Silhouette Daisies

wwDSC_8556

This CAS card features the daisies from the “Various Verses” stamp set from Gina K Designs (retired?) and a greeting from the “Painted Harvest” set from Stampin’ Up.  Both were stamped with Versafine Onyx Black ink on white card stock matted on black.    A sponged background of Gina K  Ocean Mist and Applemint inks added a pop of color.

Using the same layout, the same mask for the sponging, and the same daisy stamp, I switched up the colors and made a birthday card as well.

wDSC_8557

On this version, the images were stamped with Versafine Vintage Sepia ink on white card stock.  (The greeting on this one is also from the “Various Verses” set.)  The ink for sponging and the card stock used was Gina K Peach Bellini and Kraft.

Thanks for checking out my card projects!

This content uses referral links as described in the disclosure policy on my sidebar.

Interactive Birthday Cake Card

Interactive Birthday Cake Card

wDSC_7112.jpg

(Inside:  Wishing you the Best on your Special Day)

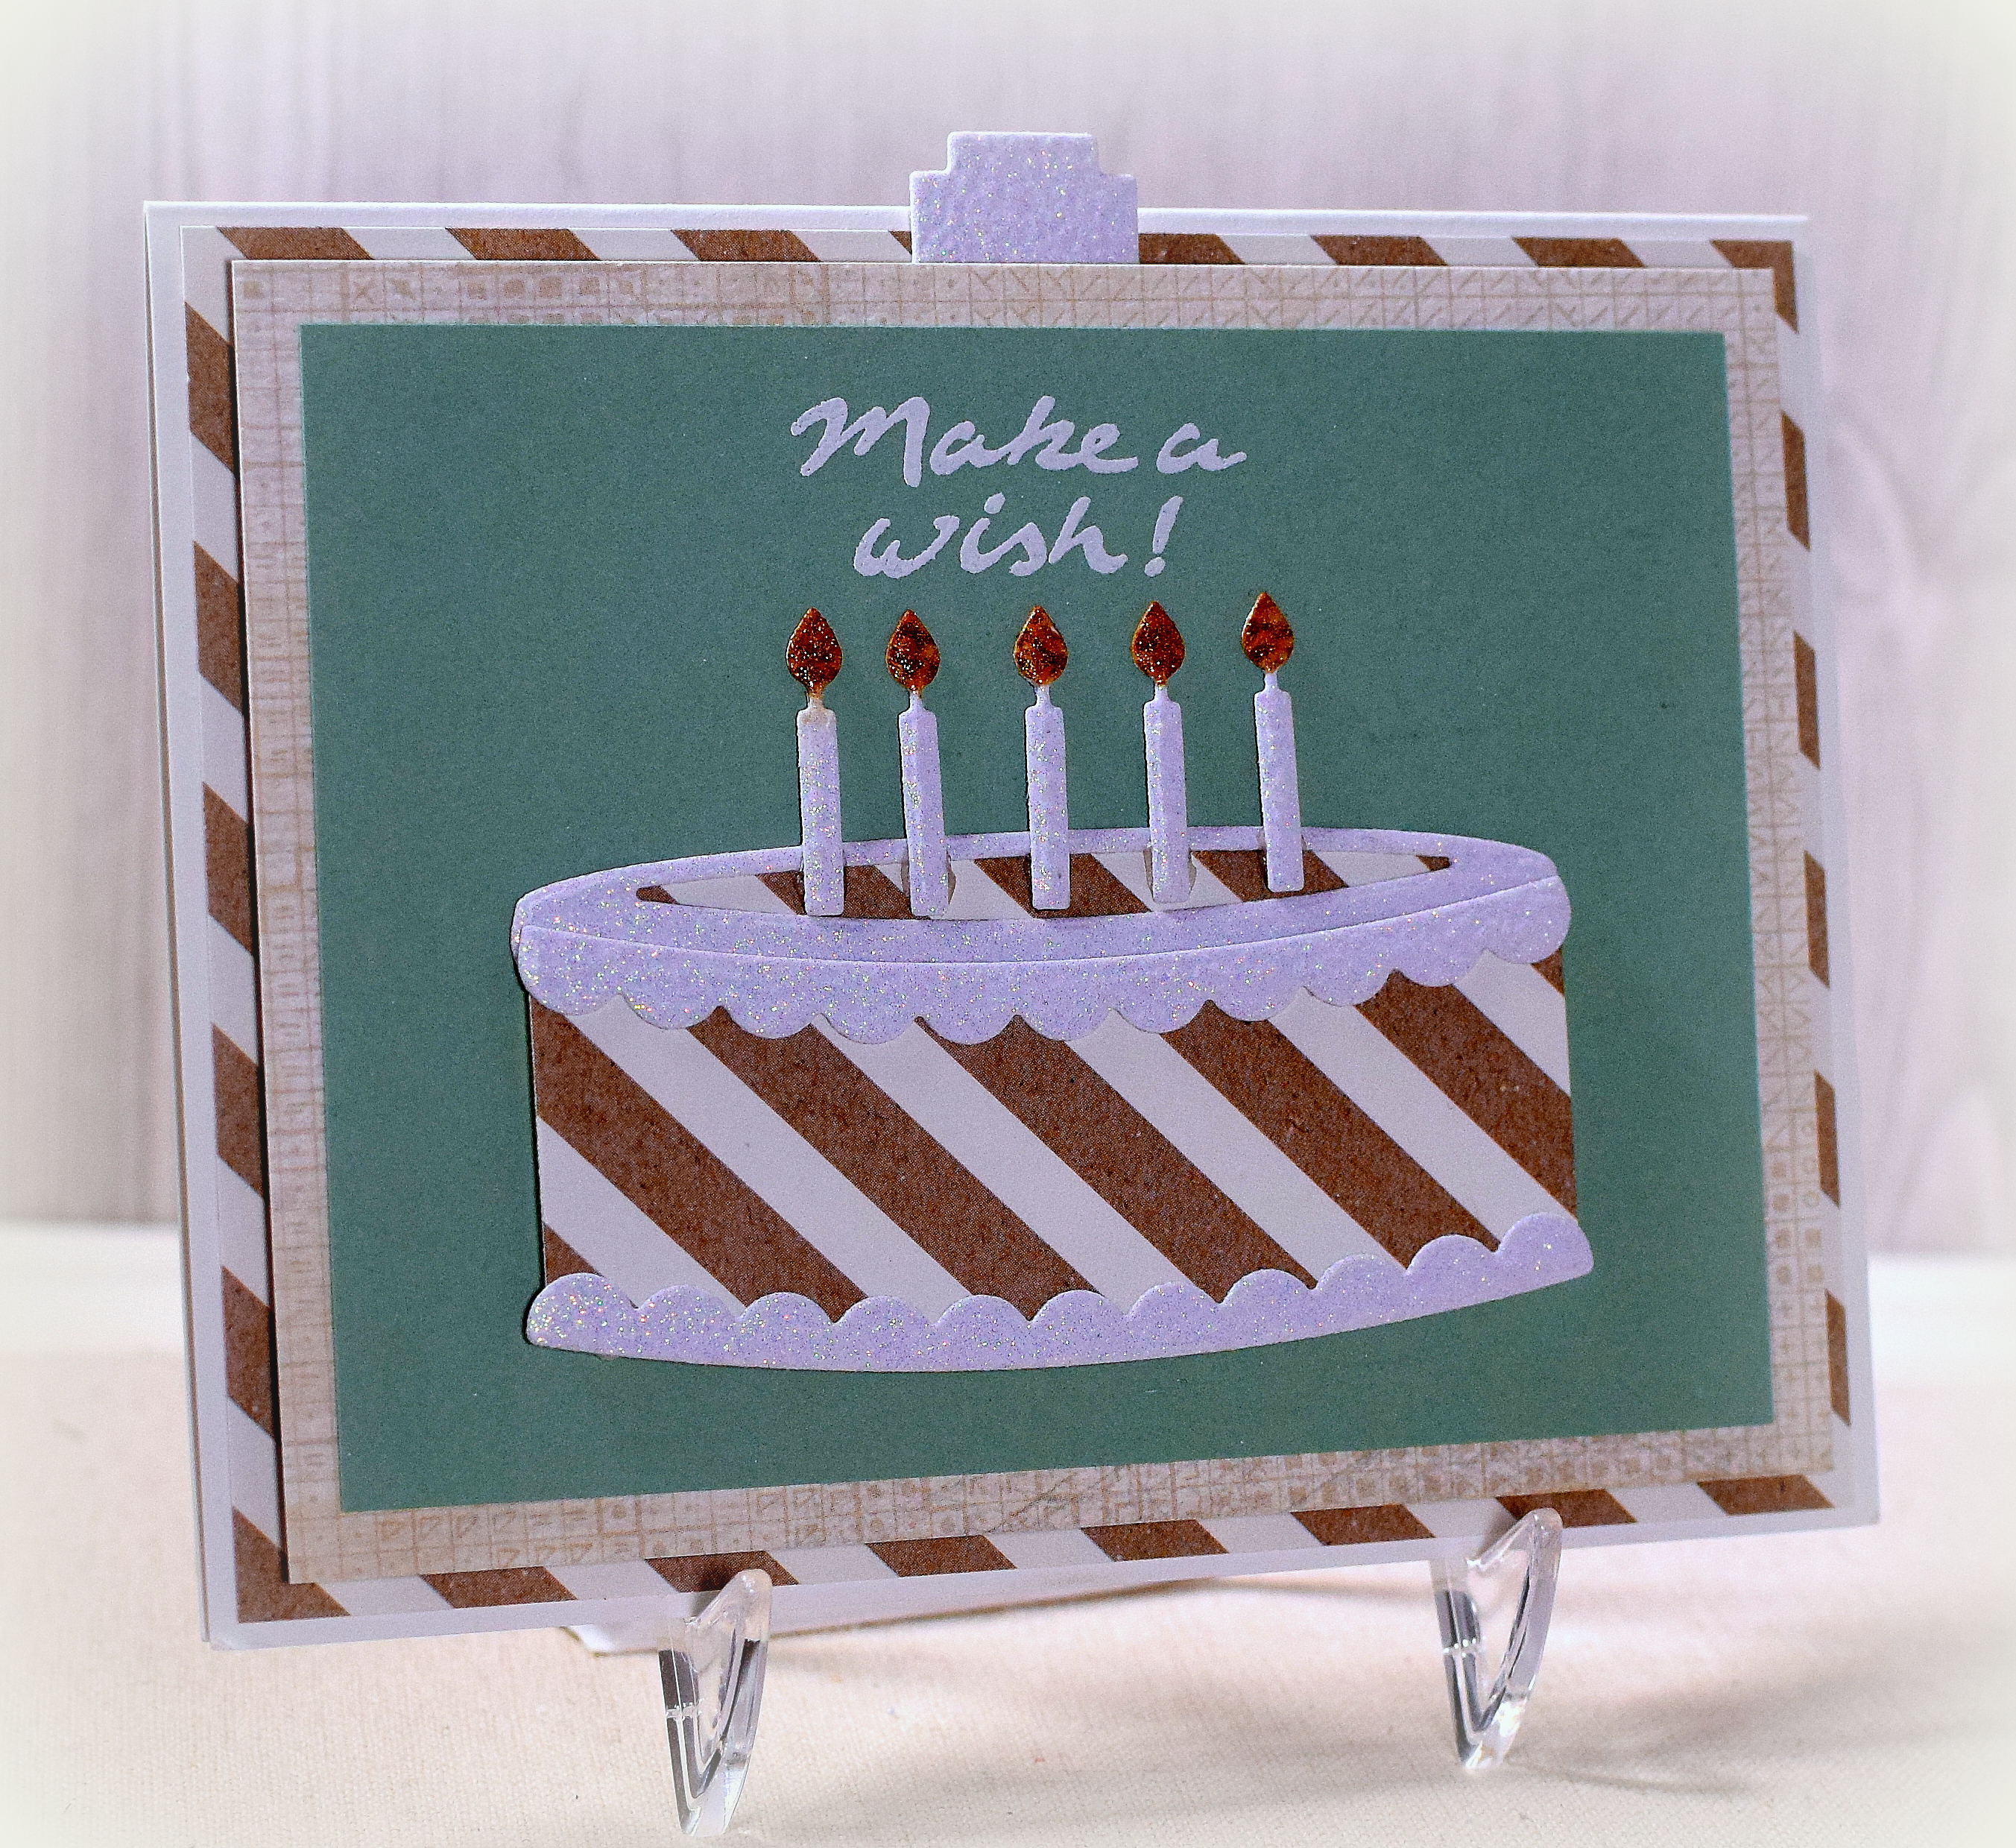
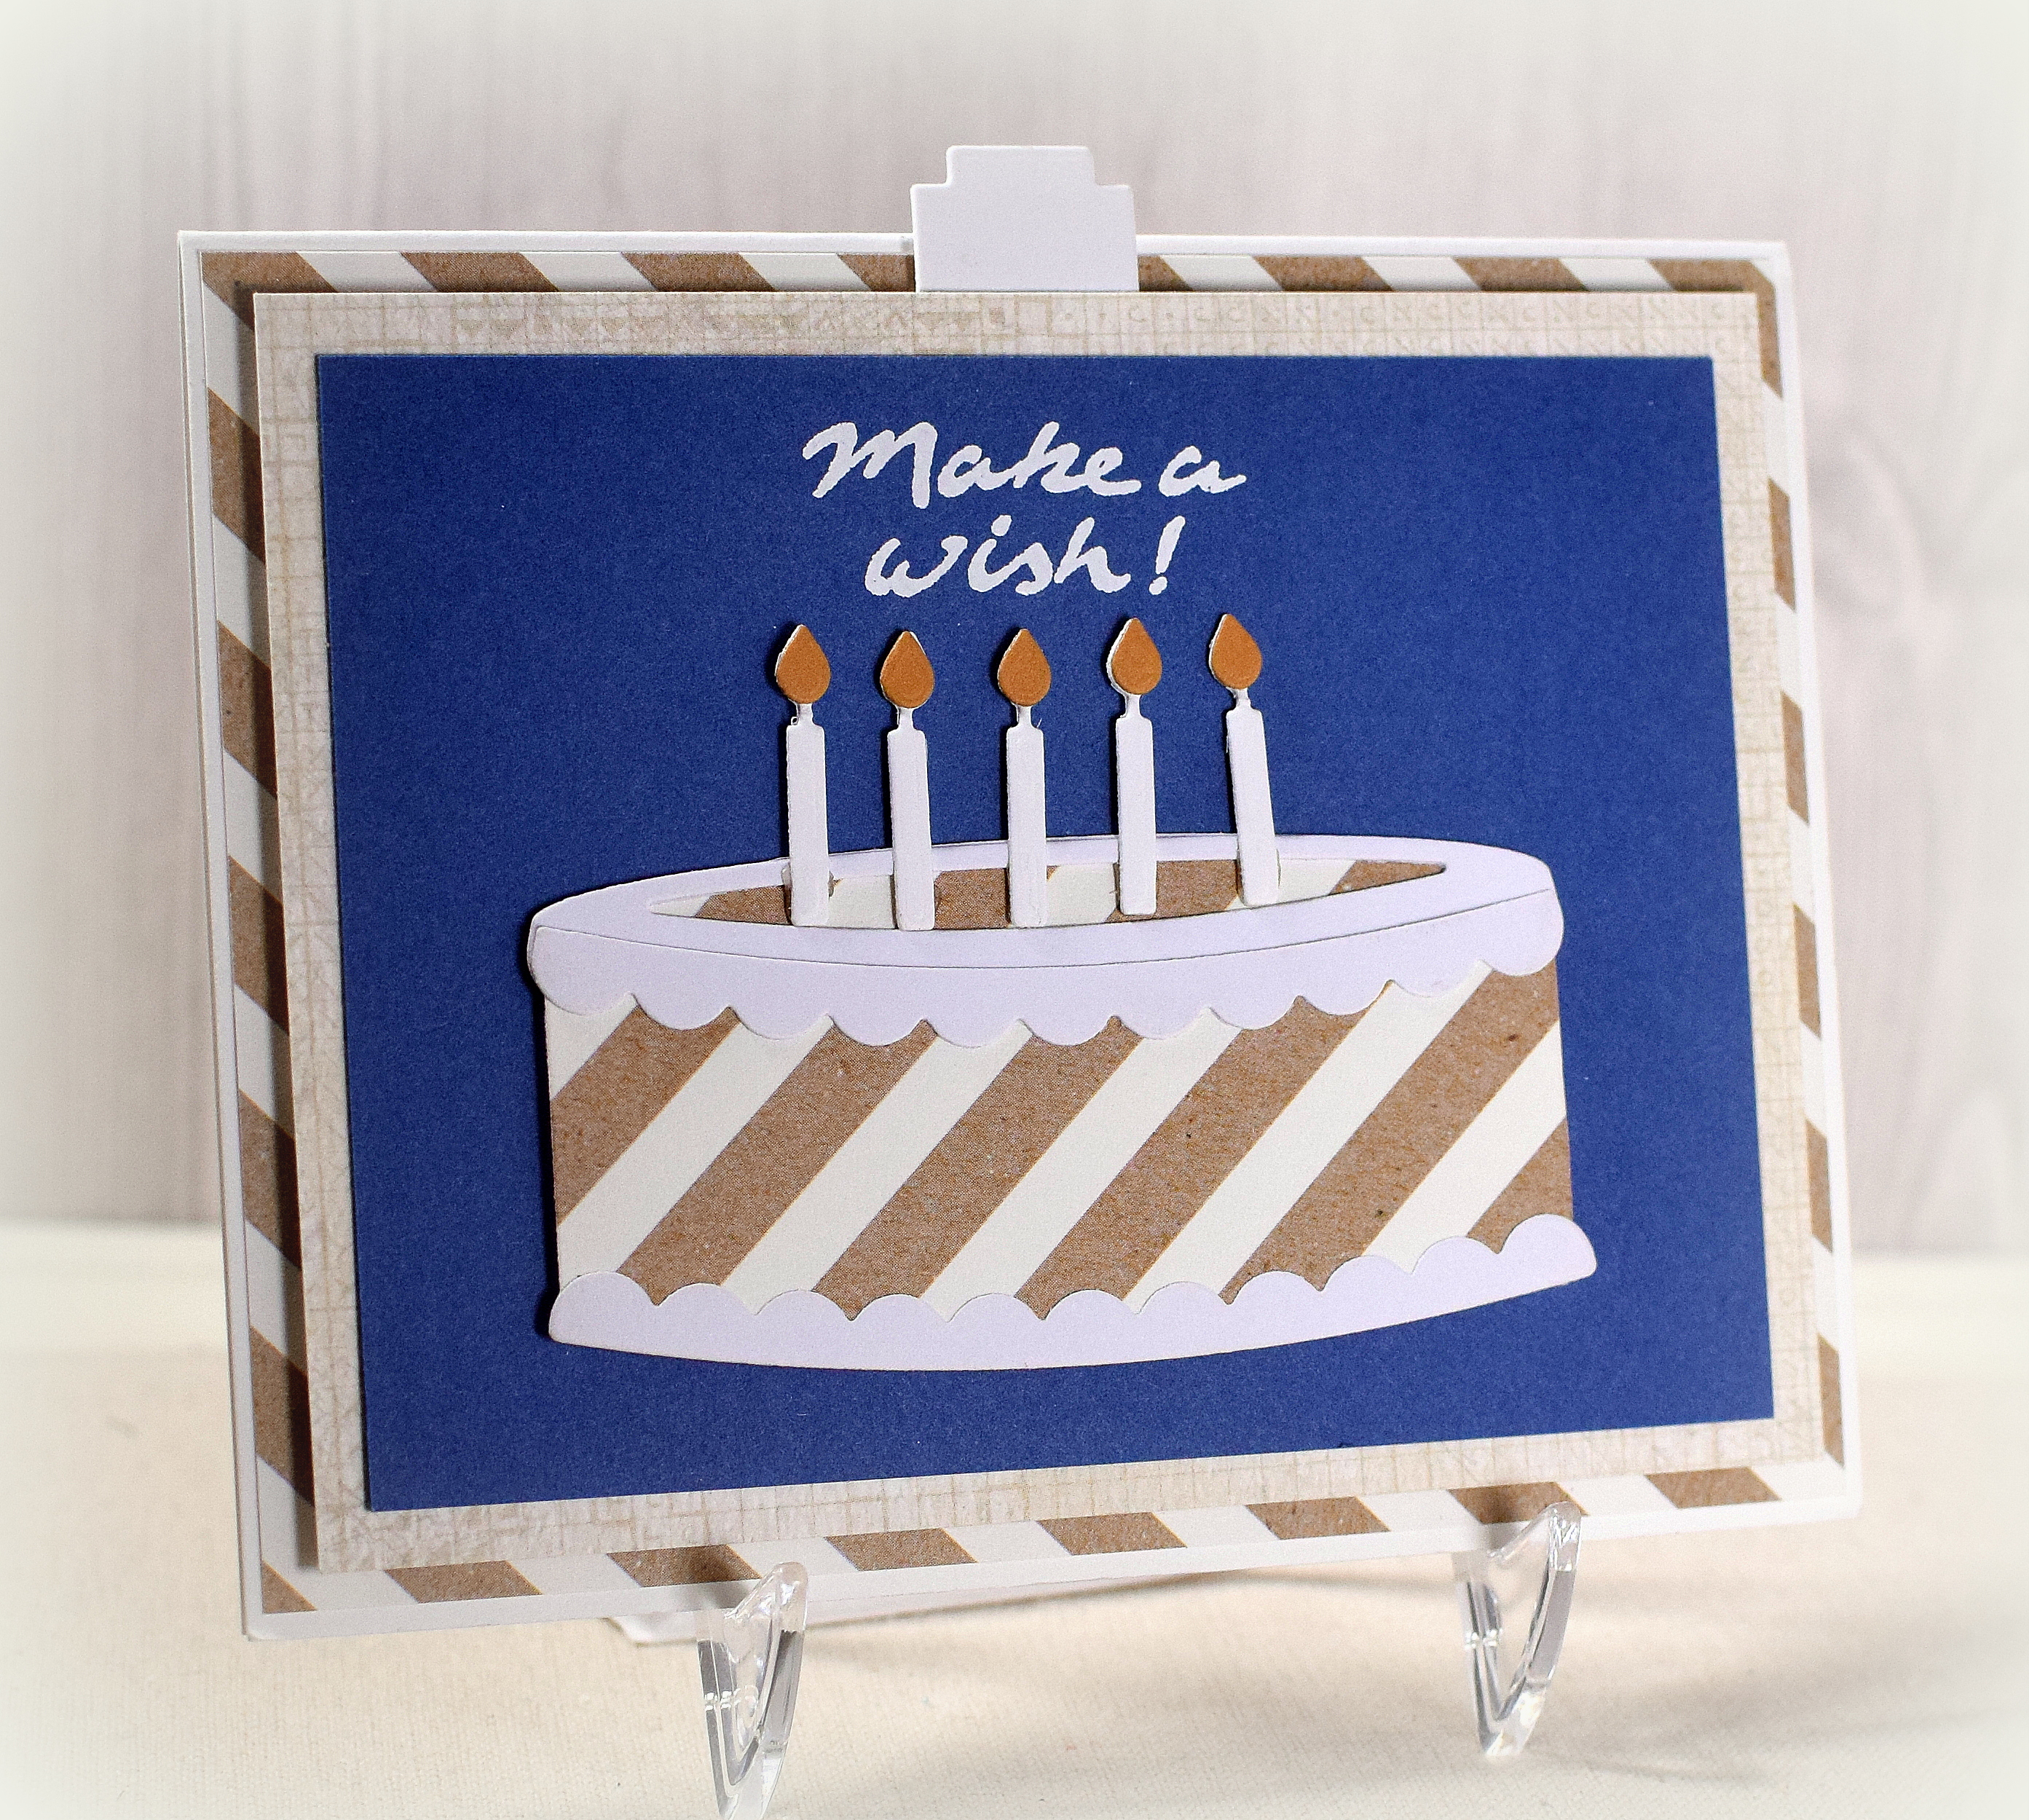
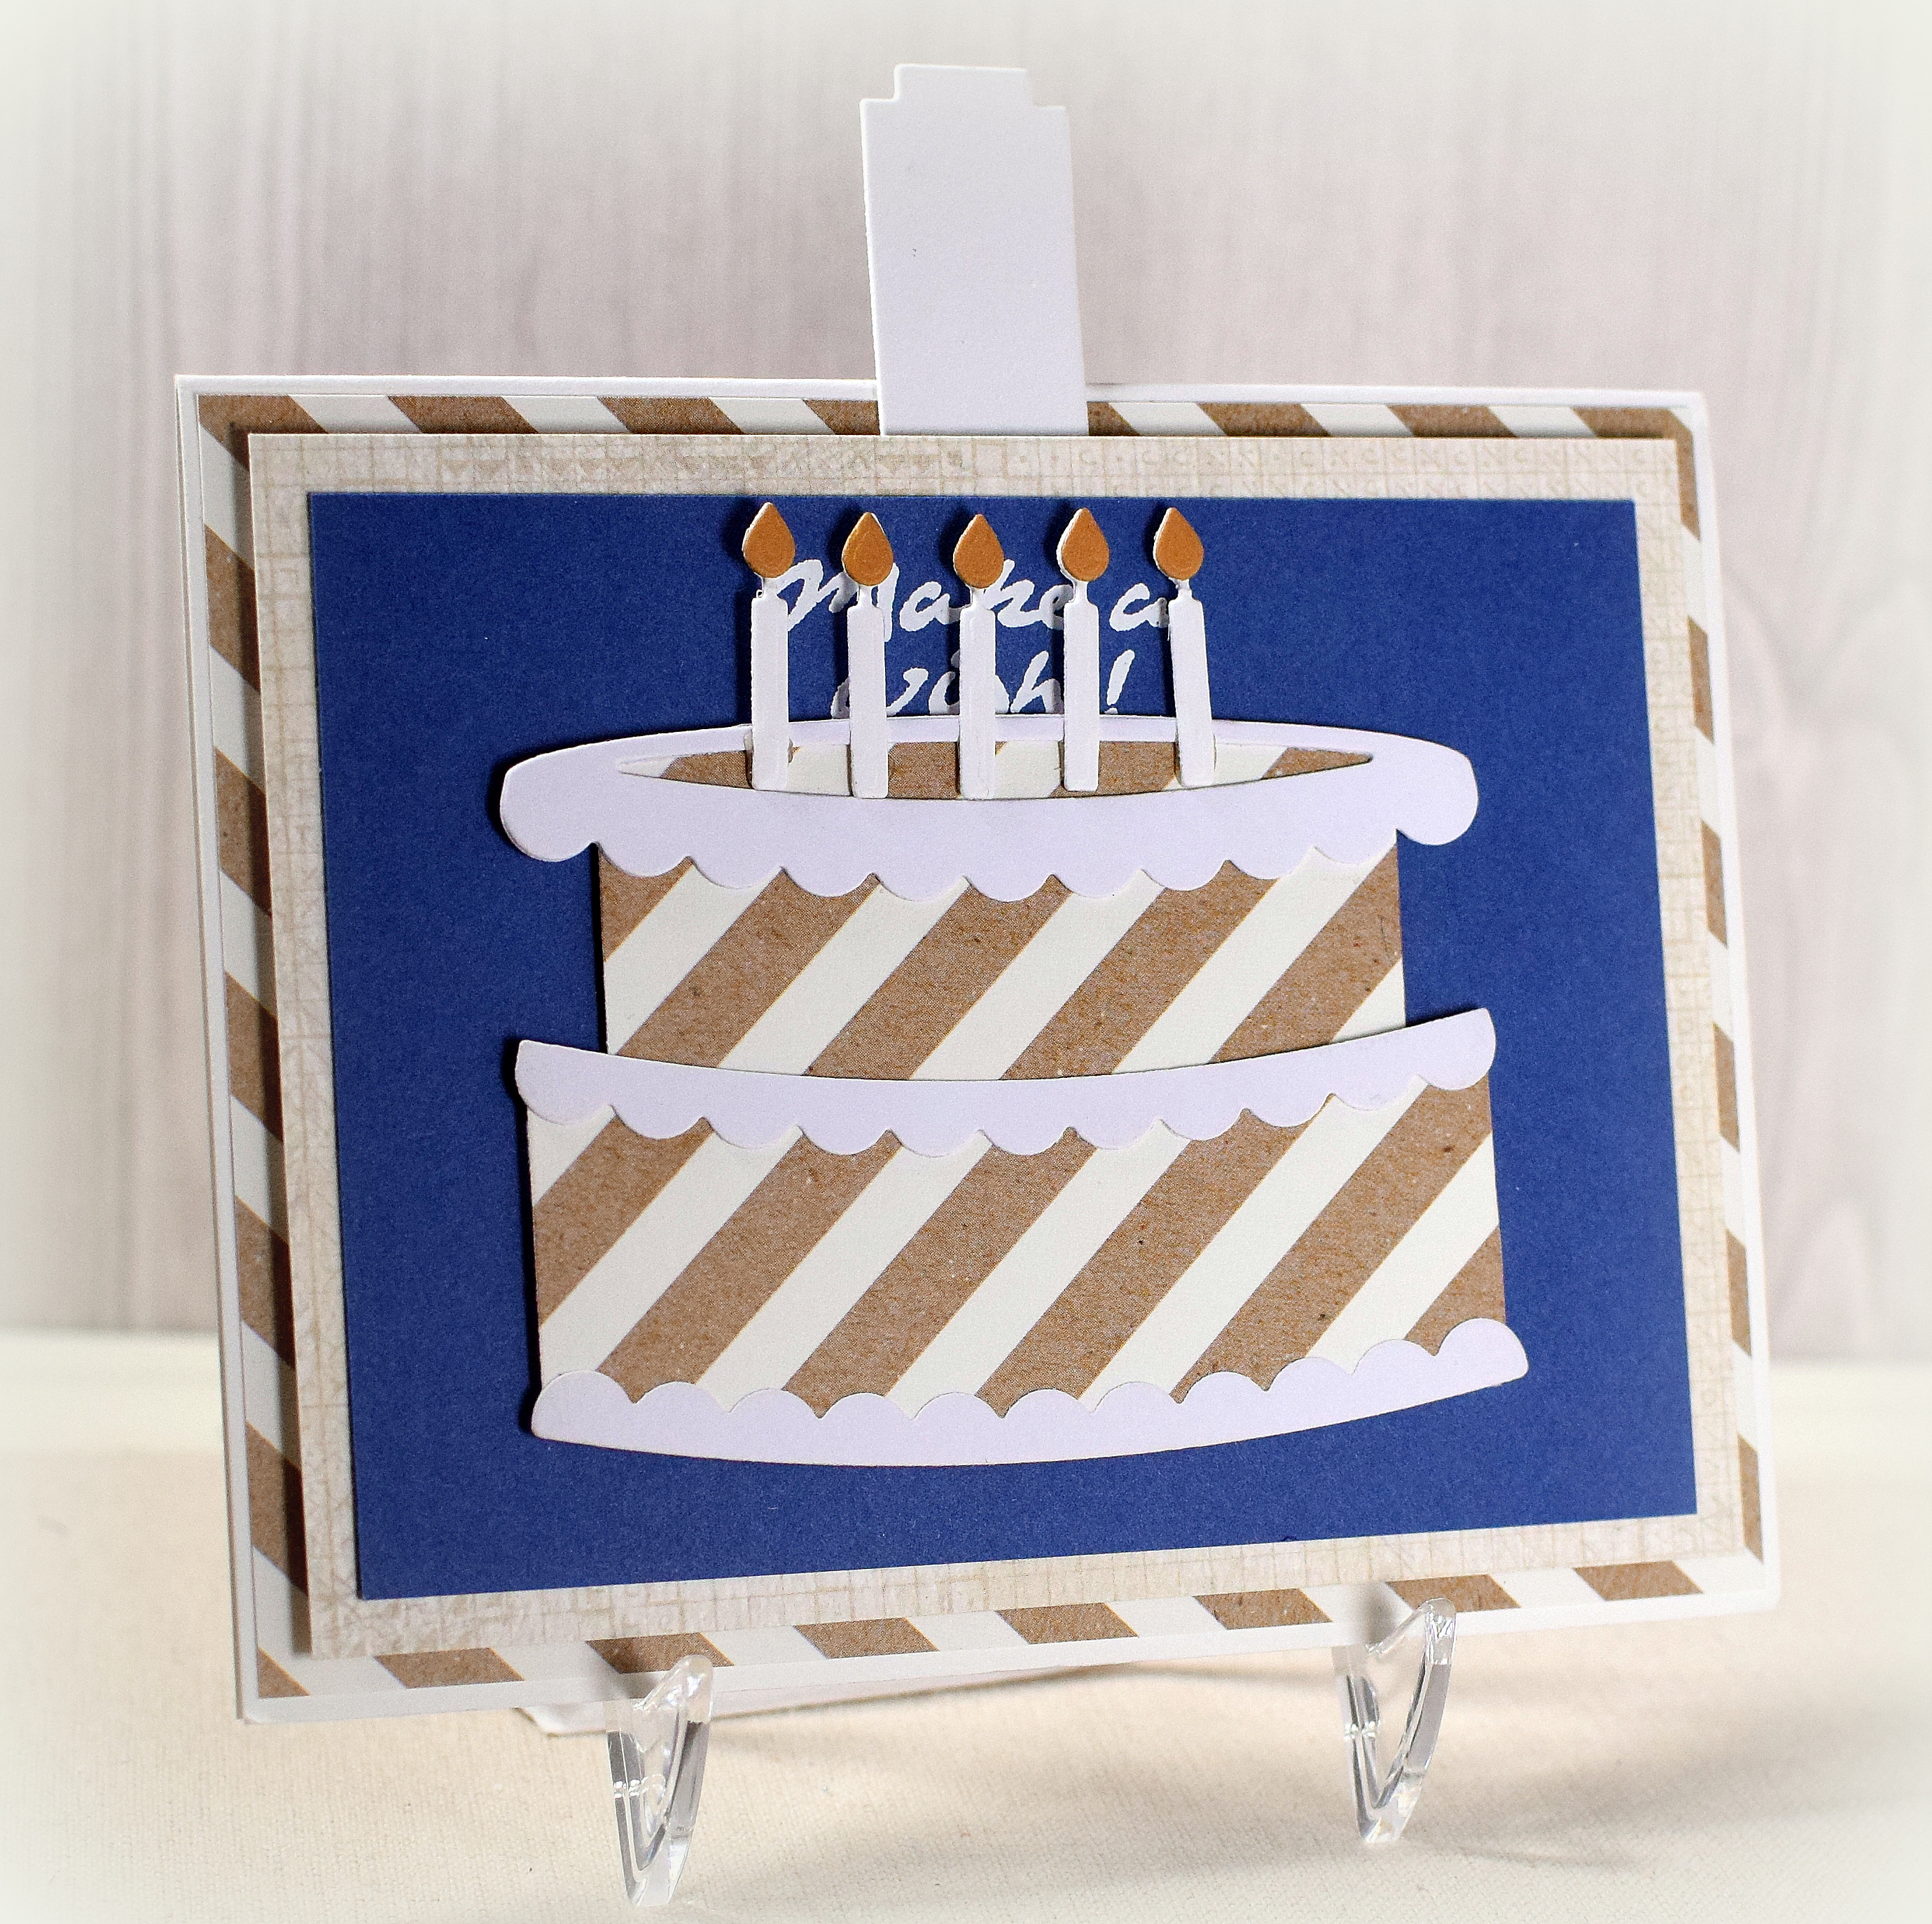
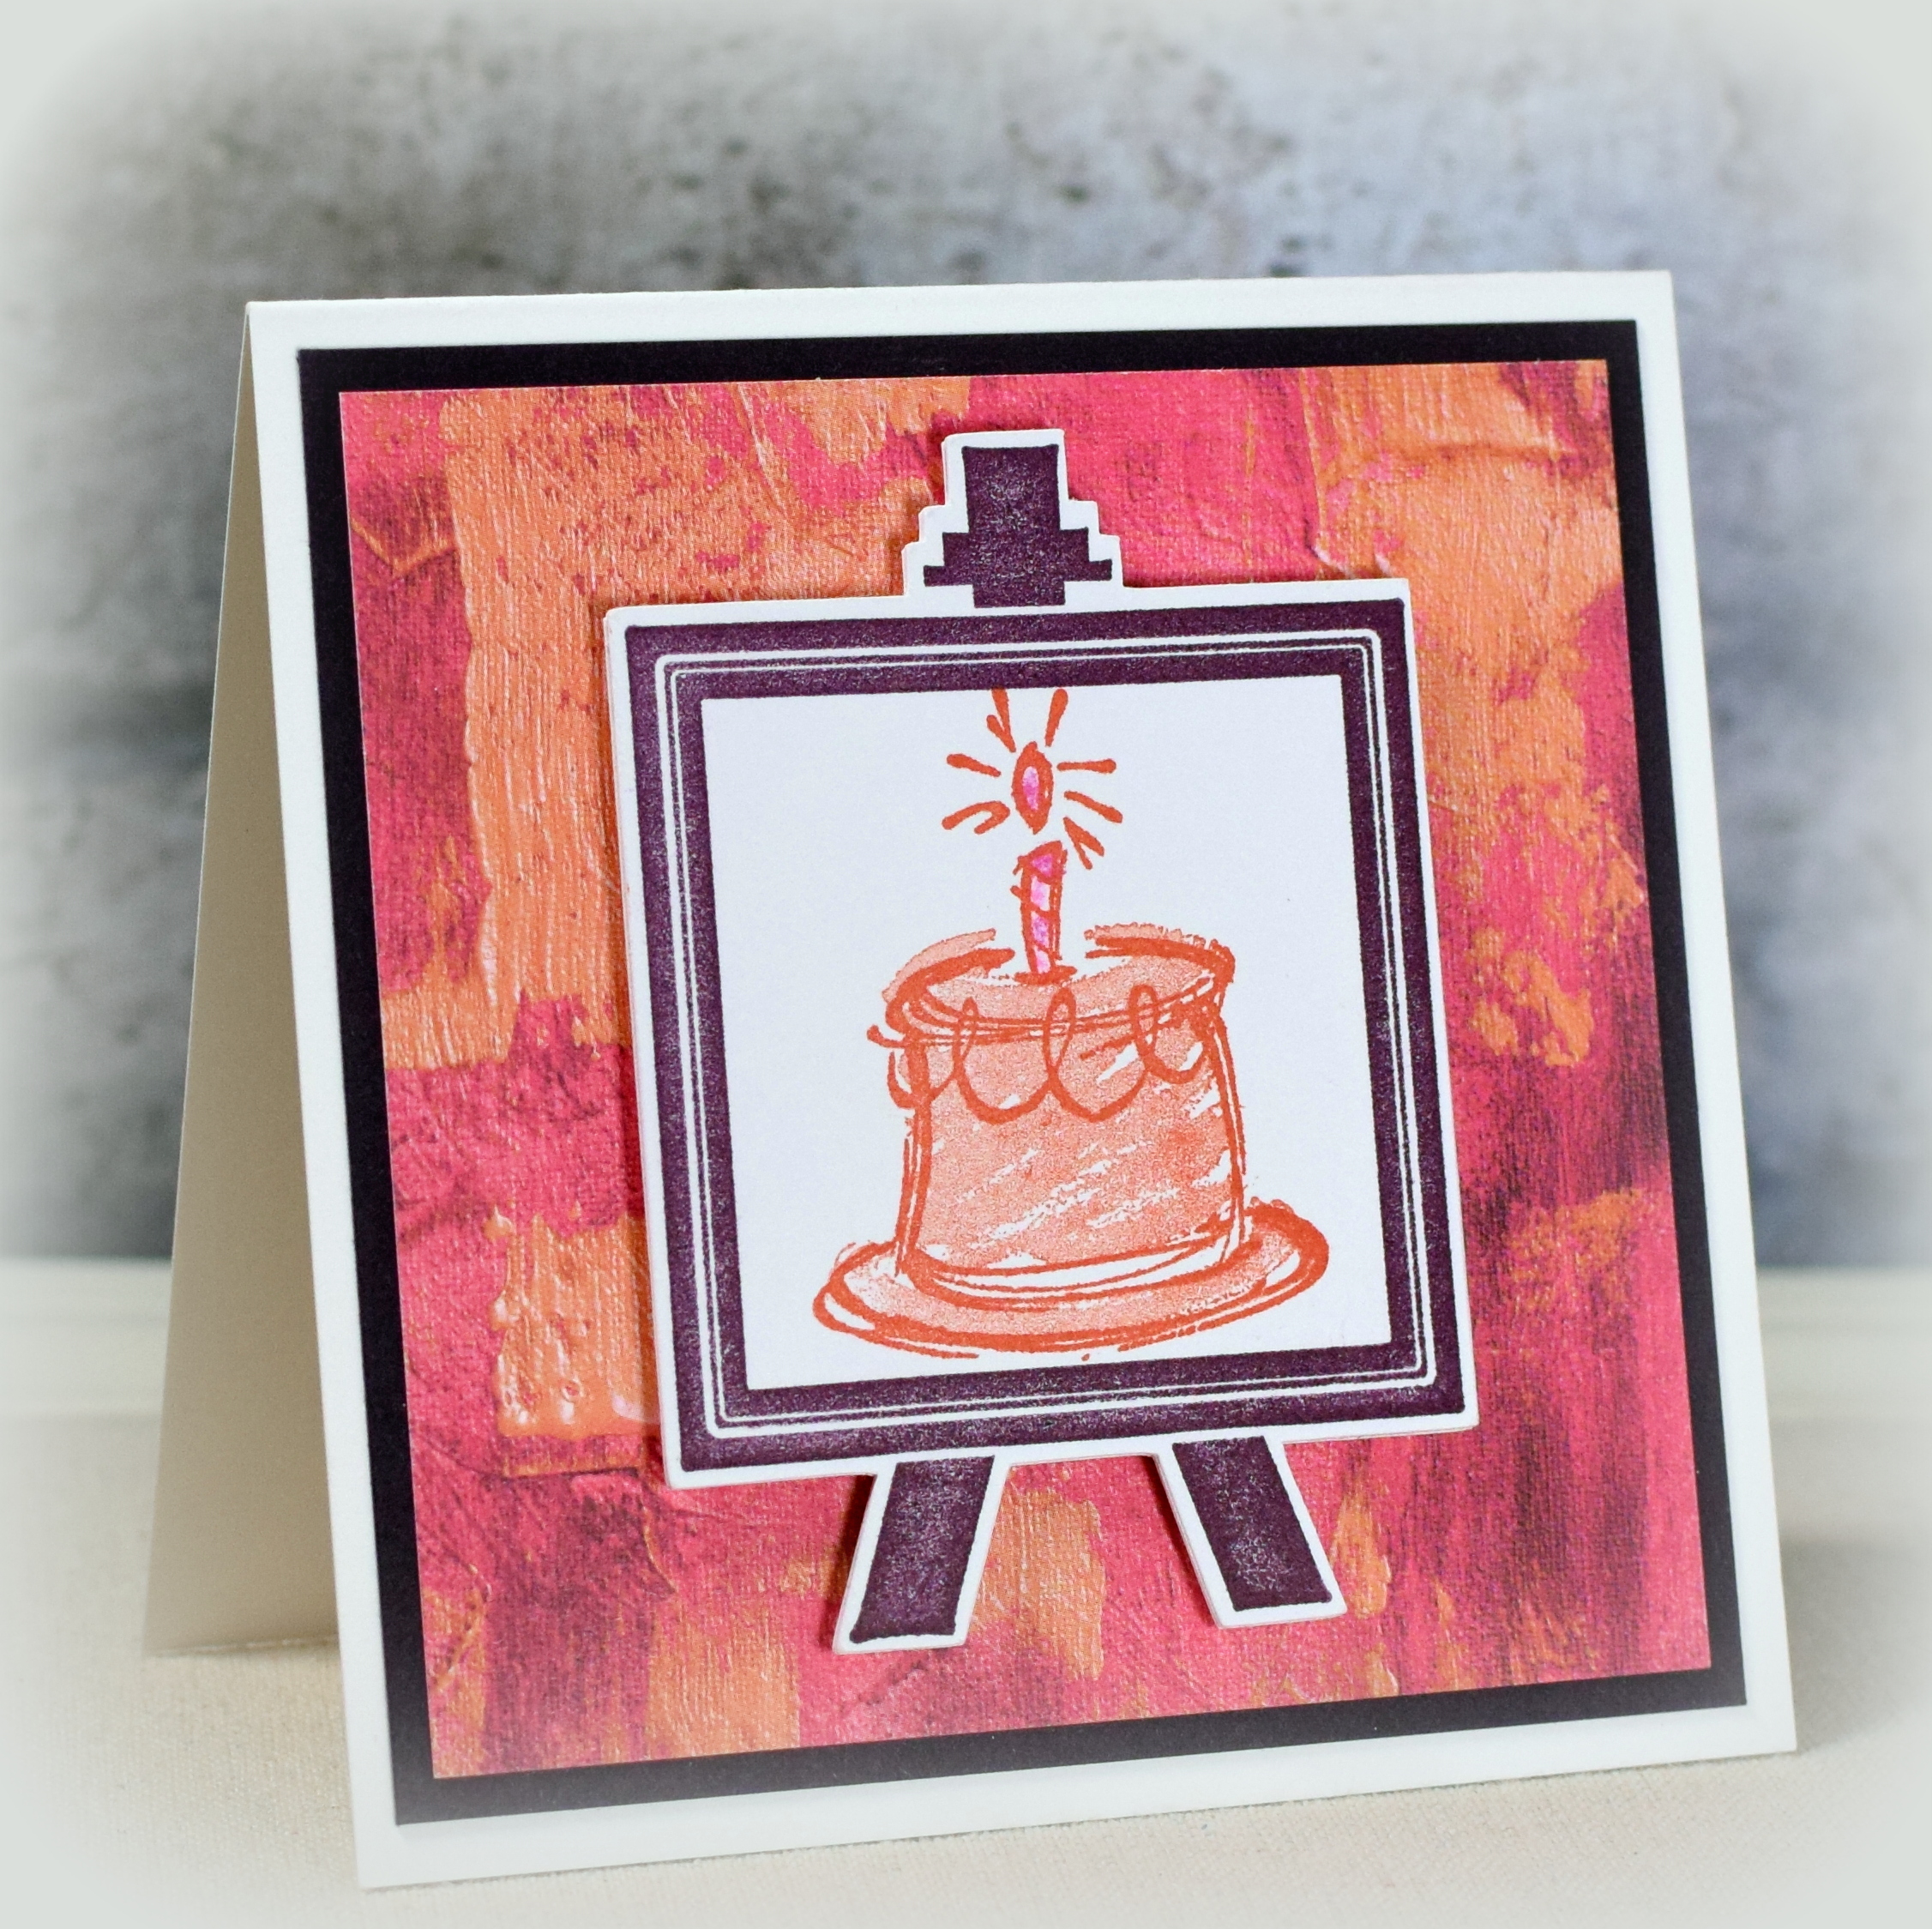
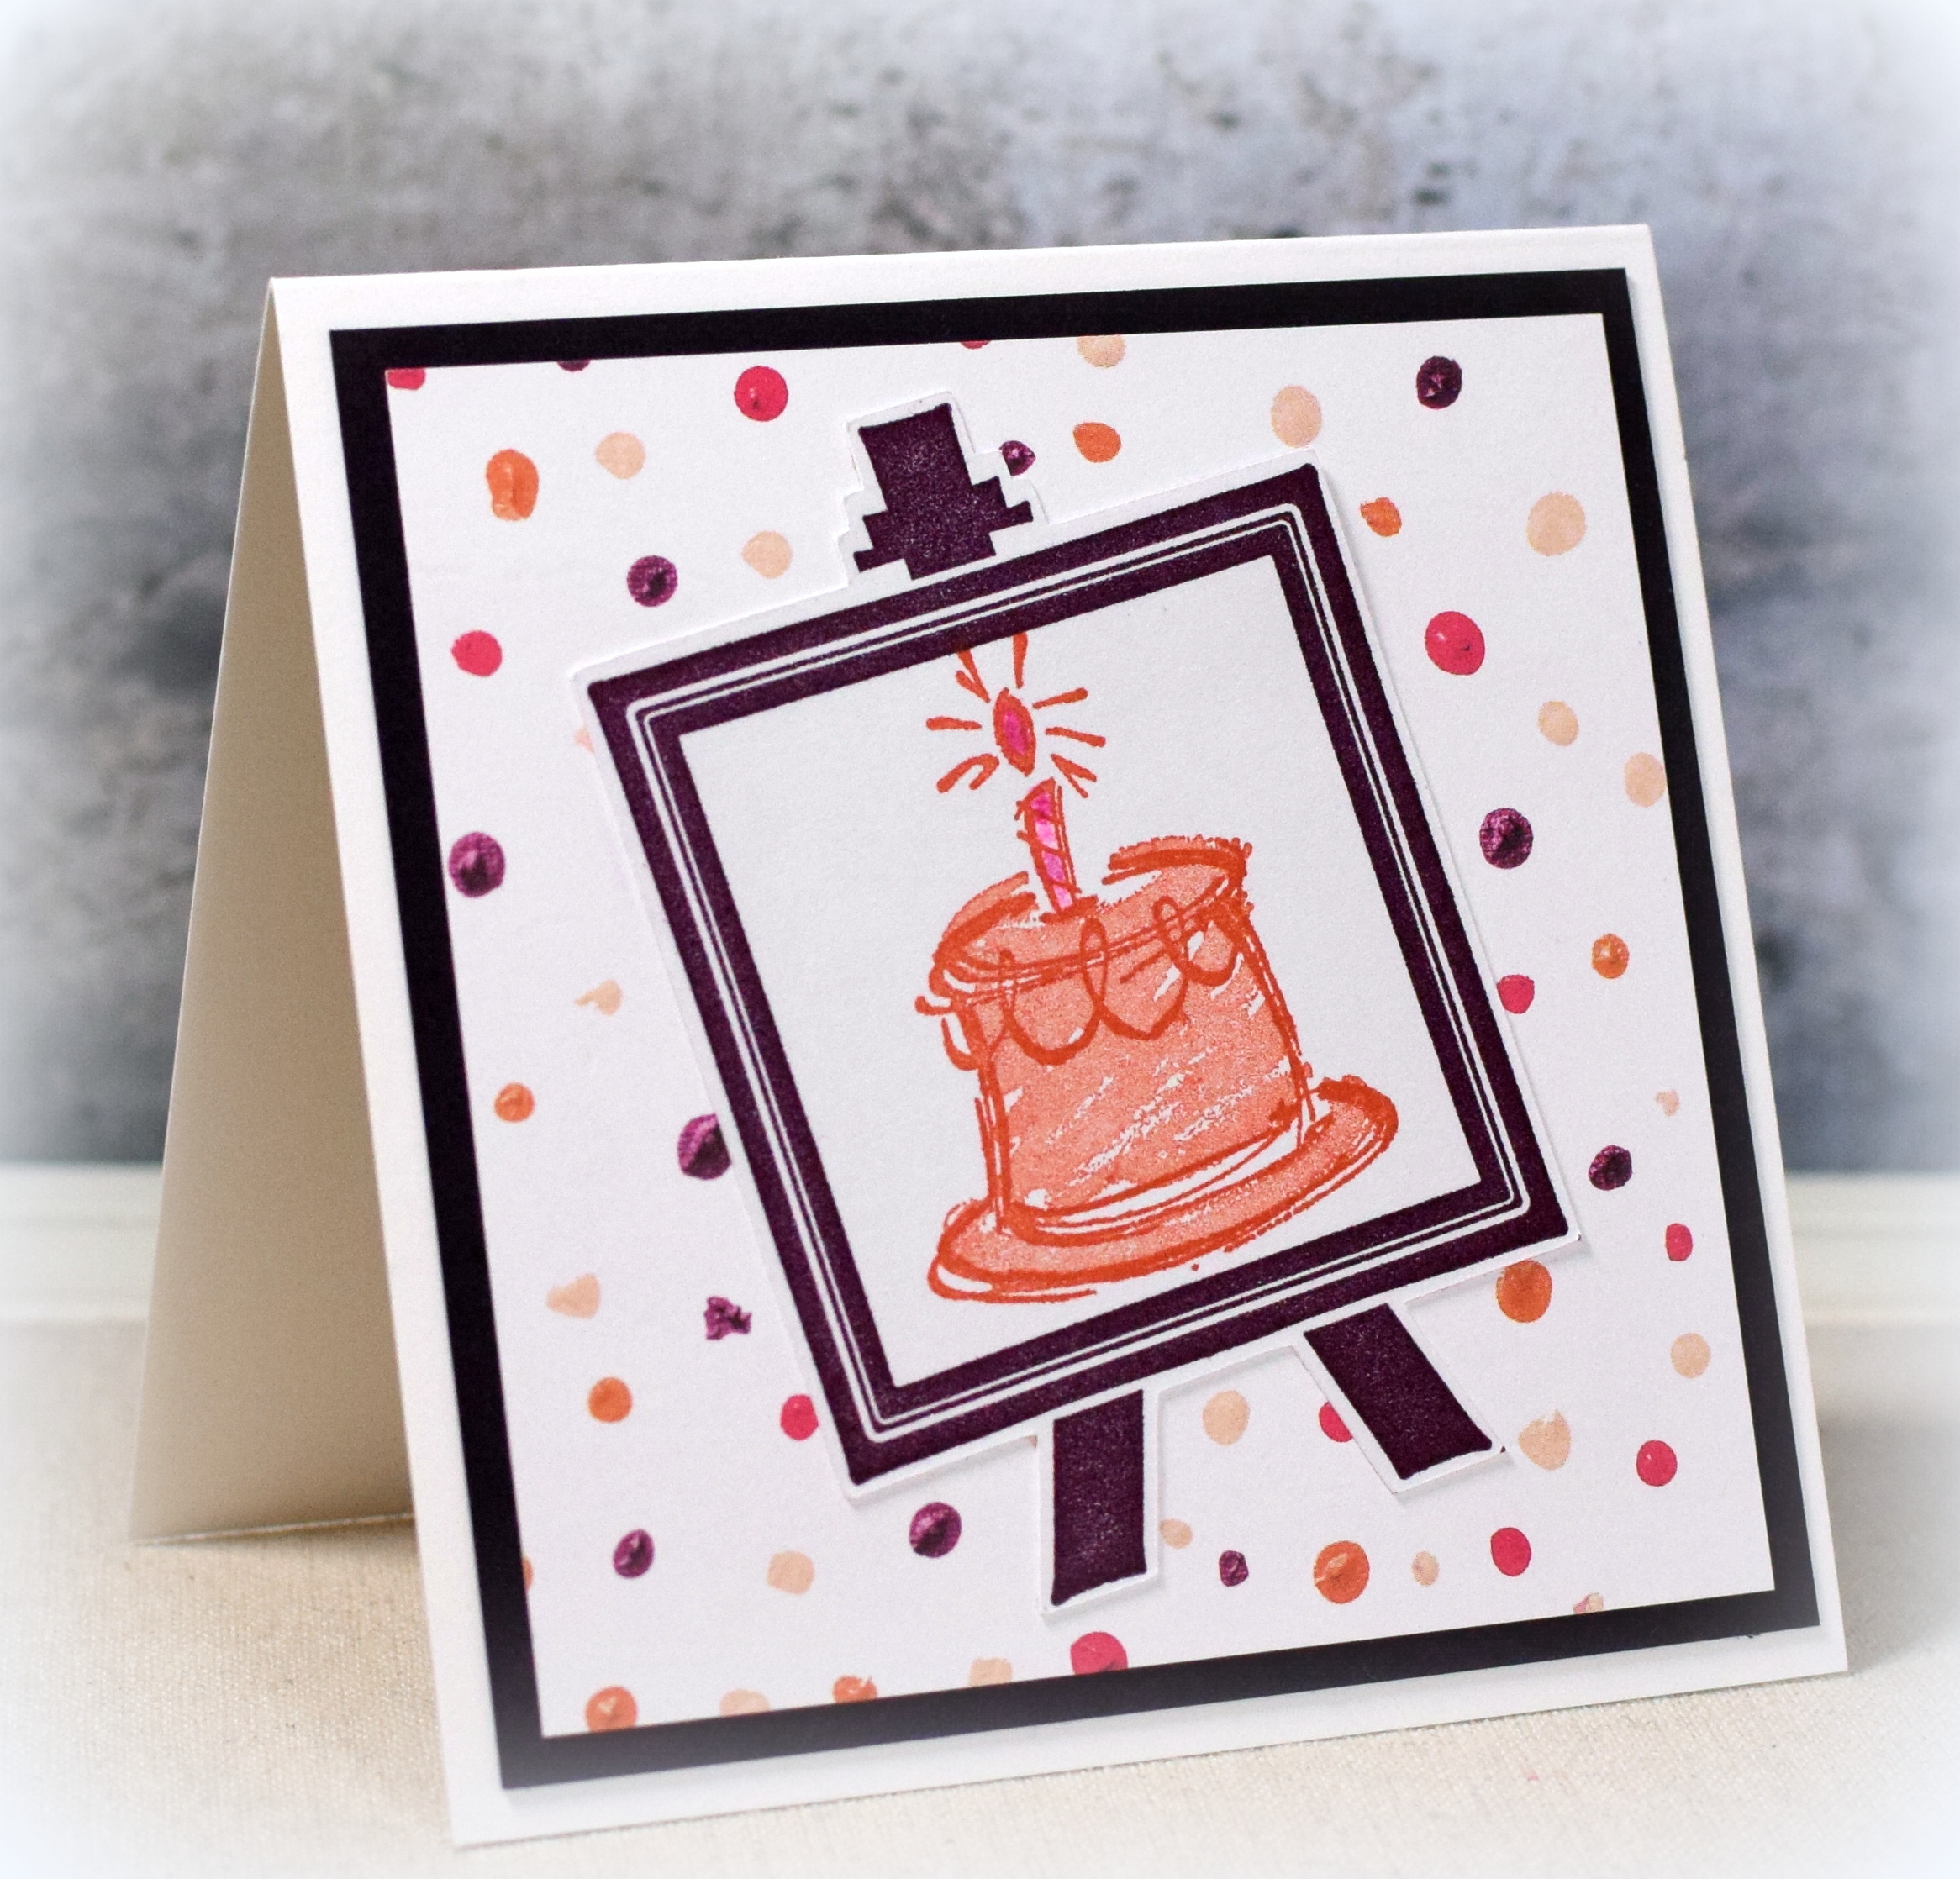
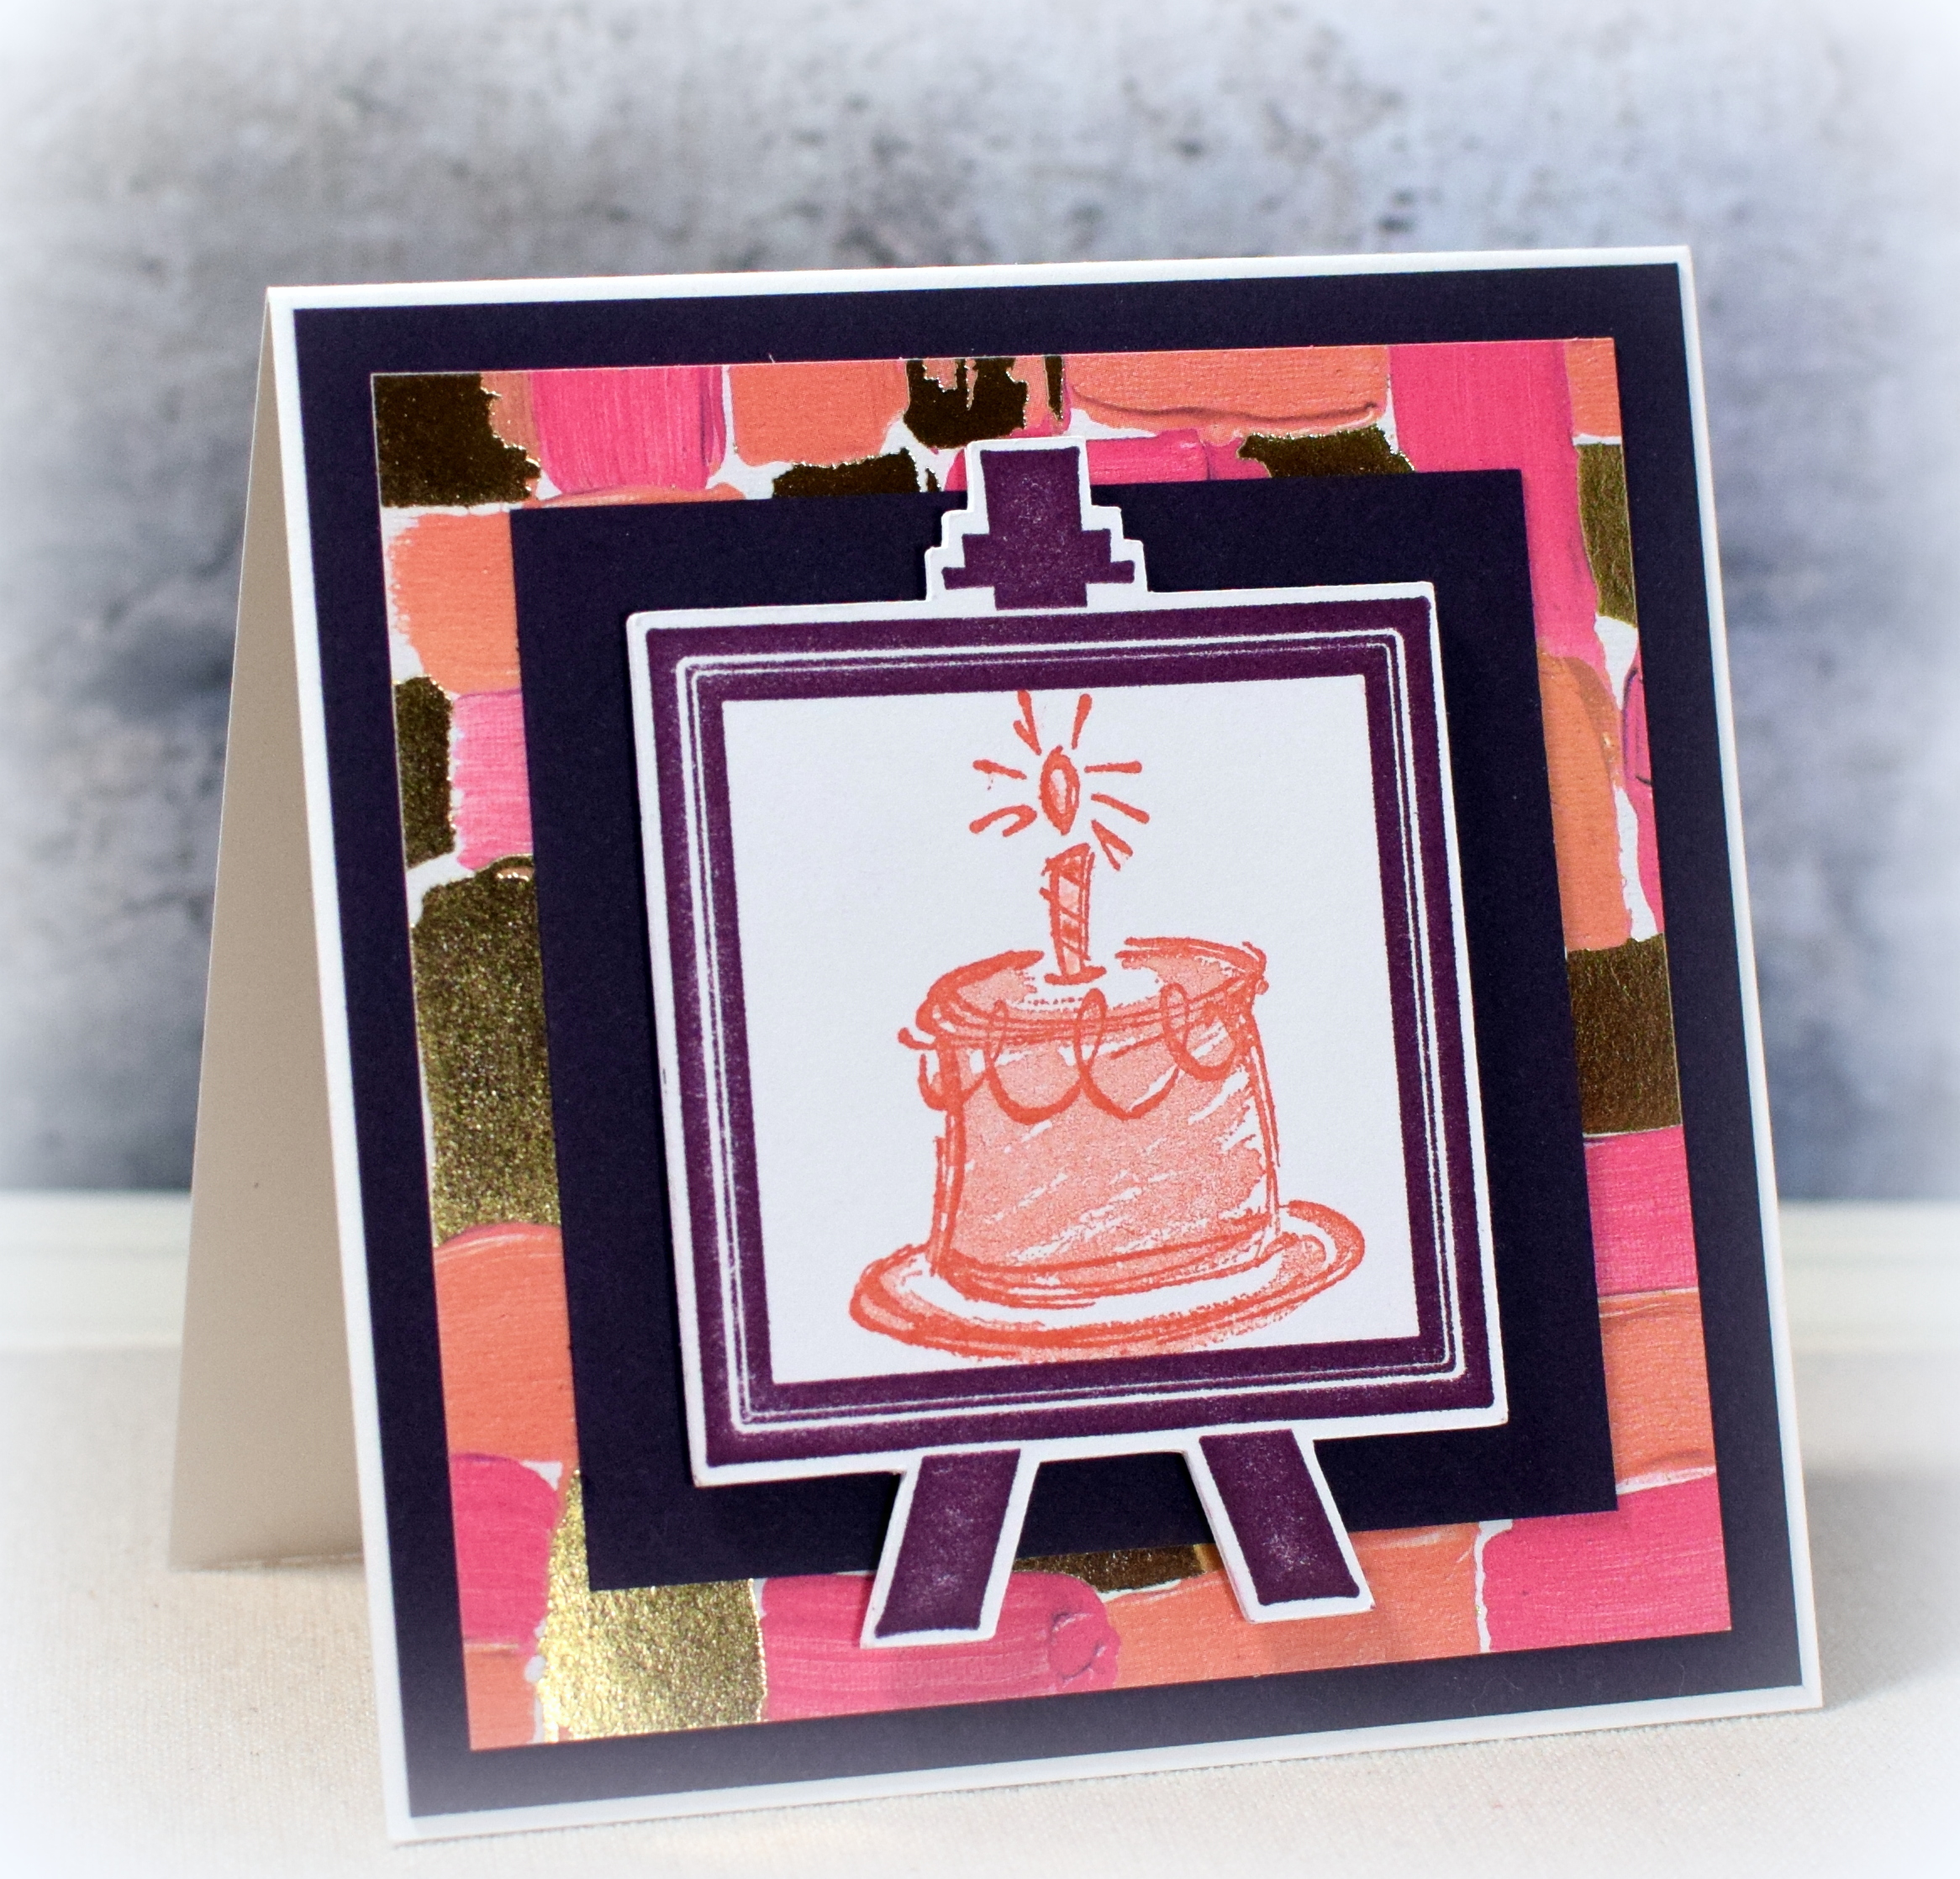
This card was made with the Die-namics “Interactive Birthday Cake” die set that was part of the “Twice the Wishes” card kit (retired?) from My Favorite Things.  When the tab is pulled, the single layer cake becomes a double layer cake.

wDSC_7104      wDSC_7108

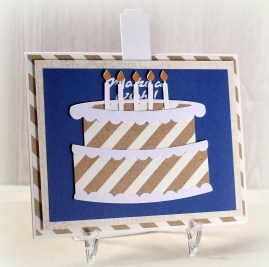
Next time, I would probably position the cake a little higher and would put the greeting either under the cake or on the hidden top layer so you would see it when the tab is pulled.  I like the greeting above the cake when the top layer is hidden, but I’m not crazy about it being covered when the top layer is pulled up.  As I said, next time…

HERE is a video by Jennifer McGuire showing the die set and how to use it to create an interactive card.  (She also talks about how to make some of the elements by hand for a slider card like this without the dies.)

If you watch the tutorial video I just mentioned, you will see that MFT has these plastic slider elements that sandwich between the pull tab and the top cake layer which allow them to slide up and down smoothly in the die cut channel behind the cake.  These slider elements do not have adhesive on them, and the glue I was using didn’t seem to want to stick to the plastic very will, so I used foam pop dots (1/4 inch diameter and 1/8 inch thick) instead.

I tried fun foam on one card and foam tape on the other to raise the front panels to allow the slider tabs to slide.  Both worked well.

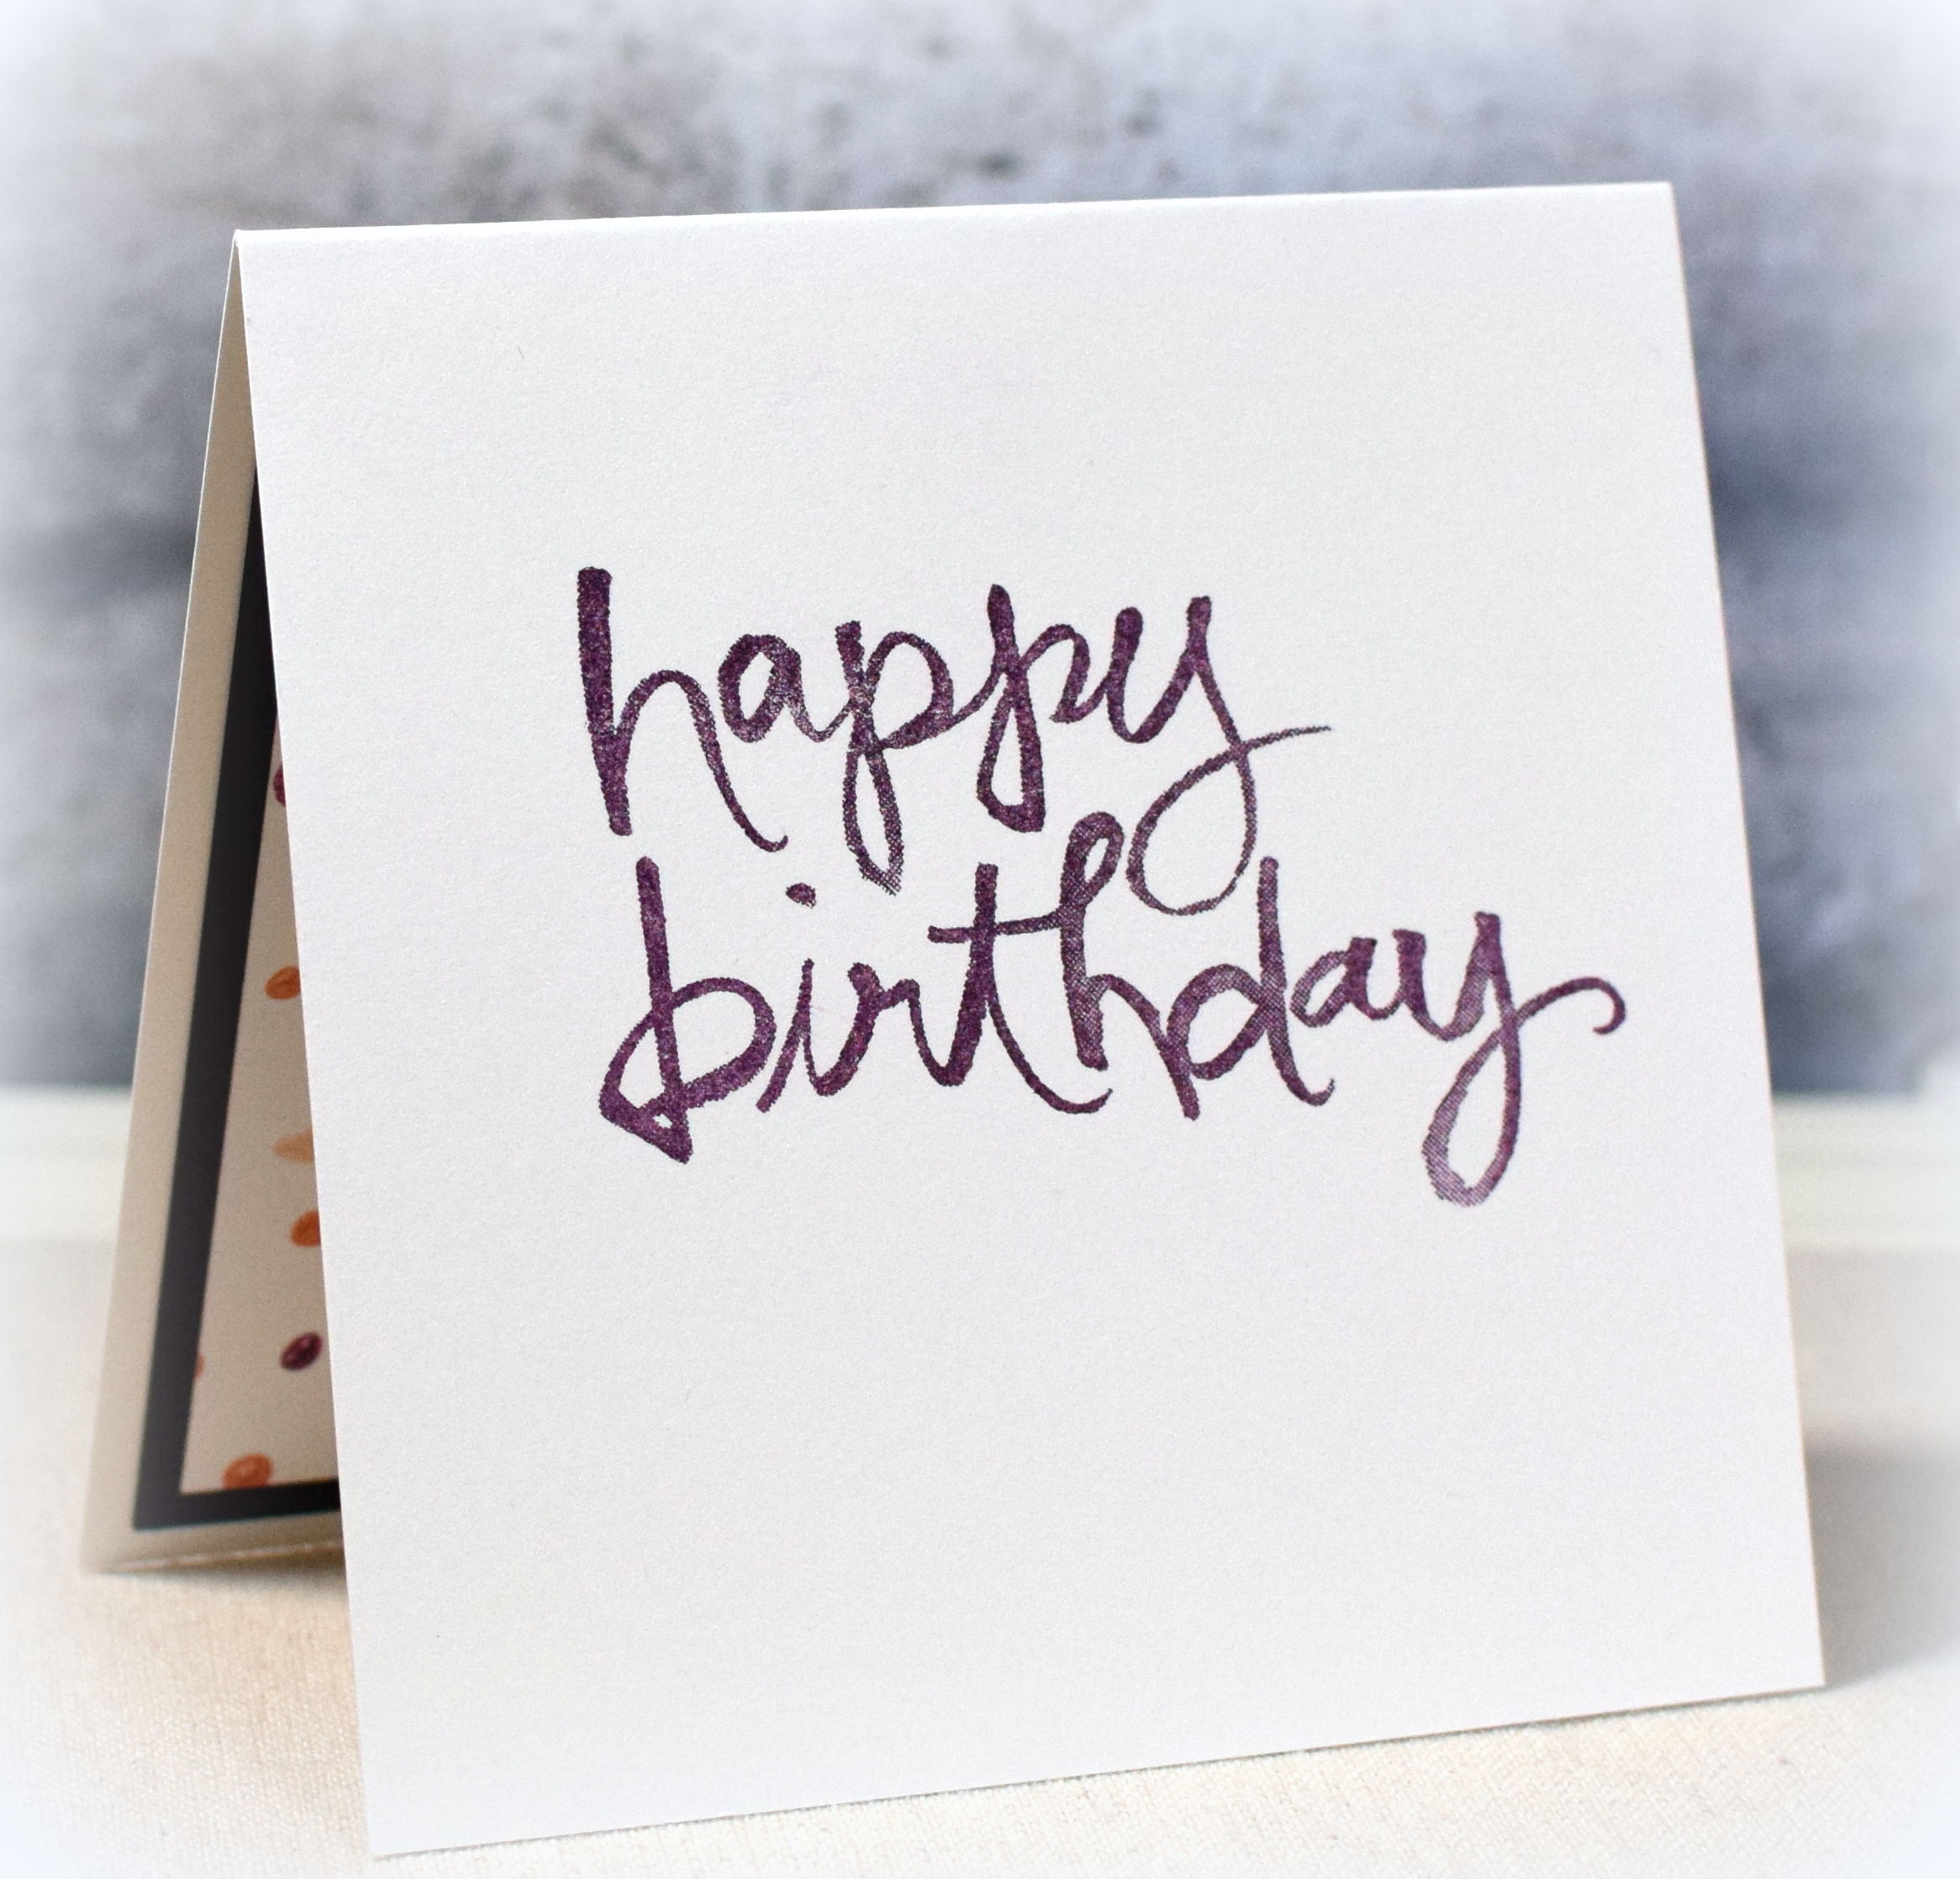
The greeting is from the “Notable Notes” set from Stampin’ Up and was heat embossed with versamark ink and Gina K white embossing powder.  The stamp originally had a cake with the words, and I cut the stamp apart (creating two separate stamps) so I could just stamp the greeting on this card.

The sentiment on the inside of the card is from the “Birthday Sentiments” set from Honey Doo Crafts.

The brown and white striped card stock is called “Party Time” from the Spring Fling Collection from Pebbles (#733104).  The tan mat is called “Nutmeg Boy Southwest Paper” from the Indie Chic collection from My Mind’s Eye (#IC0187).  I used Recollections heavy weight white for the card base, and either Gina K Blue Denim or Stampin’ Up Mint Macaron for the main panel behind the cake.  On the mint card, I used Recollections Printable Glitter Paper for the candles, flames, and cake trim.  I colored the flames with Copic E35 marker.

I tried to make the tab obvious for the recipient by making it extend over the top of the card.  As a result, I ended up creating a card that no longer fit in my standard A2 sized envelopes, so I needed to create a custom envelope with my We R Memory Keepers envelope punch board.  I started with an 8 3/8 inch square of heavy printer paper.  Normally, when using this punch board, you measure the first “punch and score line” and then use the notch on the tool and the previous line to create the next line.  Instead, for this envelope, I “punched and scored” the 1st and 3rd sides at 3 3/4 inches, and the 2nd and 4th sides at the 4 5/8 inch mark.  This created the perfect envelope (not too big, and not too small) to accommodate the tab.

Thanks for checking out my card project!

This content uses referral links as described in the disclosure policy on my sidebar.

Dahlia Fold Birthday Wishes

Dahlia Fold Birthday Wishes

wDSC_8406

(Inside:  A birthday wish is sent your way hoping you’ll have a wonderful day.)

I saw this video on You Tube on how to make flowers using the “Dahlia Fold” technique and thought I’d give it a try.

I used 2 sheets of double sided paper from the “Stella & Rose” 6 inch paper pad from My Mind’s Eye, a 1-3/8″ circle punch from Stampin’ Up, and a 5/8″ heart punch from Recollections to make my flower pieces (and mat panel).  I also used Rustic Cream card stock from Papertrey Ink.

The “stem” was from the “Dot Flourishes” stamp set from Inkadinkado, and the greeting was from the “Wild Blossoms” set from Gina K Designs.  The sentiment on the inside was from the “Birthday Sentiments” set from Honey Doo Crafts.  All were stamped with Gina K Moonlit Fog ink.  To add the speckles on the front panel, I used a Tim Holtz Bundled Sage distress marker and the Tim Holtz marker spritzer tool (which is quickly becoming one of my favorite toys!).

Currently, the Mod Squad Challenge is “ready for spring” where we are encouraged to “make a Spring themed card with flowers, bunnies, pastels…anything Spring.”  (Sadly, this site is no longer active.)

Thanks for checking out my card project!

This content uses referral links as described in the disclosure policy on my sidebar.

Scripty Balloon Birthday Card

Scripty Balloon Birthday Card

wwDSC_8154.jpg

(inside:  Happy Birthday May today be the start of a wonderful year)

This CAS birthday card features some partial embossing, a scripty greeting stamp, and a balloon die cut for a pop of color.

I saw this card on Etsy and thought a scripty greeting would also make a great string for a birthday balloon.  The stamp I used is from the “Wonderful Words I” set from Stampin’ Up (retired?) and was heat embossed with versamark ink and Gina K Designs fine detail black embossing powder.

The balloon (and background mat) was cut from a piece of  Pebbles “Garden Walk” card stock from the Happy Day Collection (#732692).  The die used was from the “Balloons” die set from Paper Smooches (#FBD119).

The left side of the card was embossed with an embossing folder called “Happy Birthday” (unknown manufacturer) I ordered on ebay.  I used my Scor-Buddy scoring board to create the embossed lines separating the balloon from the embossed section.

The sentiment on the inside is from the “Birthday Sentiments” stamp set from Honey Doo Crafts.

Thanks for checking out my card project!

This content uses referral links as described in the disclosure policy on my sidebar.

Sketched Birthday Cake

Sketched Birthday Cake

wDSC_7955

(inside: happy birthday)

I wanted to make an artist-themed birthday card for my niece, and when I saw the easel in the  “Painter’s Palette” stamp set from Stampin’ Up, I thought it would be perfect.  I ordered two other stamp sets that had images that appeared to be water-colored (to stamp on the easel) and waited not-so-patiently for the sets to arrive.  Unfortunately, the easel was much smaller than I imagined, and the images I thought I’d use on it did not fit.  I ended up putting the “Happy Birthday” image from the SU “Watercolor Words” set on the inside of the card (photo below) and set out to find a smaller image from my stash that looked hand-drawn, painted, etc.  I ended up using the cake from the SU “Sketch A Party” set (retired?) which allowed me to skip the greeting on the front while still making it obvious that it was a birthday card.  (I won’t tell you how many things I tried before finding this image that worked, and I was running out of time to get this card done before her birthday!!)

I used paper from the “Painted with Love” designer series paper pack (Stampin’ Up) along with Gina K Edible Eggplant and heavy base weight white card stock.  The ink was SU Blackberry Bliss and Calypso Coral.  (I “stamped off” the shaded part of the cake and “painted” the candle with a water brush to create two shades of the same color.)

I used the “trace and cut” feature with my Silhouette to cut out the easel.

Here are two more samples with other patterns from the same paper pack:

wDSC_7960  wDSC_7958

And here is the inside image (which I originally envisioned on the easel):

wDSC_7979

Before trying the sketched cake image, I had tried using the floral stamp from the Stampin’ Up “Heartfelt Blooms” stamp set which was a sale-a-bration incentive stamp set that was free for spending $50 (ends March 31, 2018).  I actually really liked how that came out, but with no greeting, it did not seem birthday-ish enough.  I can’t wait to play with this set again!

wDSC_7973  wDSC_7971

On the first one, I used Gina K Warm Cocoa ink for the easel and GK Charcoal Brown card stock for the background mat.  For the second one, I heat embossed the easel with versamark ink and Gina K gold embossing powder and used Edible Eggplant card stock.  The designer paper for both was still from the “Painted with Love” pack.

The cards are 4 1/4″ squares, but they fit into a regular A2 sized envelope (with extra room on the side) so they do not require a trip to the post office for mailing.

Thanks for checking out my card projects!

This content uses referral links as described in the disclosure policy on my sidebar.