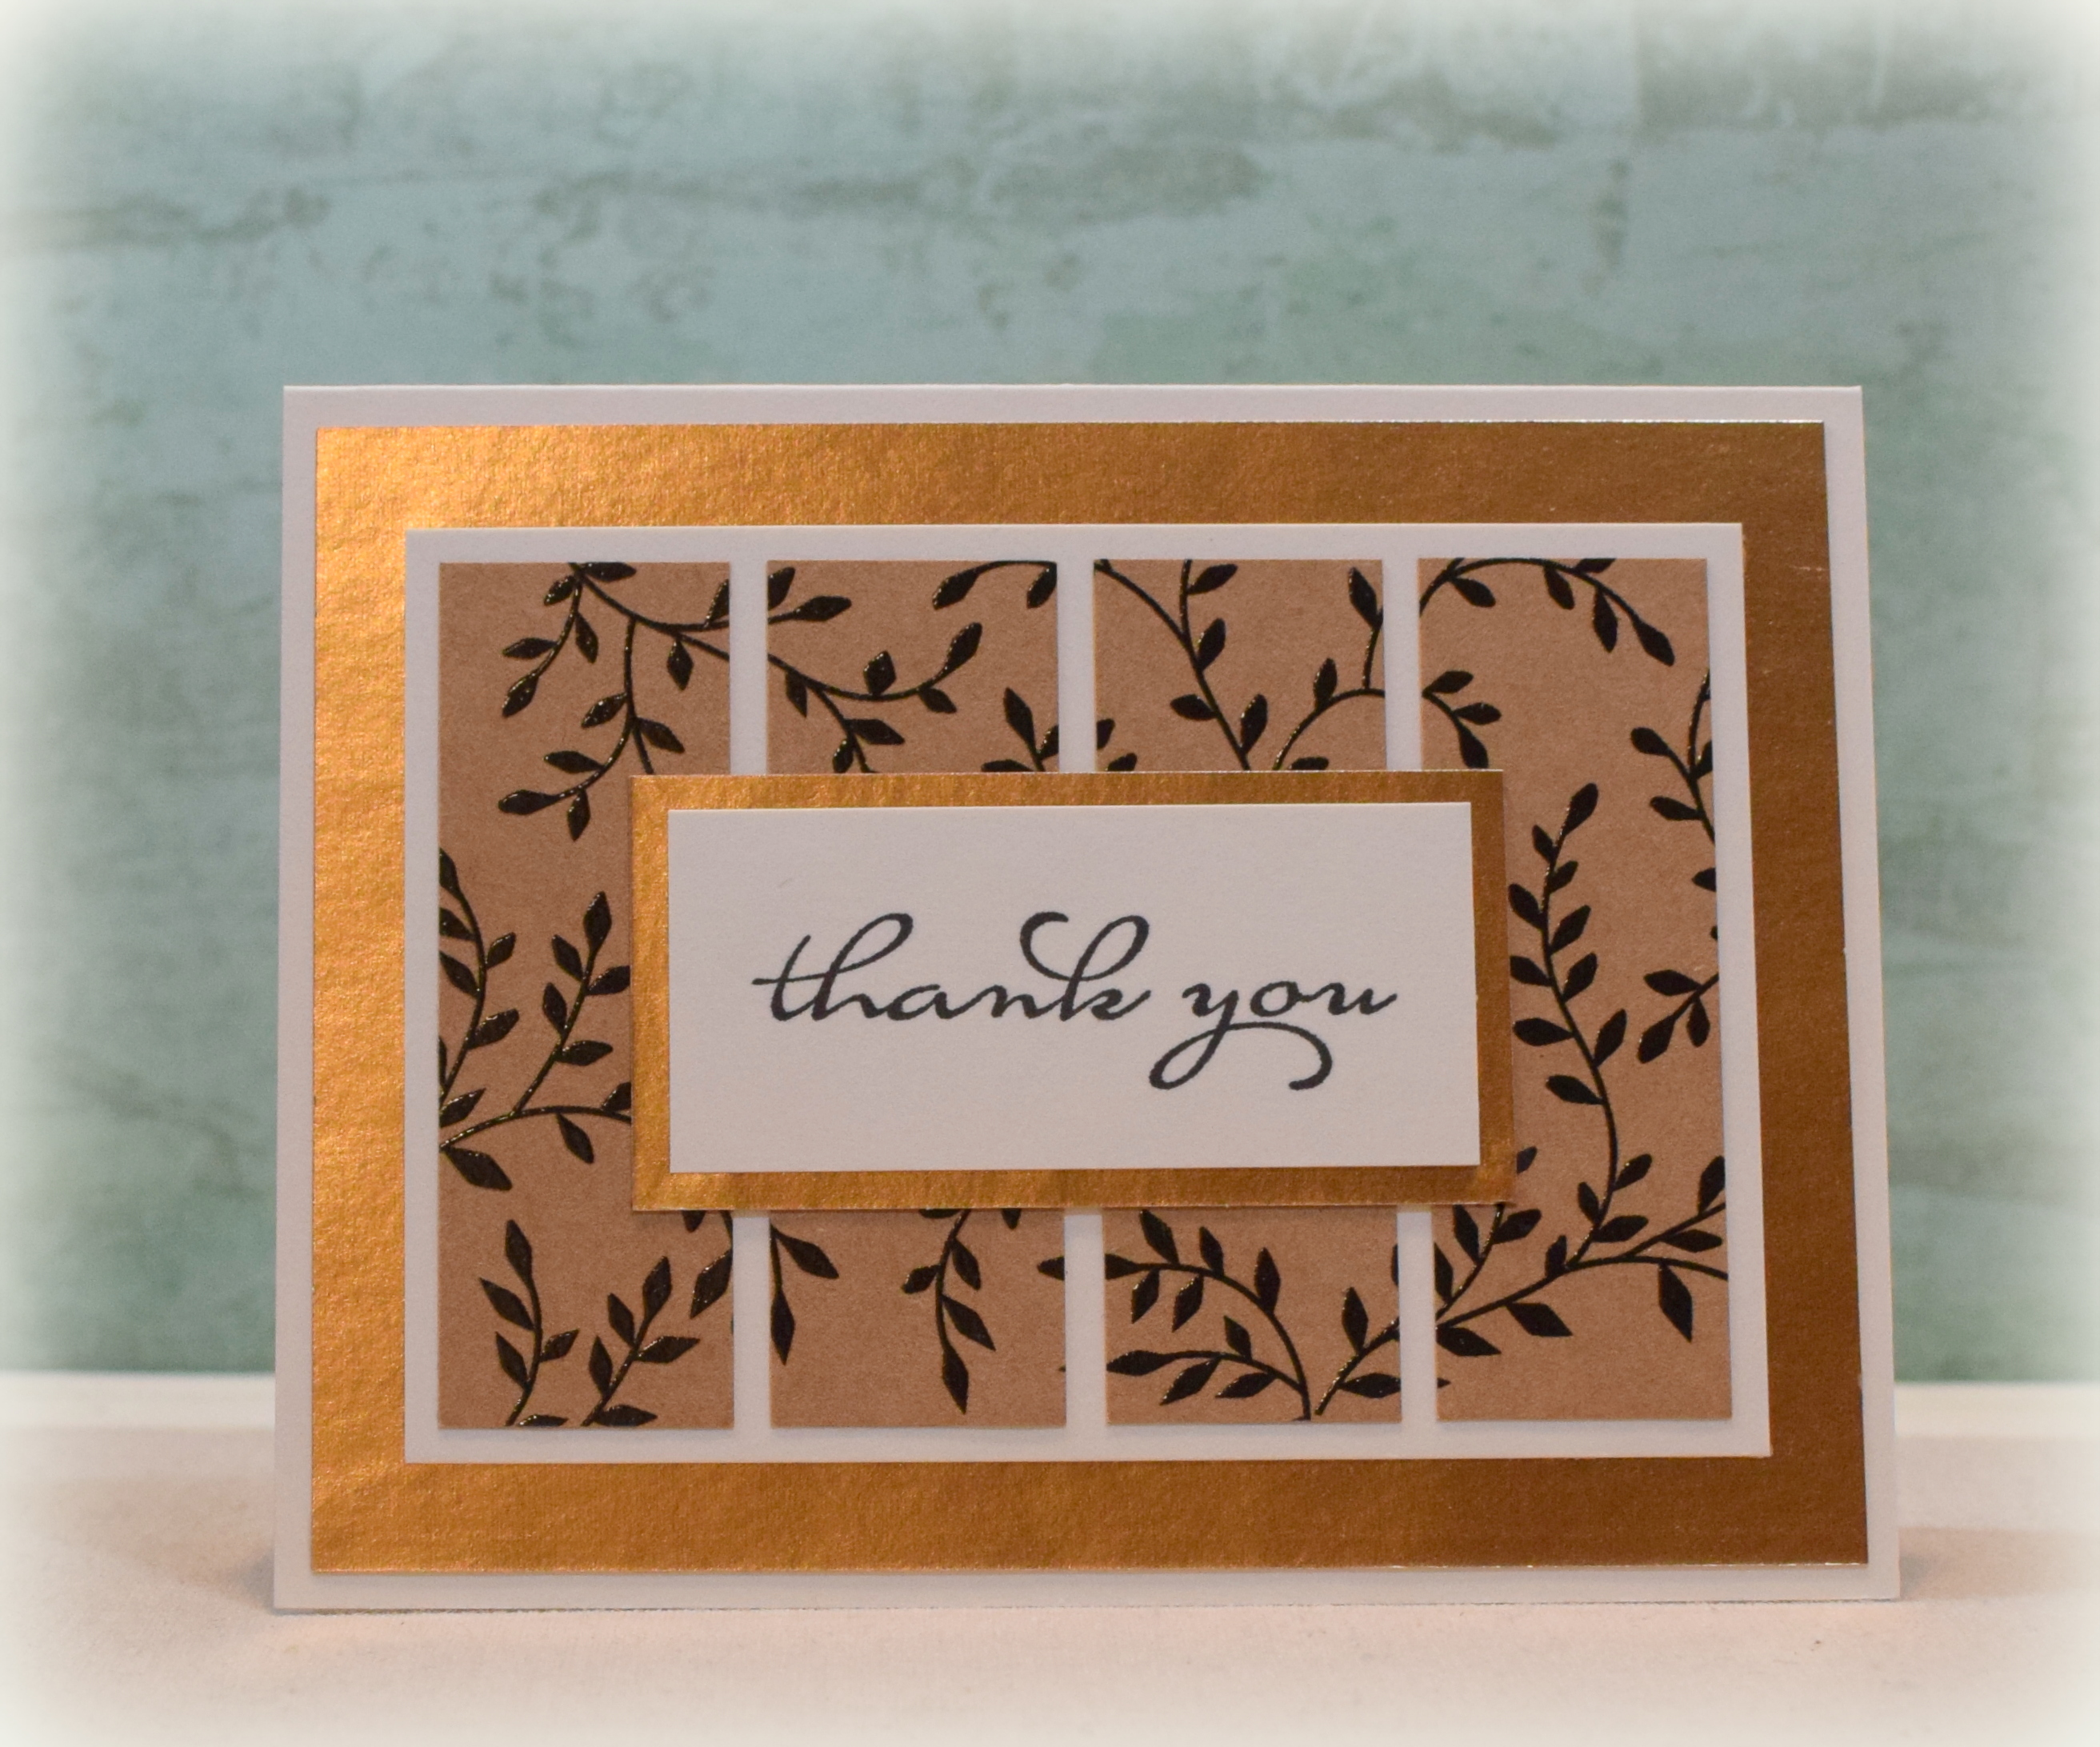
I’ve admired this simple background technique before but hadn’t tried it until now…
The “Kraft Noir” 12 x 12 paper pad by The Paper Studio has various glossy back prints on kraft card stock, and I used a sheet from the pad to create this thank you note. (Thanks, Carol, for gifting it to me!)
In addition to the printed kraft, I also used Bazzill Butter Cream and Recollections Matte Gold Foil card stock. The greeting is from the “Borders Abound” stamp set from Stampin’ Up (retired) and was stamped with Versafine Onyx Black ink.
Simply cut the patterned paper into four 1 x 3 inch strips and arrange them on a 3 1/4 x 4 5/8 inch panel – 1/8 inch apart. (I used Susan Campfield’s measurements and name for the layout.)
I think this technique makes an interesting background panel and is not difficult to do. And it’s always fun to come up with another way to use my beautiful paper!!
Thanks for checking out my card project!
This content uses referral links as described in the disclosure policy on my sidebar.
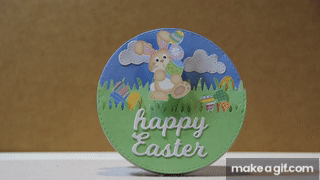
What’s a wing ding?! According to the Merriam-Webster dictionary, it’s “a wild, lively, or lavish party.” Creek Bank Creations came out with this fun interactive die set that creates a round card shape that rocks and swings; a wild party of a card – lol!
*
The Wing Ding Die set includes the pieces to create the round card base layers and the swinging mechanism. You also need a slide guide, foam (or pop dots), a small piece of acetate, and whatever else you need to decorate the card as you wish. (They sell various dies and stamp sets that could work with this card, or you can use what you have.)
For my card, I used a bunny (pre-colored) from the “Easter Clipart Set” by JoKavanaghDesigns that I found on Etsy. I sized the bunny to 2 inches and used my Silhouette software to trace, print and cut him out.
The clouds were from the Weather die set from Creek Bank Creations and were cut from label/sticker paper as I needed something super thin to prevent the swinging bunny from getting caught while he did his thing.
The grass was cut using a “Grass Border Punch” by Fiskars. The eggs were cut from the Silhouette file called “Eggs in Grass Border” (#121712) and were “filled” with various patterns I had previously loaded into my Silhouette library.
I debated whether I should even post this card as I feel I didn’t do very much to make it…
I find sympathy cards so hard to make, but this embossing folder is perfect for creating a simple but beautiful card that could be made quickly when the need arises.
The 3D embossing folder is called “Arums” by Nellie’s Choice and makes a really deep impression. Because it is pretty thick, you may need to play around with the sandwich for your machine. And spritzing a little water on your card stock before embossing helps prevent the paper from cracking.
The embossing folder is 4″ x 5 1/2″ so my card is not exactly an A2 size; my finished card is 4 1/4″ x 5 3/4″. You can get it on a (slightly narrower) A2 base which will fit comfortably in an A2 envelope if you don’t have any of the card base showing as a border. (I made a slightly larger envelope for my card as I liked the look of the border.)
I used a sheet from the Recollections Shimmer Silver and Champagne card stock pack (never sure which one is which; both gorgeous!) and a Kraft card base. The stamp is from the “The Simple Things” set by Gina K Designs (retired) and was stamped with Stampin’ Up Tip Top Taupe ink (retired).
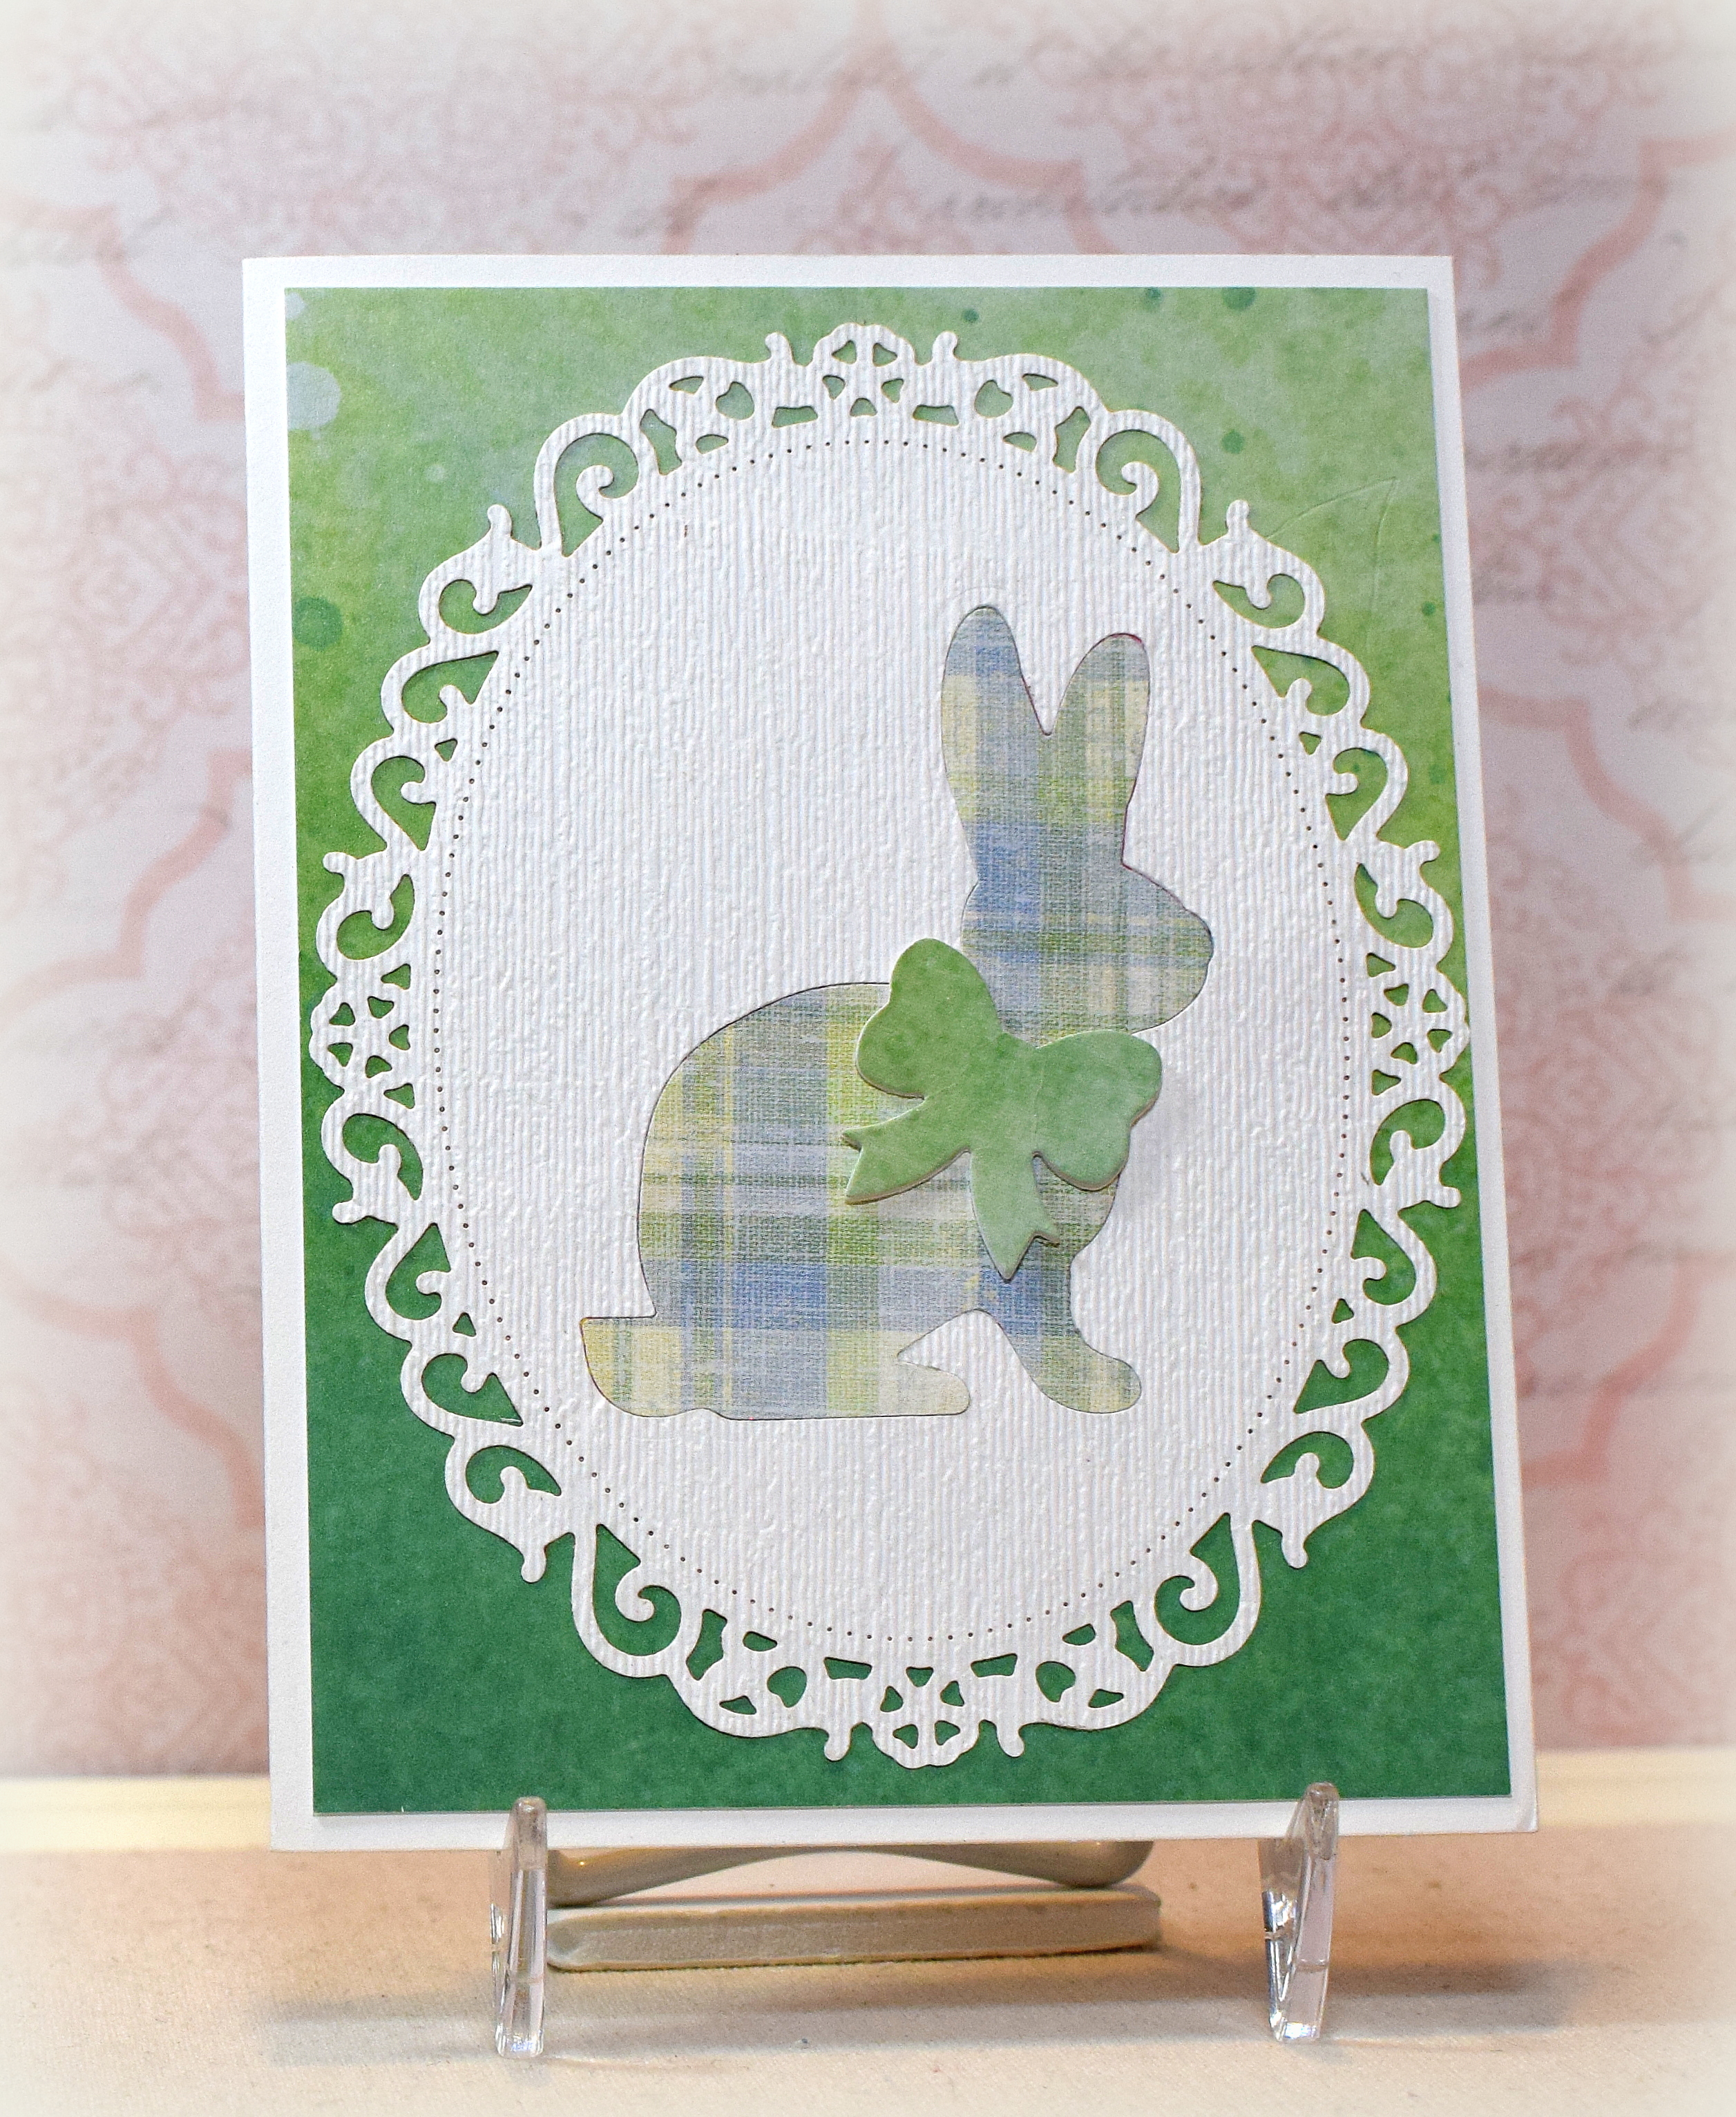
This card features the “Bunny and Bow” die set from Echo Park and one of the dies from the “Floral Ovals” set (S4-356) from Spellbinders.
The bunny was cut from the oval die cut, and then the oval was embossed with the “Subtle” embossing folder from Stampin’ Up (retired). A scrap of “Linen Door Boy Plaid” (468835) by The Paper Studio (retired?) was placed behind the hole left where the bunny was cut. A piece of paper from the “Watercolor” card stock pack by The Paper Studio was used for the front panel and bow.
Thanks for checking out my card project!
This content uses referral links as described in the disclosure policy on my sidebar.
I came across this video showing how to make a W-V fold card and thought it was another great way to use up some of my patterned paper. I think it’s a pretty cool fun fold as well!
If you look at the overhead view, you can see where the fold got its name.
I’ve had this beautiful fruit themed paper for years and have no idea where I bought it. Unfortuate since there is not a single bit of info (name, company, etc.) on it. Hmmm…
As many of you know, I love earthtones so my first thought was to pair this paper with Recollections Kraft and Bazzill Butter Mints.
I also tried one with the beautiful Bazzill Velvet (plum) card stock.
In the video, Janie made her card 5 1/4 inches tall (and her panel measurements reflect that). I made mine 5 1/2 inches tall so I adjusted my measurements accordingly:
(click on above to enlarge)
You could decorate all four of the tall skinny panels, or you could just decorate the first and third to make it less bulky. (You don’t really see the second and fourth panels when looking at the card head-on.)
I wasn’t sure how I was going to decorate the front when I made the measurement sheet above so the smaller two squares (with my greeting) aren’t on there. (My embossed panel with greeting is 2 1/4 x 2 1/4, and the mat is 2 3/8 x 2 3/8.) I used the Subtle embossing folder from Stampin’ Up (retired) or the Tapestry embossing folder from Gina K Designs for texture and the “Mini Expressions – Happy Birthday” die from Creative Expressions or the “Doodle Happy Birthday” die from Poppy Stamps for the greetings. There’s a panel on the “inside” to write or stamp a sentiment.
And I used just one sheet of patterned paper, but you could use several different prints (or solids) on the same card. So many possibilities to make use of your patterned paper with this card design…
This card folds flat to 5 1/2 x 4 inches so it fits in a regular A2 size envelope. However, it could be a bit heavy or bulky depending on the papers and card stock you use and may require extra postage (if it weighs more than an ounce) and/or a trip to the post office to mail (if it is more than 1/4 inch thick).
Thanks for checking out my card project!
This content uses referral links as described in the disclosure policy on my sidebar.