Guest Designer for Die Cut Divas

Guest Designer for Die Cut Divas

Guest Designer

Guest Designer

I am extremely excited and honored to have been asked to be a guest designer for the month of August over at Die Cut Divas! (Thanks, Cathie, for asking me!!) They have monthly challenges where all cards/projects must be made using at least one die cut or embossing folder. (Click HERE to see all the challenge rules.)

Pop on over and check out the “Your Favourite Holiday” challenge going on this August!

Thanks for checking out my post!

Happy Anniversary With Flourishes

Happy Anniversary With Flourishes

happy anniversary with flourishes xDSCN7822


Here’s a clean and simple variation of the wedding card I previously posted.  I needed an anniversary card quickly (I lost track of where we were in July!) and was curious how these stamps would look on plain white card stock.

The stamps are called “Wedding Dress” and “Groom” by So Suzy Stamps.  (The card is 5×7; these stamps are pretty big!)  The greeting is from the Gina K Designs “Bundle of Love” stamp set (retired?).  I stamped these images with Gina K Black Onyx ink and used my MISTI so I could stamp them multiple times to get really dark, crisp images.

The mini rhinestones were airbrushed with Copic BG18.

The cardstock I used was black, white, and Core’dinations Mediterranean.  I embossed double lines above and below the ribbon with my score board.

I love CAS card designs when other people do them, but I always feel like my project is not done or is missing something when I attempt it.  I’m still trying to decide if I am happy with this design!  I do love these stamps and really like that they are the focus on such a simple card.

Thanks for checking out my card project!

This content uses referral links as described in the disclosure policy on my sidebar.

Fishing You The Best

Fishing You The Best

wwwDSCN6209.jpg

As I mentioned in my last post, the Perfectly Rustics site will no longer be hosting challenges after their last “Anything Goes With Glitter” challenge.

I had already made this card for a color challenge we were intending to run in a few weeks (using three Stampin’ Up! colours -Basic Black, Bermuda Bay, and Smoky Slate), and since there will be no color challenge, I decided to share it now.

For this project, I found a printed paper by Karen Foster Design called “Coral Reef” which matched the Stampin’ Up Bermuda Bay.  I used that as the backdrop for this card.  The frames were cut with dies from the Spellbinders 5×7 Matting Basics A and B sets.  The card stock I used is Stampin’ Up Smoky Slate, Bazzill Tiarra (similar to Smoky Slate), Core’dinations Mediterranean (similar to Bermuda Bay) and black.  (This card is 5×7)

The tag was cut from a die from the Heartfelt Creations “Decorative Flower Pot” die set by Spellbinders.  The stamp is from the Gina K Designs “Fishing You the Best” set (retired?) and was heat embossed with versamark ink and Gina K black embossing powder.  A piece of black string was added.

I filled a ziplock sandwich bag with clear Suave Sculpting (hair) Gel, and placed it over the fish paper and “under” the mats to make it look like the fish were in water.  I had done another card using this technique (HERE) and a tutorial (HERE).  For the tutorial, I used blue hair gel, but the paper I was using here was blue so I used clear gel on this project.

wwDSCN7622

(click on photo to see the water/bubbles)

Thanks for checking out my card project!

This content uses referral links as described in the disclosure policy on my sidebar.

Farewell/Crafting Site No Longer Here

Farewell…

farewell cake image

UPDATE – PERFECTLY RUSTICS IS NO LONGER A CARD CRAFTING SITE….

Perfectly Rustics has been running for about two years now, and sadly, Kim and her husband Colin decided that they no longer have the time (with two small children) to continue with the challenge site so this will be the last Perfectly Rustics Challenge.

I discovered this site last summer and enjoyed regularly participating in their bi-weekly challenges. The team was always so encouraging, the challenges fun and motivating, and I got a lot of great inspiration from the design team and the projects posted by the participants.  I was truly honored when they invited me to join their design team in March and have greatly enjoyed and appreciated the opportunity.  I will really miss Perfectly Rustics, and I wish Kim and her family all the best!

Congratulations! - Wedding Card yDSCN7536


Join us this fortnight over at Perfectly Rustics for their FINAL Design Challenge: Anything Goes – with Glitter.  You can create absolutely anything from a card, a scrapbook page or an off the page project for any theme or topic – just add glitter to it and maybe a little to yourself! (http://perfectlyrustics.com/2015/07/25/prdc-no-52-glitter/)

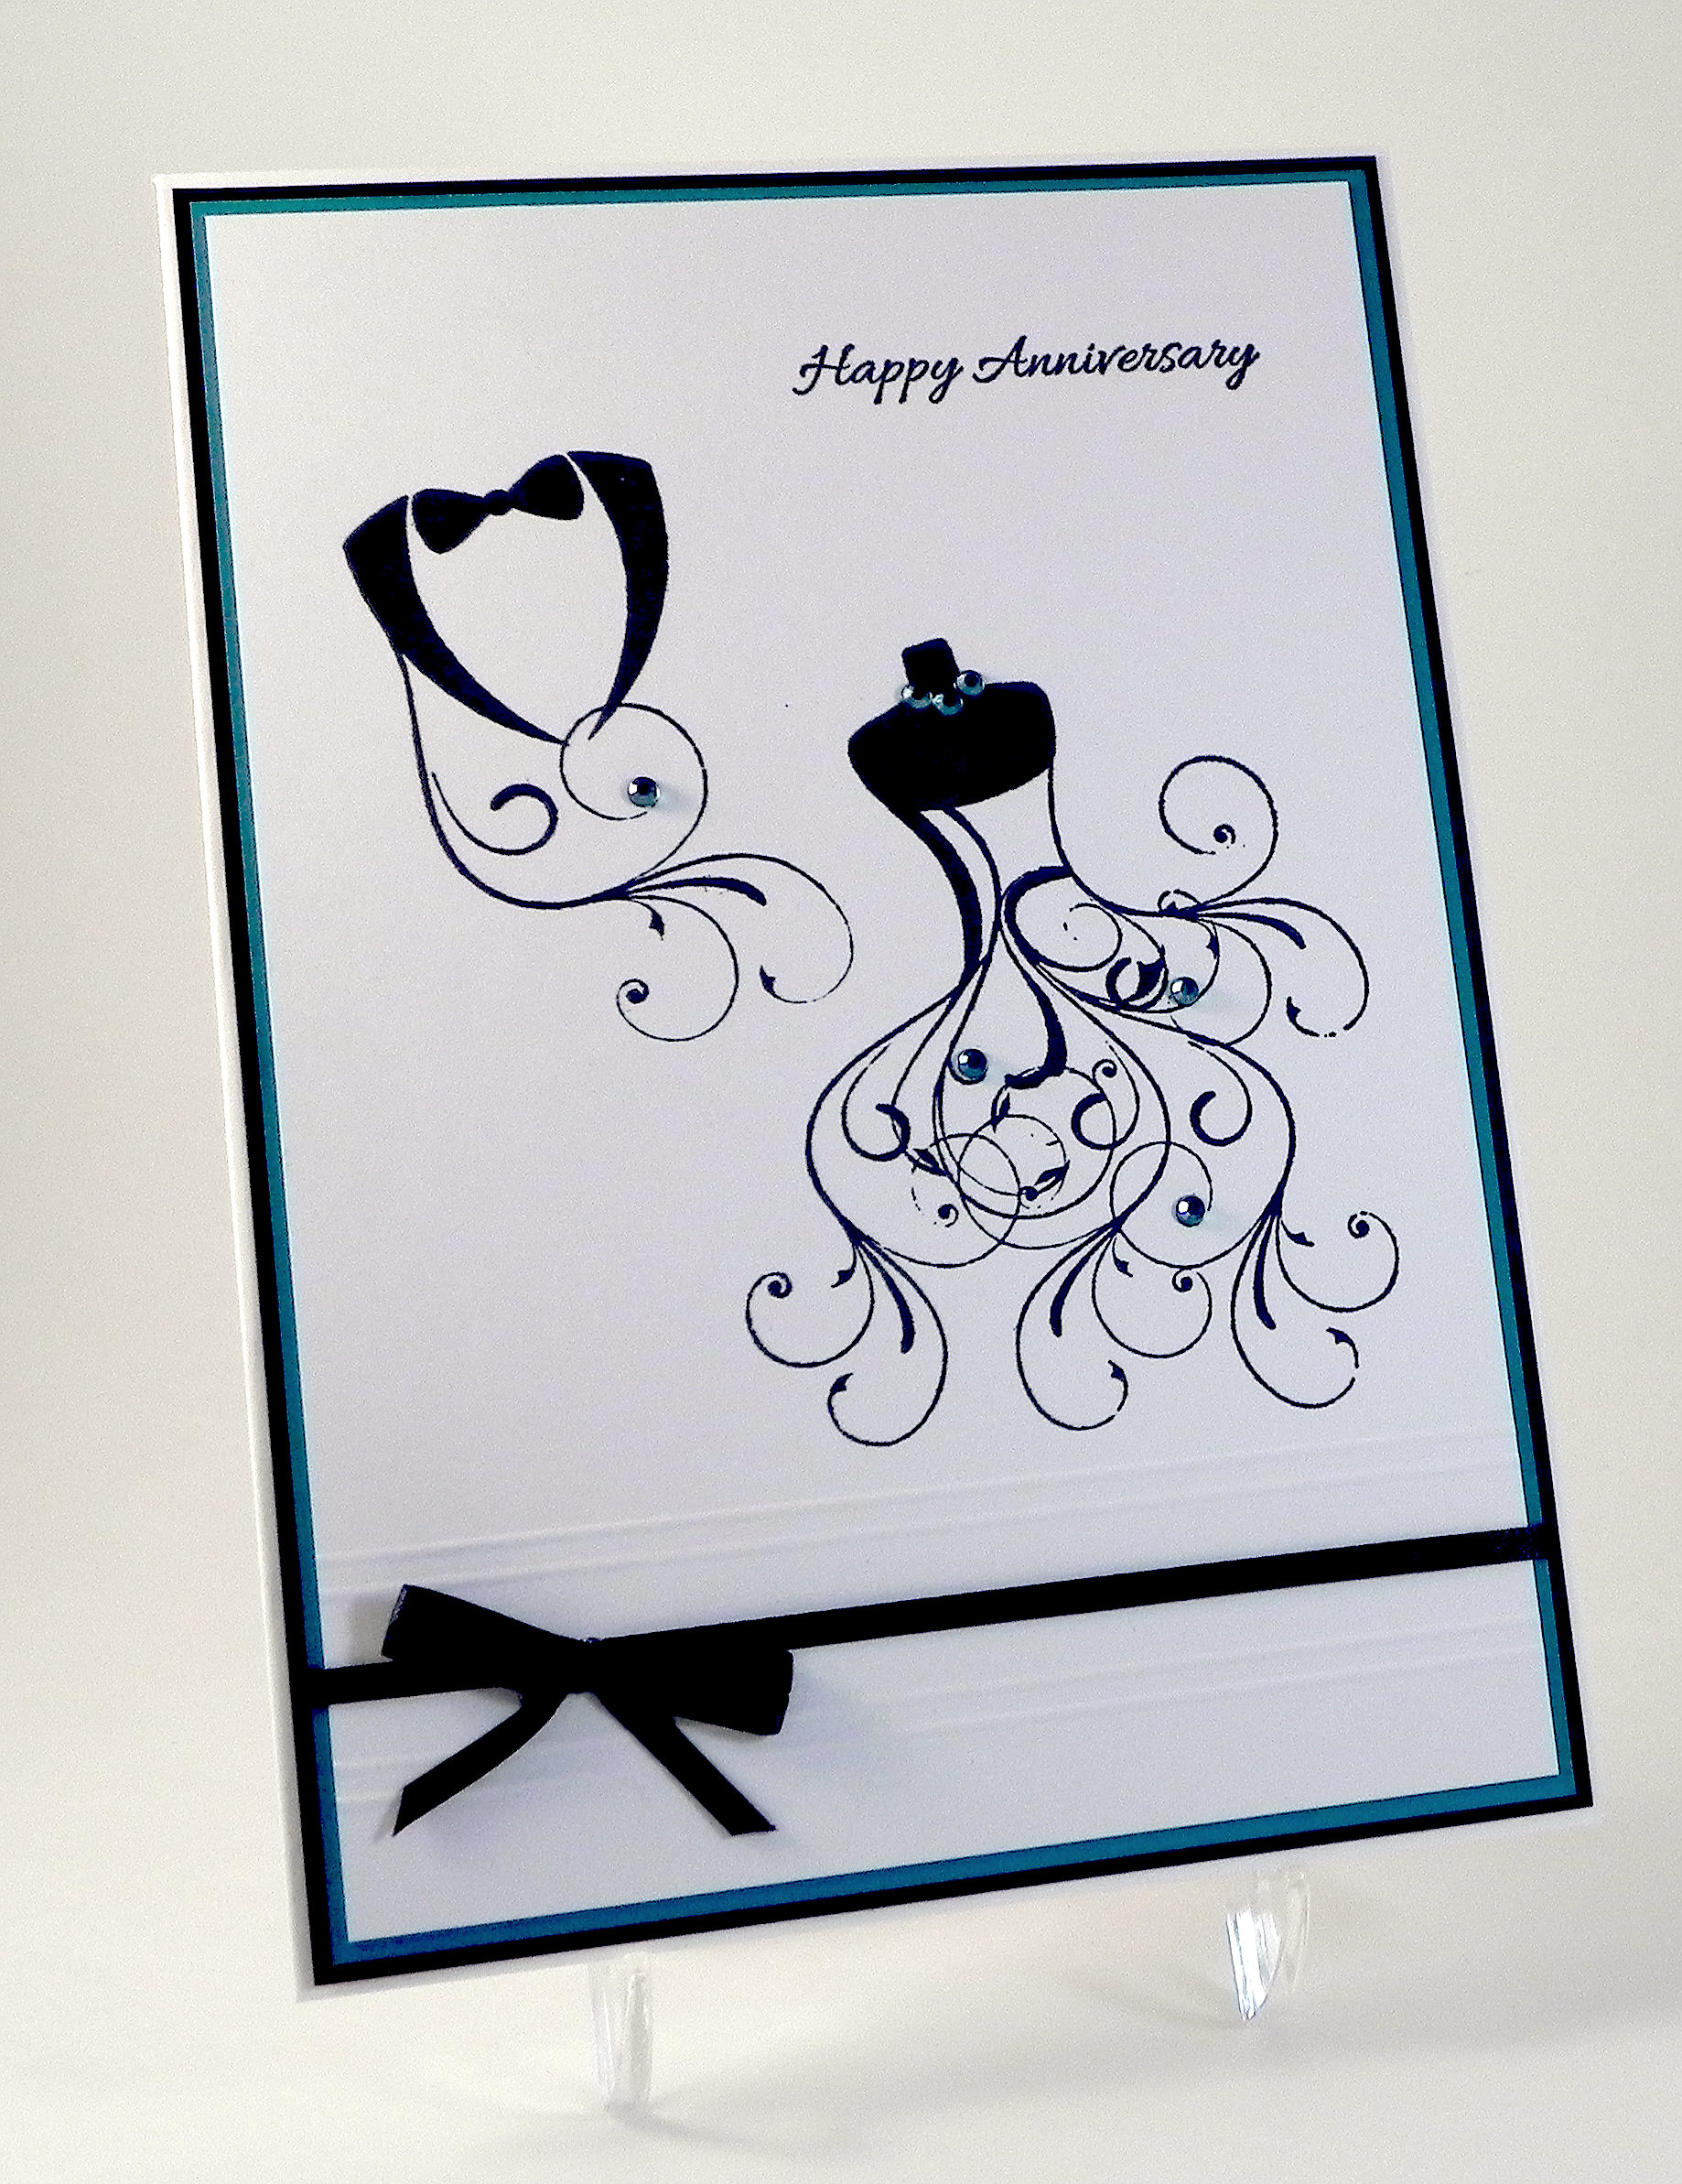
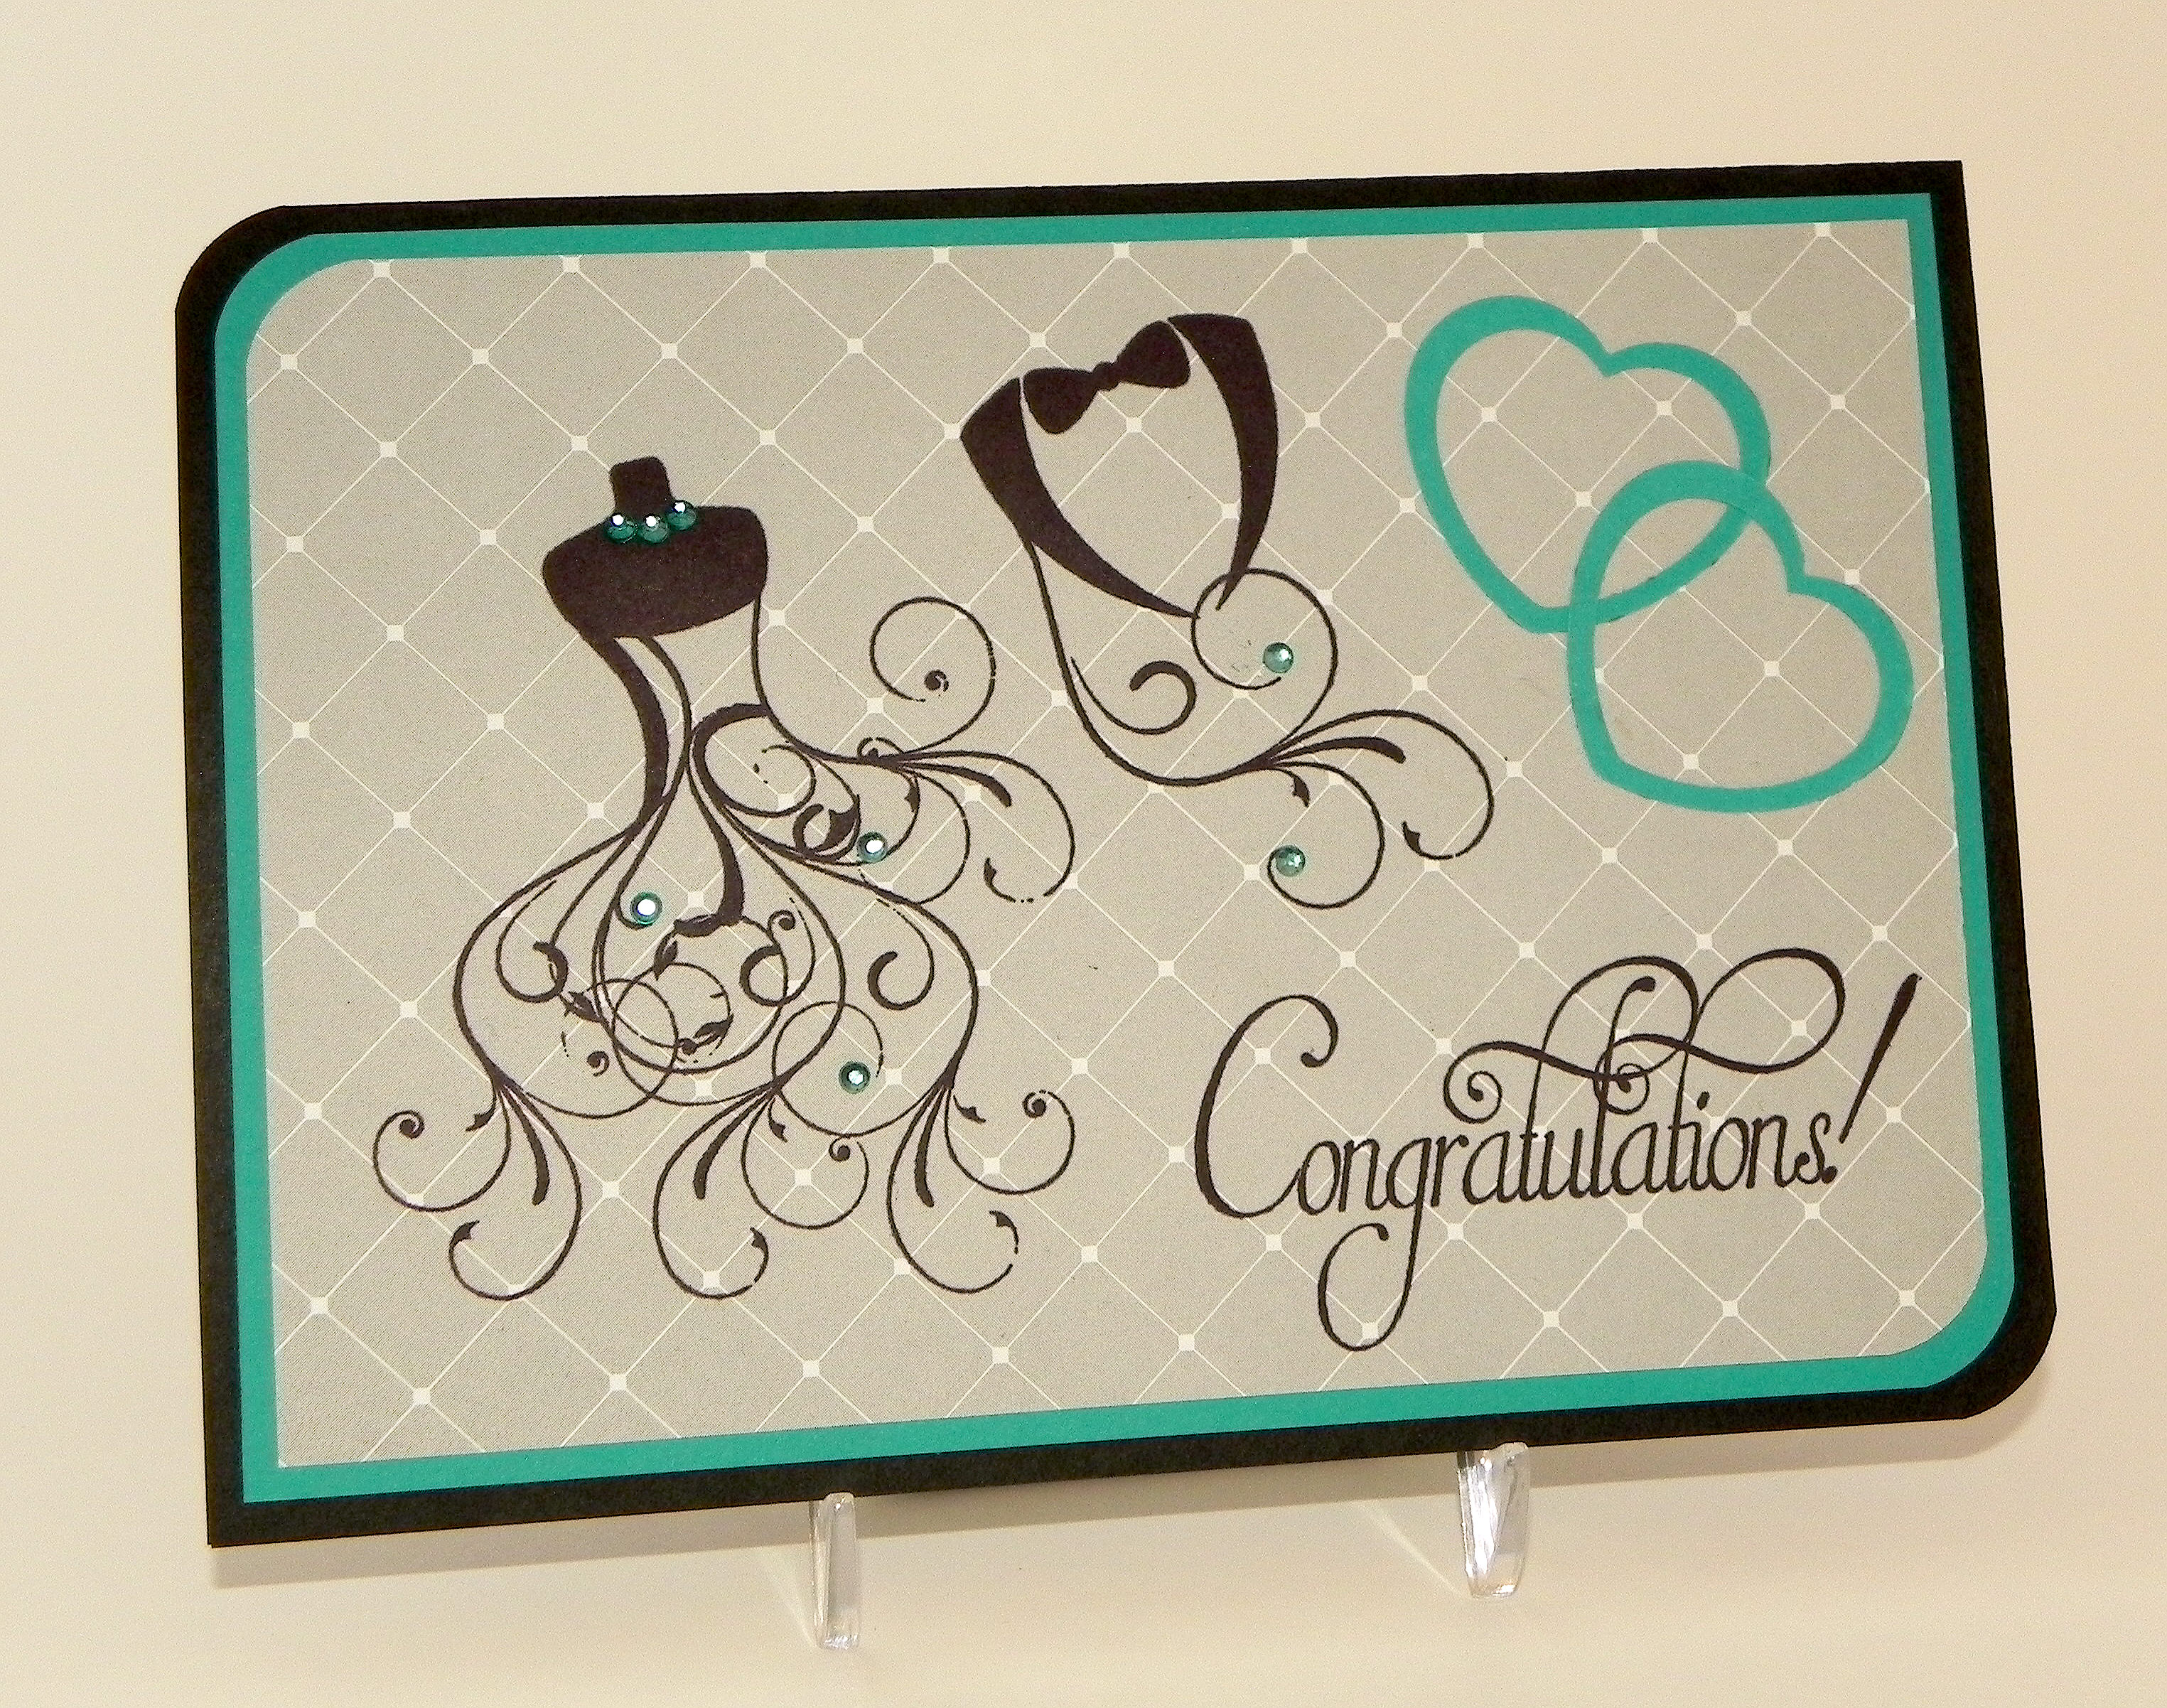
The card I am posting for this challenge was posted a few days ago (HERE) when I thought the challenge was to be announced and was originally made for a color challenge that was planned to run in a few weeks.  The three Stampin’ Up! colours for that challenge were to be Basic Black, Bermuda Bay and Smoky Slate.  Here is my original design.

Wedding Card Color Challenge yDSCN9933

I really liked the way this card came out, but I felt like it was a bit dark with the gray background panel. (I was trying to stick with the color challenge requirements at the time!)    When I saw that the new challenge included glitter, I saw an opportunity to brighten up my card a bit!

Those gorgeous stamps (I just love them!) are called Wedding Dress, Groom, and Congratulations and are by So Suzy Stamps.  I stamped these images with Gina K Black Onyx ink.  I used my MISTI so I could stamp them multiple times to get really dark, crisp images.

The gems were airbrushed with Copic BG18 to coordinate with the Bermuda Bay.

The cardstock I used was black, Core’dinations Mediterranean (for the Bermuda Bay), American Crafts The Goods – Tulle (for the Smokey Slate), and Recollections silver glitter paper.  I rounded the corners with a Fiskars corner rounder.

The hearts were punched out with a Creative Memories double heart punch.  I punched the smaller heart first, and then I punched the larger heart around the hole from the smaller one.

This card was extremely quick and easy to create.  Cut 3 panels and a card base.  Round 2 corners on each.  Stamp 3 images in black.  Add a touch of bling (which I airbrushed to coordinate).  Punch 4 hearts, and adhere.  DONE!

Now it’s your turn! Create any project you choose, and just add glitter!  I can’t wait to see your sparkly project over at Perfectly Rustics.

Thanks for checking out my post!

(Farewell image at the top of my post is a google image and is not my own.)

This content uses referral links as described in the disclosure policy on my sidebar.

Happy 29th Birthday

Happy 29th Birthday

Happy 29th Birthday.jpg

A friend recently commented that his 29th birthday was fast approaching.  I saw this as the perfect opportunity to use two new stamps I had recently added to my collection. (He is not 29….. and I am not 110 pounds!)  The image on the front is an Art Impressions wood mount stamp (distributed by Hampton Art) that I purchased at AC Moore.  There is no name on the stamp, but the item number is PS0919. (Over at the Ai blog, it is referred to as “Ai Girlfriend Birthday Celebrate!”)   The inside stamp is another Ai stamp from the “Girlfriends” collection (UMF3572).

I created a cut file with my Silhouette software and stamped the images on the die cuts I created.

AI PS0919 image of cut file

Click (HERE) for a tutorial on how to line the stamp up perfectly on the die cut.

Copic Markers were used to color the image (skin: E00, E31, E57, E04 (mouth); hair: E57; Cake: E57, E59, E40, B34; Clothes: B39, B34)  along with a Sakura clear glitter pen for a little touch of sparkle.

xDSCN7894

(Click on photo to see the sparkle.)

Once cut and colored, she was mounted on an Action Wobble spring.

Happy Birthday Friend

The white panel was embossed with a Cuttlebug Swiss Dot embossing folder.  The solid blue card stock is Gina K Blue Denim.  The striped panel is digital paper from a set called “Yankee Fan” that I purchased from a store called happyheartstudios on Etsy (HERE).

Thanks for checking out my card project!

This content uses referral links as described in the disclosure policy on my sidebar.