Golf Ball Snowman Holiday Card

Golf Ball Snowman Holiday Card

wwDSCN8720.jpg


Three stamps called “Golf Ball Snowman,” “Sand Snow Water Lines,” and “Vertical Happy Holidays” by DRS Designs  were used to create this holiday card that I made for the Rolling Green Golf Club’s Holiday Boutique and Luncheon (that I mentioned in my last post).

I used my MISTI for placement and to make it easier to make more than one card.  The images were stamped and colored with Memento tuxedo black ink and Copic Markers (R59, C2, and C4) on white card stock, mounted on Recollections black and then on a white card base.

The inside sentiment was computer generated and says “and a wonderful new year.”

This card was designed to be made and packaged as boxed sets.

wwDSCN8753

Thanks for checking out my card project.


Where has the time gone?!

Where has the time gone?!

wDSCN8512

I can’t believe the summer is over and fall is already here!  That went fast!!

It’s been a while since I’ve posted anything here on my blog or since I’ve had a chance to check out all the projects that everyone has been working on.  I’ve been so busy (since May!) preparing for a craft show of sorts.  I was invited to participate in the annual Holiday Boutique at the Rolling Green Golf Club in Springfield, PA in December.  There will be a variety of vendors and a few crafters selling items for this event, and I will be selling boxed card sets, some single cards, and other paper-crafting projects. Since it is a holiday-themed event for the lady golfers at the club, I decided to primarily make Christmas/holiday and golf related projects.  I am creating some new projects as well as re-creating some of my past favorites, and I hope to start posting some of these projects soon.  (I need to put down my markers and stamps and start taking pictures!!)  Anyway, I just wanted to take a minute to let everyone know what I have been up to all summer and to explain why it might seem (at least here on my blog) like I’m doing nothing!

Thanks for checking out my post!

Spring Blossoms Mother’s Day Box Card

Spring Blossoms Mother’s Day Box Card

wDSCN6422.jpg

I have another holiday project to share in honor of the “Your Favourite Holiday” challenge over at Die Cut Divas  where they have monthly challenges where all cards/projects must be made using at least one die cut or embossing folder.  (Click  HERE to see all the challenge rules.)  I created this box card for Mother’s Day.

One of my favorite sites for svg files is svgcuts.com.  Leo and Mary create such beautiful project files with amazing samples and tutorials for assembling the projects. This beautiful box card is from the “Spring Blossoms SVG Kit” which you can see HERE.  The kit contains several Asian-inspired projects for Spring or any time of year. Projects include a paper lantern which has a reinforced hole in the back for plug-in lights or a battery operated tea light, a beautiful tiered pagoda that could be used as a very fancy gift box or centerpiece (for a spring wedding perhaps!), and several card designs.  They provide the svg files that you can cut with your electronic die cutting machine, and you choose the papers and embellishments.  Once all the pieces are cut out, you assemble them into beautiful projects. The tutorial VIDEO makes assembly a breeze!

I loved the colors in the sample and used similar colors for my card.   The card stock I used was Core’dinations April Lovely and Nutmeg.  The printed paper was Sandy Lion Pink Flowers.  The greeting was heat embossed with versamark ink and and Tsukineko silver embossing powder.  (I can’t seem to locate the stamp I used but will keep looking and will include it here when it turns up!)  Recollections adhesive rhinestones and a Creative Memories Precious Elements (silver) Pen were used to add a touch of sparkle to the centers of the blossoms.

wDSCN6437

When open, the card stands like a box, but it closes flat for easy mailing.  There is room on the back of the box to add a panel of plain paper with a sentiment and signatures.

wDSCN6431

Thanks for checking out my card project!

This content uses referral links as described in the disclosure policy on my sidebar.

Penny Slider/Spinner Tutorial

Penny Slider/Spinner Tutorial

Tropical Penguins Penny Slider Card Video Clip.GIF

(click HERE to see original post for this card)

I’ve recently made two penny slider/spinner cards, and I must say, I LOVE watching the elements roll across the cards!  (Simple pleasures, right?!)  So I figured I’d post a tutorial on how to make one!!

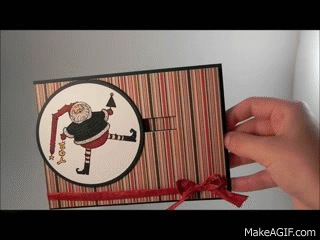
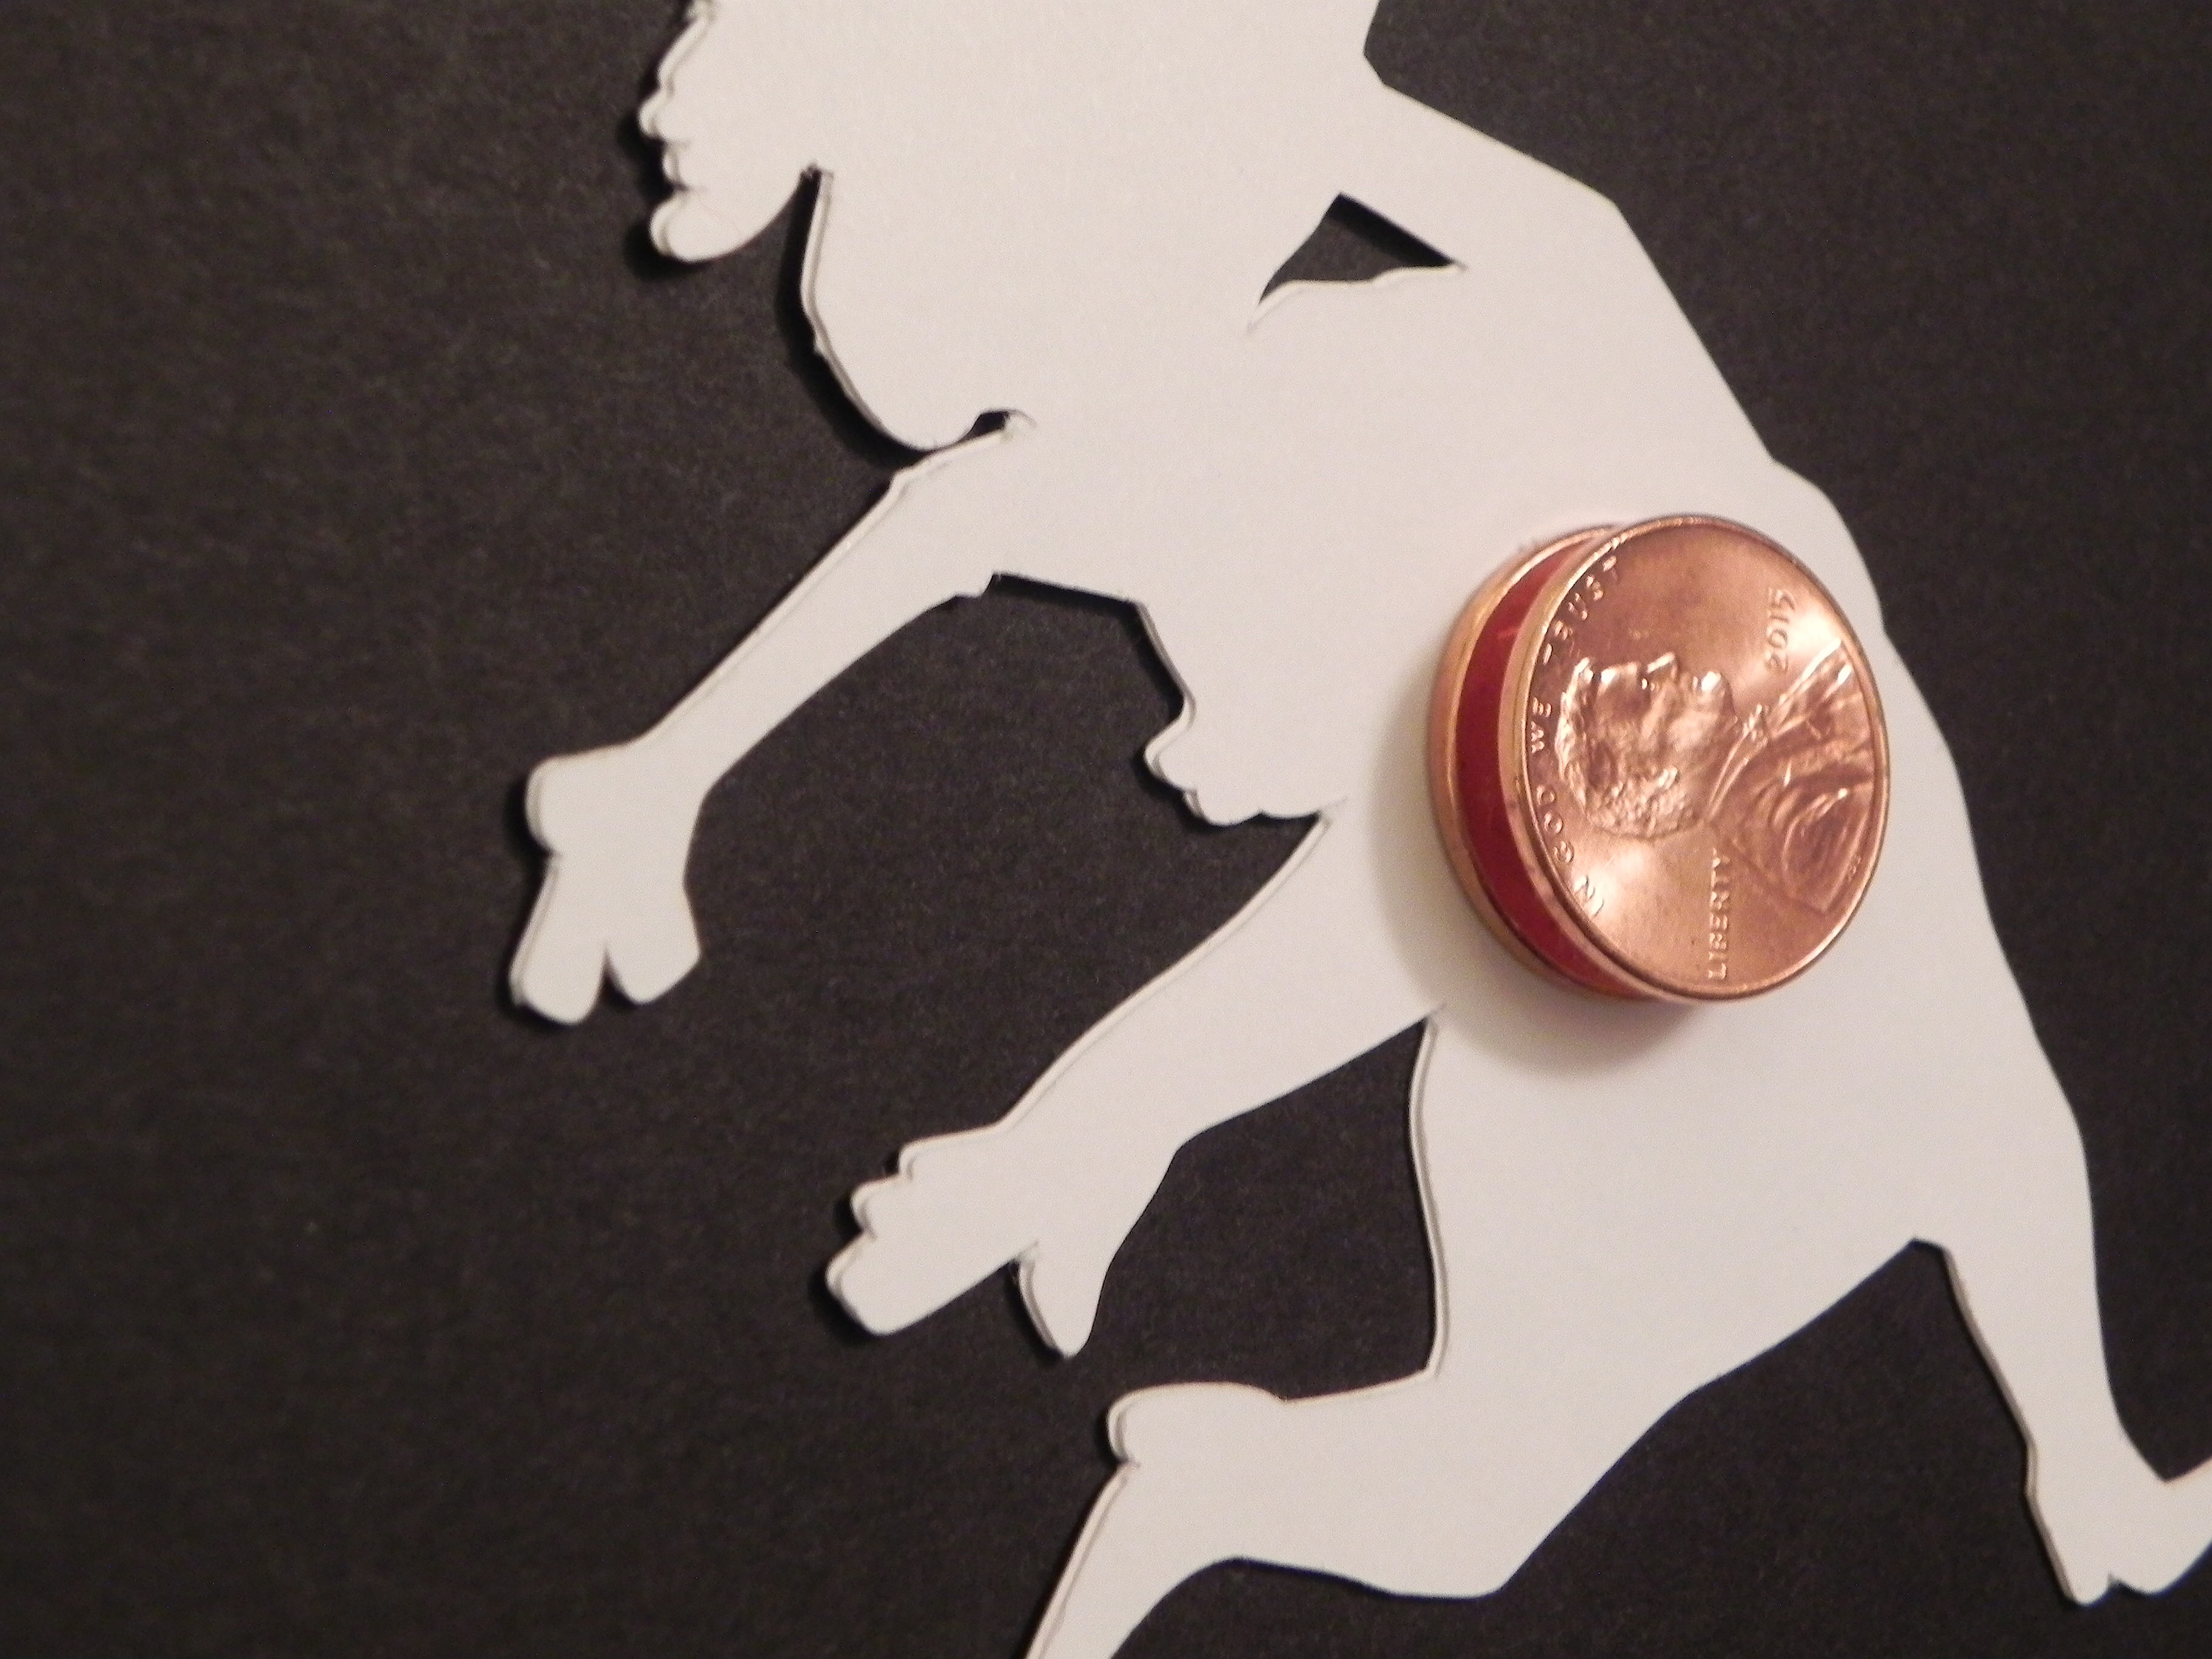
A penny slider card has an element on the card that spins as it travels across the card.  It’s called a penny slider card because the spinning element is mounted on a “sandwich” of two pennies with a pop dot in the center which rolls across the card in a slot or channel that you create on the front of your card.

Spinning Santa.gif

(click HERE to see orignal post for this card)

There are three basic parts to a penny slider card:  the element that slides/spins, the channel or slot it spins across, and the card front itself.


1.  To make the sliding/spinning element:

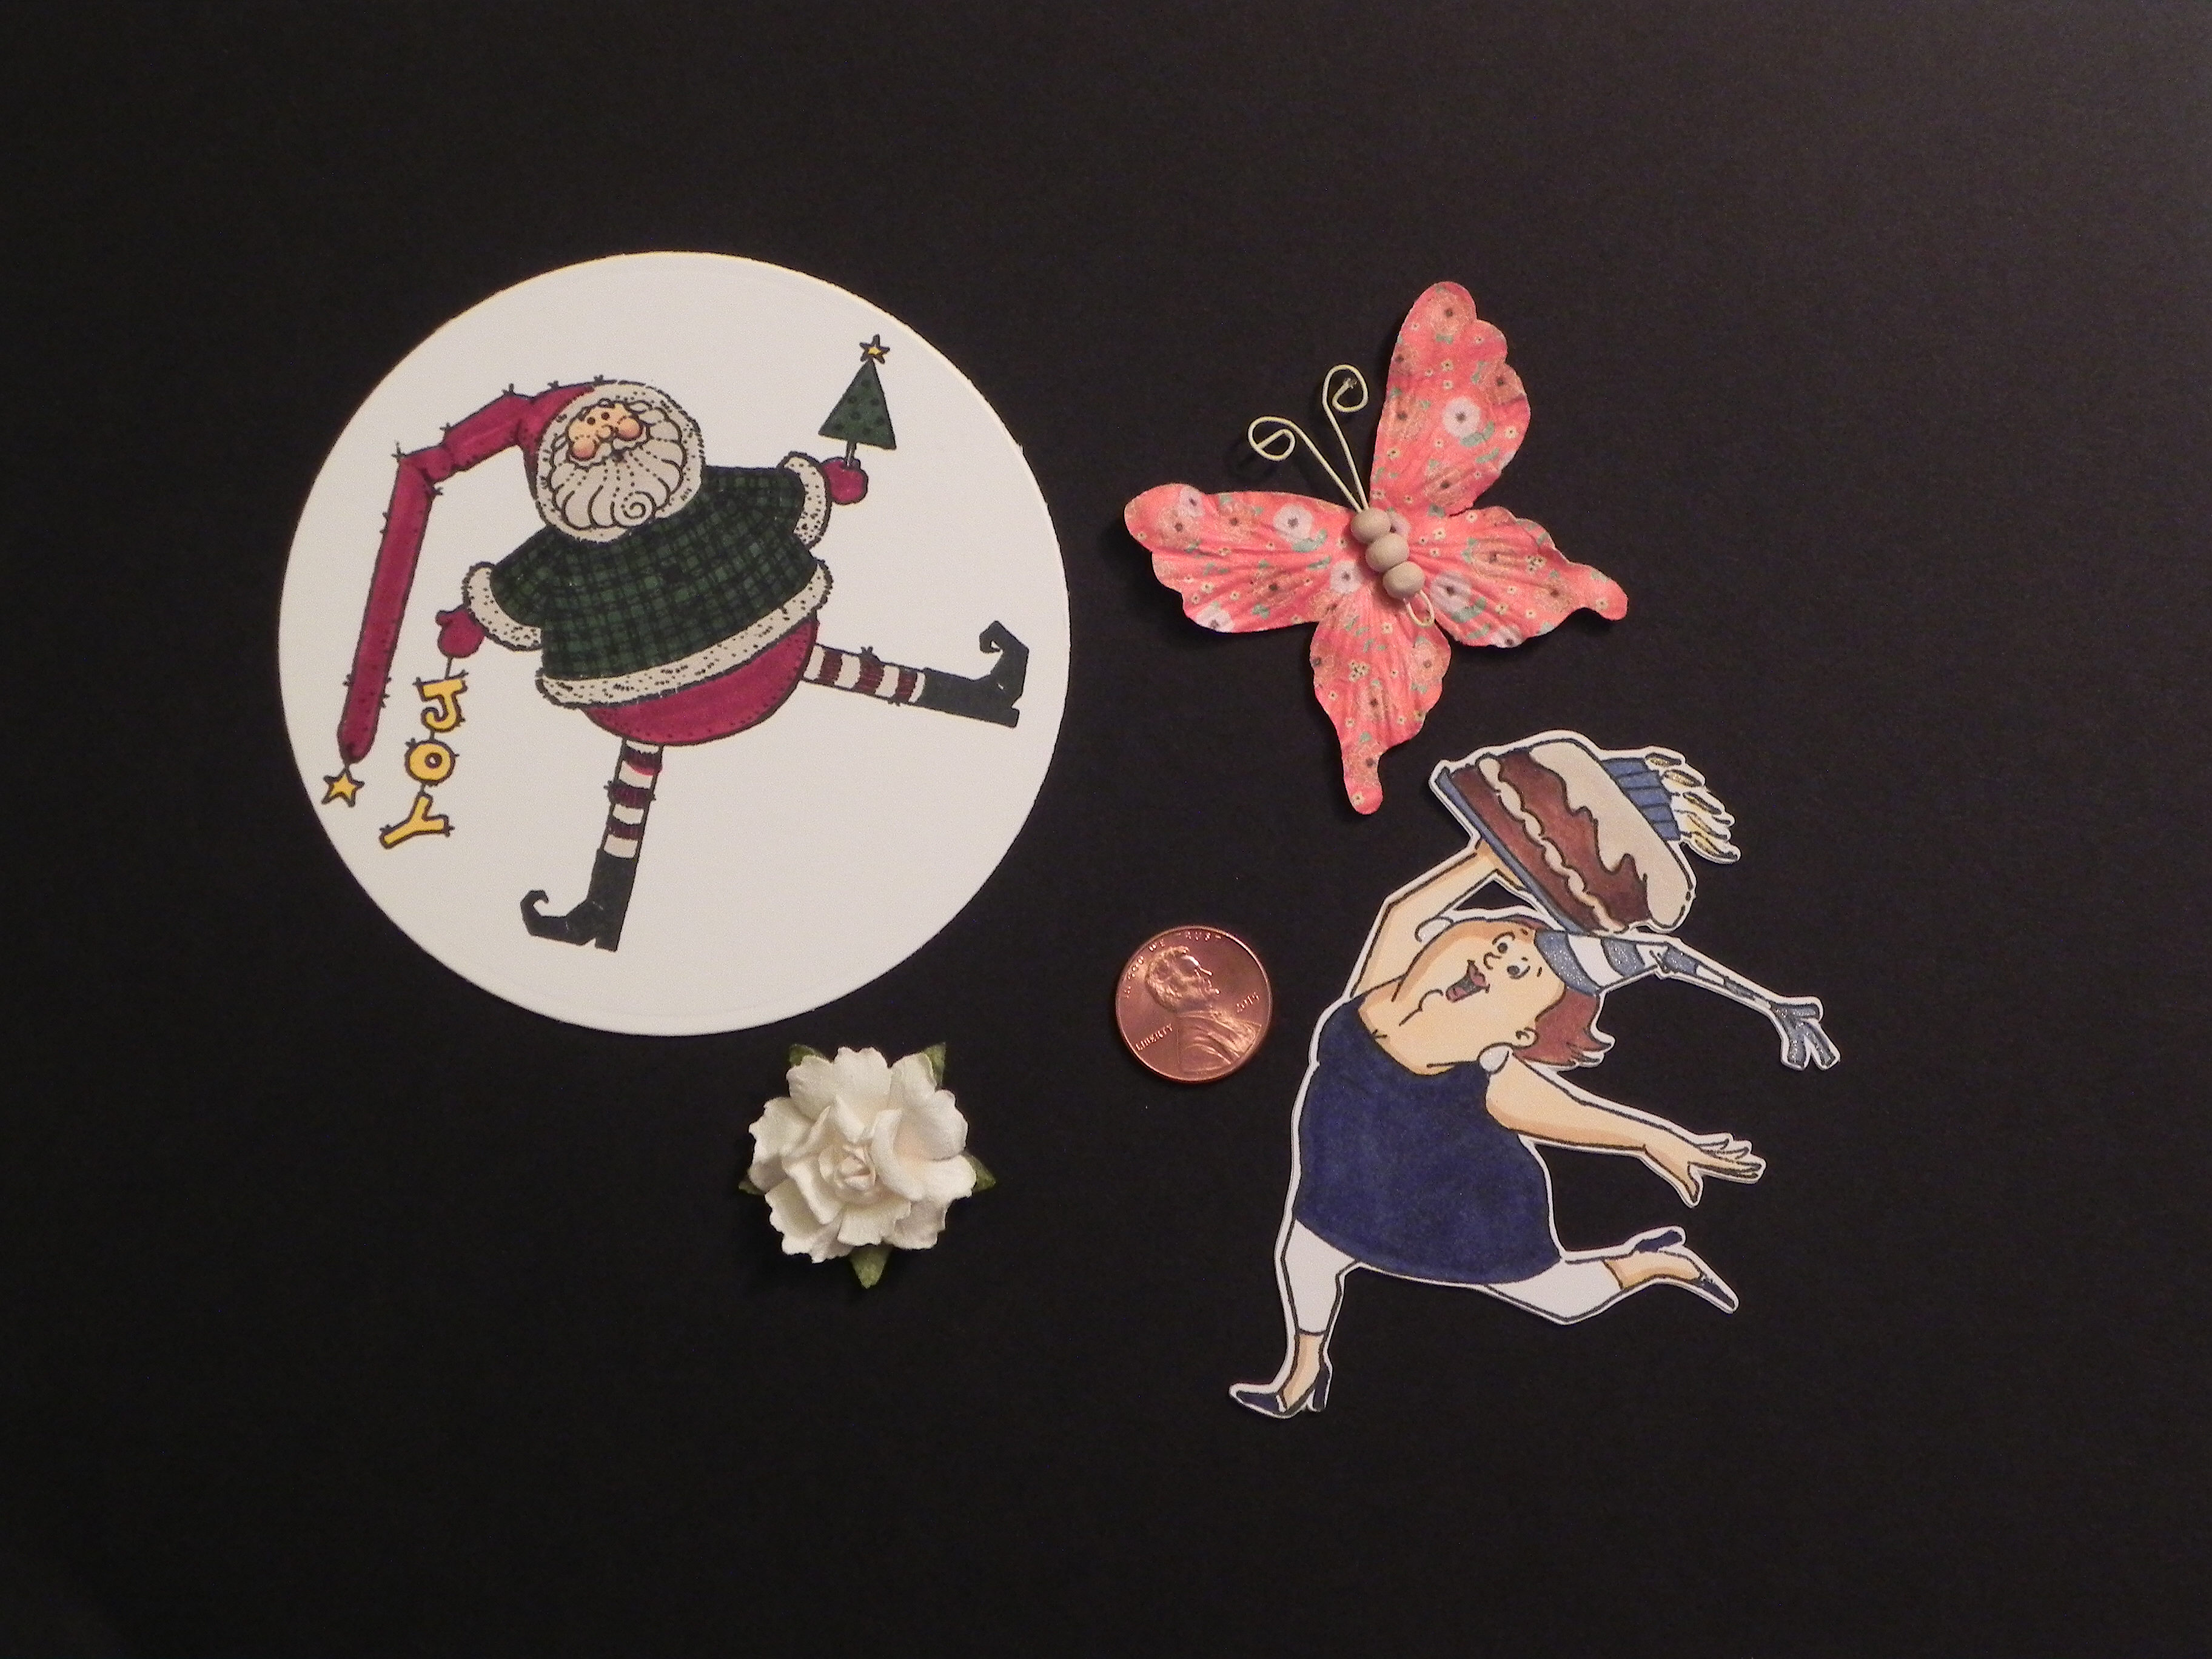
For this step, you need: 2 pennies, a round foam pop dot, glue dots and the thing you want to spin across your card.

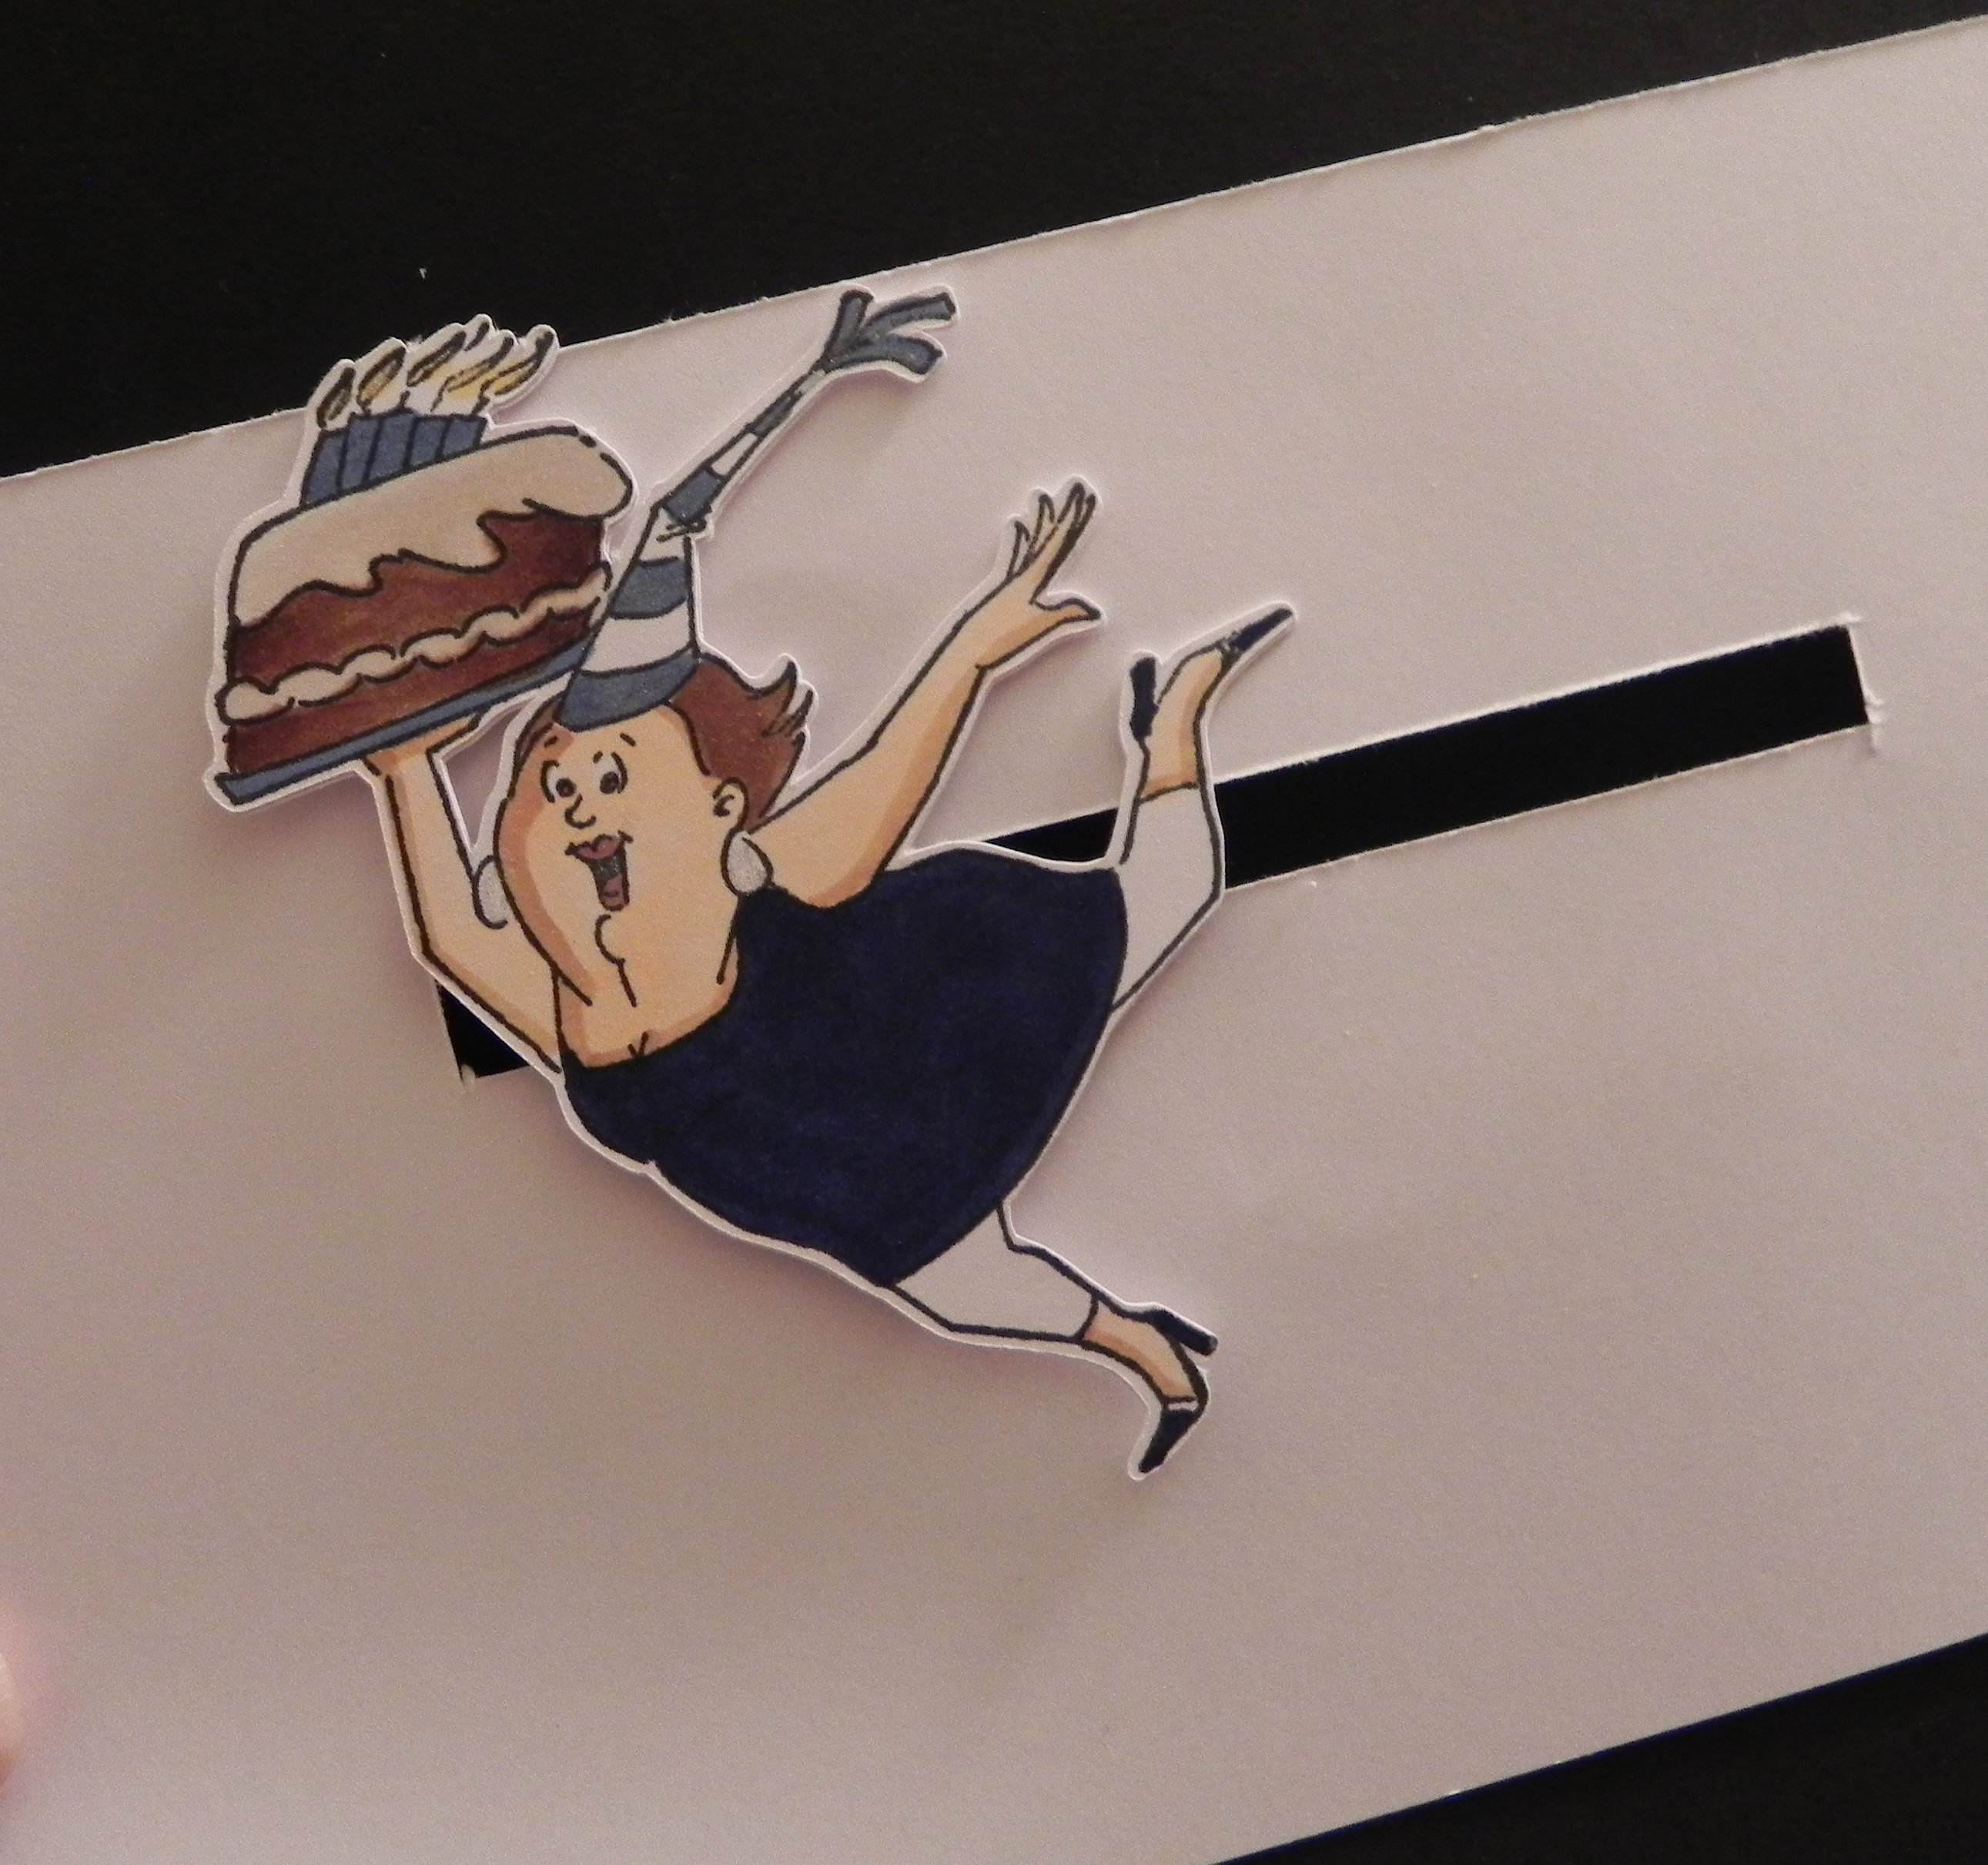
a.  Choose an image or element.  Stamped images either cut out or stamped on a basic shape work well.  Small, 3-D objects like flowers work well also.  Whatever you decide to use needs to be larger than a penny (or whatever coin you plan to use to create your spinner) so the penny will be hidden when the card is assembled.  (I am going to use the birthday gal image by Art Impressions (Hampton Art) # PS0919 for the rest of my tutorial.)
001 DSCN7977

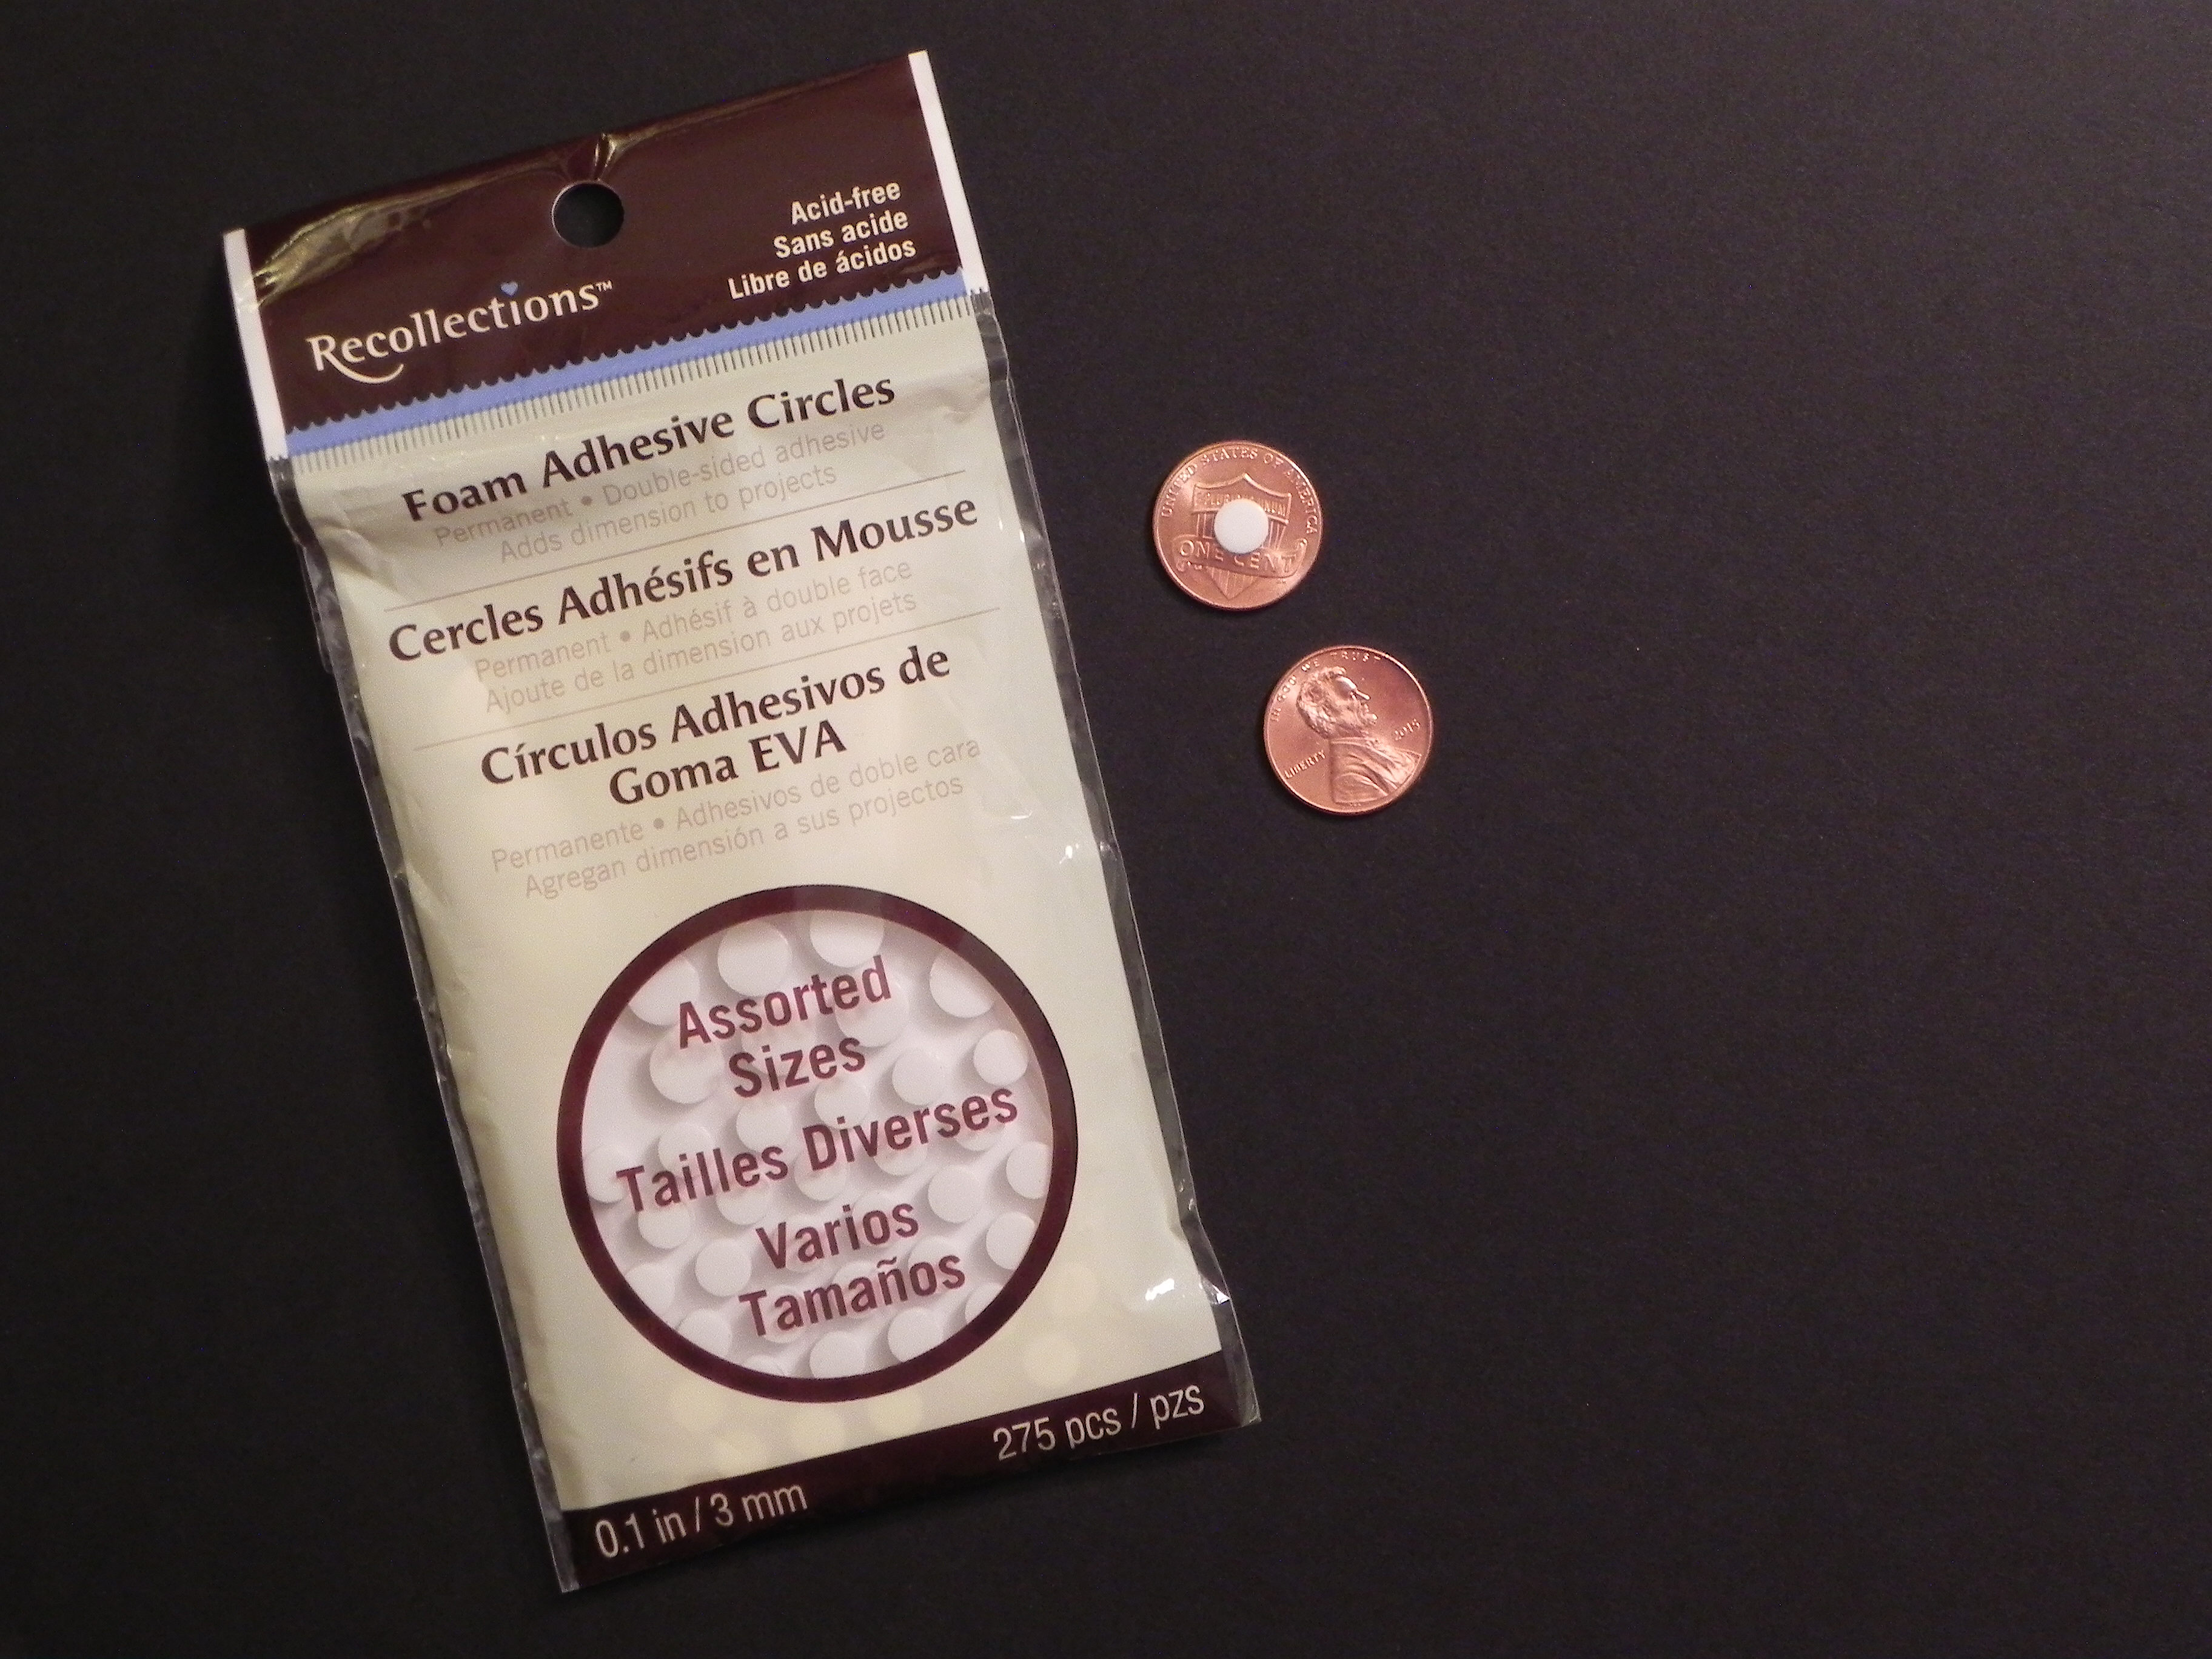
b.  Create half the penny “sandwich” by adhering a round, foam pop dot to the CENTER of one penny.  The size of the pop dot does not matter as long as it is smaller than the coin.

002 DSCN7979  003 DSCN7981

c.  Adhere the image or element to the other side of the penny with glue dots.  Try to make sure the penny is centered on the back of your element.

004 DSCN7989

d.  I’d wait to do this final step until after you create your channel (see section 3), but the final step to create your penny “sandwich” is to attach a second penny to the other side of the pop dot.  Once done, the pop dot will be “sandwiched between two pennies, and this “sandwich” will be attached to the back of your image/element.

006 DSCN7991


2.  Design your card front:

This is the step that requires little explanation since anything goes!  Just plan your card front to incorporate the spinning element you created in the section above.  I suggest using a heavy weight card stock for this panel (either by itself or mounted behind a piece of patterned paper) since you need it to be somewhat sturdy. A flimsy card front will bend slightly and cause the spinner to get stuck as it travels.  (For this tutorial, I am using a plain, white piece of card stock.  Pretend it is decorated beautifully!!)


3.  To create the channel across the front of your card:

For this step, you need a cutting tool (like scissors, a craft knife,  a die or a trimmer) to create the channel/slot.

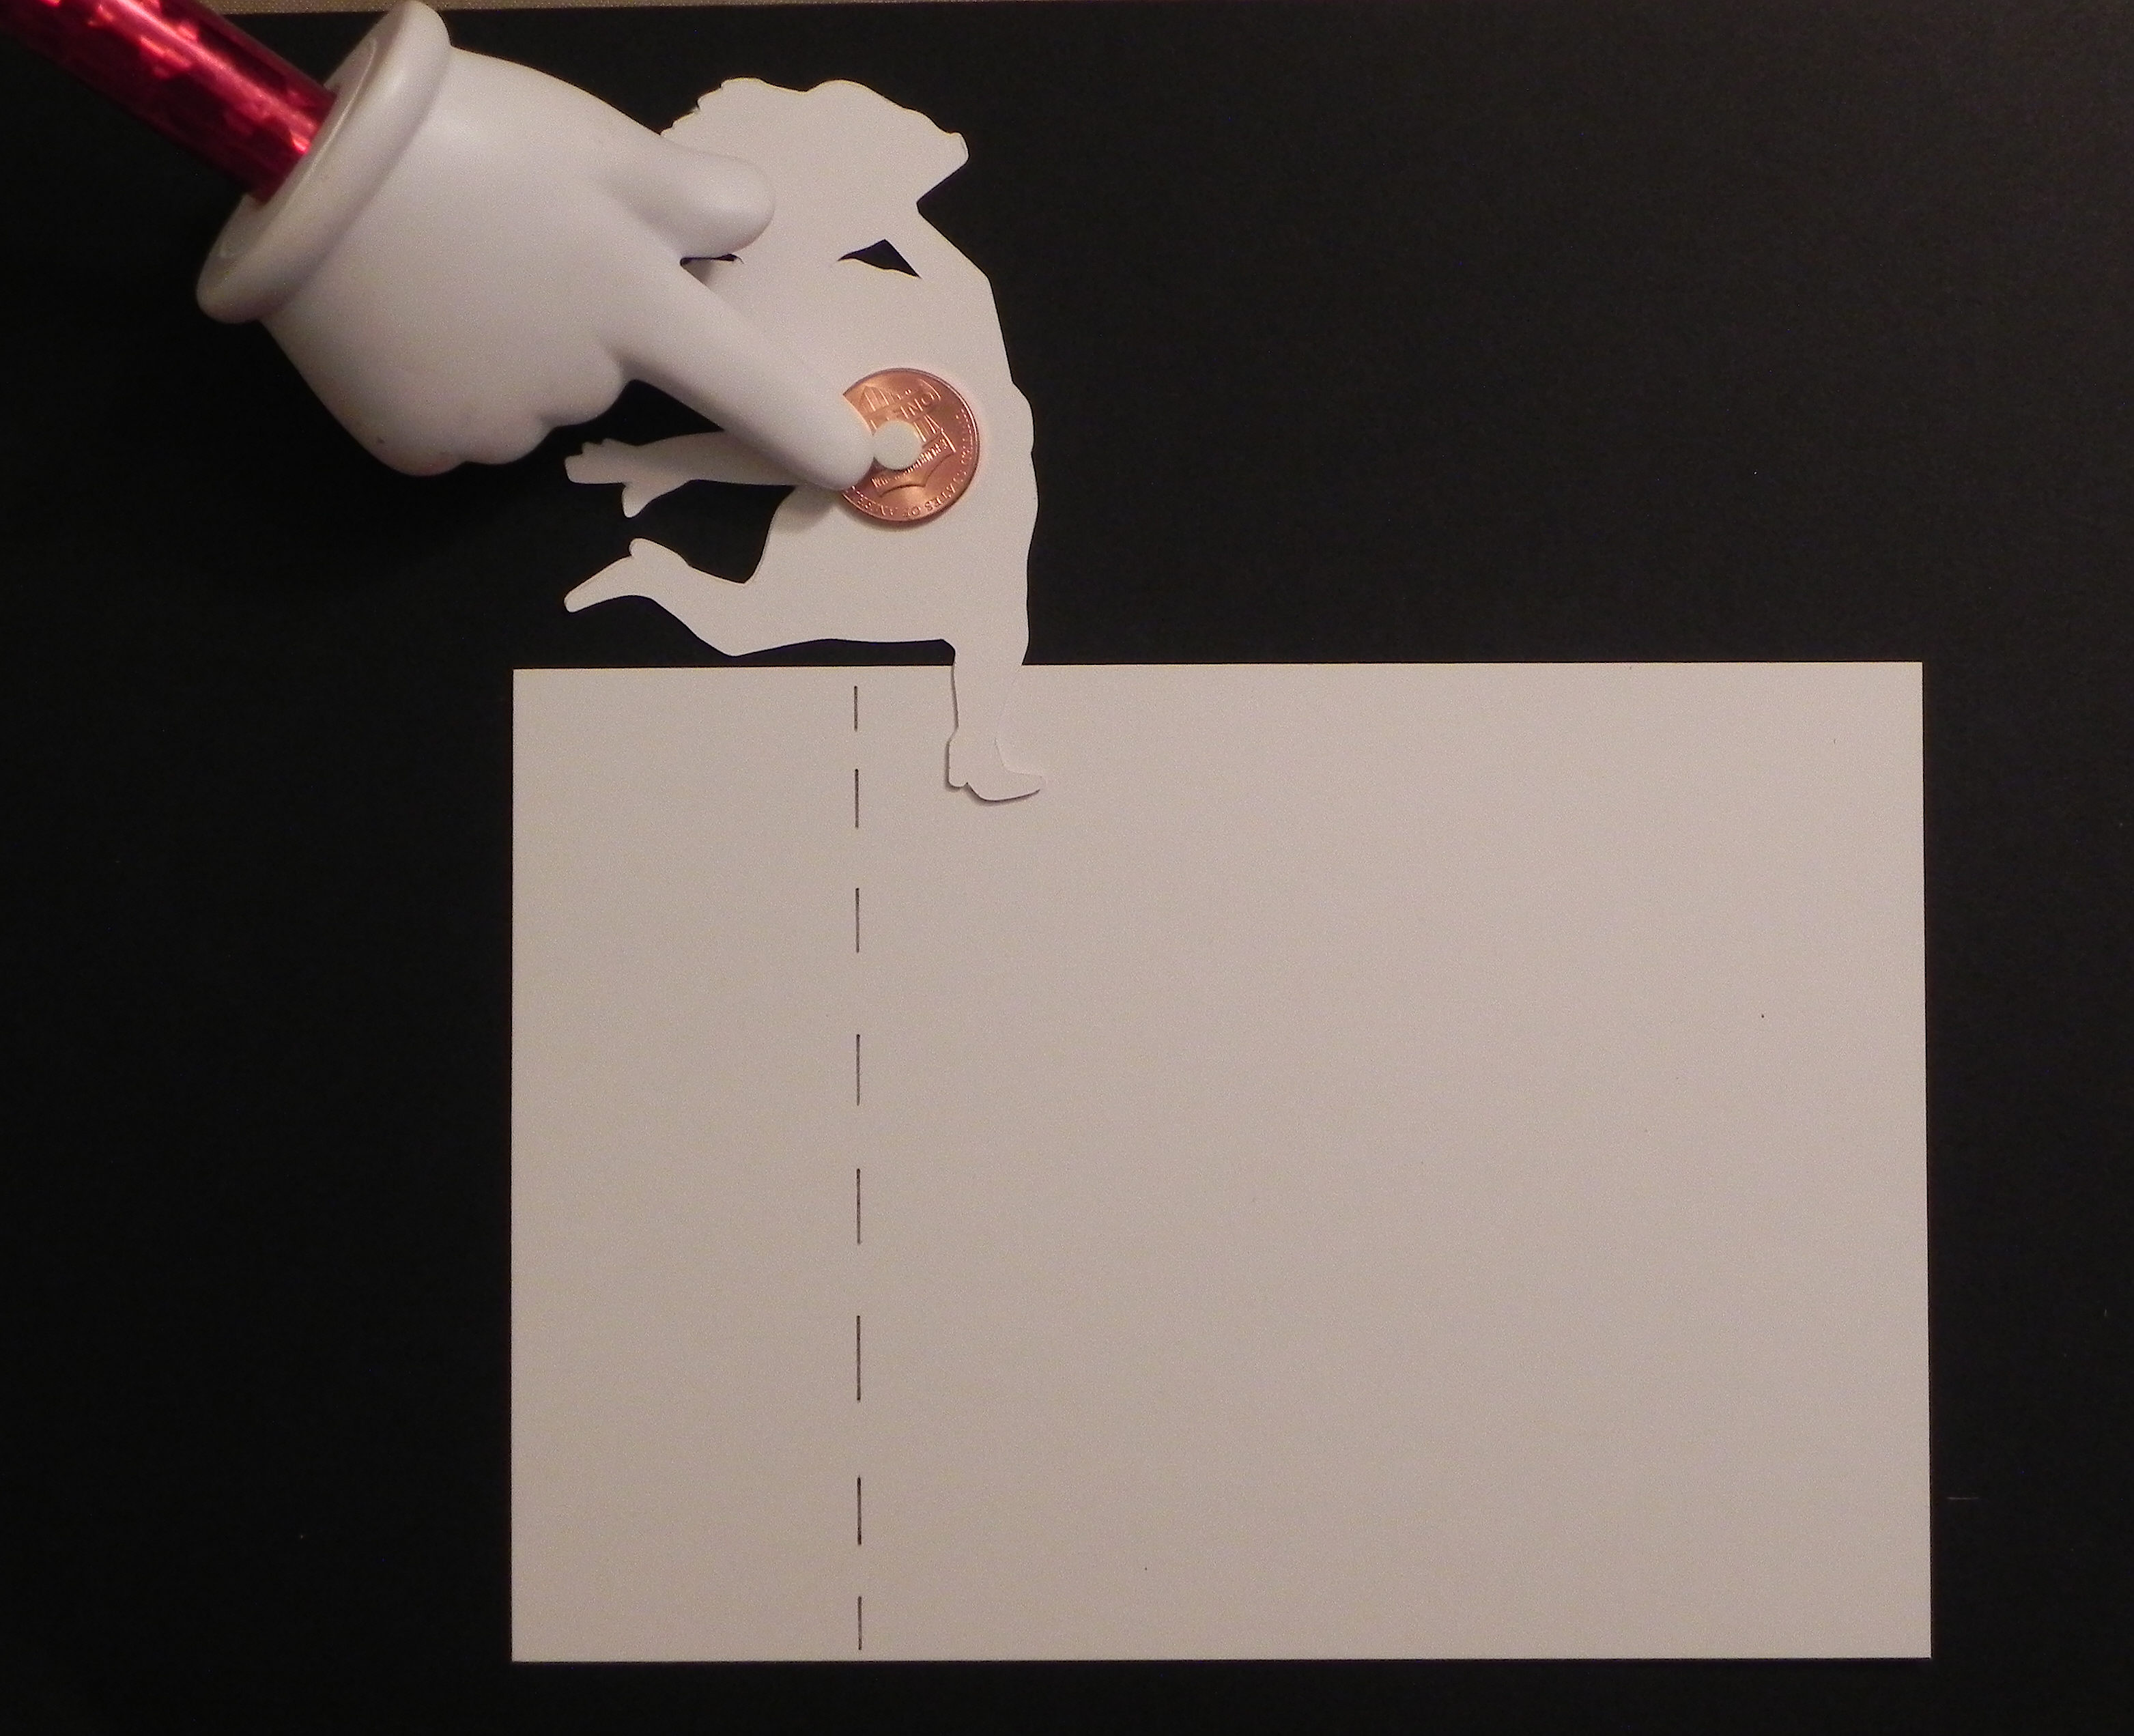
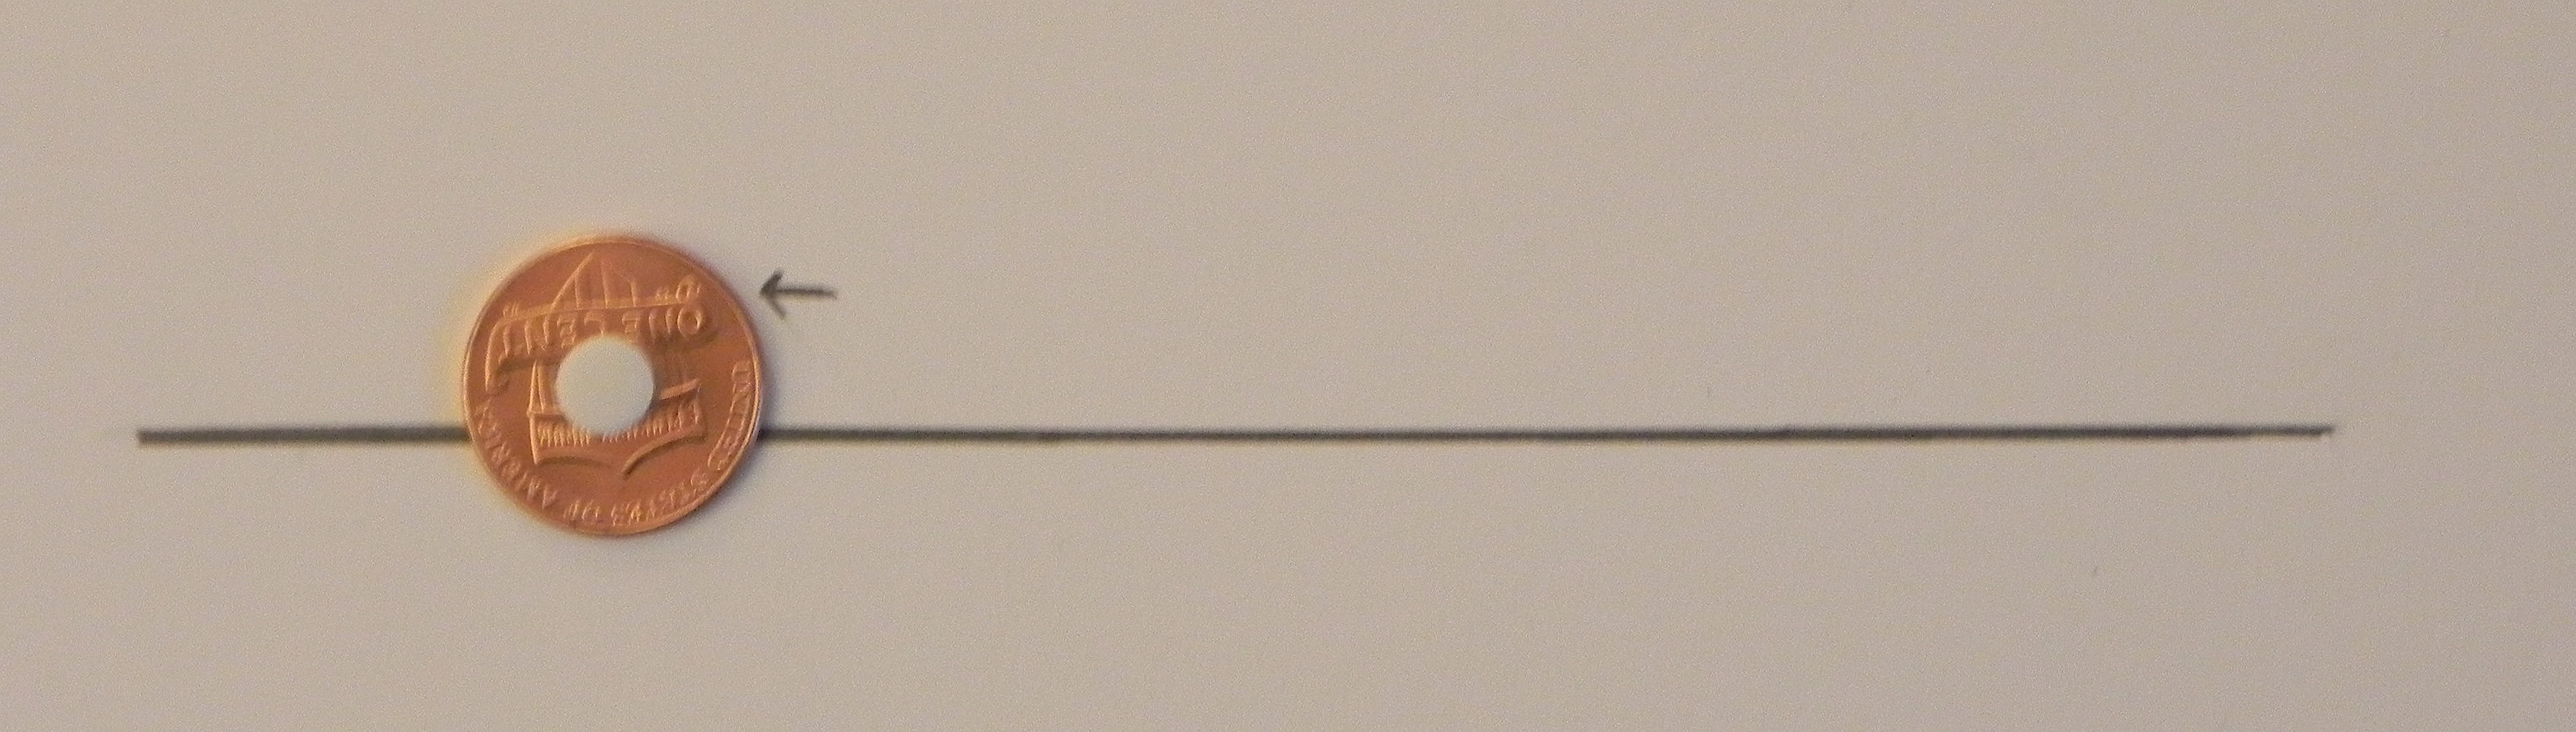
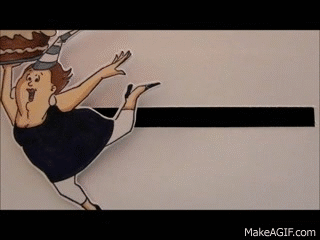
a.  This slot can either be hand-cut, die cut, or created with an electronic die cutting machine.  The slot can be as long/short as you desire.  To prevent the spinning element from hanging over the edges of your card when it gets all the way to the right or left, place your element upside down and note where the pop dot on the penny needs to stop in order for the element to stay within the boundaries of the card.  (Check all possible directions of the element.)  This will give you an idea of how long to make your channel.  (The element will stop spinning to the left when the left side of the foam pop dot hits the left edge of the channel.  The dashed line on the card stock shows where the channel should end based on where the foam pop dot is for this particular element.)

007 DSCN7994  008 DSCN7999

009 DSCN8000  010 DSCN8002

So the yellow highlighted line (below) shows a good length for the channel.  Anything shorter is fine; there will just be less room for your spinner to spin.  Anything longer will allow the spinning element to hang off the card (which is fine if you are ok with that!).

011 DSCN8006

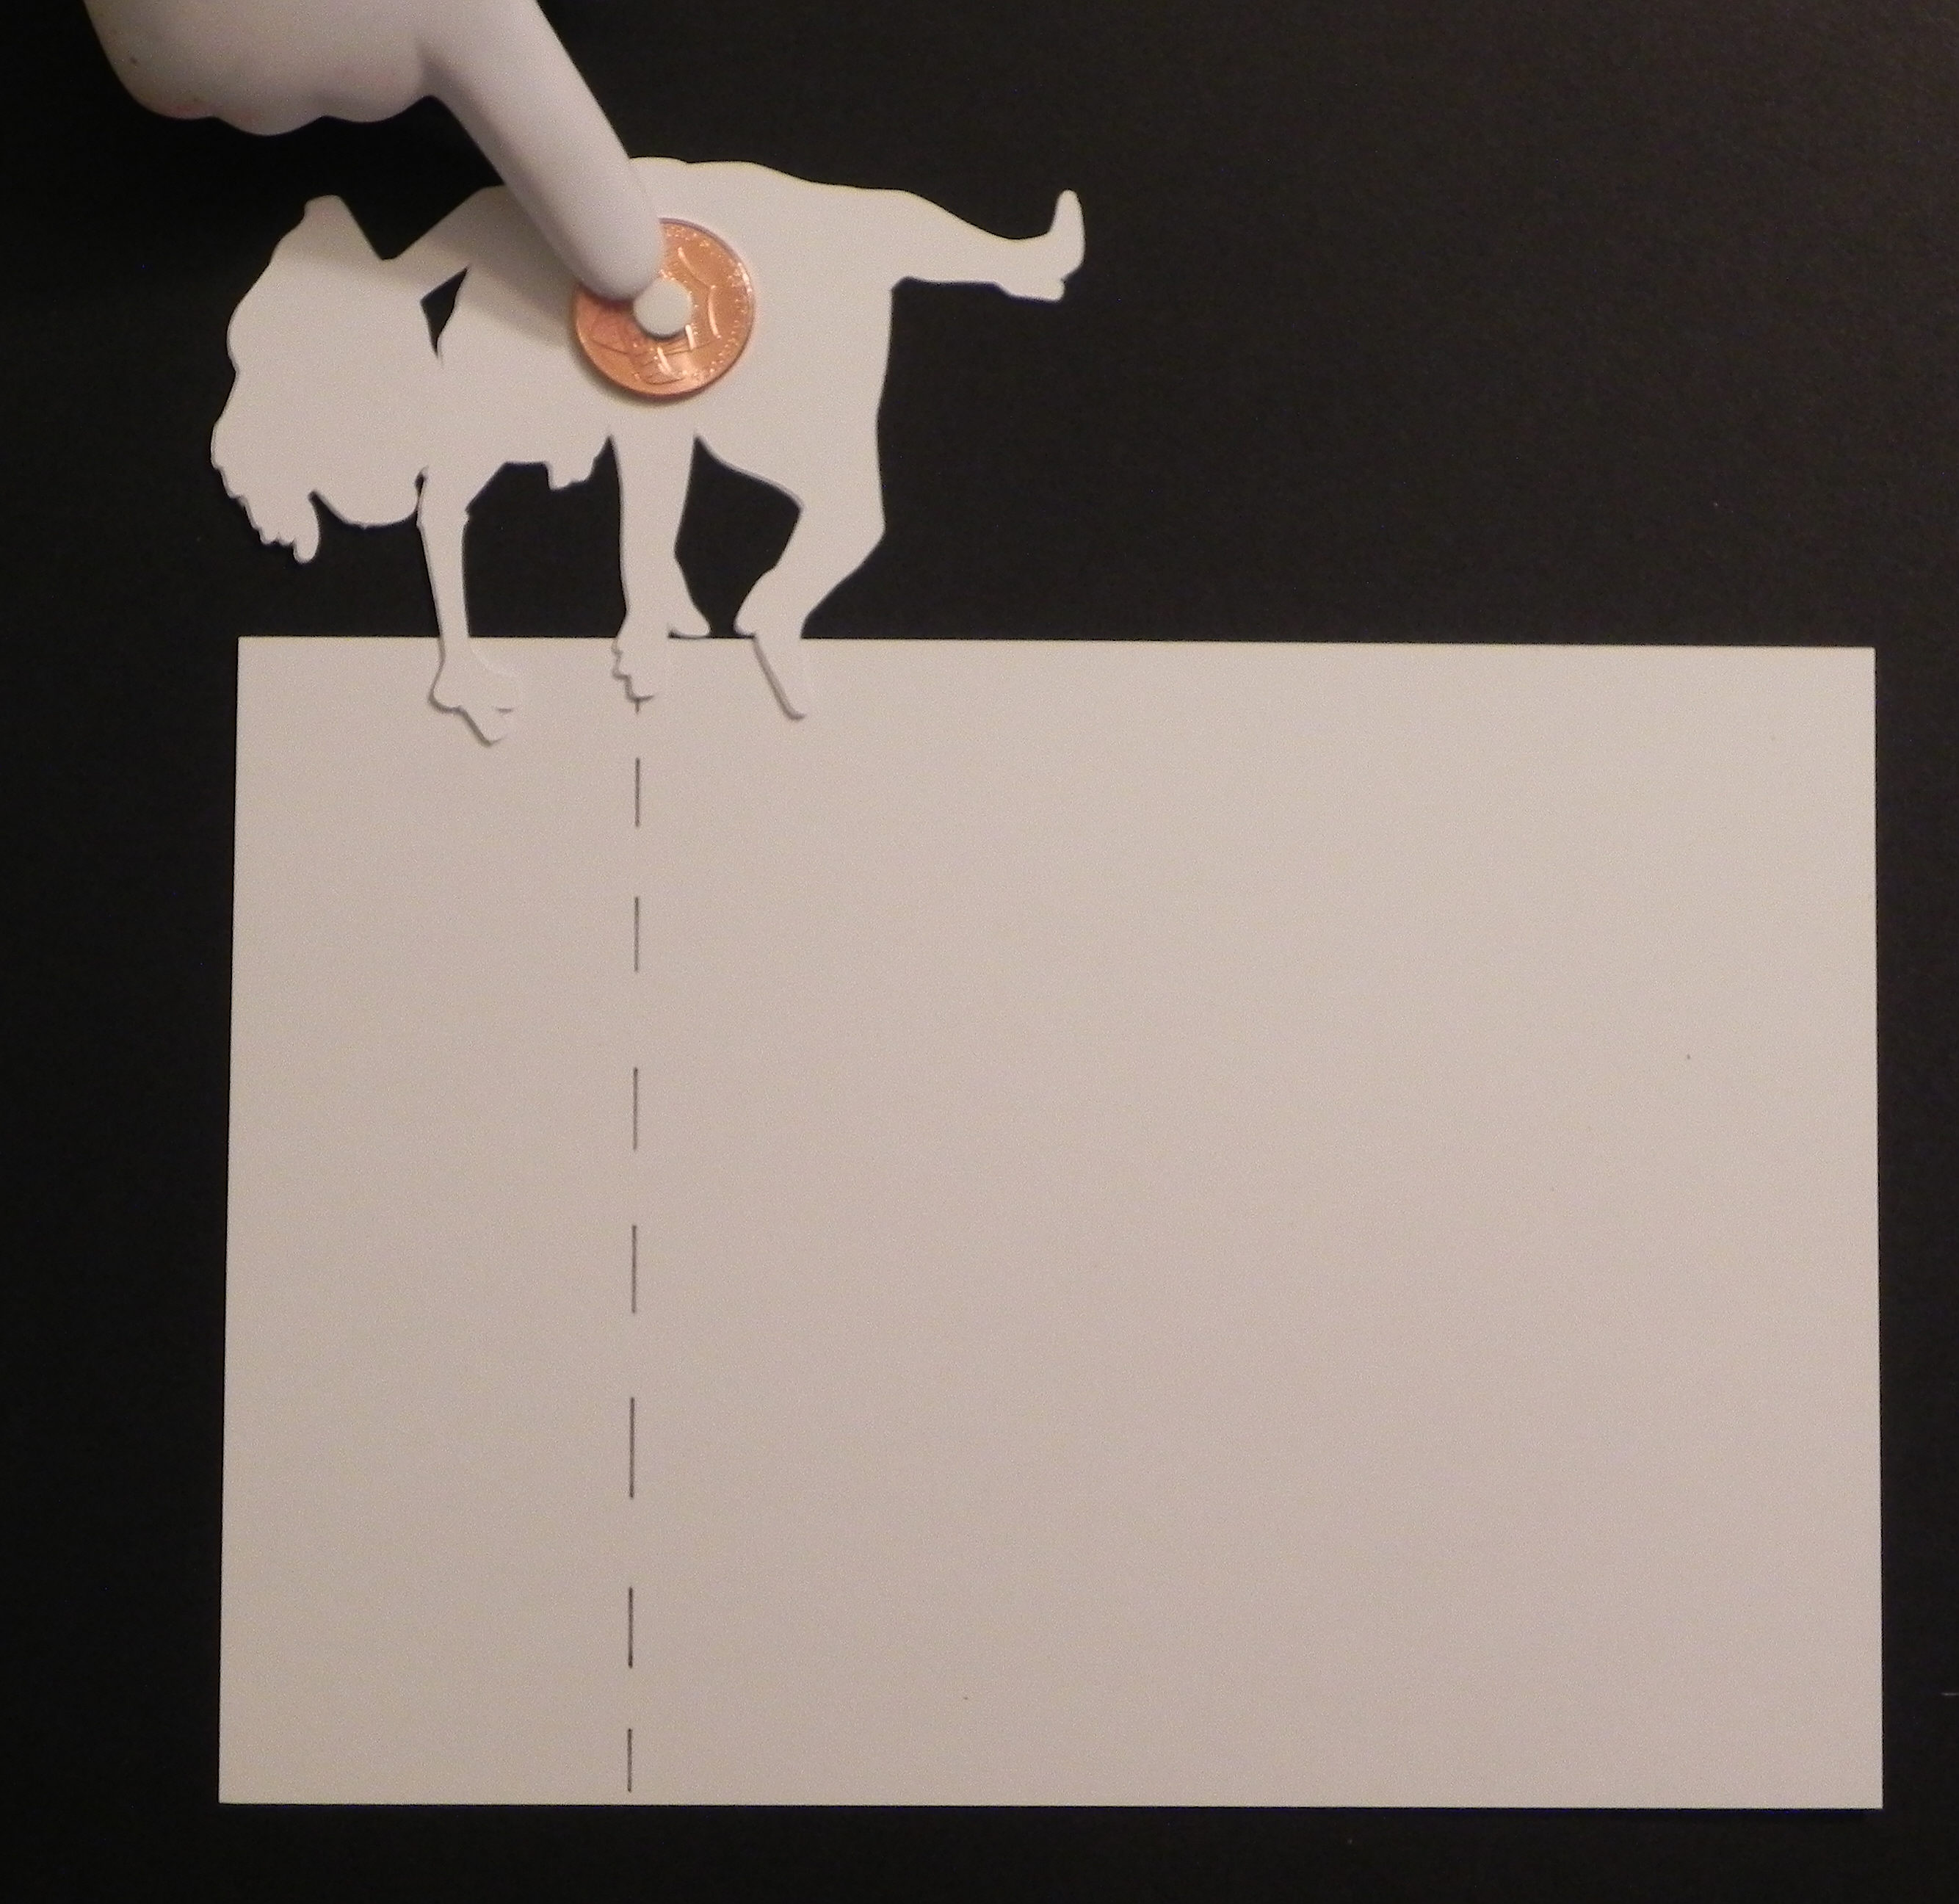
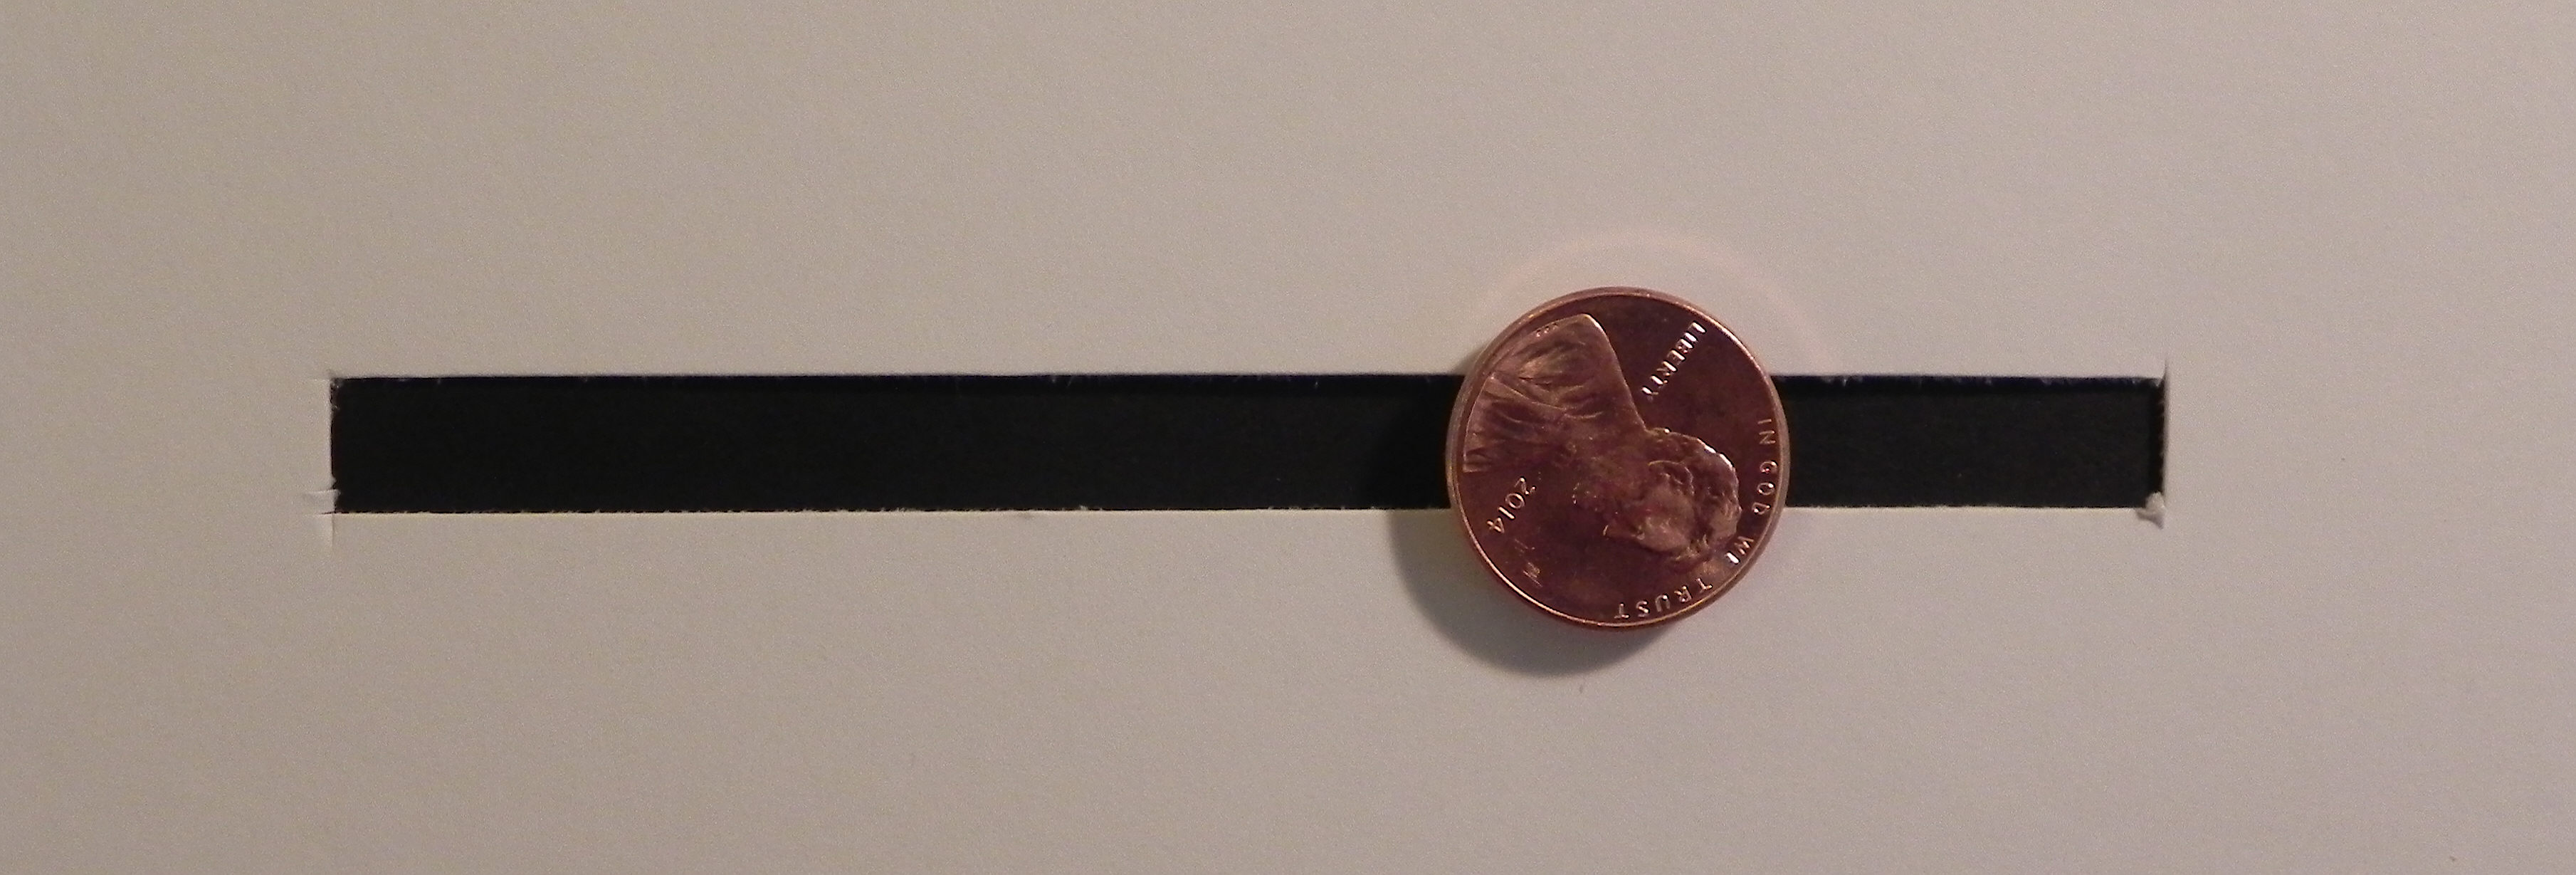
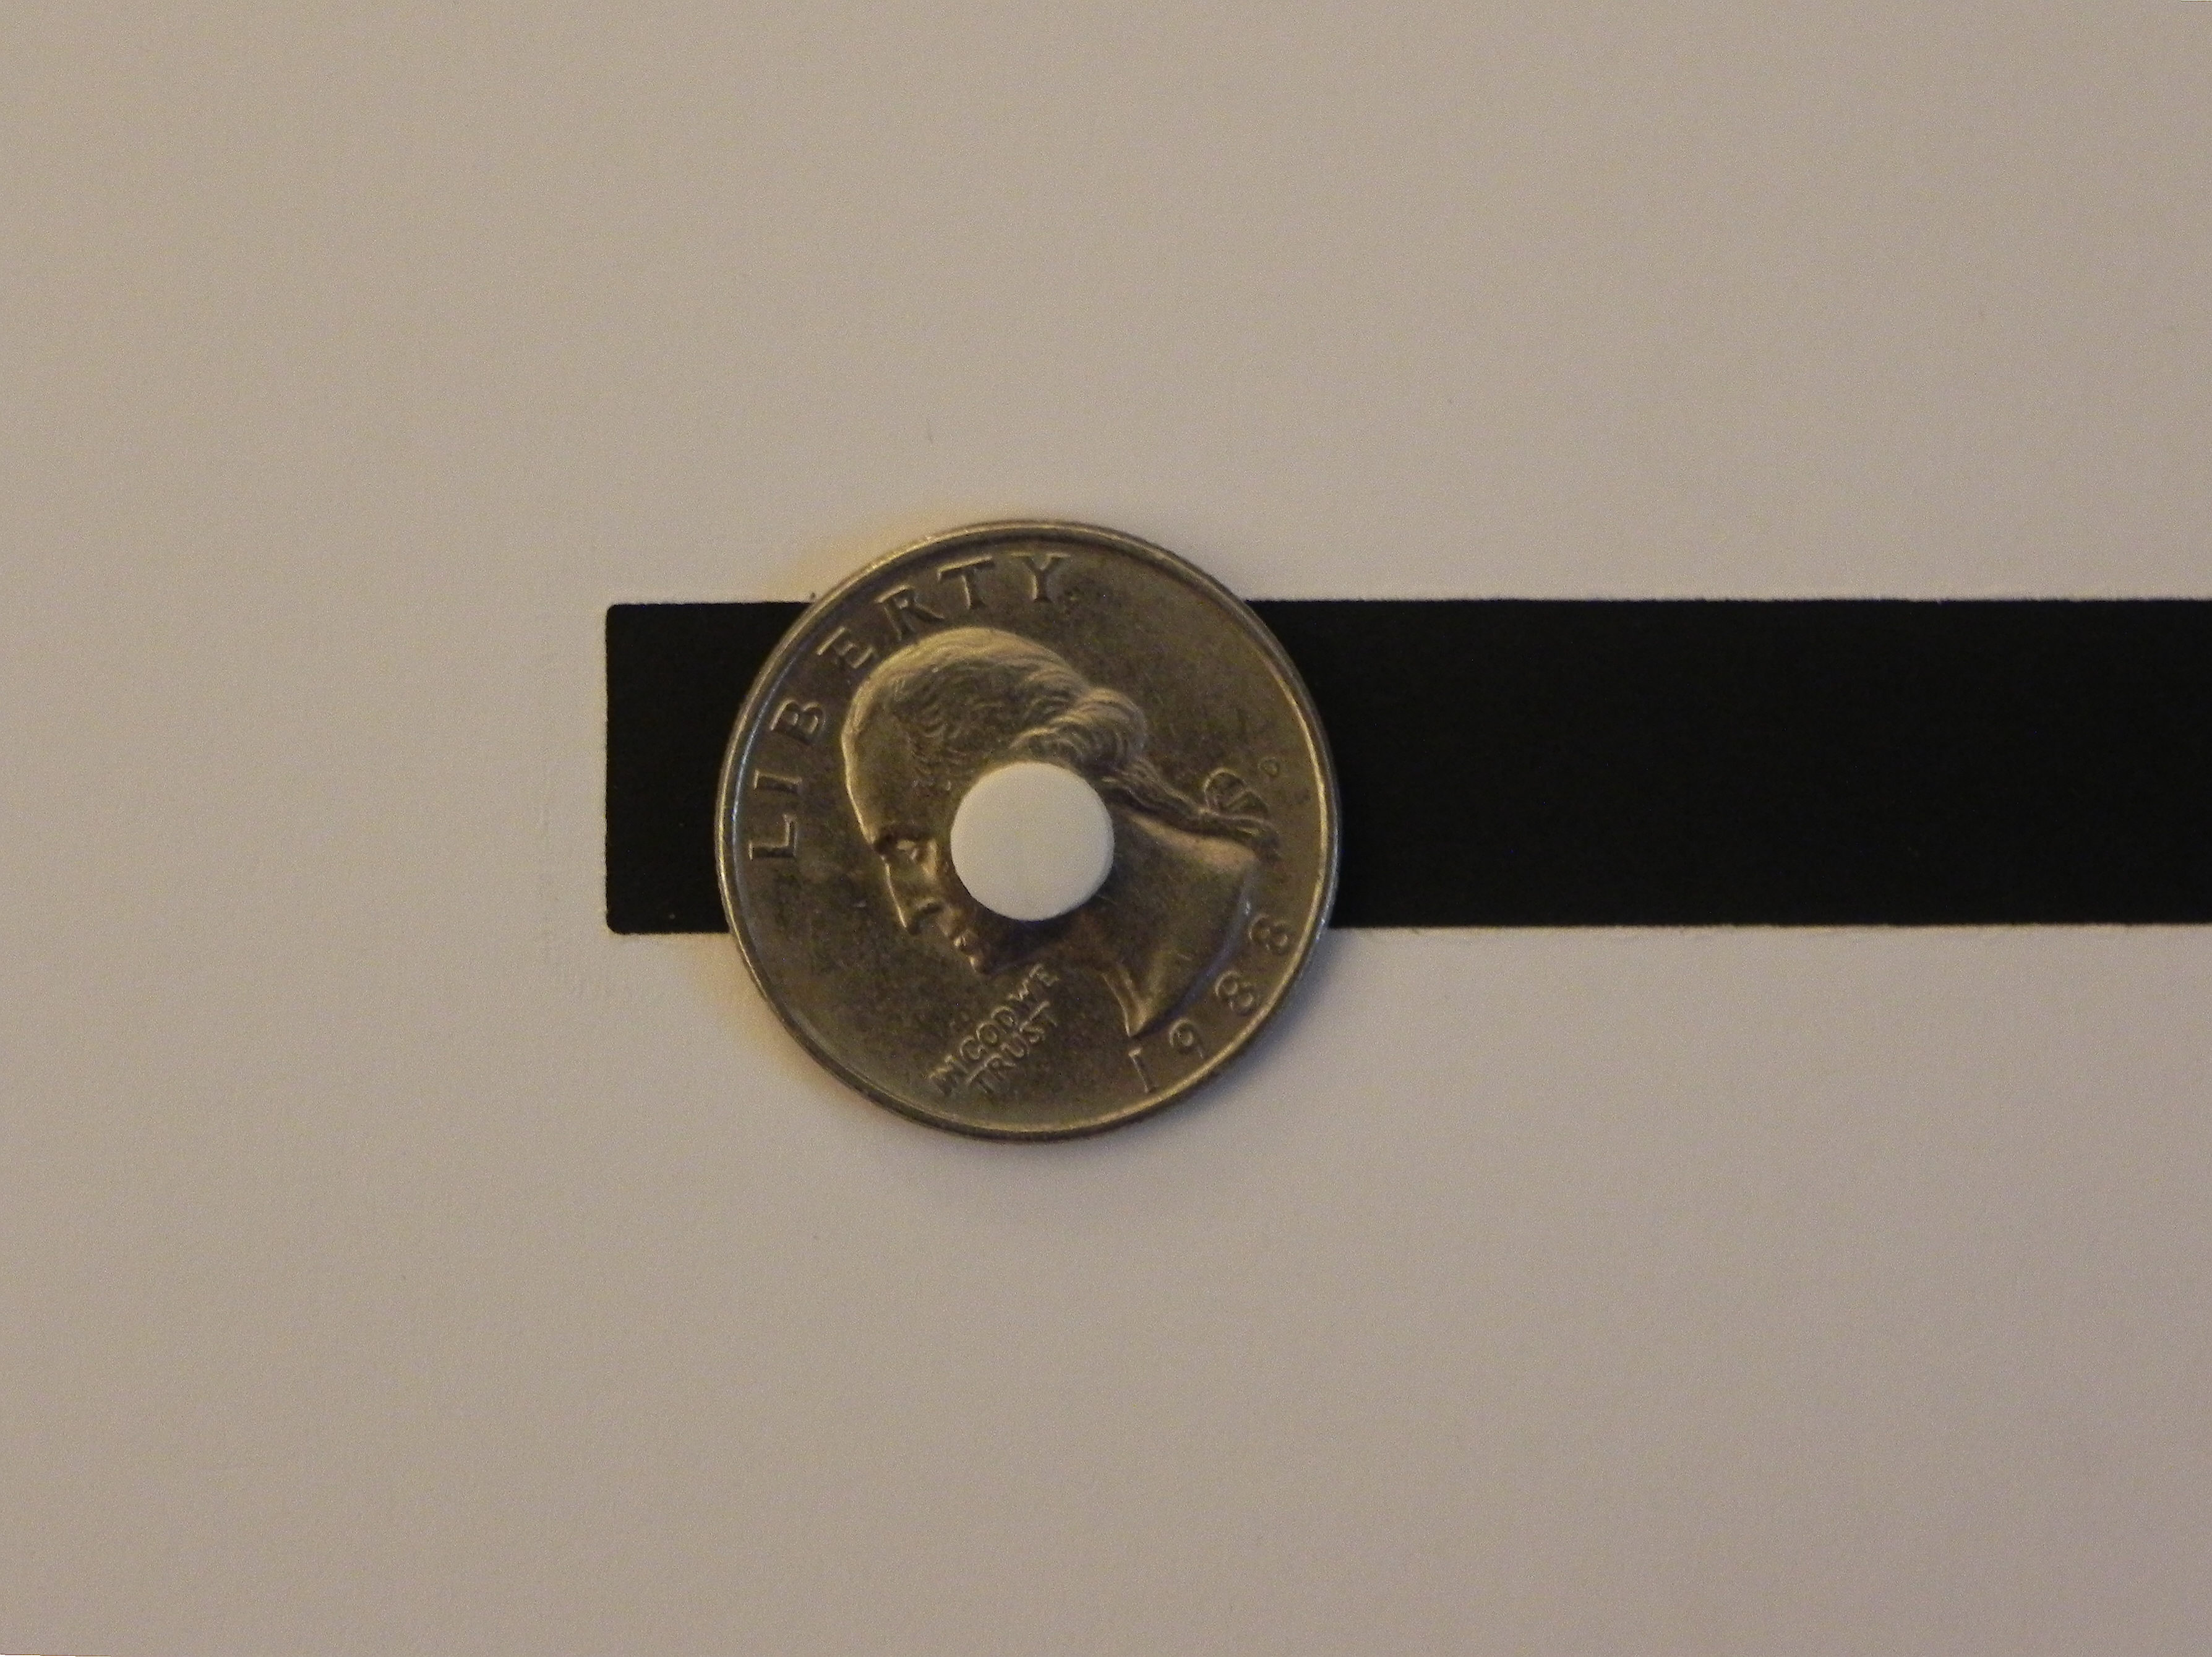
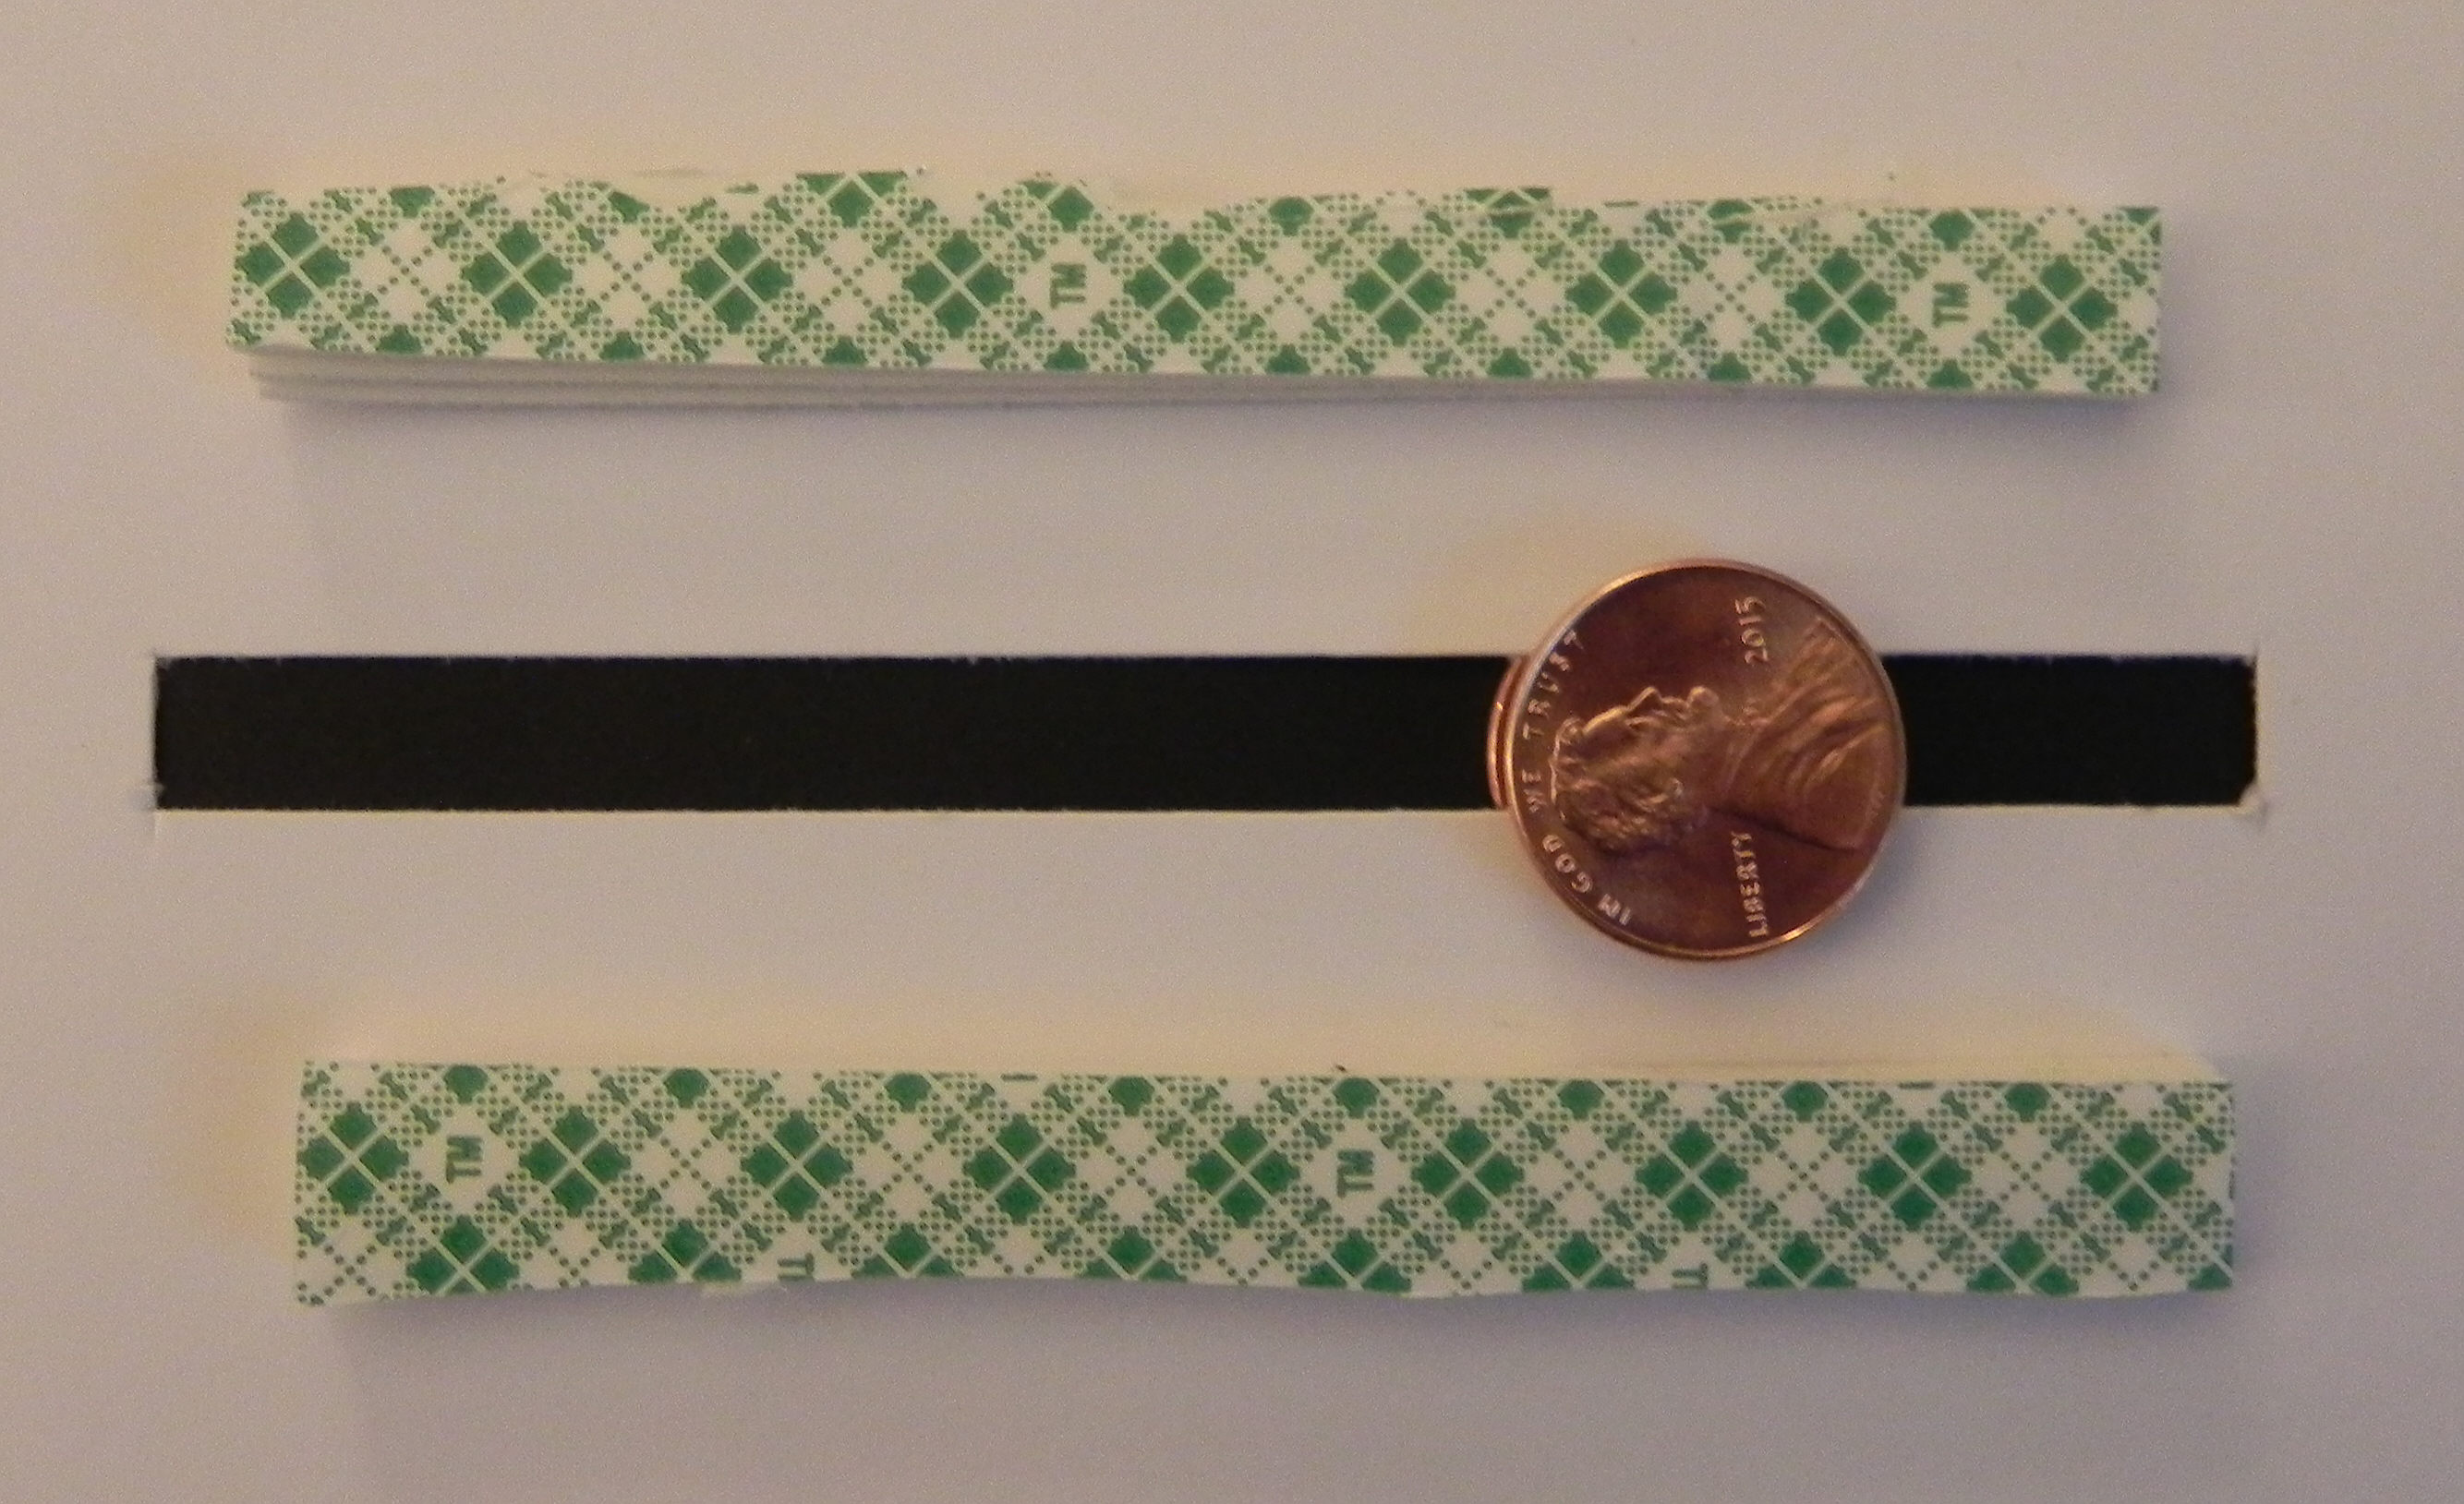
b.  To determine how wide to make the channel, look at the pop dot and coins you chose to use.  Your slot needs to be just slightly larger than the diameter of the pop dot and smaller than the distance from the edge of your coin to the opposite edge of the pop dot.  You want the pop dot to be able to spin freely in the channel, but you don’t want the sandwich to fall out of the slot once it is inserted.

012 DSCN7655

In the photo above, the line represents the bottom of the channel or slot on which the pop dot will sit/roll.  The little arrow shows a good place to cut the top of the channel because it is above the pop dot but below the top of the coin.

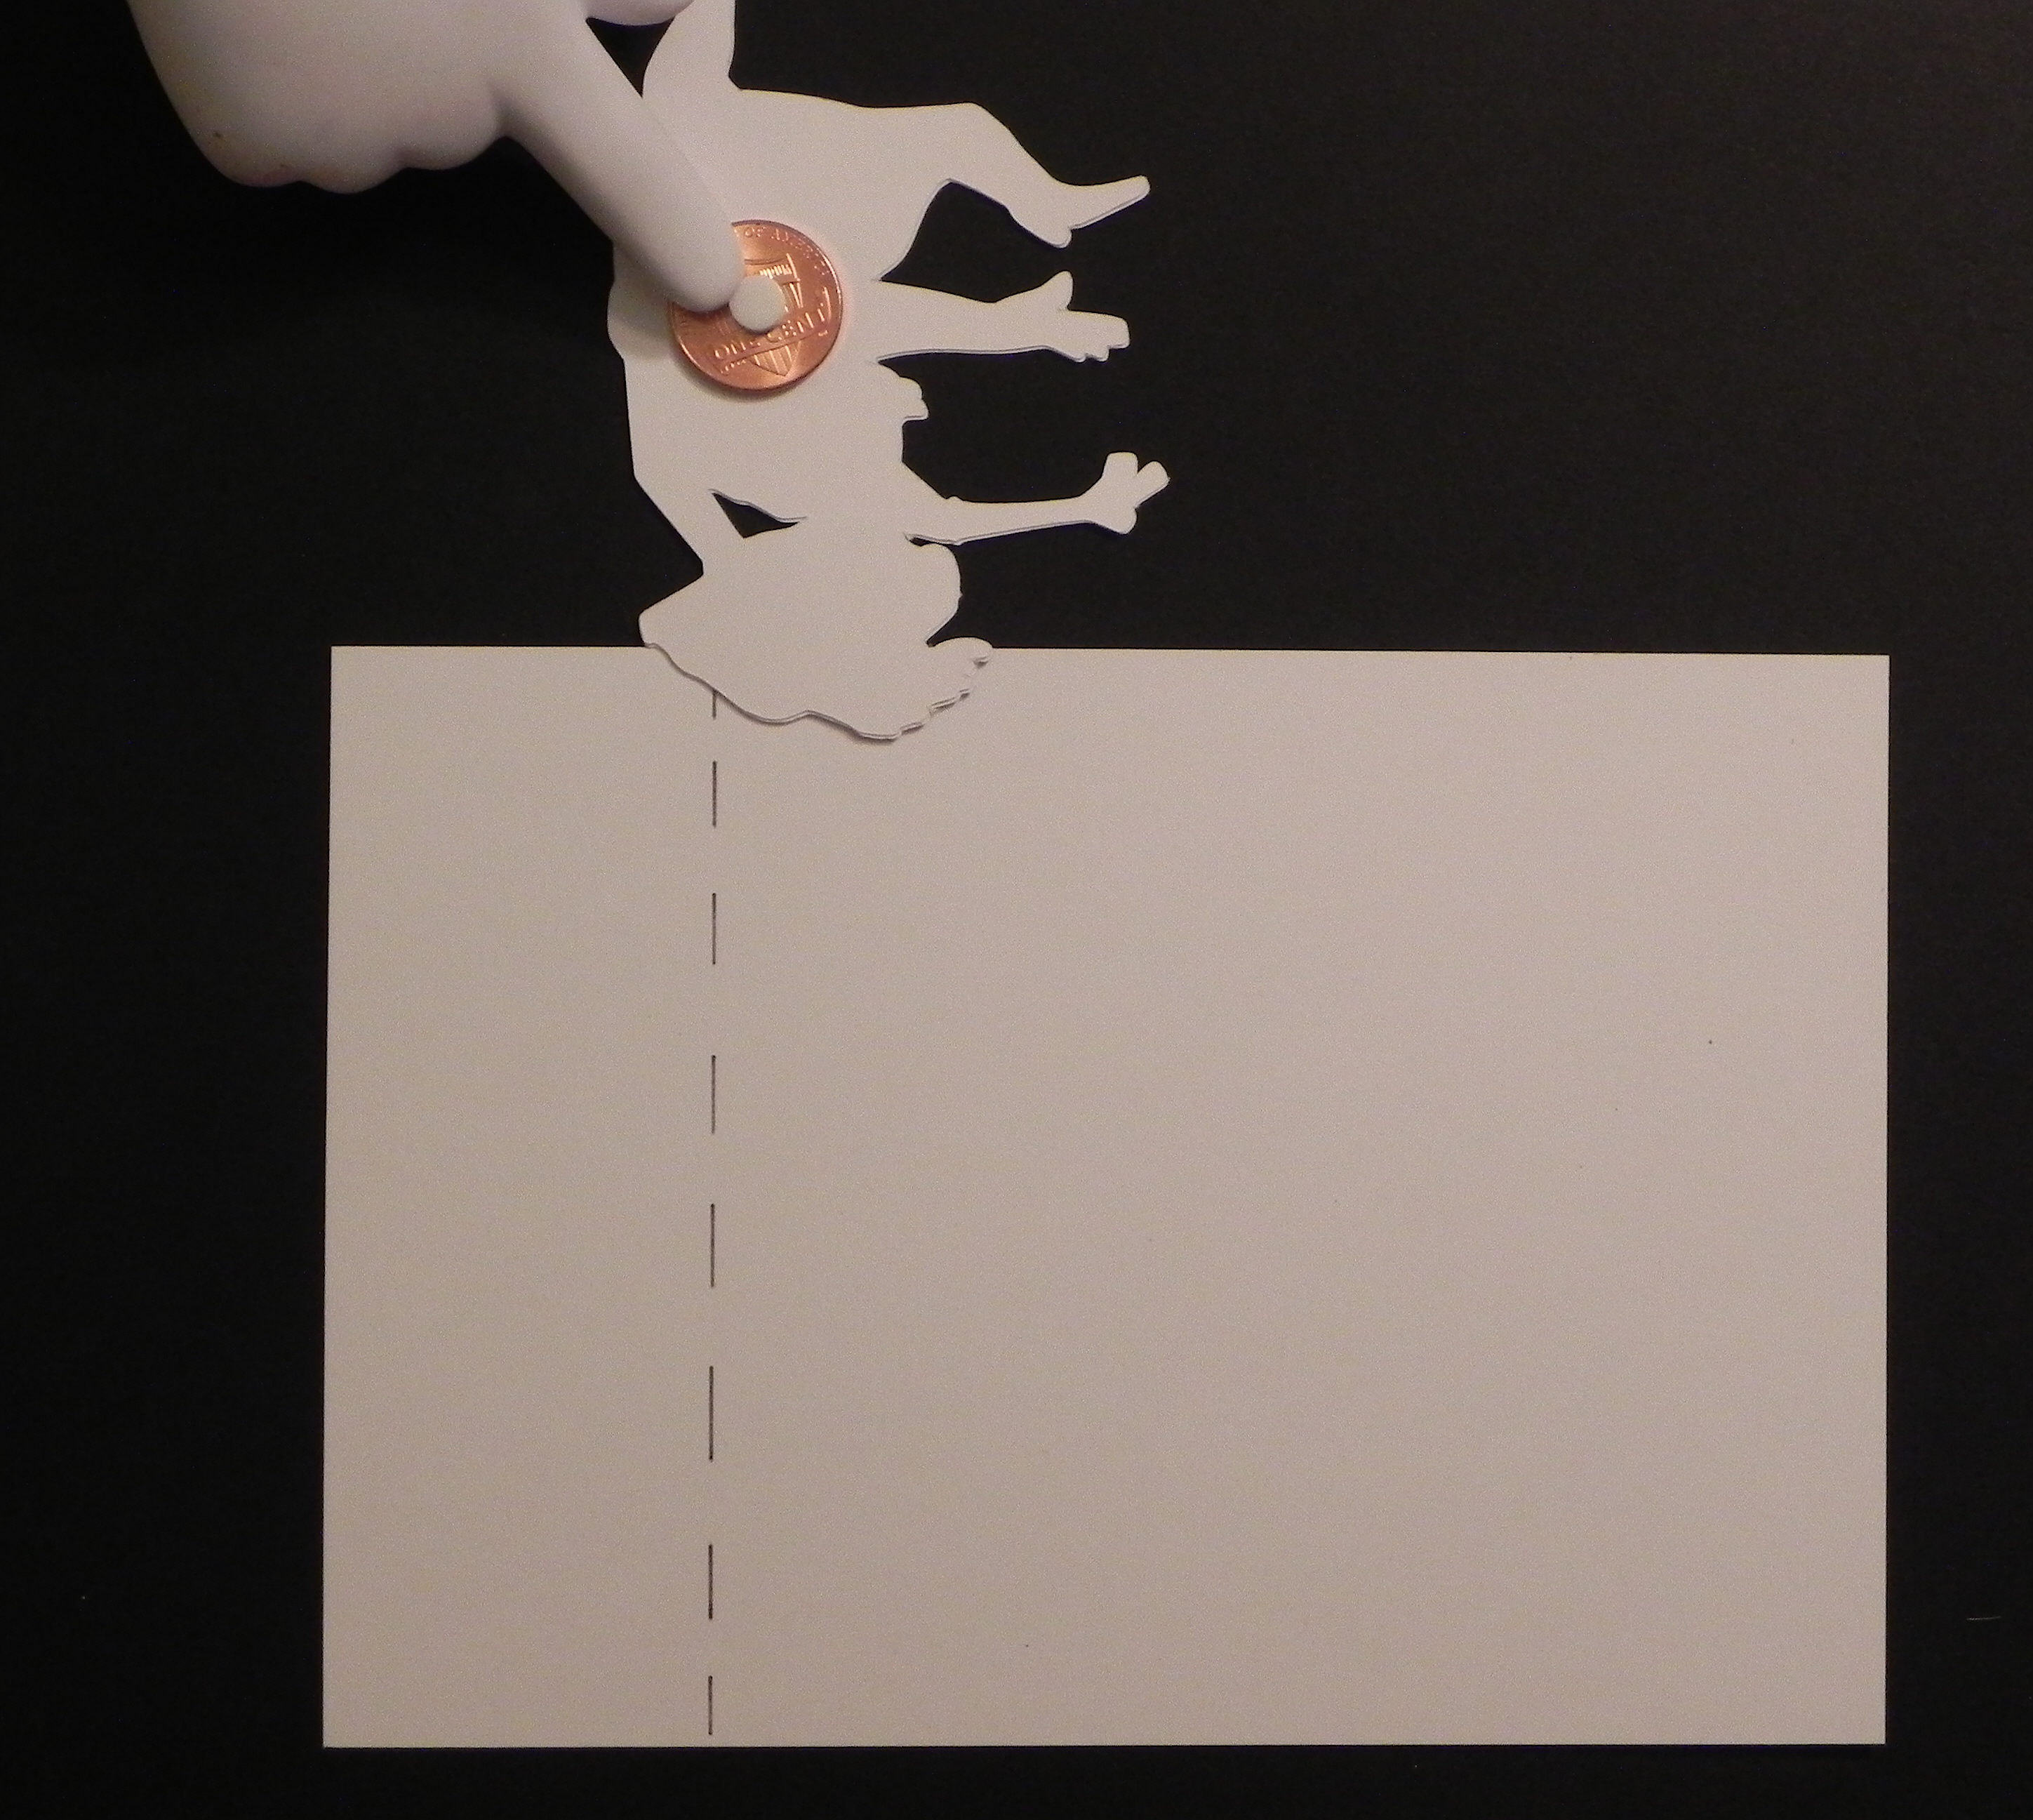
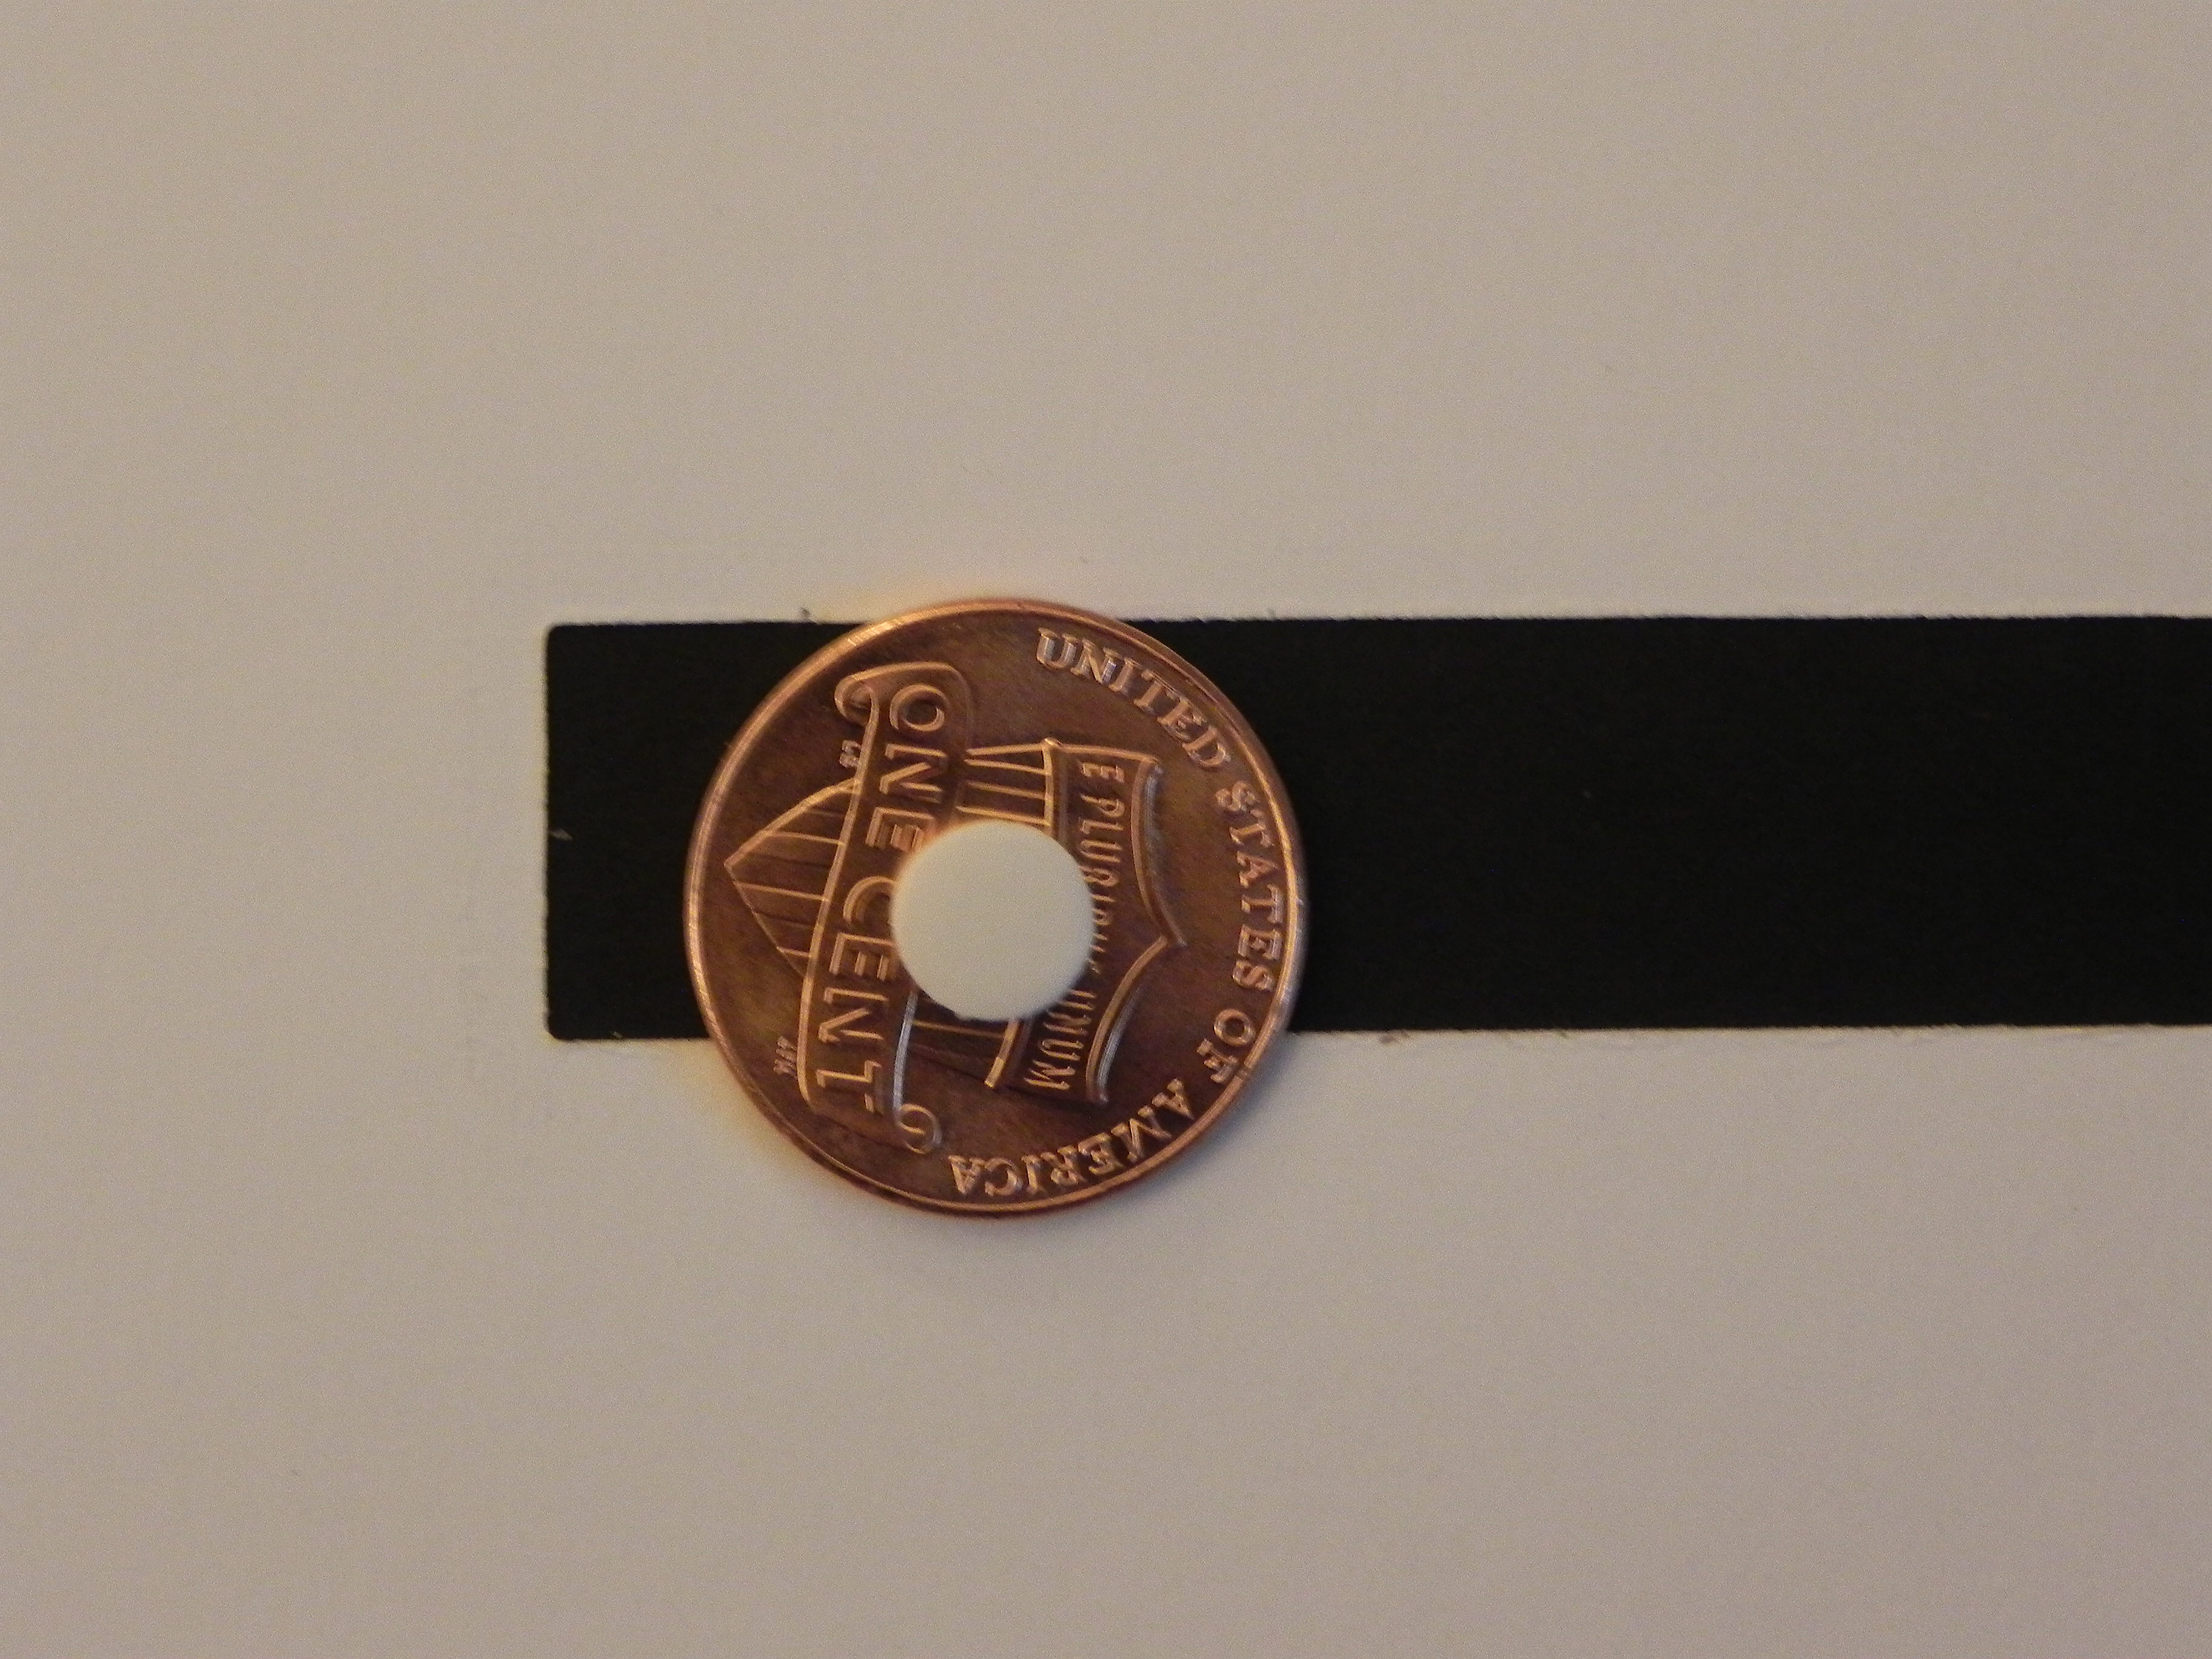
This is a good width.  The penny sandwich can move freely but won’t fall out.

013 DSCN7677

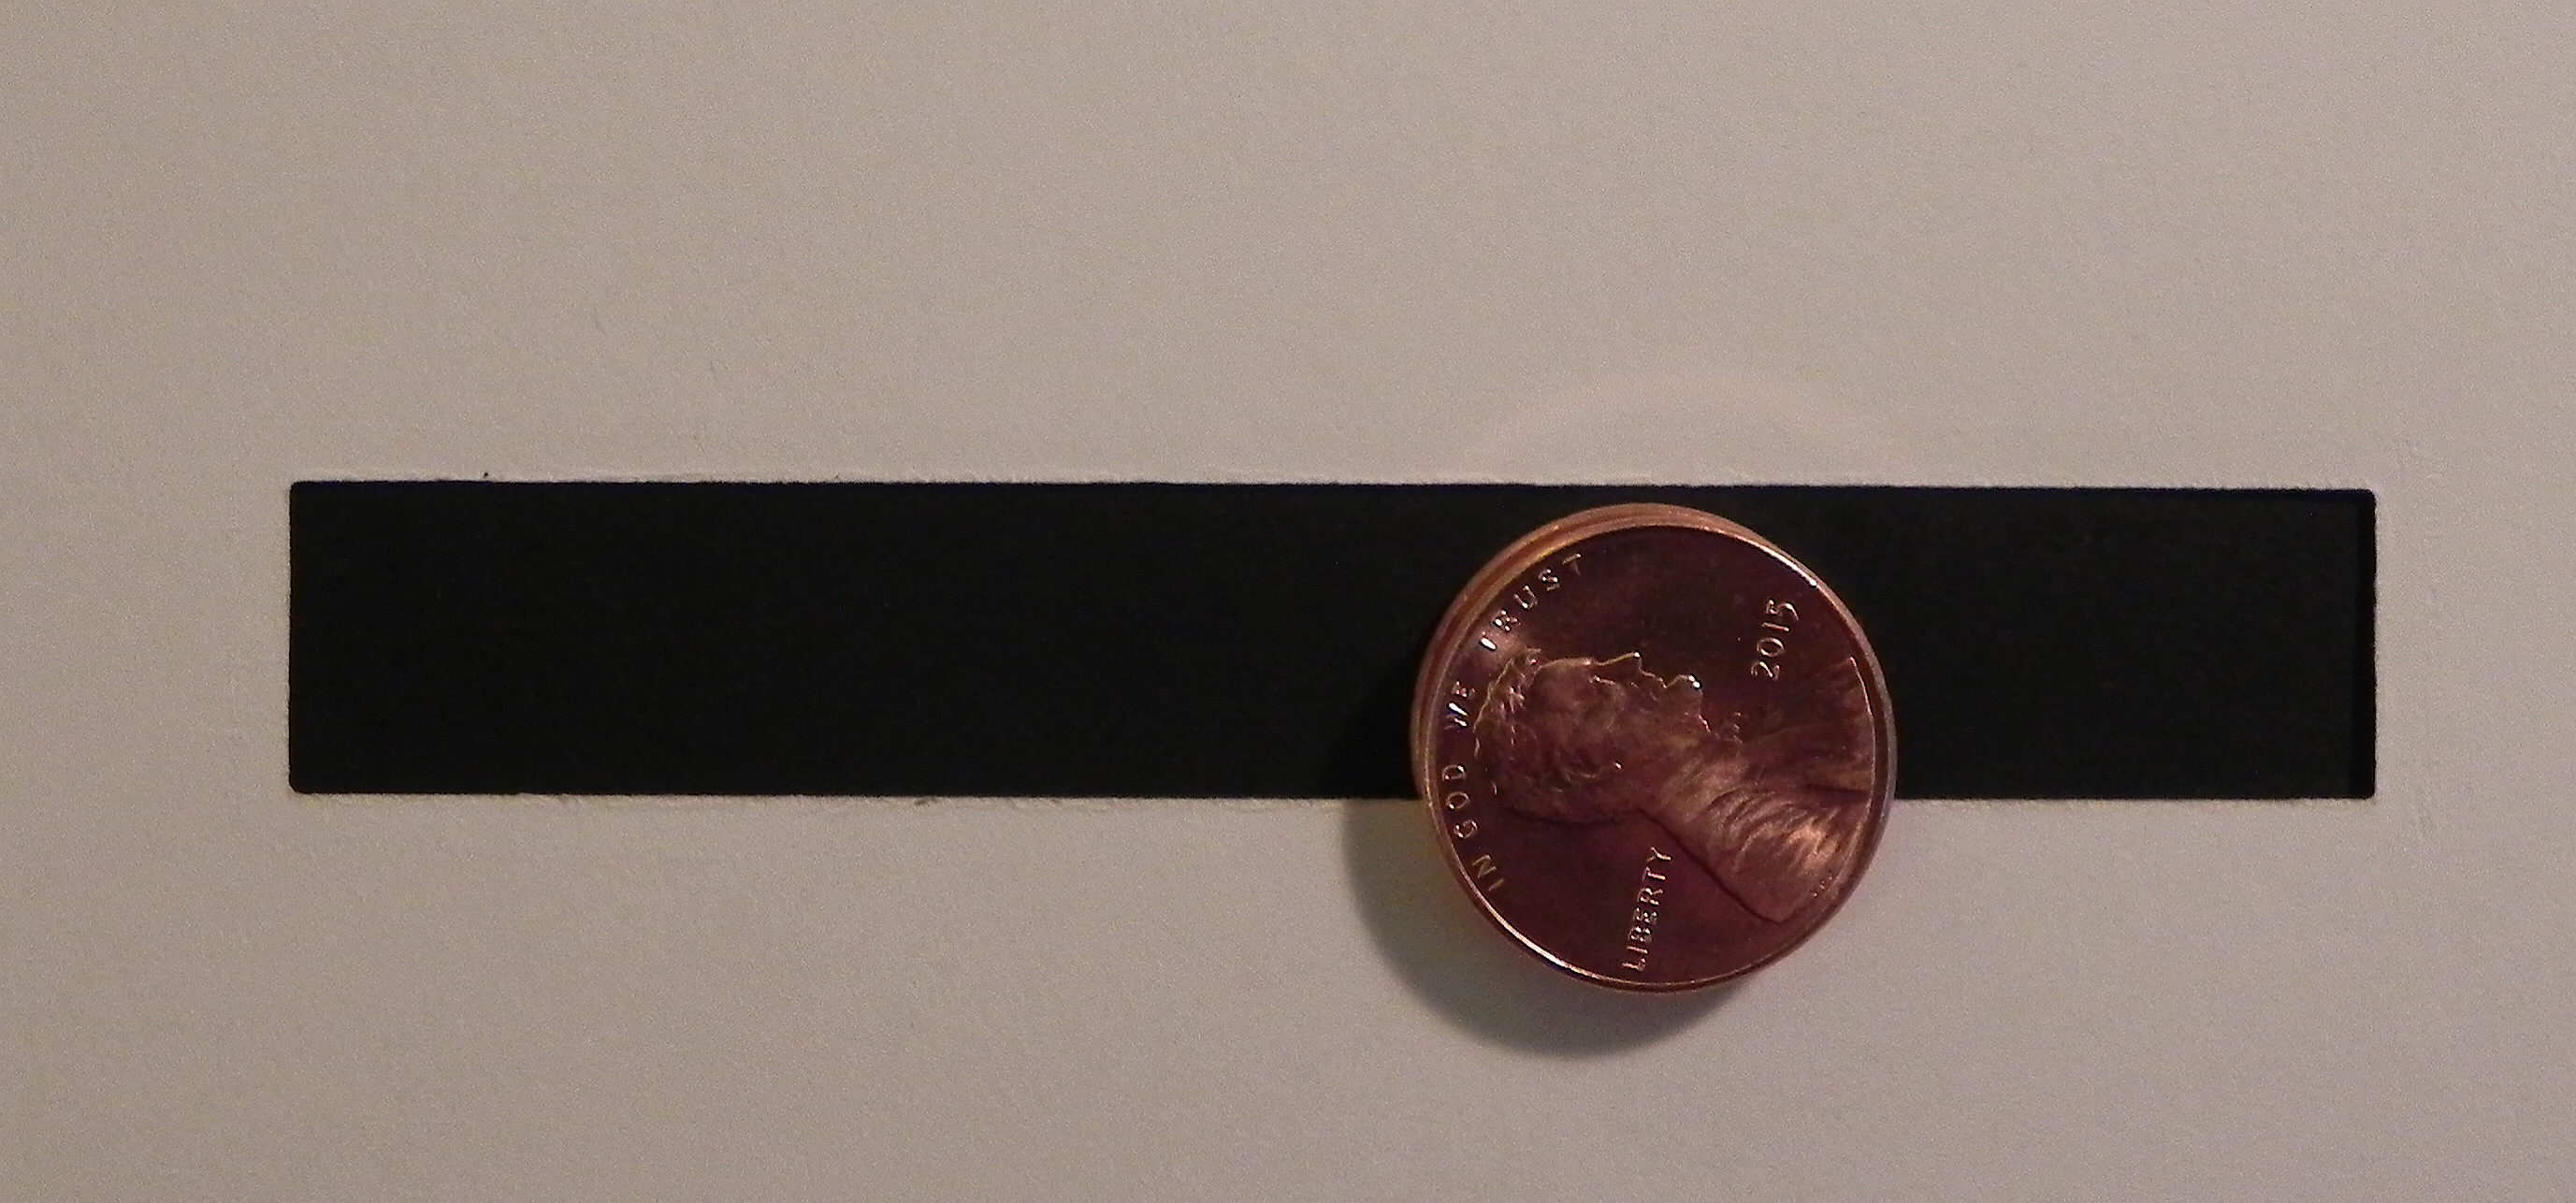
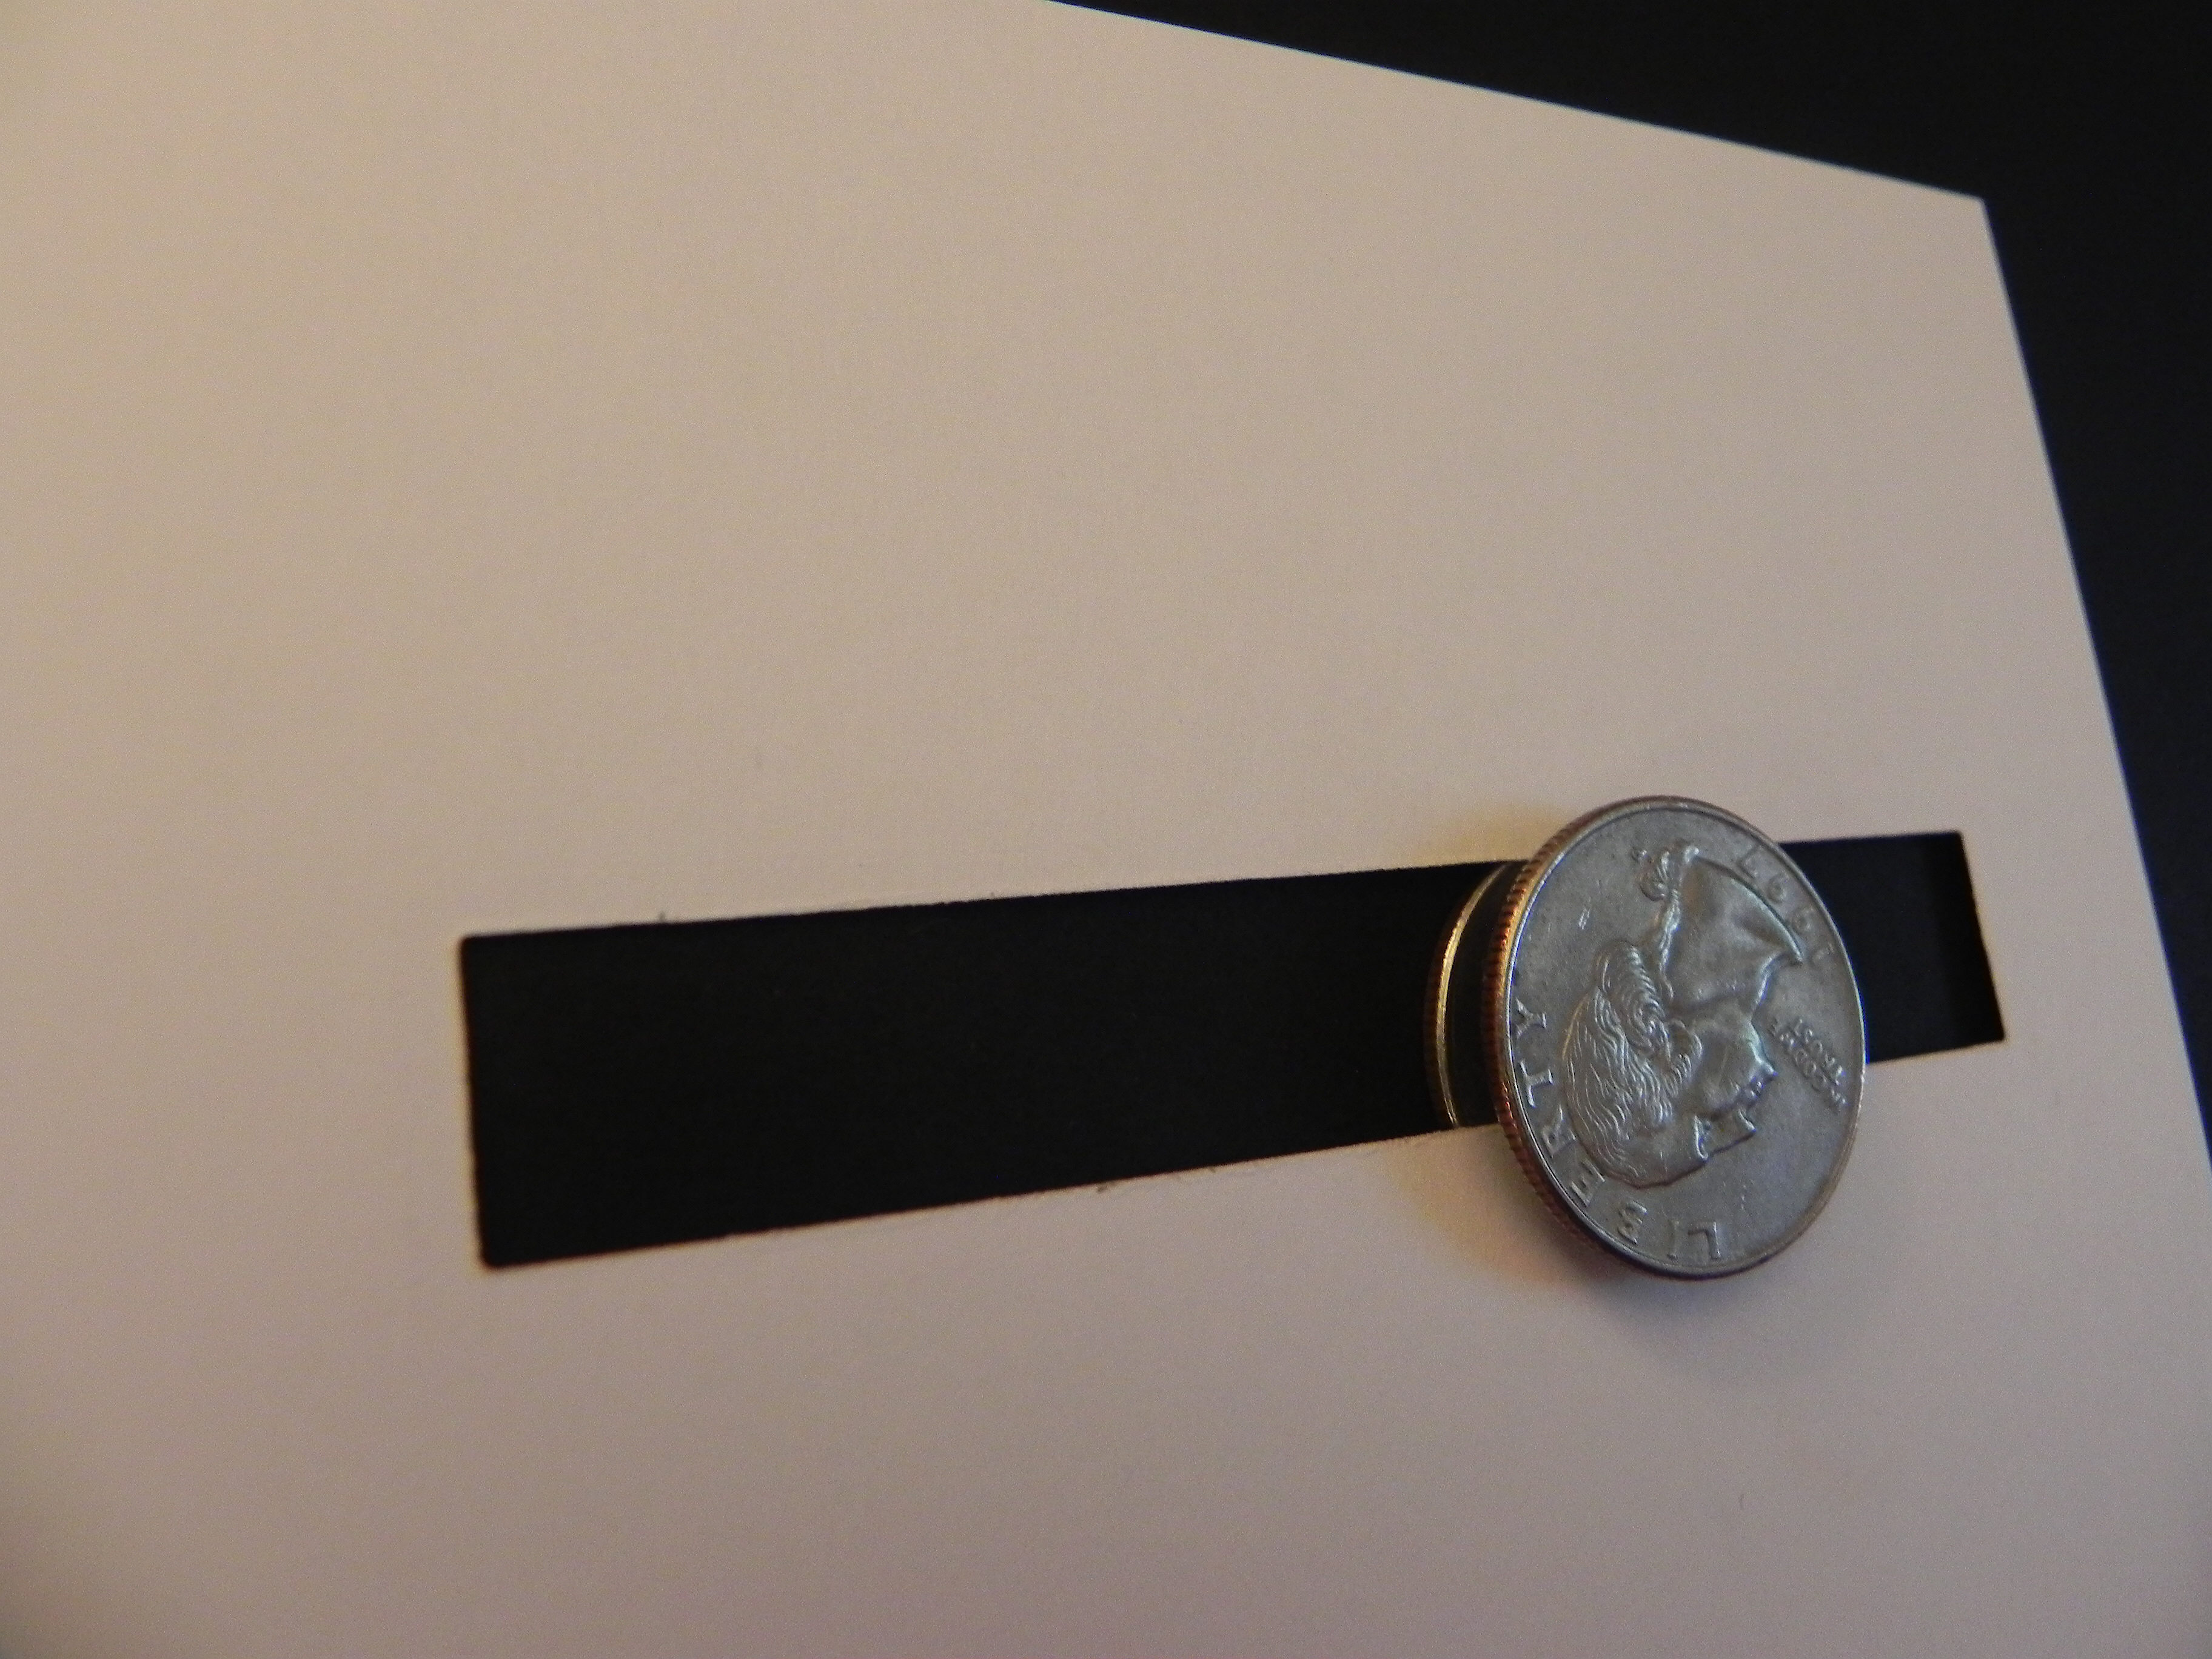
The slot below is too wide.  The penny sandwich can move freely, but the coin is not big enough to stay in the slot.

014 DSCN7662  015 DSCN7676

To fix this, you can use a larger coin, a larger pop dot, (or cut a more narrow channel/slot).

016 DSCN7664  017 DSCN7670


4.  Assembly:

For this step, you need pop dots or foam tape.

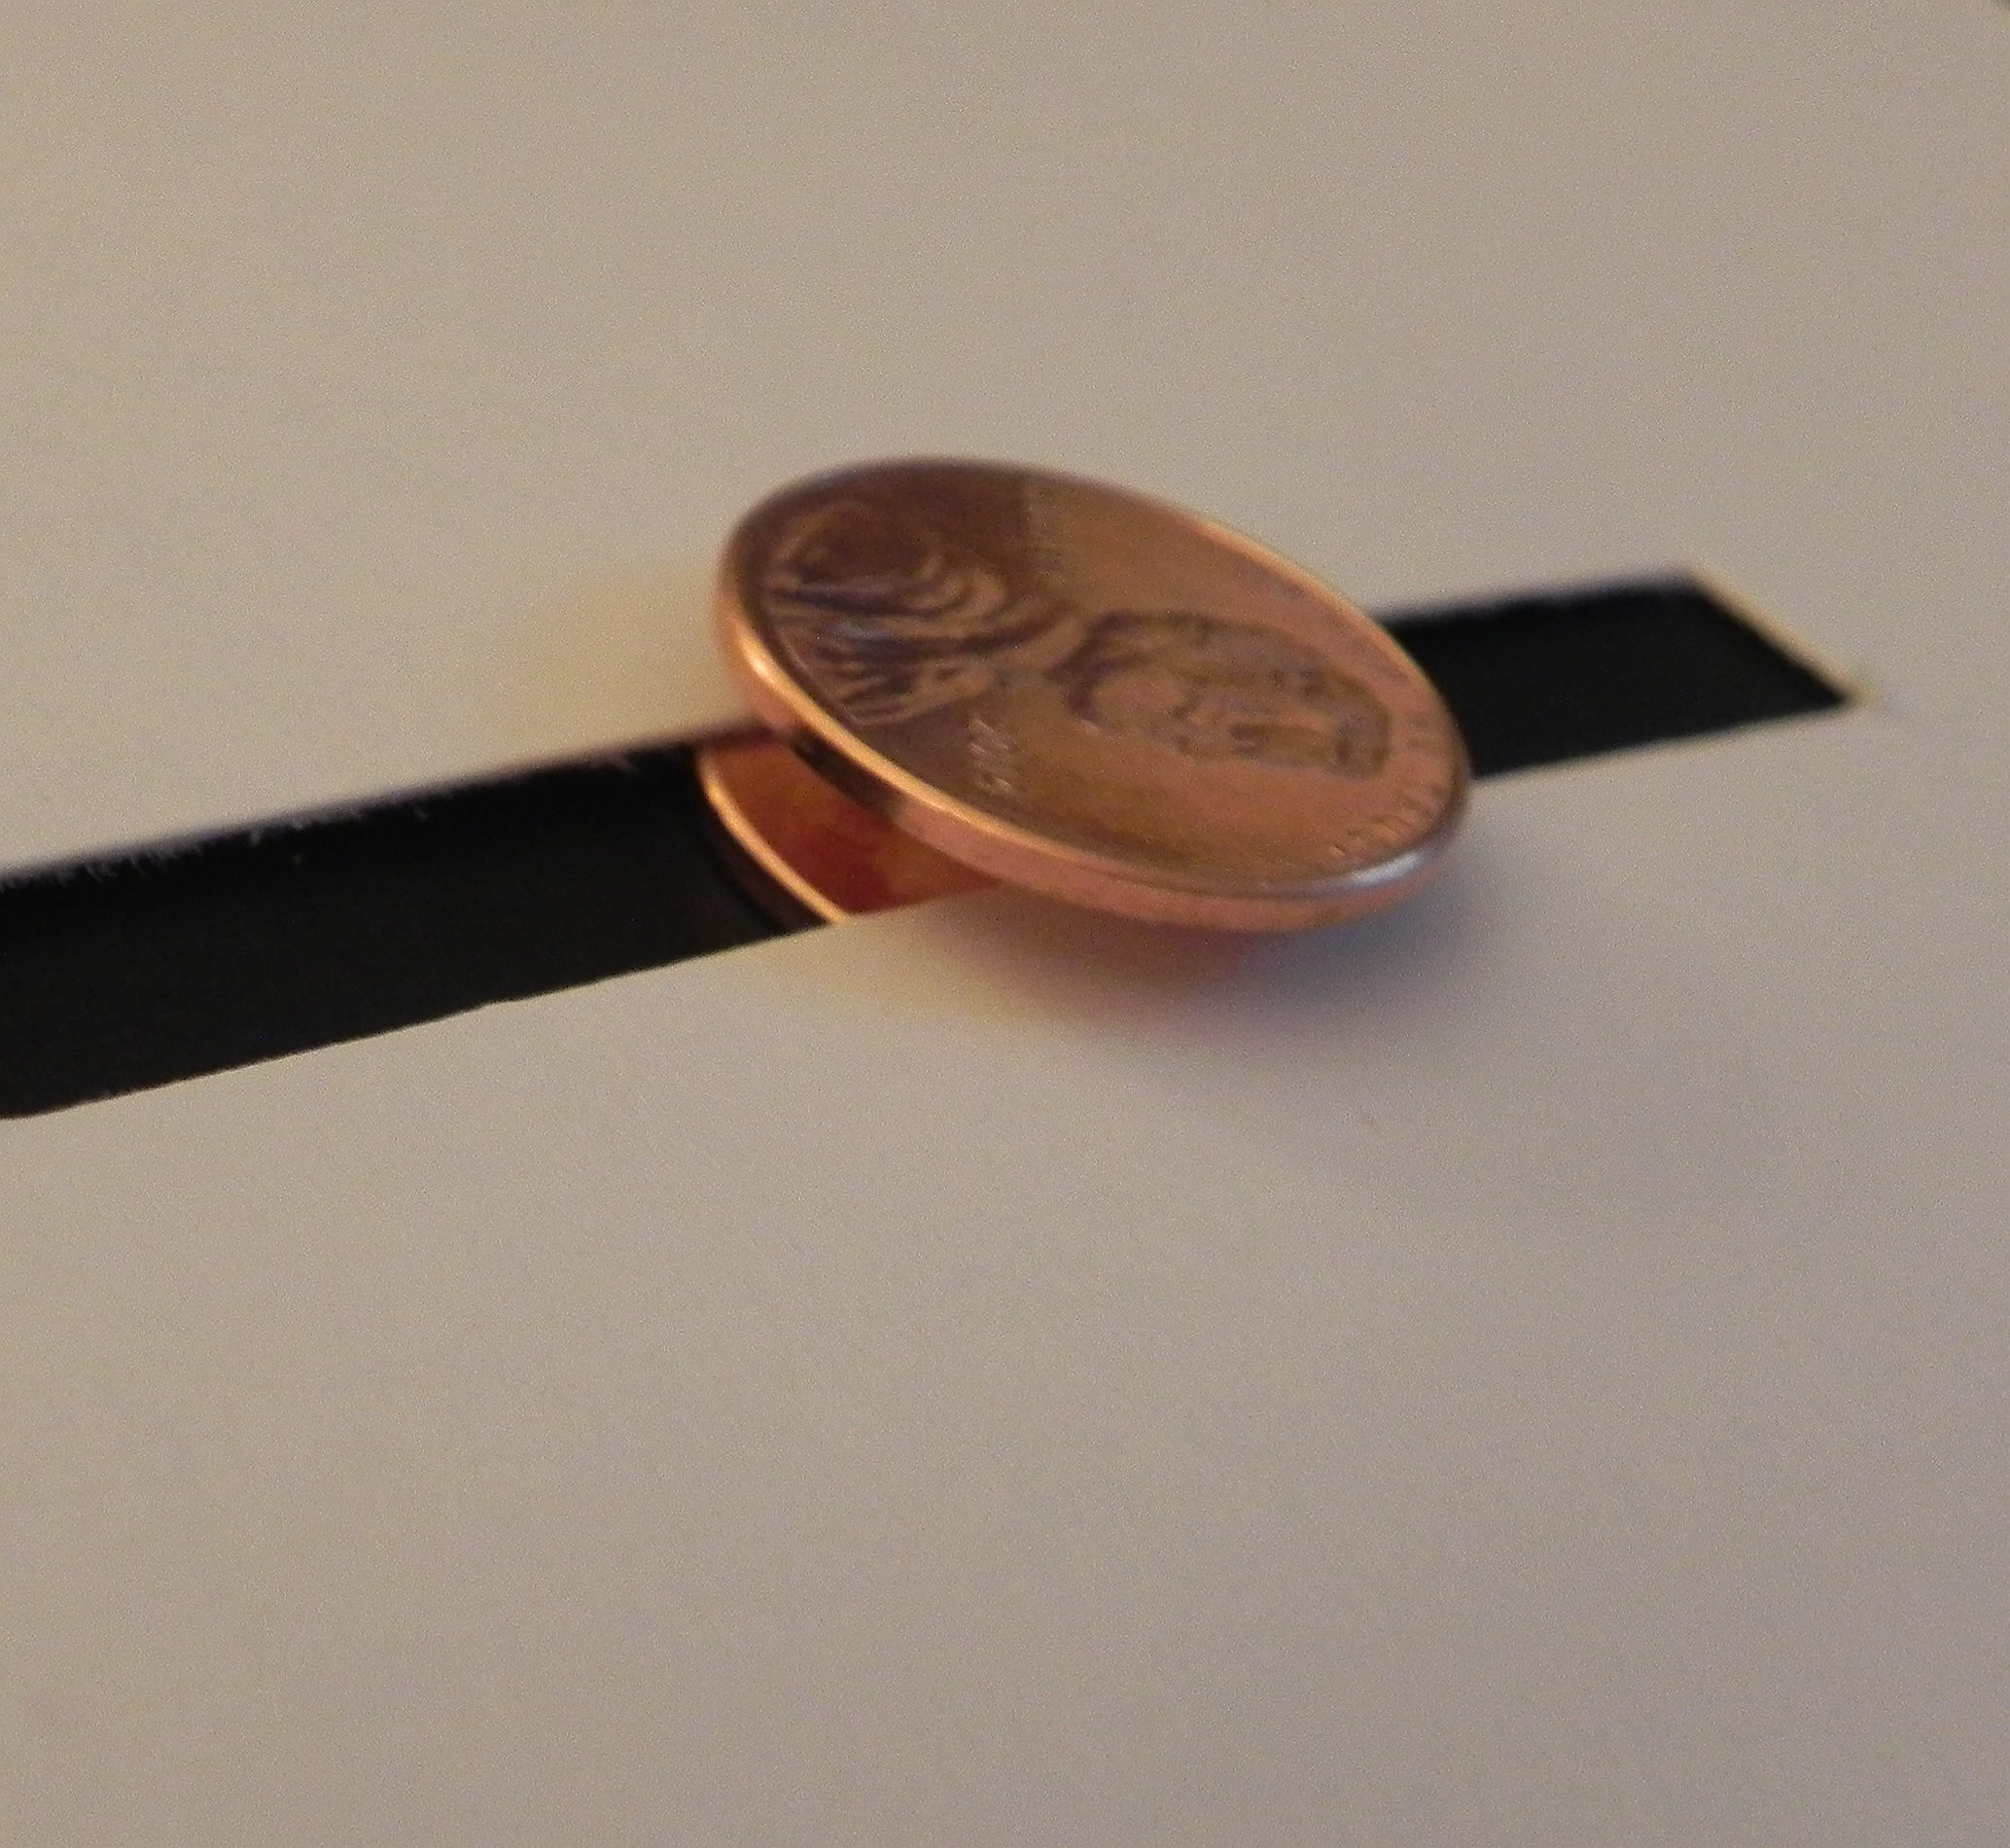
a.  If you still need to finish the penny sandwich, you can do that now by attaching the second penny to the foam pop dot directly over the first penny.

006 DSCN7991

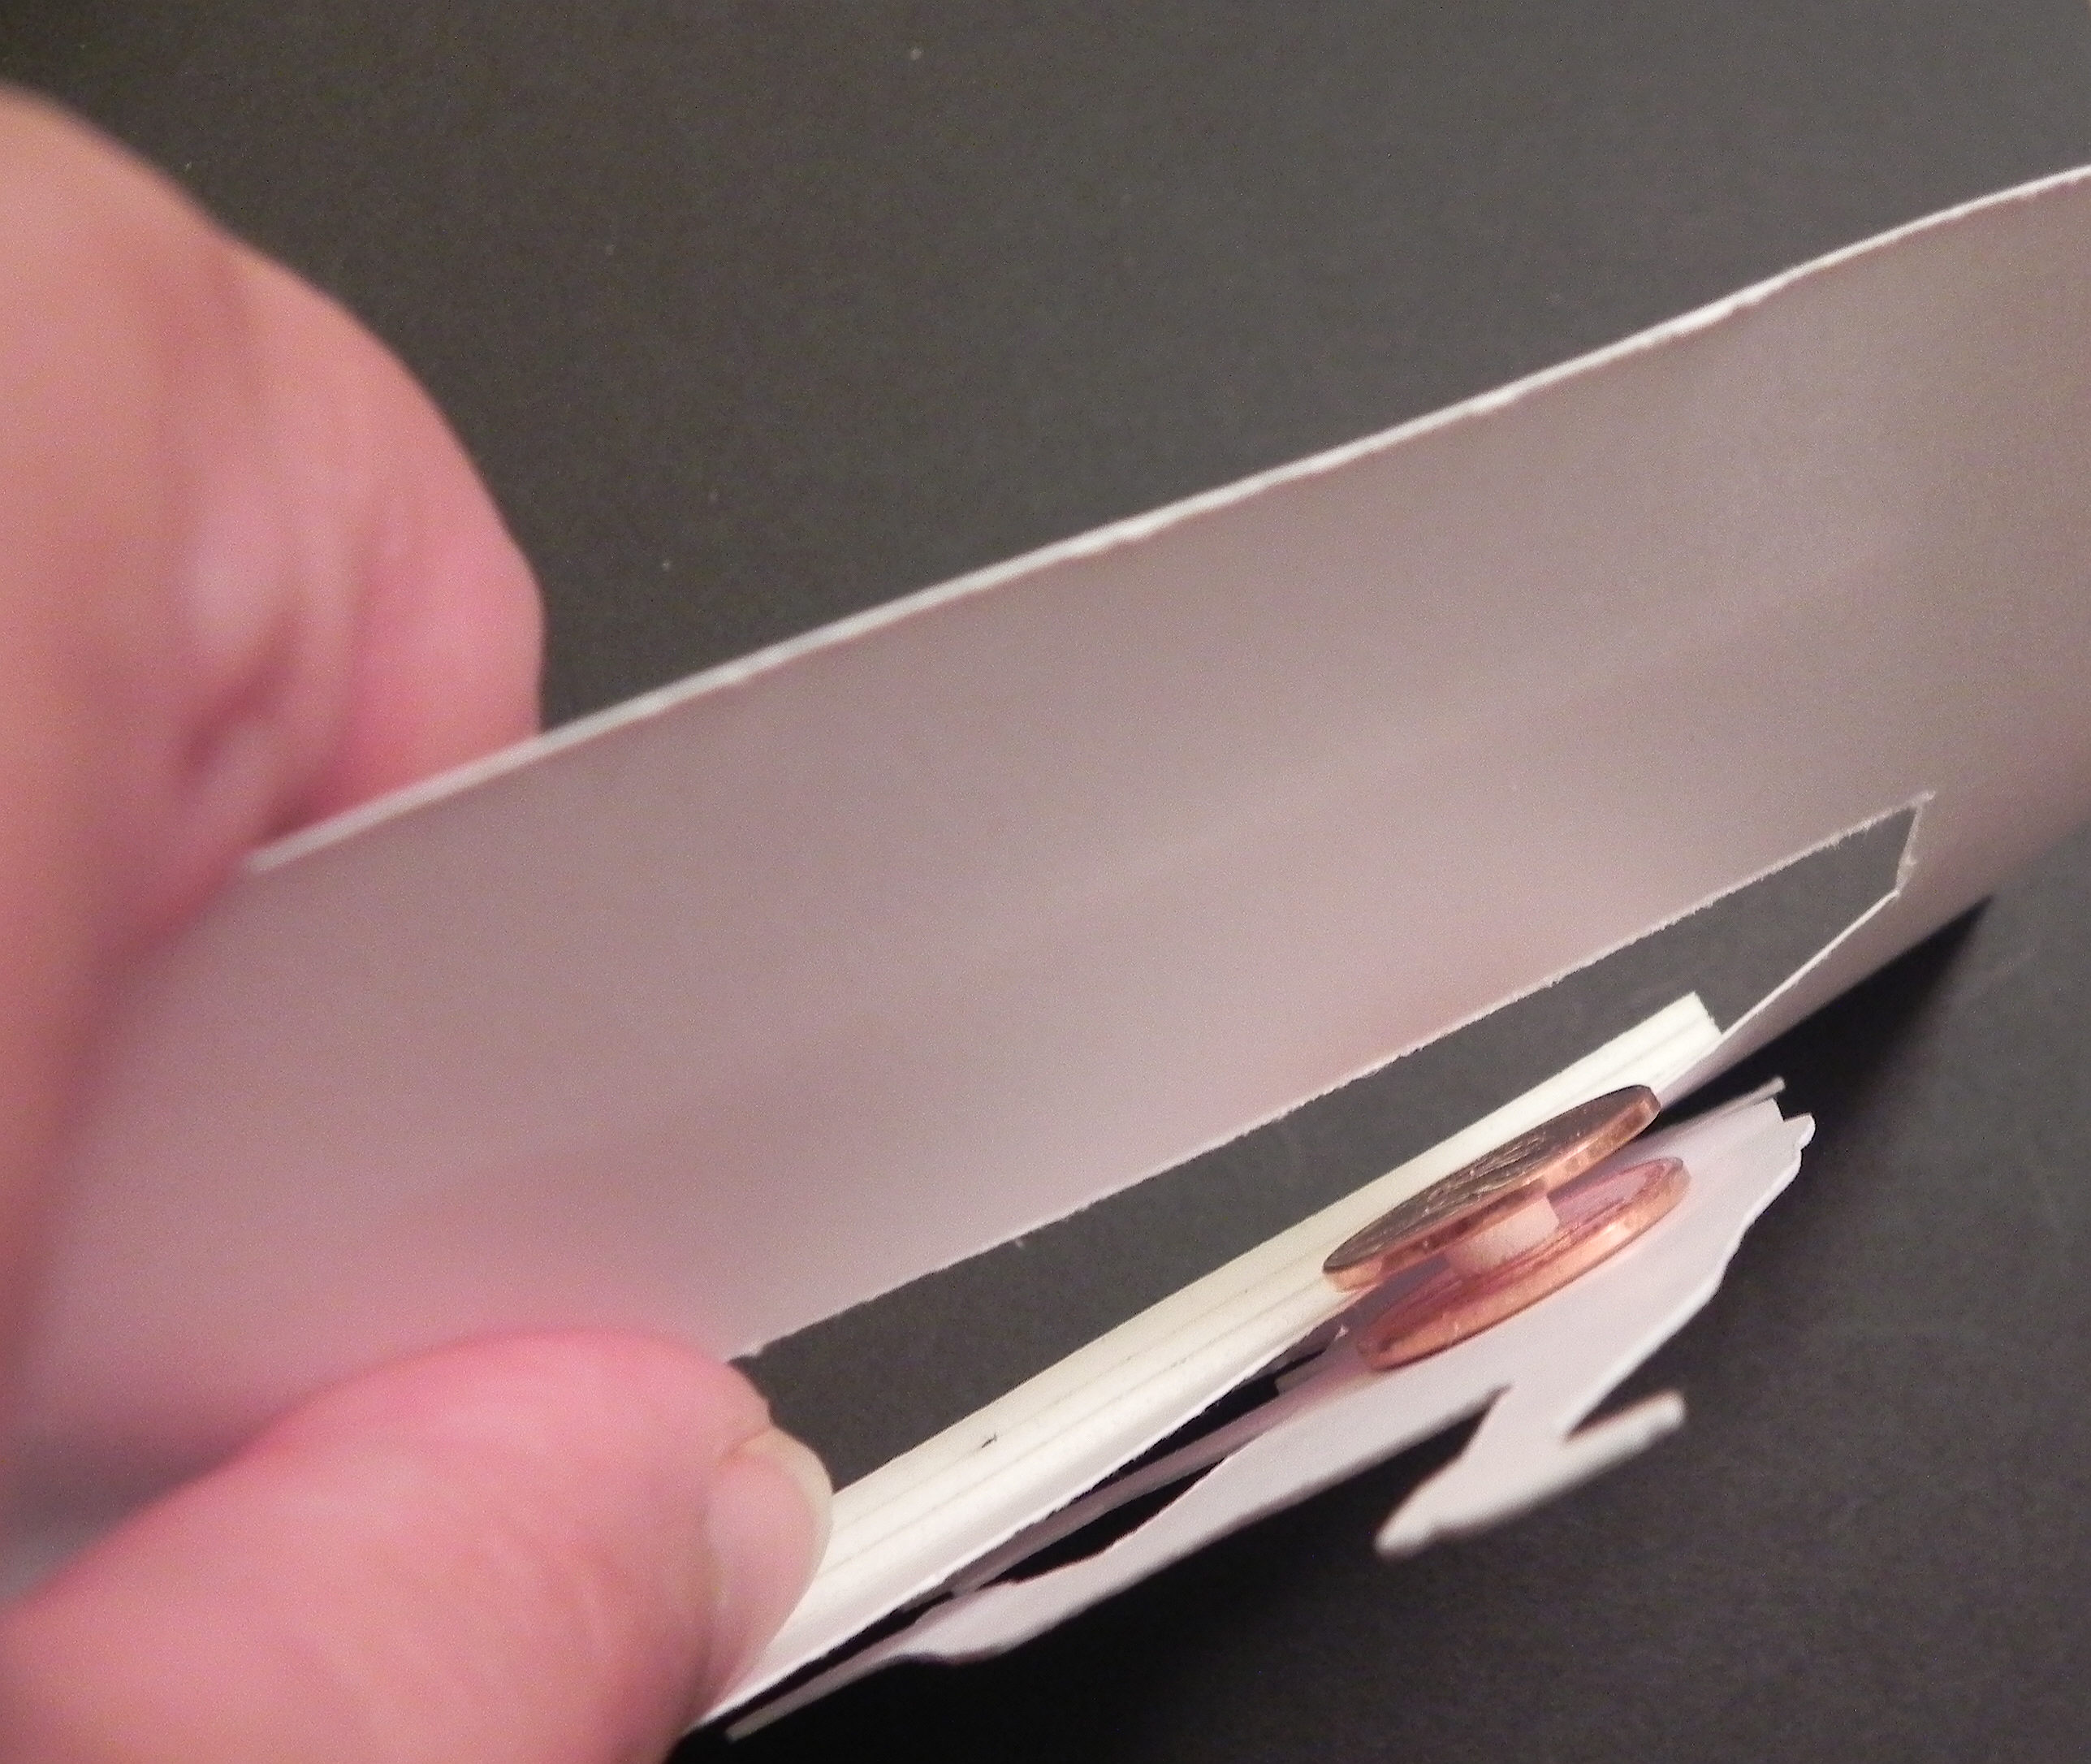
b.  Carefully insert the back penny in the slot by pushing the slot open slightly with your fingers.  Once in, it should not fall out.  (Again – If the element does not spin freely, your slot needs to be wider.  If the element falls out of the slot as it spins, your slot is too wide.  To fix this, use a larger coin or larger pop dot.)

019 DSCN8012

22 DSCN7679   020 DSCN8013 

Tutorial Spinning Element

c.  Once your card front is complete with the spinner element inserted in the slot, it’s time to adhere it to the card base.  This panel needs to be raised to allow the penny sandwich to roll freely so use pop dots or foam tape.  On the back of the card front panel, place the foam tape or pop dots around the channel (without touching the penny) as shown below, and also place foam tape around the edges of the panel (not shown).  You may need to double up the foam tape or pop dots to raise the panel enough so the card base does not come in contact with pennies.

021 DSCN7686

c.  Attach this panel to your card base, and enjoy!


This tutorial is being featured over at Die Cut Divas this month where I was invited to be a guest designer.  They have monthly challenges where all cards/projects must be made using at least one die cut or embossing folder, and this month’s challenge is Your Favourite Holiday.  (Click HERE to see all the challenge rules.)  Pop on over to Die Cut Divas and share your holiday projects.  I can’t wait to see what you create!


Thanks for checking out my post!

Spinning Santa

Spinning Santa

Spinning Santa wDSCN7952.jpg

This adorable Santa stamp called “Santa Falling Off Roof” is by Uptown Rubber Stamps.  It just seemed to me like he needed to be “tumbling” so I created a penny slider/spinner card to allow him to “tumble” freely!

A penny slider or spinner card (I’ve seen them called both) has an element on the card that spins as it travels across the card.  It’s called a penny slider or spinner card because the spinning element is mounted on a “sandwich” of two pennies with a pop dot in the center which rolls across the card in a slot or channel that you create on the front of your card.

Spinning Santa

Click HERE to see a tutorial on how to create a penny slider or spinner card.

After I stamped and colored my image, I used two dies (the 7th and 8th from the outside) from the We R Memory Keepers Nesting Dies “Circles” set to cut out the image and the mat.  I used the smaller of the two long, skinny dies from the Spellbinders “A2 Matting Basics B”  set to cut the channel or slot across the middle of my card.  (It made a beautiful, clean looking cut, but it was slightly wider than I would have liked so I ended up using quarters instead of pennies to insure that the spinning element didn’t fall out.  I discovered later that using larger pop dots would also have fixed the problem.)  What I really like about this design is that with such a large spinning element, it is possible to display the card with the channel completely hidden from view when you are not “playing” with it.  (I created another penny slider card HERE where the channel is always visible.)

I colored the image with Copic Markers (R59, G29, E21, E04, W1, and Y17) .  The striped designer paper is called “Christmas Stripe” from the “A Christmas Story” line by Reminisce.  I mounted this panel on a piece of heavy weight card stock (before cutting the channel) to make it sturdier.  The strip of patterned paper that says “Merry Christmas” is actually the back of the bar code/label strip of a piece of paper called “Christmas Holly” from the same Reminisce line.  The mats are Gina K Christmas Pine.   Recollections heavy weight white was used for the card base.  I adhered the striped piece (that was removed to create the channel) to the card base directly behind the channel to make the channel less noticeable.   A piece of red raffia ribbon was added to finish it off.

This card is one of the cards being featured over at Die Cut Divas this month where I was invited to be a guest designer.  They have monthly challenges where all cards/projects must be made using at least one die cut or embossing folder, and this month’s challenge is Your Favourite Holiday.  (Click HERE to see all the challenge rules.)  Pop on over to Die Cut Divas and share your holiday projects.  I can’t wait to see what you create!

Thanks for checking out my card project!

This content uses referral links as described in the disclosure policy on my sidebar.